Creating a website is not just picking a design and writing some code. Actually, you need a step-by-step process that turns your ideas into something real and useful. From the first planning session to the final launch and the next updates, every stage helps shape how your site looks, works, and connects with people.
In this guide, we’ll walk you through each part of the website development process, share what really matters along the way, and help you build an expected site.
>> Read more:
- Top Reasons Why Web Development Is So Important
- Custom Web App Development: Detail Explanation
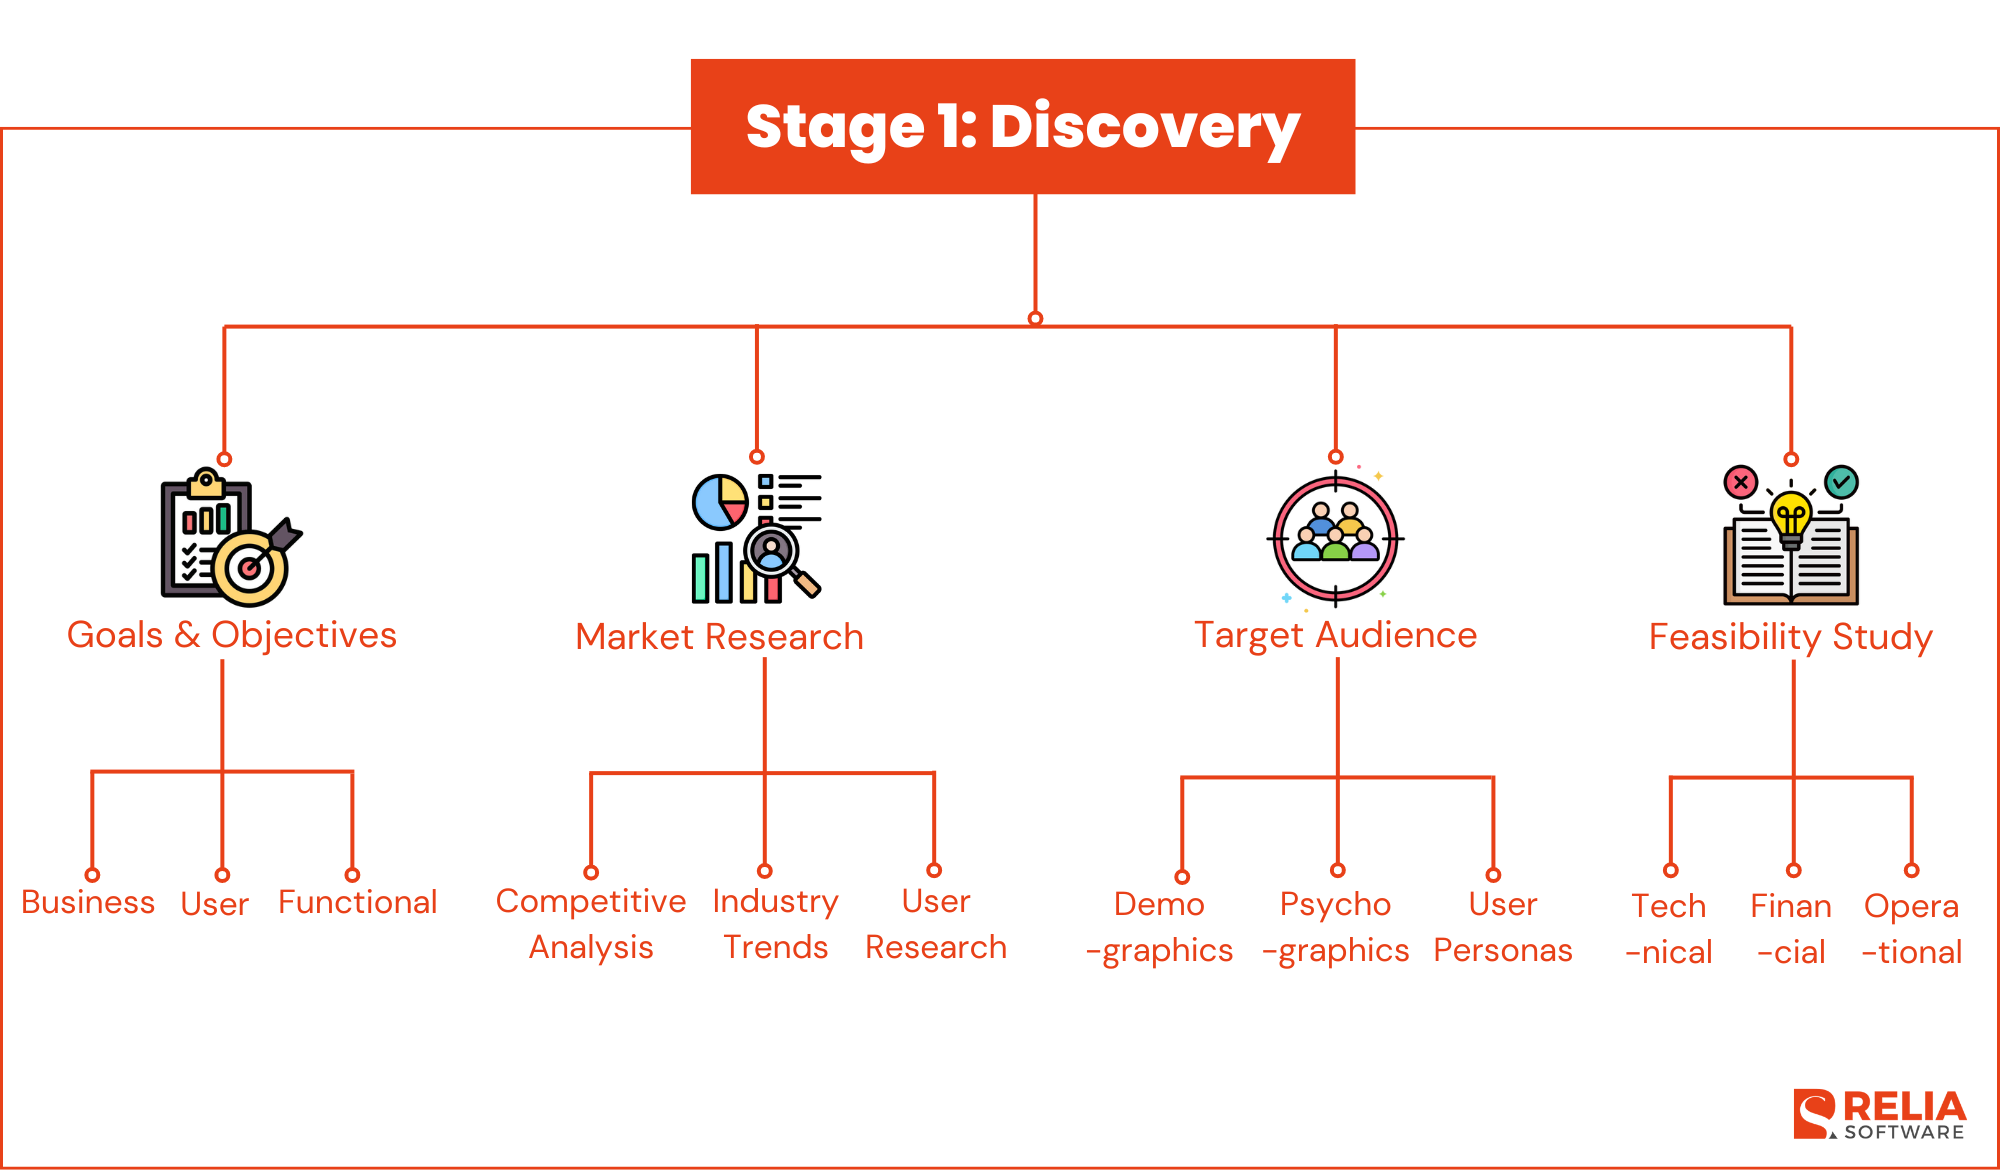
Stage 1: Discovery
Before jumping into design or development, it’s important to take a step back and ask the big questions:
- Why are we building this website?
- Who is it for?
- What should it actually do?
That’s what the discovery phase is all about.
Identify Goals
A website without clear goals, you know, is like a trip without a destination. During this step, you’ll define what success looks like. It's not just for your business, but for your users too.
Consider these factors:
- Business Goals: What do you want the website to gain? Some common aims are generating leads, selling products, building brand awareness, or just sharing information.
- User Goals: What are your visitors actually trying to do? Your site has to help them do it, like booking appointments, browsing your portfolio, or reading blog posts, easily.
- Functional Goals: What are the must-have features? Maybe it’s an online store, contact forms, user logins, or something more unique to your business.
Tips:
- Turn your goals into SMART goals (Specific, Measurable, Achievable, Relevant, Time-bound). Something likes “Grow organic traffic by 20% in six months”. This clear metrics help your team focused and accountable.
- Don’t forget to loop in key stakeholders early. Everyone should be aligned on where you’re headed and how the website will support bigger business objectives.
Conduct Market Research
Before planning your site, dig into your target market to know what else is out there and where you can stand out.
- Competitive Analysis: Analyze the websites of your competitors to identify their strengths and weaknesses, and find gaps that your website can fill.
- Industry Trends: Keep up with the latest web development trends to know preferred design elements and features in your industry, like dark mode, live chat, or minimalist layouts.
- User Research: Gather insights from real users via surveys, quick interviews, or feedback sessions. You’ll learn what matters to them and what makes them frustrated, so you can design following their needs.
Bonus tip: Do a simple SWOT analysis (Strengths, Weaknesses, Opportunities, Threats), you can better understand where you are and what your opportunities are.
Define Target Audience
A great website is one that speaks directly to its audience. That means knowing not just who they are, but what they care about.
- Demographics: Age, gender, income level, and location are key factors that you can visualize your target audience.
- Psychographics: What are their values, hobbies, or habits? To get a better picture, also think about their attitudes and ways of living.
- User Personas: Create detailed user personas that profiles your ideal customers, including all insights above, goals, and their behaviors.
Feasibility Study
Big ideas are great but only if you can make them work. Don't skip this step in the feasibility test. It helps you figure out if the project is doable with the time, money, and resources you have.
- Technical Feasibility: Do you have access to the right tools and technologies? Are your team members okay with using them? If not, you should think about other options or plan to get trained.
- Financial Feasibility: Be clear about the overall cost, which includes both development and other phases like design, content, hosting, and ongoing maintenance. You should set aside some funds for unexpected costs that can come up throughout development.
- Operational Feasibility: Who will take care of the site after it goes live? Do you need someone to update content or fix tech problems? Make sure there is a plan for long-term maintenance.
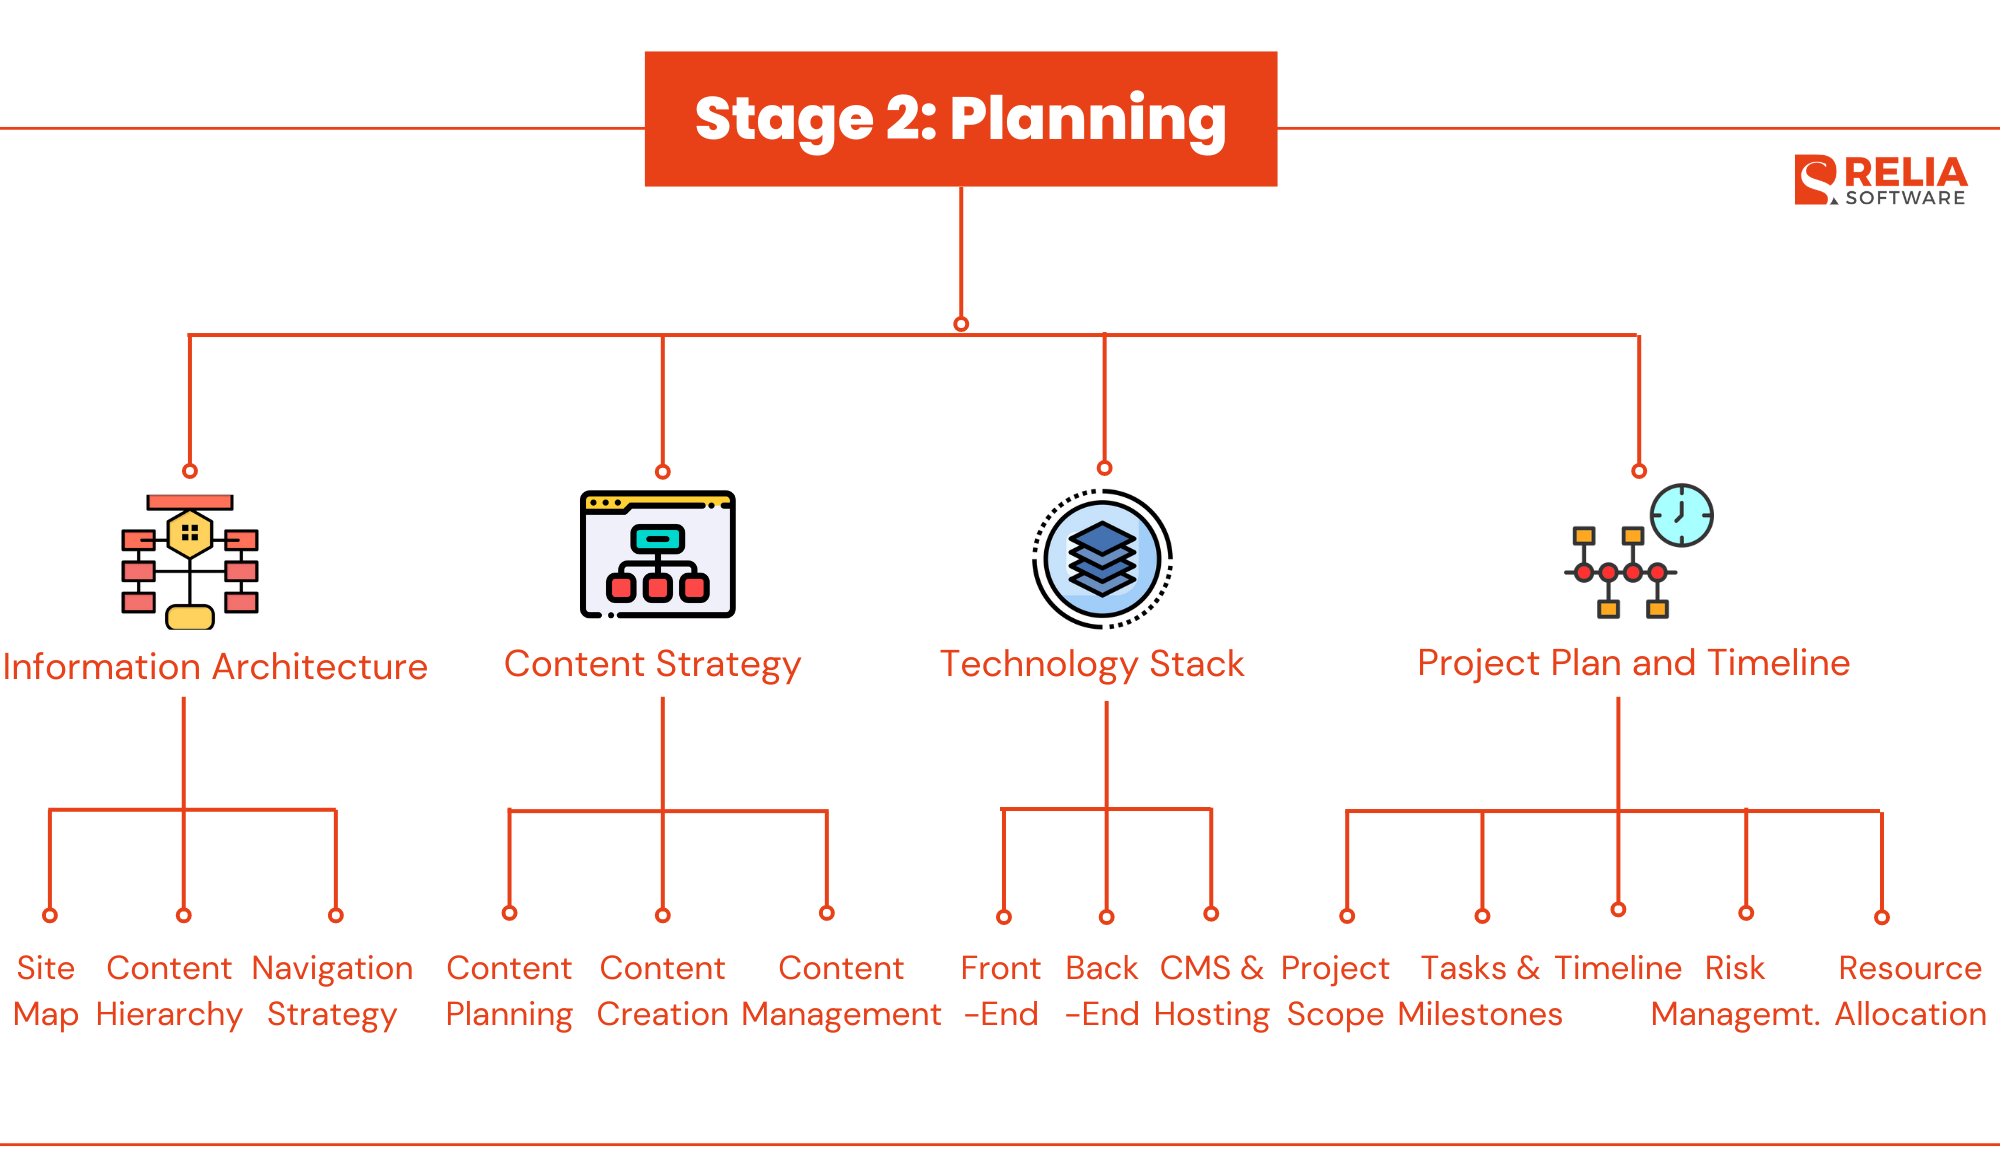
Stage 2: Planning
This stage is where things start to take shape. You turn ideas into structure, content into strategy, and vision into something real and buildable.
Information Architecture
- Site Map: Begin by making a simple layout of your main pages, such as the homepage, services, about us, contact, blog, etc. A visual site map shows you how pages are linked and makes sure that nothing crucial gets lost.
- Content Hierarchy: Choose what content should be most important. What pages need to be seen at the top level and what should be in dropdowns or sub-sections? This helps people find their way and keeps things clear and on track.
- Navigation Strategy: Plan out how people will move through your site. Users should be able to easily understand menus. Breadcrumbs and footer links should help them navigate without getting stuck or lost.
Content Strategy
A website that looks excellent isn't enough; it also needs to provide helpful content to both people and Google bots.
- Content Planning: Write out everything your site needs, such as homepage content, service descriptions, blog posts, FAQs, case studies, and more. Your content have to meet users’ questions and goals.
- Content Creation: Write content in a tone that matches your brand, like friendly, professional, or whatever fits. Stay consistent, keep it clear, and always write with your audience in mind. Don’t forget to use basic SEO practices so your site shows up where it should.
- Content Management: Choose a content management system (CMS) that is easy to use for you. Commonly, many businesses often compare WordPress vs Webflow when making this choice as they are popular, but you can also consider a custom solution depending on your needs. Also, figure out who’s in charge of writing, editing, and updating content.
Technology Stack
- Front-End Technologies: These tools shape what users see and interact with on your web. For most sites, some common front-end technologies are HTML, CSS, and JavaScript. But if your project is more complex, web frameworks like React or Vue.js might be better fits.
- Back-End Technologies: These tools manage server-side operations, databases, and integrations. Node.js, Python, Ruby on Rails, and PHP are some of the most popular back-end technologies for making websites. It depends on what your site needs, like managing users, handling forms, or running an online store.
- CMS and Hosting: Pick a CMS that fits your content style, and choose a hosting provider that can handle your traffic, keep your site safe, and scale if needed. You can consider cloud platforms like AWS for flexibility. But if your needs are simpler, traditional hosts perform just as well.
>> Read more:
- An In-Depth Guide for Front-End Development with React
- Top 12 Best Javascript Frameworks for Your Projects
- Top 9 Best Node.js Frameworks For Web App Development
Project Plan and Timeline
Once you have your website’s structure and tech stack, it’s time to get organized. A good project plan makes sure that everyone knows what's going on and the whole thing go smoothly without any last-minute problems.
- Project Scope: Start by making a clear list of all the features, pages, and functions that need to be built for the project. With set expectations, you keep the project from getting bigger than planned.
- Tasks and Milestones: Divide the project into smaller, easier-to-manage phases. Next, specify the objectives of each major phase. This is easier to track progress and celebrate small wins along the road.
- Resource Allocation: Define who’s doing what. Assign tasks to team members, make sure they have the proper tools, and check that the budget is realistic for what you want to do.
- Timeline: Write out when each task and milestone should begin and end. You can keep track of the schedule with Gantt charts or Trello boards and find any gaps or slowdowns early on.
- Risk Management: You know that unexpected problems can happen on every project. So, don't be subjective. You should be aware of possible problems upfront and have back-up plans ready in case they come up.
Stage 3: Design
This stage focuses on designing custom websites, defining the user experience and interface of your website. The design phase is crucial for creating a site that is not only aesthetically pleasing but also functional and user-friendly.
Creating Wireframes and Prototypes
Wireframes
Wireframes are the blueprint of your website. They outline the basic structure and layout of each page, focusing on where content, images, and navigation elements will be placed. Wireframes are simple, without colors or detailed designs, helping you focus on how users will interact with the site. This stage is crucial for getting feedback and making early adjustments.
Prototypes
Once wireframes are approved, the next step is creating interactive prototypes. Prototypes are more detailed and simulate how the website will work. You can click through the pages, test out navigation, and see how everything fits together. Prototypes are great for user testing, allowing you to spot and fix any issues before moving into full development.
>> You may consider:
- Proof of Concept (POC): A Guide to Validating Your Ideas
- Proof of Concept (PoC) vs Prototype: What Are The Differences?
UX and UI Design Principles
- User Experience (UX) Design: UX design is all about making the website easy and enjoyable to use. It ensures that every element of the site is intuitive, from how users navigate to how they interact with different features. The goal is to create a smooth experience where users can find what they need without frustration.
- User Interface (UI) Design: UI design focuses on the look and feel of your site. This includes choosing the right colors, fonts, and images that reflect your brand and appeal to your audience. UI design also ensures that all visual elements work together to create a cohesive and attractive design. It’s not just about making the site look good but also about enhancing usability.
- Responsive Design: Responsive design is important as people use different devices to access websites. Your design should look and work well on all screen sizes, from large desktop monitors to small smartphone screens. This means creating layouts and elements that automatically adjust to fit the screen size, ensuring a consistent user experience across devices.
>> Read more:
- Web Design Tips: Elevating Your Website's User Experience
- UI/UX Design: What's The Difference Between UI and UX?
- How To Choose The Best Responsive Website Builder Tool?
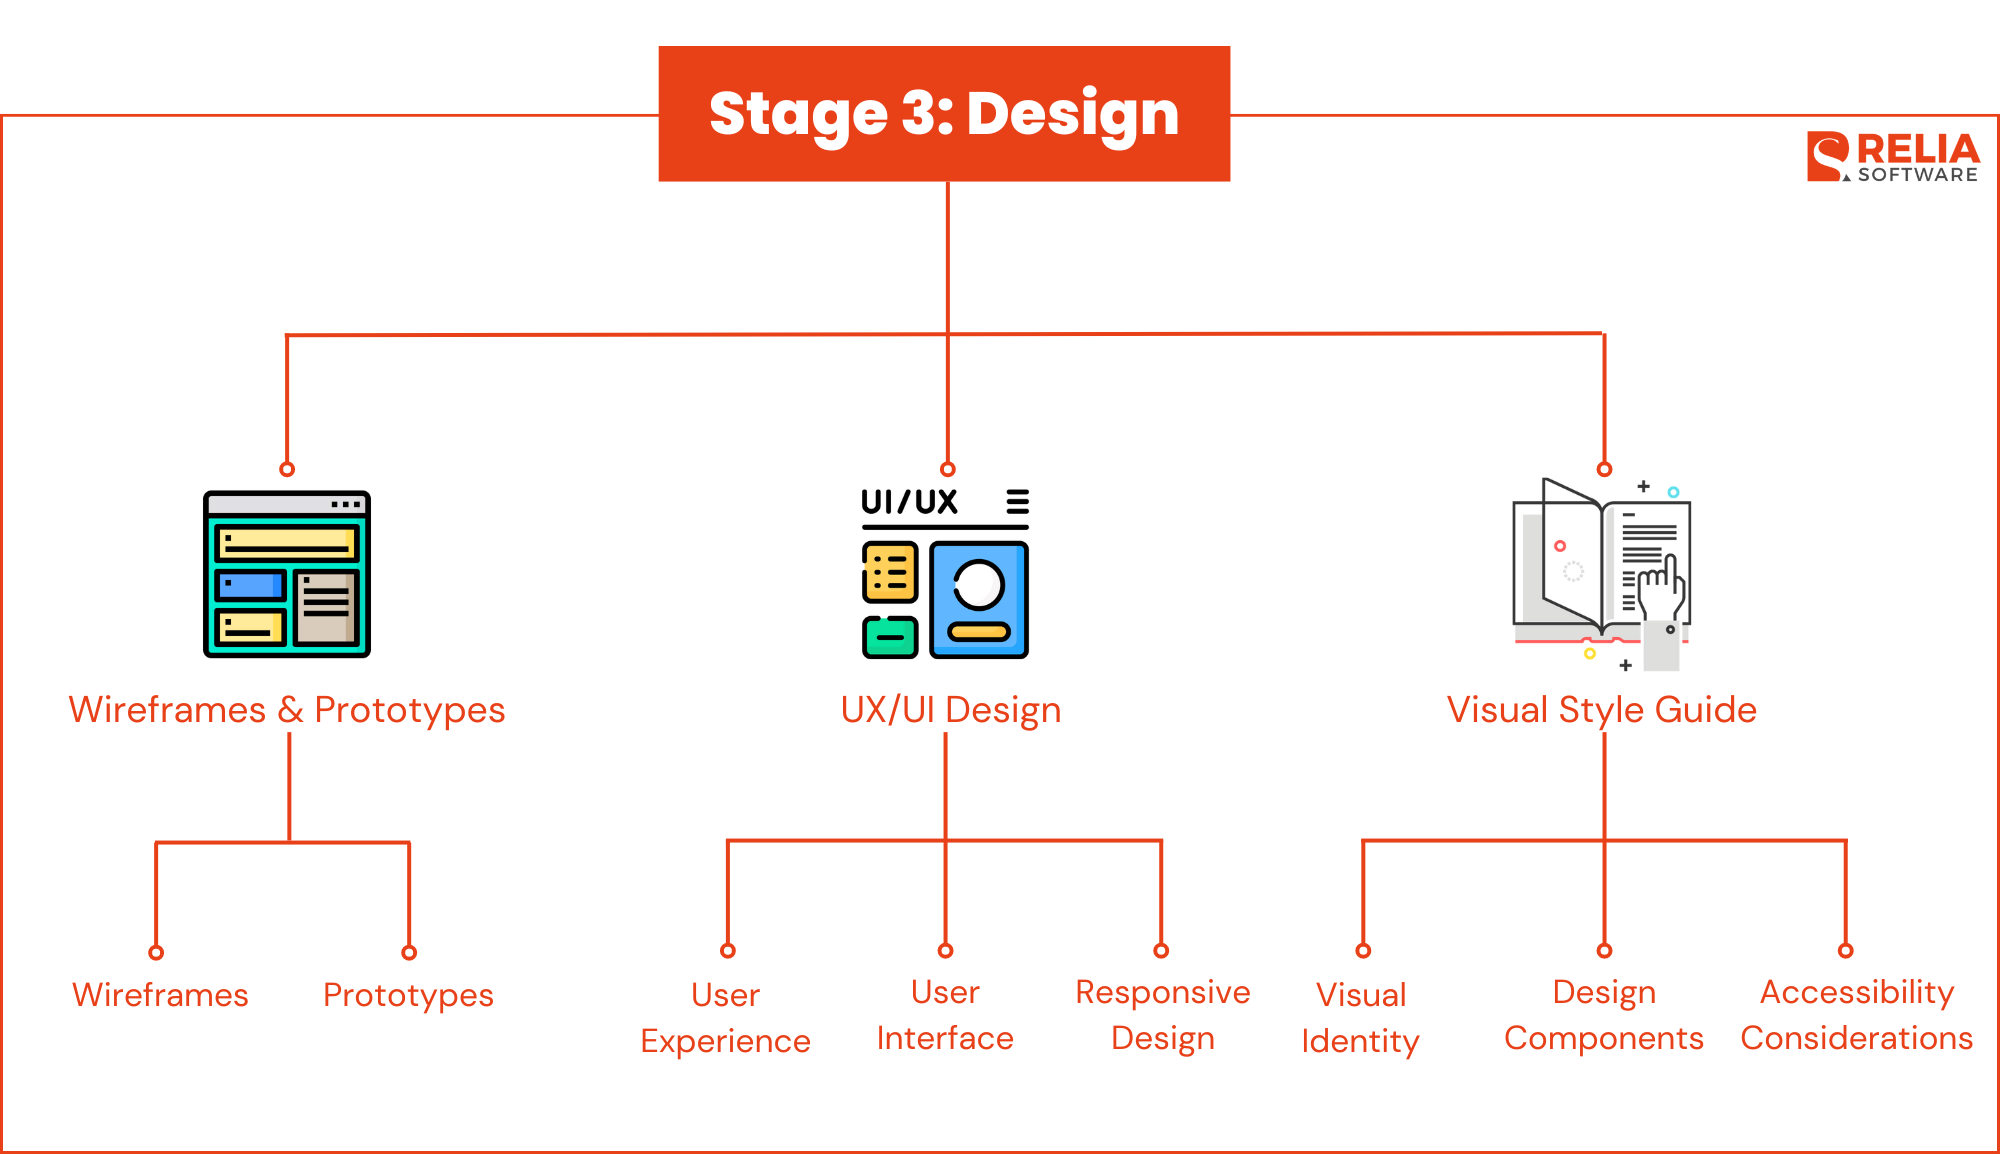
Creating a Cohesive Visual Style Guide
- Visual Identity: A visual style guide ensures that your website looks consistent and on-brand across all pages. It includes guidelines for colors, fonts, and imagery, so everyone working on the site uses the same elements. This consistency is important for building a strong brand identity.
- Design Components: Your style guide should also include reusable design components like buttons, forms, and navigation menus. Having a library of these components makes it easier to maintain consistency throughout the site and speeds up the design process.
- Accessibility Considerations: Make sure your design is accessible to everyone, including people with disabilities. This includes using readable fonts, high-contrast colors, and providing alternative text for images. This helps your web reach a wider audience.
Tools and Software for Website Design
- Design Software: Use design tools like Adobe XD, Figma, or Sketch to create your wireframes, prototypes, and final designs. These tools are powerful and user-friendly, making it easy to collaborate with your team and refine your designs.
- Prototyping Tools: Tools like InVision and Marvel are great for creating interactive prototypes that you can share with stakeholders for feedback. These tools let you test the design and make adjustments before moving into development.
- Collaboration and Handoff Tools: Platforms like Zeplin or Figma’s design handoff features help streamline the process between designers and developers. These tools ensure that the design specs are accurately implemented during development, reducing the chances of miscommunication.
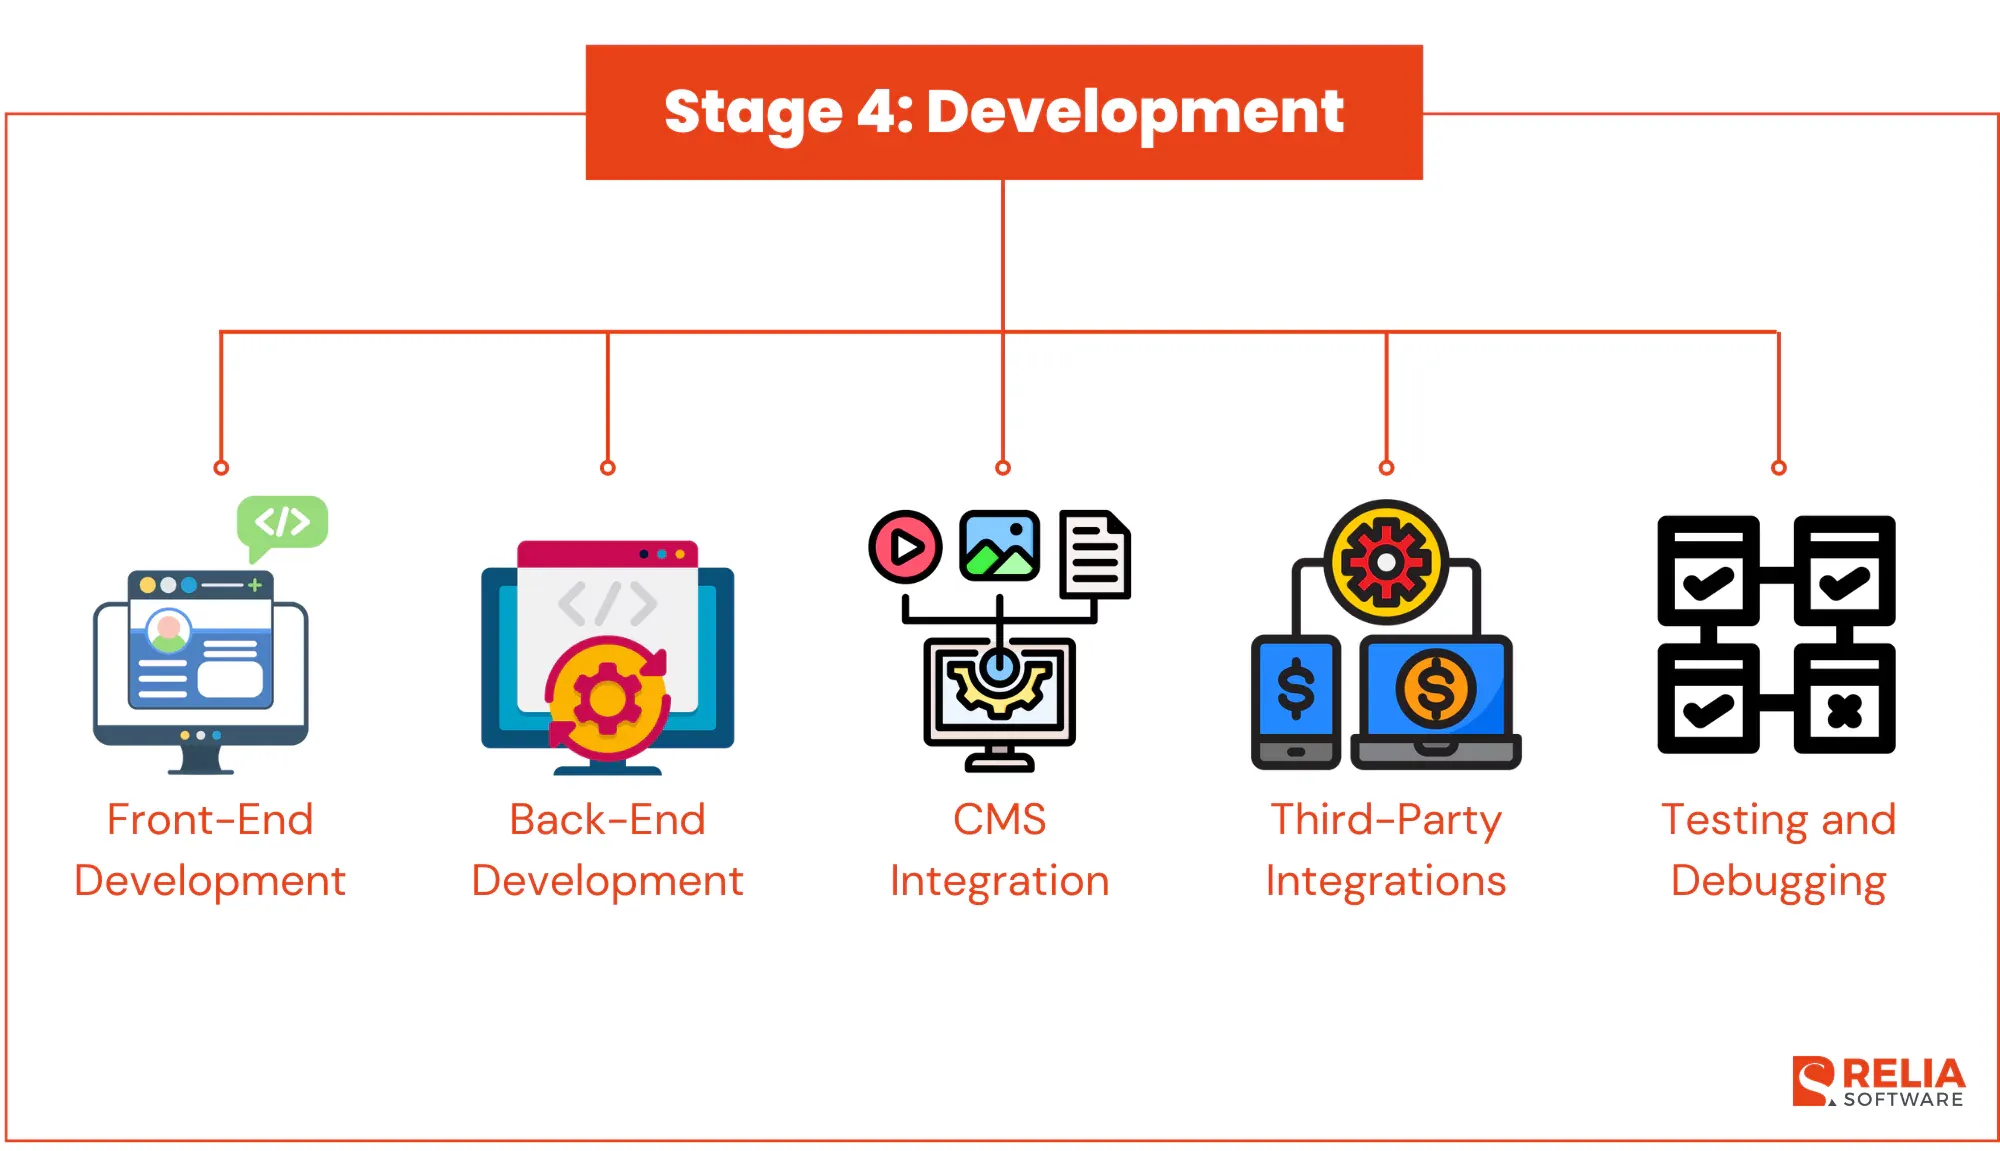
Stage 4: Development
In this phase, the designs created in the previous stage are transformed into a fully functional website. This stage involves writing the code that brings the design to life, setting up the back-end infrastructure, and integrating the necessary features and functionalities.
Front-End Development
- Implementing the Design: Front-end development involves converting the visual designs into actual code that web browsers can display. Using HTML for structure, CSS for styling, and JavaScript for interactivity, the front-end developer makes sure the site looks just like the design and works well on all devices.
- Responsive Design: The front-end code should be responsive. This involves using flexible grid layouts, scalable images, and CSS media queries to ensure a consistent user experience on all devices.
- Cross-Browser Compatibility: Ensure that the website works well across all major web browsers, including Chrome, Firefox, Safari, and Edge. Cross-browser testing is essential to identify and fix any issues that might cause the site to behave differently on various platforms.
Back-End Development
- Server-Side Logic: The back-end is the engine of your website. It handles all the server-side operations, including processing user requests, managing databases, and ensuring data flows smoothly.
- Database Integration: The back-end also manages databases, which store all the essential data for your website. Whether it’s a relational database like MySQL or a NoSQL database like MongoDB, the back-end developer ensures that data is stored securely, retrieved efficiently, and scaled as needed.
- API Development and Integration: APIs (Application Programming Interfaces) are integrated to enable your website to communicate with other services and platforms. Whether it’s a payment gateway, social media platform, or a third-party service, APIs allow your site to extend its functionality beyond its own environment.
>> You may be interested in:
- Database Scaling Explained: A Guide to Efficient Growth
- Mastering Index in SQL to Improve Database Performance
- Understanding 6 Different Types of Indexes in SQL
- What is a Graph Database? Benefits, Use Cases & Examples
- Vector Database vs Graph Database: Which One Is Better?
- gRPC vs GraphQL: Choosing the Right API Technology
Content Management System (CMS) Integration
- Customizing the CMS: If a Content Management System (CMS) like WordPress, Drupal, or Joomla is being used, this stage involves customizing the CMS to fit the project’s needs. This includes setting up content types, fields, and templates that allow for easy content management by non-technical users.
- Template Development: Develop custom templates for different types of content, such as blog posts, product pages, and landing pages. These templates should be designed to maintain the site’s visual consistency while allowing flexibility in content presentation.
- User Roles and Permissions: Configure user roles and permissions within the CMS to control who can add, edit, or delete content. This is particularly important for larger websites where multiple people are involved in content creation and management.
Third-Party Integrations
- External Services Integration: Integrate third-party services that add functionality to the website. This might include payment gateways like PayPal or Stripe for e-commerce sites, marketing tools like Mailchimp for newsletters, or analytics tools like Google Analytics for tracking user behavior.
- Ensuring Seamless Functionality: Test all third-party integrations thoroughly to ensure they work seamlessly with the website’s existing features. This includes checking for compatibility issues, performance impacts, and ensuring that the integrations meet the project’s security standards.
Testing and Debugging
- Unit Testing: Developers perform unit testing during development to verify that individual components or functions of the code work as intended. These tests focus on the smallest testable parts of the application, such as functions, methods, or classes.
- Integration Testing: Integration testing checks how well different parts of the website work together. This includes testing the interactions between the front-end and back-end, as well as how the website integrates with third-party services.
- Debugging: Debugging during development typically addresses syntax errors, logical errors, and issues uncovered during unit and integration testing. This process involves carefully reviewing the code, running tests, and using debugging tools to identify and fix problems.
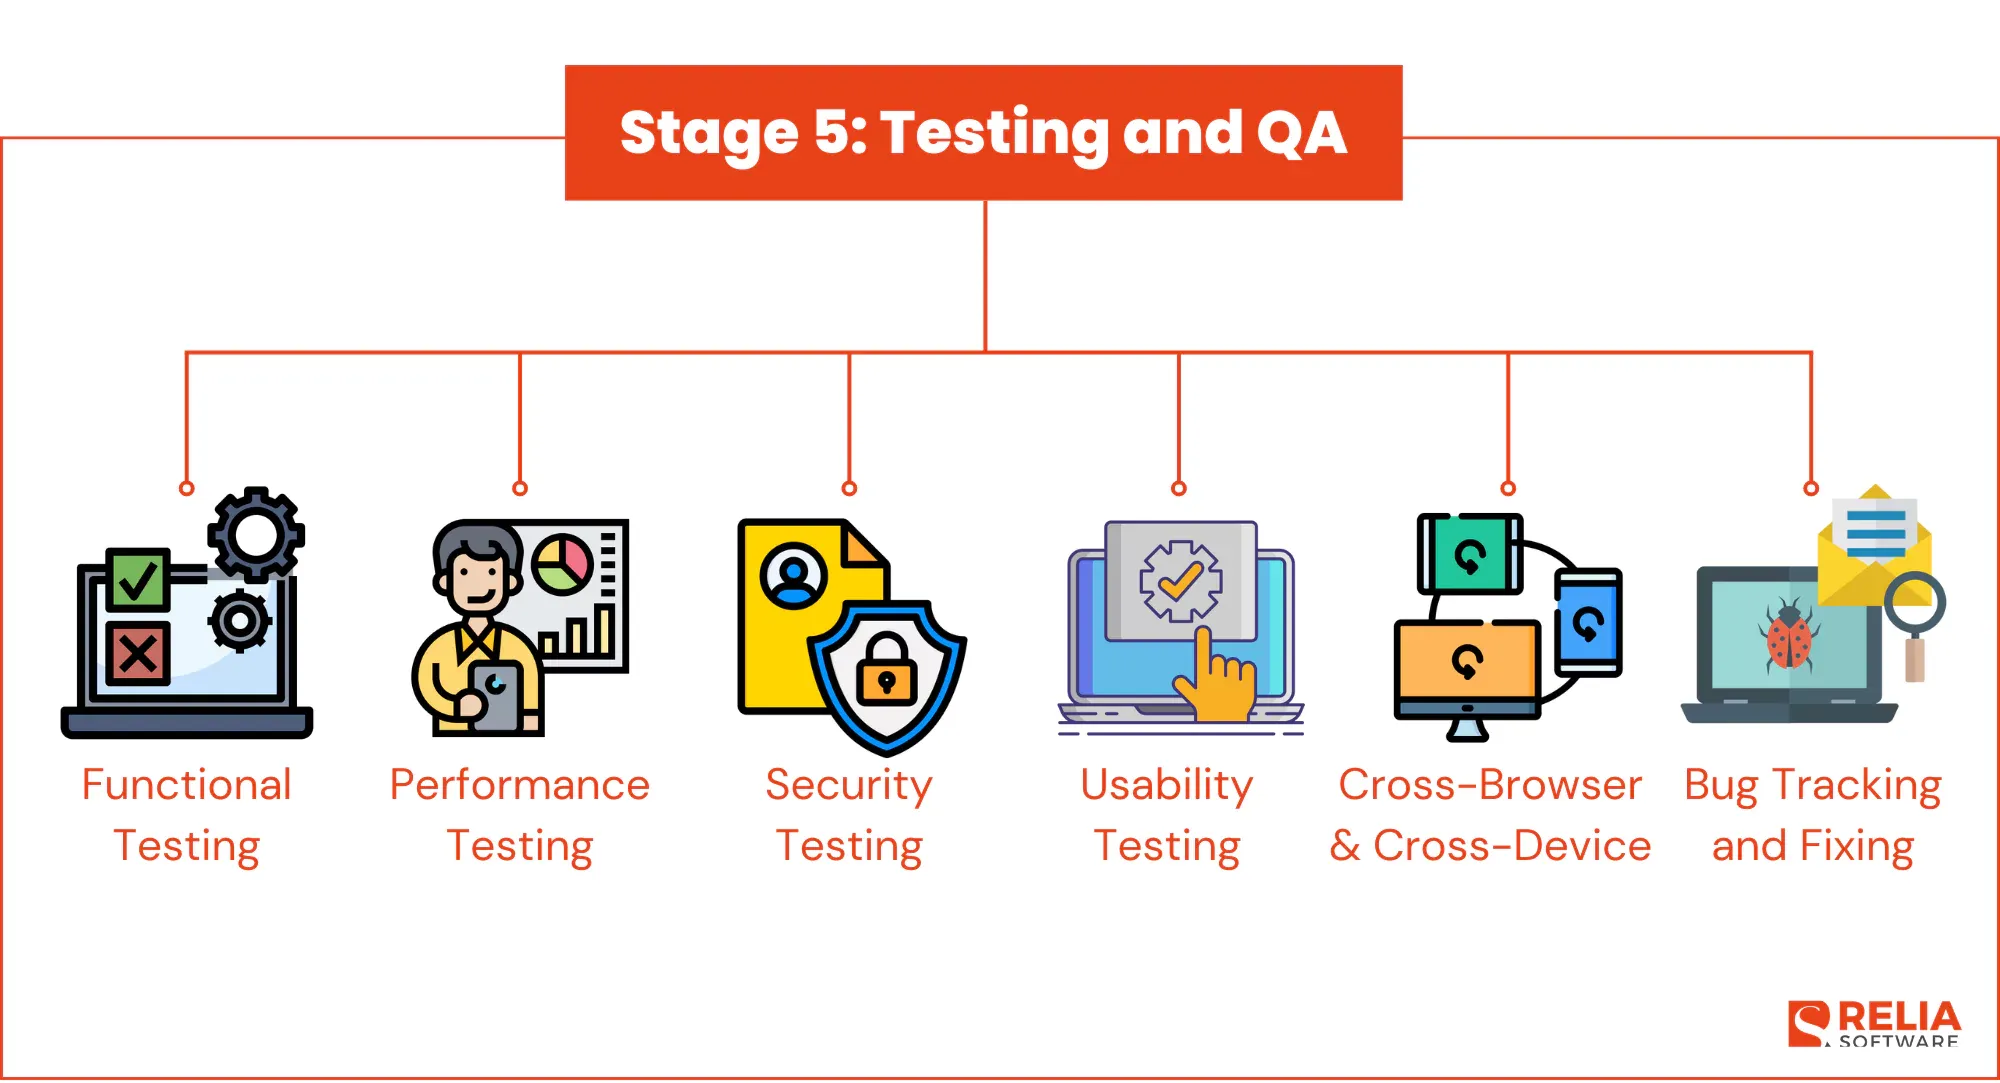
Stage 5: Testing and QA
This stage focuses on a series of rigorous and thorough testing processes for the entire website. It is about ensuring the overall quality, performance, and security of the site, with an emphasis on testing from a user’s perspective.
Functional Testing
- Feature Testing: Ensure every feature—forms, buttons, links—works as intended using both manual and automated tools.
- User Flow Testing: Verify that users can navigate the website smoothly, completing tasks like form submissions or purchases without issues.
>> Related topics:
- A Comprehensive Guide to Non-Functional Testing (NFT)
- Differences Between Functional and Non-Functional Testing
Usability Testing
- User Experience: Real users test the site to identify usability problems, ensuring it’s easy to navigate and intuitive.
- Accessibility: Confirm the site meets accessibility standards, such as screen reader compatibility, proper alt text, and appropriate color contrast.
Performance Testing
- Load Testing: Simulate high traffic to see how the website performs under stress and identify bottlenecks.
- Speed Optimization: Test and optimize loading times across different devices and networks to improve user experience and search rankings.
>> You should consider: Top 7 Best Performance Testing Tools for Developers
Security Testing
- Vulnerability Scanning: Check for security flaws like SQL injection and cross-site scripting (XSS).
- Data Protection: Ensure SSL encryption is in place and that sensitive data is securely handled.
>> You should consider:
- Top 7 Web App Security Testing Tools For Developers
- An Ultimate Guide To Web Application Security for Businesses
Cross-Browser and Cross-Device Testing
- Compatibility: Test the website across different browsers and devices to ensure consistent performance and appearance.
- Responsive Design: Verify that the site adapts well to various screen sizes and orientations.
Bug Tracking and Fixing
- Logging Bugs: Document any issues found during testing, detailing how to reproduce them and their severity.
- Resolving Issues: Prioritize and fix critical bugs, then retest to confirm they’re resolved.
>> Read more about software testing-related topics:
- Understanding the Importance of Software Testing in Development
- Software Testing Life Cycle (STLC)
- Detailed Explanation of 7 Software Testing Principles
- An Ultimate Guide to Different Test Case Design Techniques
- How to Write A Powerful Test Plan in Software Testing?
- 4 Levels Of Testing In Software Testing: Explanation & Examples
- Top 17 API Testing Tools for Software Testing Process
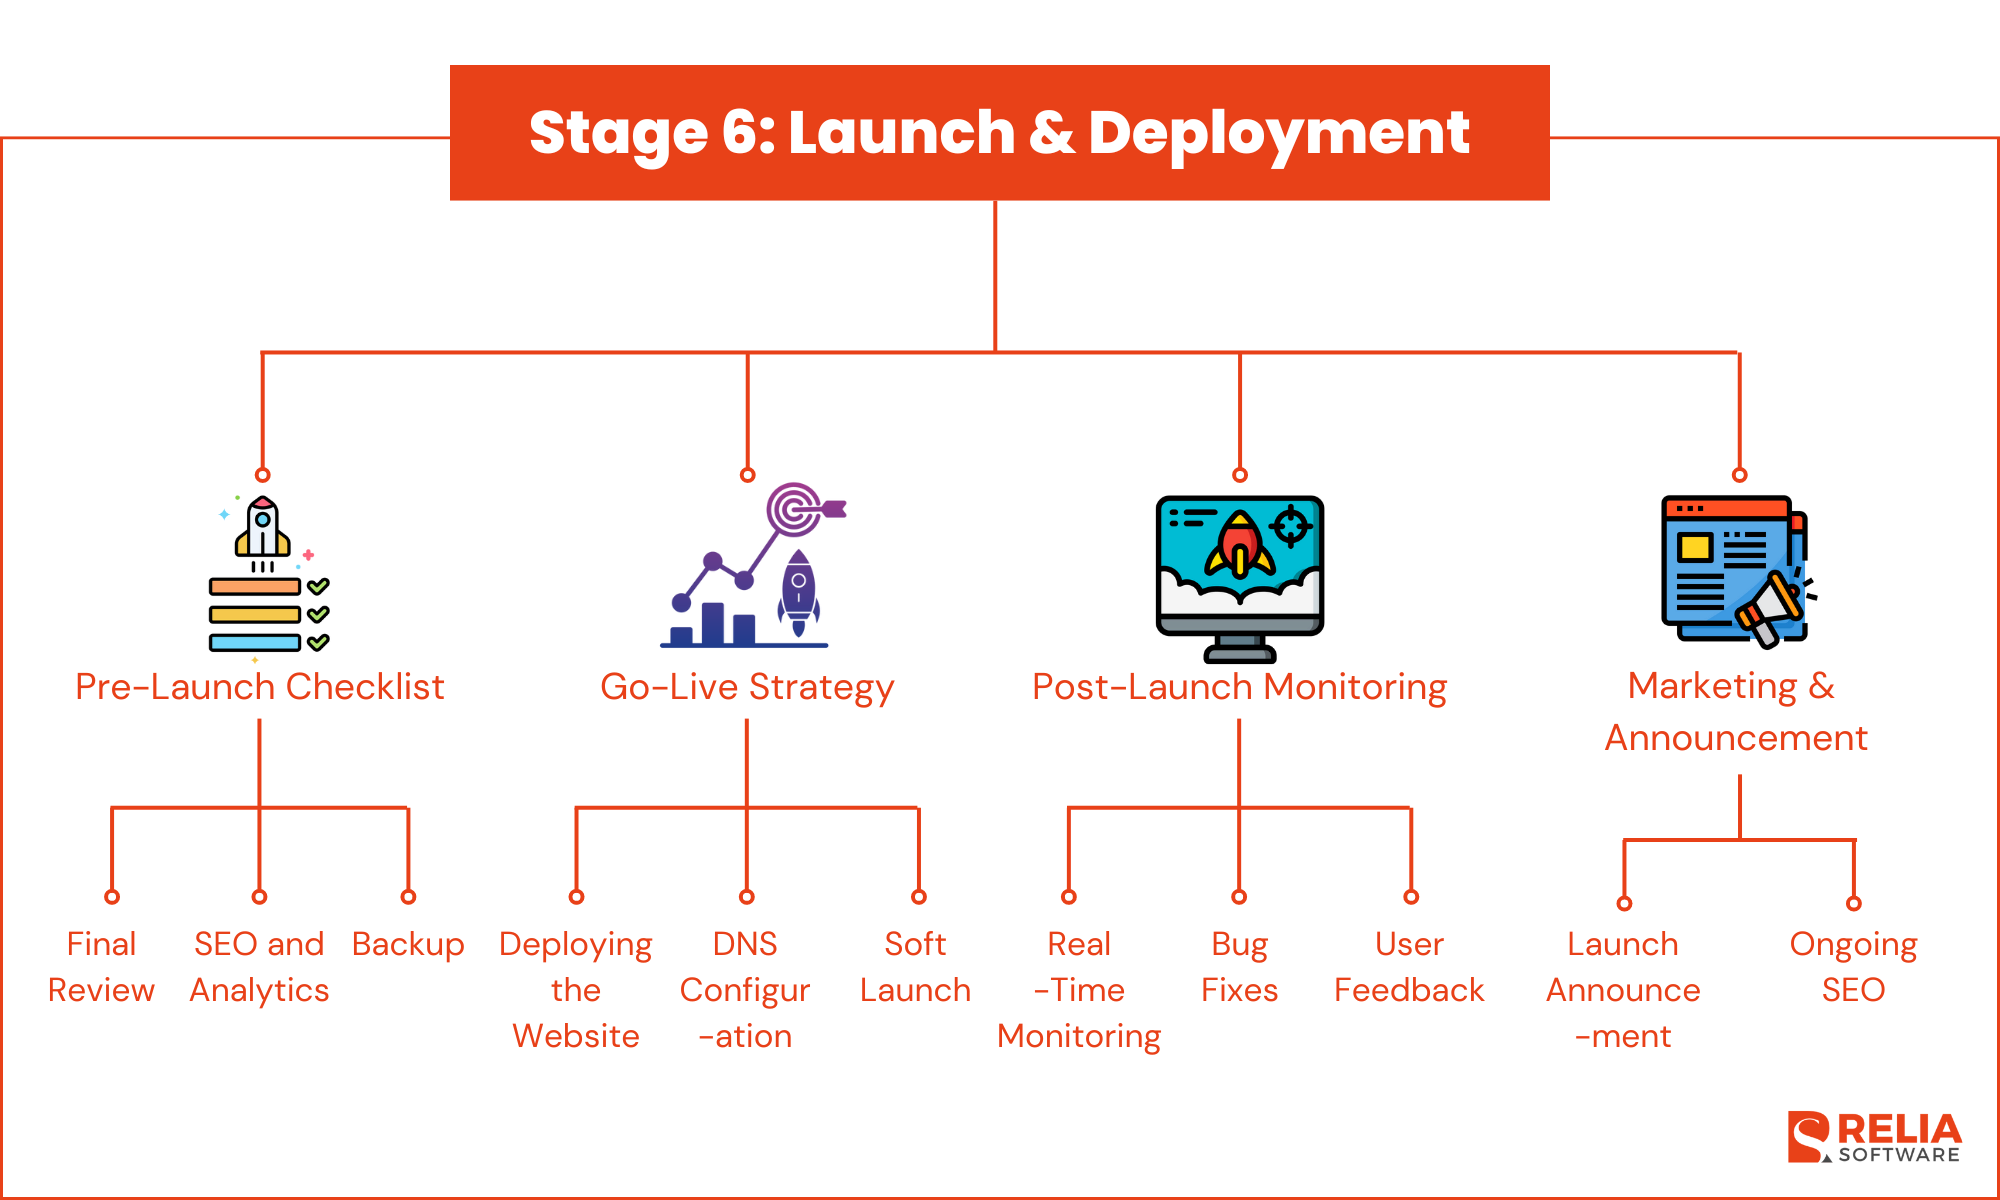
Stage 6: Launch & Deployment
This is the final step before your website goes live. This phase involves a careful transition from the development environment to the live server, ensuring that everything is set up correctly and that the website functions as intended in the real world.
Pre-Launch Checklist
- Final Review: Conduct a comprehensive review of all website elements, including content, design, functionality, and integrations. Make sure there are no broken links, all forms work, and every image and media file displays correctly.
- SEO and Analytics: Set up your SEO elements like meta tags and alt texts, and ensure that Google Analytics (or another tracking tool) is ready to go. This will help you monitor site performance from day one. To maximize effectiveness, consider working with industry SEO experts to ensure your setup aligns with the latest best practices.
- Backup: Before launching, create a complete backup of your site. This way, if anything goes wrong during the launch, you have a fallback option.
Go-Live Strategy
- Deploying the Website: Move the website from the staging environment to the live server. This process involves transferring files, databases, and any other necessary elements to the hosting environment where the website will be accessible to the public.
- DNS Configuration: Update the DNS settings to point to the new server. DNS changes can take anywhere from a few minutes to 48 hours to propagate fully across the internet, so plan the timing of your launch accordingly.
- Soft Launch: Consider a soft launch, where the website is made live without any major announcements. This allows you to monitor the site in a live environment and make any final adjustments before a full public launch.
Post-Launch Monitoring
- Real-Time Monitoring: Once the website is live, closely monitor it for any issues. Use monitoring tools to track server performance, uptime, and load times. Keep an eye on traffic patterns and user behavior to ensure everything is functioning smoothly.
- Bug Fixes and Adjustments: Be prepared to address any bugs or issues that arise immediately after launch. Even with thorough testing, some problems may only become apparent once the site is live.
- User Feedback: Gather feedback from real users to identify any usability issues or areas for improvement. This feedback is key for making your site even better.
Marketing and Announcement
- Launch Announcement: Once the site is stable and running smoothly, announce the launch through email, social media, and other channels. Highlight new features or content that will draw users in.
- Ongoing SEO: After the launch, continue to optimize your site for search engines. Monitor SEO performance and make necessary adjustments to improve rankings and visibility over time. If possible, consider to build a strong backlink profile using link building tools to enhance your website’s authority.
Stage 7: Maintenance and Updates
Ongoing Maintenance
- Regular Updates: Keep your website current by regularly updating content, plugins, and software. This helps prevent security issues and ensures your site remains compatible with new technologies and devices.
- Content Management: Continuously refresh your content to keep your site engaging and relevant. Whether it's blog posts, new products, or service updates, fresh content helps maintain your site's SEO rankings and user interest.
- Performance Monitoring: Regularly check your website's performance, including load times and server uptime. Use tools like Google Analytics to track user behavior and identify areas where your site can be improved.
Security Updates
- Patch Management: Make sure your website’s software and plugins are always updated with the latest security patches. This is key to protecting your site from potential security threats.
- SSL and Encryption: Regularly verify that your SSL certificate is active and that all data on your site is securely encrypted, especially if you're handling sensitive information like user passwords or payment details.
- Security Audits: Conduct periodic security checks to spot and fix vulnerabilities before they become problems. This proactive approach helps keep your site secure.
Performance Optimization
- Speed Improvements: Continuously optimize your website to load faster. This can involve compressing images, enabling caching, and refining your code. Faster sites offer better user experiences and higher search rankings.
- Mobile Optimization: Ensure your site remains fully optimized for mobile devices. With more users browsing on smartphones and tablets, it's essential that your site performs well on all screen sizes.
- Error Monitoring: Set up systems to catch and fix issues like broken links or server errors as soon as they occur, and back them up with regular website audits using tools like SE Ranking. This keeps your site running smoothly and avoids user frustration.
User Feedback and Improvements
- Collecting Feedback: Regularly gather feedback from your users to learn how they interact with your site and where improvements can be made. Tools like surveys and feedback forms are great for gaining these insights.
- Making Changes: Use the feedback and performance data to make necessary updates that improve the user experience. This could involve tweaking the design, adding new features, or simplifying navigation.
- Feature Updates: As your business evolves, your website should too. Regularly assess the need for new features and implement them to keep your site aligned with your business goals.
Backup and Recovery
- Regular Backups: Schedule automatic backups of your website to ensure you always have a recent copy. This is crucial in case something goes wrong, like a security breach or technical failure.
- Disaster Recovery: Have a plan in place to quickly restore your site in the event of a major issue. This includes steps for restoring from backups and communicating with users during any downtime.

Web Development Services at Relia Software
At Relia Software, we offer tailored web development services designed to help your business thrive online. We create custom websites that are not only visually appealing but also easy to use and optimized for performance. Whether you need a simple site or a complex web application, we’ve got you covered.
What We Offer:
- Custom Websites: We build websites that fit your brand and meet your unique needs. Our focus is on creating user-friendly, responsive sites that work well on any device.
- E-commerce Solutions: We develop secure, scalable e-commerce platforms that enhance your online sales and provide a smooth shopping experience for your customers.
- CMS Integration: Managing your website content is simple with our CMS solutions. We work with popular platforms like WordPress and Drupal, or we can create a custom CMS just for you.
- Ongoing Support: After your website launches, we’re here to help. Our maintenance and support services ensure your site stays updated, secure, and running smoothly.
Relia Software is committed to delivering web development solutions that help you reach your business goals, ensuring your website is a valuable tool for growth and engagement.
Final Thoughts
Bringing your website from concept to launch is a journey that involves careful planning, creative design, precise development, thorough testing, and ongoing maintenance. Each stage plays a critical role in ensuring that your website is not only visually appealing but also functional, secure, and user-friendly. By following a structured approach and continually optimizing after launch, you set your website up for long-term success, ensuring it meets your goals and provides value to your users.
>>> Follow and Contact Relia Software for more information!

- web development
- development
- Web application Development