Clean Architecture is a software design approach that promotes code reusability, testability, and maintainability. When applied to Flutter, it creates a robust app structure that separates concerns and ensures long-term project health. This guide will explore the core principles, benefits, and practical implementation of Clean Architecture in Flutter development.
>> Read more about Flutter coding:
- The In-depth Guide for Mastering Navigation in Flutter
- Step-by-Step Tutorial to Master Flutter TextField Validation
Introduction to Clean Architecture
Clean Architecture is a software design philosophy introduced by Robert C. Martin, also known as "Uncle Bob," in his 2017 book Clean Architecture: A Craftsman's Guide to Software Structure and Design. The philosophy aims to create systems that are easy to understand, develop, maintain, and test.
By organizing code into layers that separate concerns, Clean Architecture promotes a clear structure and ensures that the system is resilient to change.
The key principles of Clean Architecture focus on independence:
- Independence from Frameworks: Frameworks should be tools, not dependencies, allowing them to be swapped out without affecting the system’s core.
- Independence of User Interface: UI changes should not impact business rules.
- Independence of Databases: The business logic should remain unaffected by database changes.
Clean Architecture offers several benefits:
- Maintainability through a modular design that simplifies bug fixing and system understanding;
- Testability by isolating each layer, increasing reliability, and allowing mocks and stubs for dependencies;
- Scalability through a layered architecture that optimizes different parts separately;
- Separation of concerns with clear boundaries and focused development, reducing complexity and improving productivity.
Clean Architecture in Flutter Development
Clean Architecture and Flutter form a powerful combination for building robust, scalable, and maintainable applications. Flutter's ability to create visually stunning and performant user interfaces complements Clean Architecture's focus on separating concerns and promoting testability. By adhering to Clean Architecture principles, Flutter developers can create applications that are not only beautiful but also well-structured, easy to test, and adaptable to change.
Core Concepts of Flutter Clean Architecture
Layers
- Entities:
This layer holds the core business logic and the enterprise-wide rules. Entities represent the most general, high-level business rules, often as rich domain objects that contain the core logic of the system. These entities are stable and rarely change, making them reusable across various applications within the enterprise.
- Use Cases:
This layer encapsulate application-specific business rules. Use cases layer coordinate the flow of data to and from the entities and direct the work they perform. They contain the application-specific logic that defines what the system should do in response to a particular user action or event. Use cases are responsible for orchestrating business processes.
- Interface Adapters:
This layer acts as a bridge between the application and the user interface or external systems. It converts data between the use cases and a form the UI can use. Components in this layer, such as controllers, presenters, and gateways, are responsible for transforming data into a form usable by the outer layers. This ensures that the core business logic is not affected by changes in the presentation layer or external systems.
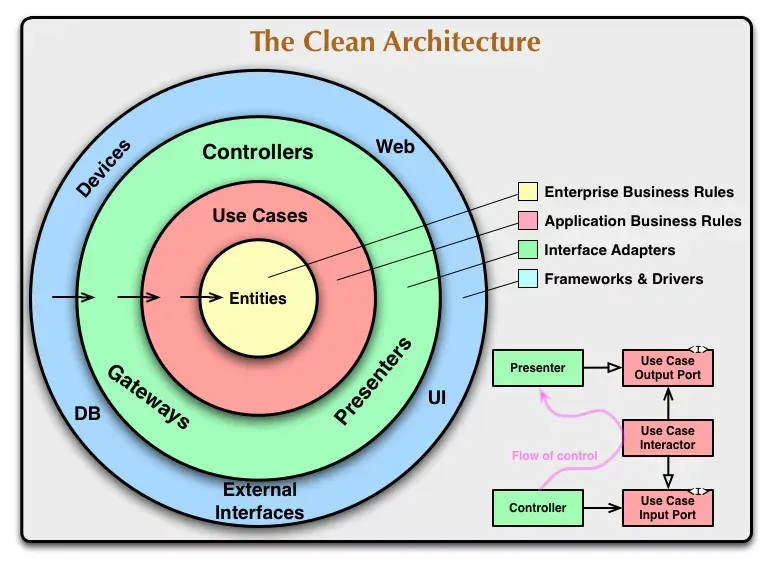
Dependency Rule
The Dependency Rule is a core principle in Clean Architecture that defines how the different layers should interact. The key idea is that dependencies should only flow inward. This means:
- Inner layers (like Entities and Use Cases) should remain unaware of the outer layers (such as Interface Adapters and Frameworks & Drivers).
- Code in the inner layers should not rely on any code from the outer layers.
- Outer layers are allowed to depend on inner layers, but it should never work the other way around.
By following this rule, the core business logic stays independent from external factors. This makes the system more modular, maintainable, and testable. It also allows the application to be flexible and adaptable to changes in technology and external interfaces without affecting the core business logic.
>> Read more: Making HTTP Requests in Flutter with Dio: A Step-by-Step Tutorial
Applying Clean Architecture in Flutter
Implementing Clean Architecture in Flutter involves addressing several key considerations unique to the framework. These include state management, the widget tree, separation of concerns, and managing dependencies through plugins and packages.
State Management
State management is a critical aspect of any Flutter application. Clean Architecture can be integrated with various state management solutions to ensure a clean separation of concerns:
- Provider: A lightweight and flexible solution for managing state that integrates well with Clean Architecture. It allows you to easily inject dependencies and manage state across your application.
- Riverpod: An improvement over Provider that offers a more robust and scalable approach to state management. Riverpod simplifies dependency injection and state management, making it a good fit for Clean Architecture principles.
- Bloc: The Bloc (Business Logic Component) pattern provides a more structured approach to state management by separating business logic from UI. It aligns well with Clean Architecture by keeping business logic in use cases and states in separate blocs.
Widget Tree and Separation of Concerns
Managing dependencies and integrating plugins and packages in a Flutter application while adhering to Clean Architecture principles is crucial:
- Dependency Management: Use dependency injection to manage plugins and packages, ensuring they are only used in the outer layers (Frameworks & Drivers) of the architecture. Popular dependency injection packages in Flutter include
get_itandinjectable. - Integration: Plugins and external packages should be confined to the outermost layer of the architecture. For instance, a database plugin like
sqfliteor a network library likedioshould be abstracted behind repository interfaces. The implementation details should remain hidden from the core business logic and use cases.
Adhering to these principles, you can ensure that your Flutter application remains modular, testable, and maintainable. The combination of state management solutions, a well-structured widget tree, and careful integration of plugins and packages will help you build robust applications that leverage the strengths of Clean Architecture.
Setting Up the Project Structure
Organizing your Flutter project following Clean Architecture principles ensures a scalable, maintainable, and testable codebase. Below is a suggested folder structure to get you started:
lib/: Main directory containing all the Dart files for the application.
core/: Common utilities and base classes used across the application.
features/: Contains the specific functionalities of the application, divided into subfolders for each feature.
feature_name/: Placeholder for a specific feature’s folder, where feature_name represents the name of the feature.
domain/: Contains the business logic layer, including entities, repositories, and use cases.
entities/: Business objects and rules.
repositories/: Abstract classes defining repository interfaces.
use_cases/: Application-specific business logic.
data/: Contains data sources, models, and repository implementations.
models/: Data transfer objects (DTOs) and data models.
data_sources/: APIs, database interactions, and other data sources.
repositories/: Concrete implementations of the repository interfaces defined in the domain layer.
presentation/: Contains UI components, widgets, and state management.
pages/: Screens and page-level widgets.
widgets/: Reusable widgets and UI components.
state_management/: State management logic, such as Bloc, Provider, or Riverpod.
Let’s dive in with a real project example:
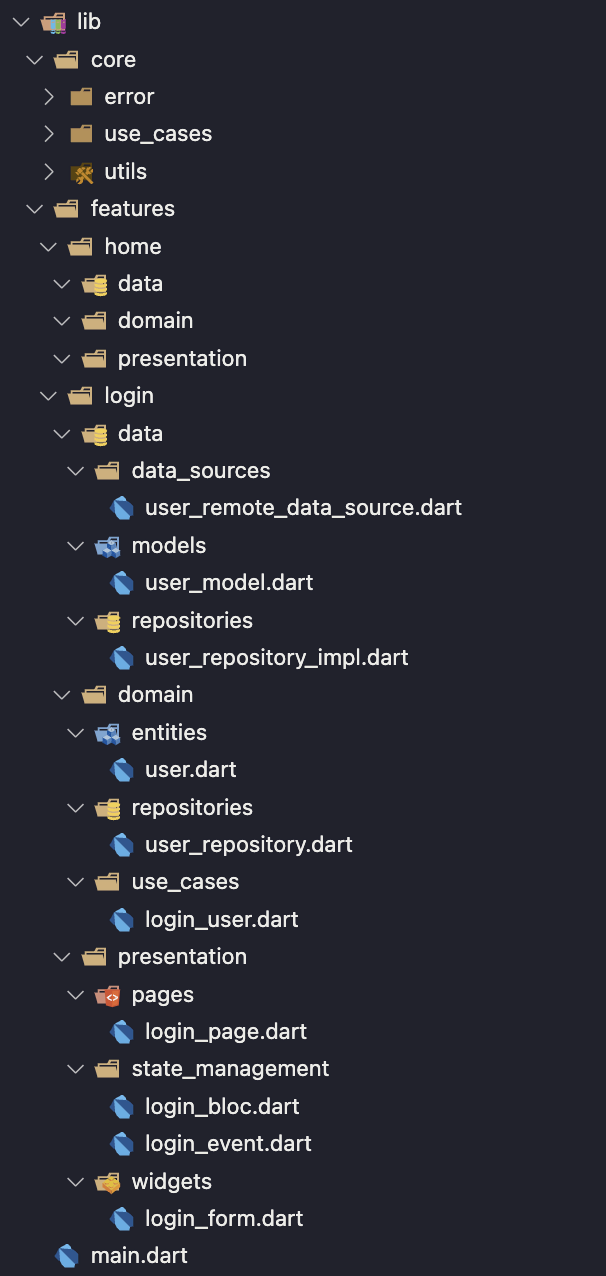
When applying Clean Architecture to a Flutter project, you can structure your project as described above. This setup ensures a clear separation of concerns, aligning with Clean Architecture principles. It helps keep the application modular, testable, and maintainable. Each feature is self-contained, making it easier to develop, test, and manage different parts of the app independently.
Now, let's dive deeper into each layer to better understand its purpose and how to implement it effectively.
Domain Layer
The domain layer is the core part of the Clean Architecture structure. It contains the business logic, which is central to the application. This layer is completely independent of other layers, ensuring that it can be easily tested and maintained. The domain layer includes entities, repositories, and use cases.
- Entities
Entities are the core objects of the application, encapsulating the most general and high-level business rules. They are plain Dart classes that define the properties and behavior of the core business objects.
Sample code for User Entity:
class User {
  final String id;
  final String name;
  final String email;

  User({required this.id, required this.name, required this.email});
}- Repositories
Repositories define the interfaces for data operations. They abstract the data layer, ensuring that the domain layer is not dependent on any specific data source or implementation details.
Sample code for User Repository Interface:
abstract class UserRepository {
  Future<User> getUserDetails(String id);
}- Use Cases
Use cases (or interactors) contain the application-specific business logic. They define the operations that can be performed on the entities and interact with the repositories to execute these operations. Each use case typically corresponds to a specific user action or feature requirement.
Sample code for GetUserDetails Use Case:
class GetUserDetails {
  final UserRepository repository;

  GetUserDetails(this.repository);

  Future<User> call(String id) {
    return repository.getUserDetails(id);
  }
}
Data Layer
The data layer is responsible for handling data operations, including fetching data from remote or local sources and converting raw data into domain entities. This layer includes models, data sources, and repository implementations.
- Models
Models are data representations used to transfer data between the data layer and other layers of the application. They often map to JSON structures received from APIs or database schemas.
Sample code for UserModel:
class UserModel {
  final String id;
  final String name;
  final String email;

  UserModel({required this.id, required this.name, required this.email});

  factory UserModel.fromJson(Map<String, dynamic> json) {
    return UserModel(
      id: json['id'],
      name: json['name'],
      email: json['email'],
    );
  }

  Map<String, dynamic> toJson() {
    return {
      'id': id,
      'name': name,
      'email': email,
    };
  }
}- Data Sources
Data sources are responsible for fetching data from remote or local sources. They define methods to retrieve and store data and are abstracted by interfaces to allow for easy testing and replacement.
Sample code for UserRemoteDataSource Interface:
abstract class UserRemoteDataSource {
  Future<UserModel> fetchUserDetails(String id);
}
Sample code for UserRemoteDataSource Implementation:
import 'package:http/http.dart' as http;
import 'dart:convert';

class UserRemoteDataSourceImpl implements UserRemoteDataSource {
  final http.Client client;

  UserRemoteDataSourceImpl({required this.client});

  @override
  Future<UserModel> fetchUserDetails(String id) async {
    final response = await client.get(Uri.parse('https://api.example.com/users/$id'));

    if (response.statusCode == 200) {
      return UserModel.fromJson(json.decode(response.body));
    } else {
      throw Exception('Failed to load user details');
    }
  }
}- Repository Implementations
Repository implementations are concrete classes that implement the repository interfaces defined in the domain layer. They use data sources to fetch and persist data and convert data models to domain entities.
Sample code for UserRepository Implementation:
class UserRepositoryImpl implements UserRepository {
  final UserRemoteDataSource remoteDataSource;

  UserRepositoryImpl({required this.remoteDataSource});

  @override
  Future<User> getUserDetails(String id) async {
    final userModel = await remoteDataSource.fetchUserDetails(id);
    return User(id: userModel.id, name: userModel.name, email: userModel.email);
  }
}
This structure maintains a clear separation of concerns, ensuring that data operations are modular, testable, and independent of the core business logic.
Presentation Layer
The presentation layer in a Flutter application handles the user interface and user interactions. It includes state management and UI components such as widgets and pages. This layer communicates with the domain layer to execute use cases and display data.
- State Management
State management in the presentation layer can be handled using various methods, such as Bloc, Provider, or Riverpod. In this example, we will use Bloc (Business Logic Component) to manage the state.
import 'package:flutter_bloc/flutter_bloc.dart';
import 'package:equatable/equatable.dart';
import 'package:my_app/features/user/domain/use_cases/get_user_details.dart';
import 'package:my_app/features/user/domain/entities/user.dart';

// Events
abstract class UserEvent extends Equatable {
  const UserEvent();

  @override
  List<Object> get props => [];
}

class GetUser extends UserEvent {
  final String id;

  const GetUser(this.id);

  @override
  List<Object> get props => [id];
}

// States
abstract class UserState extends Equatable {
  const UserState();

  @override
  List<Object> get props => [];
}

class UserInitial extends UserState {}

class UserLoading extends UserState {}

class UserLoaded extends UserState {
  final User user;

  const UserLoaded(this.user);

  @override
  List<Object> get props => [user];
}

class UserError extends UserState {
  final String message;

  const UserError(this.message);

  @override
  List<Object> get props => [message];
}

// Bloc
class UserBloc extends Bloc<UserEvent, UserState> {
  final GetUserDetails getUserDetails;

  UserBloc({required this.getUserDetails}) : super(UserInitial());

  @override
  Stream<UserState> mapEventToState(UserEvent event) async* {
    if (event is GetUser) {
      yield UserLoading();
      try {
        final user = await getUserDetails(event.id);
        yield UserLoaded(user);
      } catch (e) {
        yield UserError('Failed to fetch user details');
      }
    }
  }
}- UI Components
UI components in the presentation layer include widgets and pages that present the data to the user and handle user interactions.
Sample code for UserPage:
import 'package:flutter/material.dart';
import 'package:flutter_bloc/flutter_bloc.dart';
import 'package:my_app/features/user/presentation/bloc/user_bloc.dart';
import 'package:my_app/features/user/presentation/widgets/user_details.dart';

class UserPage extends StatelessWidget {
  final String userId;

  const UserPage({Key? key, required this.userId}) : super(key: key);

  @override
  Widget build(BuildContext context) {
    return Scaffold(
      appBar: AppBar(
        title: Text('User Details'),
      ),
      body: BlocProvider(
        create: (context) => UserBloc(
          getUserDetails: RepositoryProvider.of(context),
        )..add(GetUser(userId)),
        child: UserDetails(),
      ),
    );
  }
}

class UserDetails extends StatelessWidget {
  @override
  Widget build(BuildContext context) {
    return BlocBuilder<UserBloc, UserState>(
      builder: (context, state) {
        if (state is UserLoading) {
          return Center(child: CircularProgressIndicator());
        } else if (state is UserLoaded) {
          return Center(
            child: Column(
              mainAxisAlignment: MainAxisAlignment.center,
              children: [
                Text('Name: ${state.user.name}'),
                Text('Email: ${state.user.email}'),
              ],
            ),
          );
        } else if (state is UserError) {
          return Center(child: Text(state.message));
        } else {
          return Center(child: Text('Please wait...'));
        }
      },
    );
  }
}
This structure ensures a clear separation of concerns, making the presentation layer modular, testable, and maintainable, while effectively communicating with the domain layer to execute use cases and display data.
Dependency Injection for Clean Architecture Flutter
Dependency injection (DI) is a technique used to manage dependencies in a software application, promoting loose coupling and making the system more modular and testable. In Flutter, DI helps manage the creation and lifecycle of objects, particularly in large and complex applications.
The purposes of using DI for clean architecture can be:
- Managing Dependencies: DI allows you to control how dependencies are provided to various parts of the application, making it easier to manage object creation and lifecycle.
- Promoting Loose Coupling: By injecting dependencies, components do not need to create their own dependencies. This reduces coupling between components and makes them more interchangeable and testable.
Let’s take a look at the sample code for DI in the above example:
First we will add two new packages get_it and injectable into our project with:
- get_it: A simple and lightweight service locator for Dart and Flutter.
- injectable: A code generator that works with
get_itto simplify the DI setup.
Next we will create a file named injection.dart to configure and register dependencies.
import 'package:get_it/get_it.dart';
import 'package:injectable/injectable.dart';
import 'injection.config.dart'; // Generated file

final GetIt getIt = GetIt.instance;

@InjectableInit()
void configureDependencies() => $initGetIt(getIt);
Then we will annotate our classes to be injectable using @injectable and @singleton:
import 'package:injectable/injectable.dart';
import 'package:my_app/features/user/data/data_sources/user_remote_data_source.dart';
import 'package:my_app/features/user/data/repositories/user_repository_impl.dart';
import 'package:my_app/features/user/domain/repositories/user_repository.dart';
import 'package:my_app/features/user/domain/use_cases/get_user_details.dart';

// Data sources
@injectable
class UserRemoteDataSourceImpl implements UserRemoteDataSource {
  // Implementation
}

// Repositories
@injectable
class UserRepositoryImpl implements UserRepository {
  final UserRemoteDataSource remoteDataSource;

  UserRepositoryImpl(this.remoteDataSource);

  @override
  Future<User> getUserDetails(String id) async {
    // Implementation
  }
}

// Use cases
@injectable
class GetUserDetails {
  final UserRepository repository;

  GetUserDetails(this.repository);

  Future<User> call(String id) {
    return repository.getUserDetails(id);
  }
}
Then using the following command to run build_runner to generate the necessary file:
flutter pub run build_runner buildFinally initiate our DI configuration in the main.dart file.
import 'package:flutter/material.dart';
import 'package:my_app/injection.dart';
import 'package:my_app/features/user/presentation/pages/user_page.dart';

void main() {
  configureDependencies();
  runApp(MyApp());
}

class MyApp extends StatelessWidget {
  @override
  Widget build(BuildContext context) {
    return MaterialApp(
      title: 'Flutter Demo',
      theme: ThemeData(
        primarySwatch: Colors.blue,
      ),
      home: UserPage(userId: '123'),
    );
  }
}
We can access the registered dependencies using getIt. Let’s update our user_page.dart a little bit.
import 'package:flutter/material.dart';
import 'package:flutter_bloc/flutter_bloc.dart';
import 'package:my_app/features/user/presentation/bloc/user_bloc.dart';
import 'package:my_app/features/user/presentation/widgets/user_details.dart';
import 'package:my_app/injection.dart';

class UserPage extends StatelessWidget {
  final String userId;

  const UserPage({Key? key, required this.userId}) : super(key: key);

  @override
  Widget build(BuildContext context) {
    return Scaffold(
      appBar: AppBar(
        title: Text('User Details'),
      ),
      body: BlocProvider(
        create: (context) => getIt<UserBloc>()..add(GetUser(userId)),
        child: UserDetails(),
      ),
    );
  }
}
Testing of Clean Architecture Flutter
One of the main purpose of applying Clean Architecture is to ensure a easy and clear module for testing (from unit test all the way to integration test). As we applied Clean Architecture in the sample code, let’s write some test for it.
To create mock data, it is recommended to use mockito package for generating test data easily as well as using integration_test package for performing integration tests in Flutter.
Unit Test
Unit tests focus on testing individual components, such as use cases and repositories, to ensure they function as expected.
This example tests the GetUserDetails use case. A mock UserRepository is used to simulate the data source. The test checks if the use case correctly retrieves user details from the repository.
import 'package:flutter_test/flutter_test.dart';
import 'package:mockito/mockito.dart';
import 'package:my_app/features/user/domain/entities/user.dart';
import 'package:my_app/features/user/domain/repositories/user_repository.dart';
import 'package:my_app/features/user/domain/use_cases/get_user_details.dart';

class MockUserRepository extends Mock implements UserRepository {}

void main() {
  late GetUserDetails useCase;
  late MockUserRepository mockUserRepository;

  setUp(() {
    mockUserRepository = MockUserRepository();
    useCase = GetUserDetails(mockUserRepository);
  });

  final tUserId = '123';
  final tUser = User(id: '123', name: 'Test User', email: 'test@example.com');

  test('should get user details from the repository', () async {
    // Arrange
    when(mockUserRepository.getUserDetails(tUserId)).thenAnswer((_) async => tUser);

    // Act
    final result = await useCase(tUserId);

    // Assert
    expect(result, tUser);
    verify(mockUserRepository.getUserDetails(tUserId));
    verifyNoMoreInteractions(mockUserRepository);
  });
}
Widget Test
Widget tests (or component tests) verify the behavior and appearance of individual widgets.
This example tests the UserPage widget. A mock UserBloc is used to simulate the state. The test verifies that the widget correctly displays user details.
import 'package:flutter/material.dart';
import 'package:flutter_test/flutter_test.dart';
import 'package:my_app/features/user/presentation/pages/user_page.dart';
import 'package:my_app/features/user/presentation/bloc/user_bloc.dart';
import 'package:my_app/injection.dart';
import 'package:mockito/mockito.dart';

class MockUserBloc extends Mock implements UserBloc {}

void main() {
  late MockUserBloc mockUserBloc;

  setUp(() {
    mockUserBloc = MockUserBloc();
    getIt.registerFactory<UserBloc>(() => mockUserBloc);
  });

  tearDown(() {
    getIt.reset();
  });

  testWidgets('UserPage displays user details', (WidgetTester tester) async {
    // Arrange
    when(mockUserBloc.state).thenReturn(UserLoaded(User(id: '123', name: 'Test User', email: 'test@example.com')));

    // Act
    await tester.pumpWidget(
      MaterialApp(
        home: UserPage(userId: '123'),
      ),
    );

    // Assert
    expect(find.text('Name: Test User'), findsOneWidget);
    expect(find.text('Email: test@example.com'), findsOneWidget);
  });
}
Integration Test
This example tests the app’s ability to display user details correctly. It simulates user interaction by tapping a button and checks if the correct details are displayed.
import 'package:flutter_test/flutter_test.dart';
import 'package:integration_test/integration_test.dart';
import 'package:my_app/main.dart' as app;

void main() {
  IntegrationTestWidgetsFlutterBinding.ensureInitialized();

  testWidgets('User details are displayed correctly', (WidgetTester tester) async {
    // Arrange
    app.main();
    await tester.pumpAndSettle();

    // Act
    await tester.tap(find.byKey(Key('fetchUserButton')));
    await tester.pumpAndSettle();

    // Assert
    expect(find.text('Name: Test User'), findsOneWidget);
    expect(find.text('Email: test@example.com'), findsOneWidget);
  });
}
Challenges and Best Practices for Clean Architecture in Flutter
Implementing Clean Architecture in Flutter can be challenging but rewarding. Here are some common challenges and their solutions:
- The complexity of initial setup (particularly due to the separation of layers and dependency management): Using step-by-step guides and tools like injectable can simplify the process.
- Increased boilerplate: Automated tools and templates can help generate necessary code, allowing focus on business logic.
- Over-engineering (especially in small projects): Carefully assess project scope and apply Clean Architecture principles only where they add clear value.
- Performance overhead from abstraction layers: Optimize critical paths and use performance profiling tools.
- Consistency in implementation across large teams: Establishing coding standards and conducting regular code reviews help ensure adherence to principles.
Best practices include:
- Maintain a clear separation of concerns.
- Use dependency injection to promote loose coupling.
- Follow SOLID principles to write maintainable and scalable code.
- Practice test-driven development (TDD) to ensure testable code that meets requirements.
- Keep UI logic separate from business logic through state management solutions to help keep UI components focused on presentation.
- Modularize code by features or layers, such as core, features, data, and presentation, to make the codebase easier to navigate.
- Use code generation tools like
build_runnerandinjectableto reduce boilerplate and errors. - Adopt consistent naming conventions to improve readability and maintainability.
- Refactor regularly to keep code clean and efficient.
- Document code thoroughly to provide context and explain complex logic, aiding new team members.
>> You may consider:
- Is Flutter Good For Web Development? Benefits & Drawbacks
- A Complete Guide To Successfully Hire Flutter Developers
- Flutter or React Native: What to Choose?
- Top 9 Flutter App Development Companies
Conclusion
In summary, implementing Clean Architecture in Flutter projects ensures a maintainable, testable, and scalable codebase. Key points include understanding the layered structure (entities, use cases, interface adapters, frameworks, and drivers) and adhering to the Dependency Rule, which mandates that inner layers should not know anything about outer layers.
Addressing challenges such as complexity, boilerplate code, over-engineering, and performance overhead is crucial. Best practices involve maintaining separation of concerns, using dependency injection, following SOLID principles, embracing test-driven development, and keeping UI logic separate from business logic.
For further reading and deeper understanding, consider these resources:
- Books: “Clean Architecture: A Craftsman’s Guide to Software Structure and Design” by Robert C. Martin, “Clean Code: A Handbook of Agile Software Craftsmanship” by Robert C. Martin.
- Articles: Online articles and tutorials on Clean Architecture in Flutter, available on Medium, Dev.to, and other tech blogs.
- Documentation: Official Flutter documentation, Dart documentation, and package documentation for tools like get_it, injectable, flutter_test, and integration_test.
These resources provide comprehensive insights and practical examples to enhance your knowledge and implementation of Clean Architecture in Flutter projects.
>>> Follow and Contact Relia Software for more information!

- Mobile App Development
- Native and Hybrid App Development
- development