Flutter, developed by Google, is an open-source framework for building natively compiled mobile, web, and desktop applications from a single codebase. The interface of a Flutter application consists of basic elements which are widgets, the building blocks of Flutter. These widgets can be controlled by state management, which handles the dynamic aspects of the UI (deal with how the widgets behave).
Effective state management is crucial for building complex UIs as it ensures the UI reflects the app's current state efficiently and consistently. Provider, a state management approach in Flutter, simplifies data sharing across the app by providing an efficient way to manage changes to the UI, ensuring a seamless user experience.
>> Read more:
- Is Flutter Good For Web Development? Benefits & Drawbacks
- Flutter or React Native: What to Choose?
- The In-depth Guide for Mastering Navigation in Flutter
- Step-by-Step Tutorial to Master Flutter TextField Validation
What is Provider?
Provider is a widely used state management solution in Flutter applications. It simplifies the process of managing and sharing state across different parts of the widget tree. Provider acts as a wrapper around Flutter's InheritedWidget providing a more convenient and efficient API for state management. By using Provider, developers can easily inject and access dependencies, handle state updates, and ensure that only the necessary parts of the widget tree rebuild when the state changes.
Provider offers several benefits, including simplicity, reusability, and performance optimisation. It reduces boilerplate code, making state management more straightforward and the codebase cleaner. The use of different types of providers like ChangeNotifierProvider, FutureProvider, and StreamProvider allows for flexible management of various state types, whether synchronous or asynchronous.
Additionally, Provider enhances performance by ensuring efficient state propagation, minimising unnecessary widget rebuilds, and facilitating dependency injection, which allows for a modular and maintainable architecture. Increased scalability for classes with a listening mechanism that grows exponentially in complexity (such as ChangeNotifier, which is O(N) for dispatching notifications).
Core Concepts of Provider
InheritedWidget
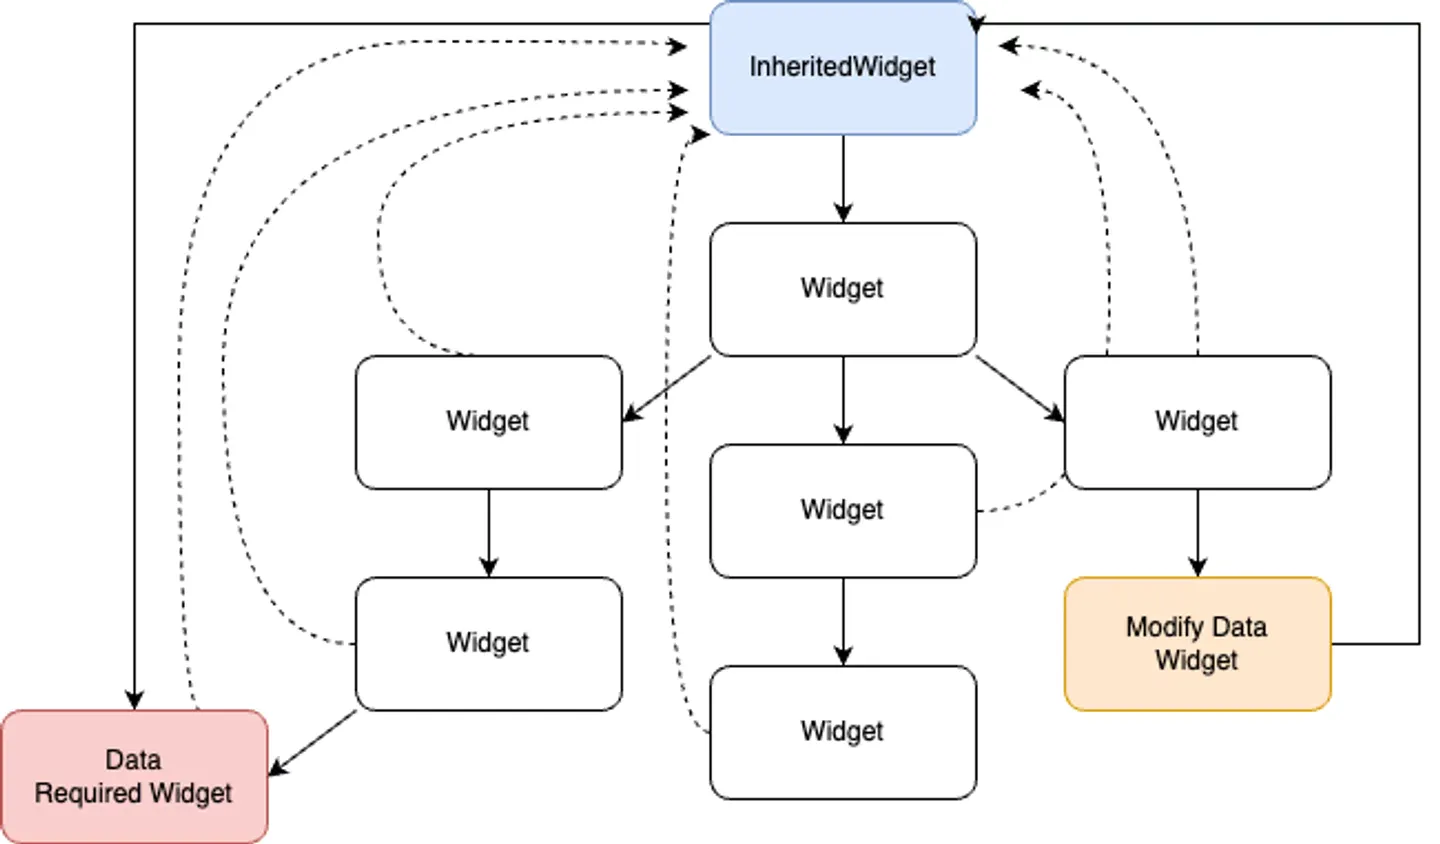
An InheritedWidget is a special kind of widget that allows data to be efficiently passed down the widget tree. It is primarily used to share data across the widget tree without requiring direct dependencies or the need for passing data manually to each widget.
Specifically, to use an InheritedWidget, we typically create a subclass that defines the data you want to share and override the updateShouldNotify() method to determine when the widget should notify its dependents of a change.
Descendant widgets can access the data from an InheritedWidget using the *of* method. This method is usually a static method defined in the InheritedWidget subclass and uses the BuildContext to find the nearest instance of the InheritedWidget in the widget tree.
When the data in the InheritedWidget changes (typically through some external mechanism since the data is immutable within the widget itself), the updateShouldNotify() method decides if the widgets that depend on this data should rebuild.
To easier understand the implement process, we’ll go through the following example code:
First, we need to make a class extended from InheritedWidget class:
class ExampleInheritedWidget extends InheritedWidget {
  final int data;

  const ExampleInheritedWidget({
    super.key,
    required super.child,
    required this.data,
  });

  @override
  bool updateShouldNotify(ExampleInheritedWidget oldWidget) => oldWidget.data != data;

  static ExampleInheritedWidget? of(BuildContext context) {
    return context.dependOnInheritedWidgetOfExactType<ExampleInheritedWidget>();
  }
}
The properties data will represent the data that will be used across the widget tree.
There are two method we will need to take a look into:
*updateShouldNotify()*: to notify whether the base on the condition given, in this case the widget will be rebuilt when the data pass into the widget is different from the data in previous state of widgetoldWidget.data != data*of*: using the method*dependOnInheritedWidgetOfExactType*to return an instance of typeExampleInheritedWidgetin a different state. The method*dependOnInheritedWidgetOfExactType()*does two major things:- It traverses up the widget tree starting from the given
BuildContextto find the nearest instance ofExampleInheritedWidget. - It registers the calling widget as a dependent of the found
InheritedWidget. This means that if theInheritedWidgetchanges, the calling widget will be notified and can rebuild if necessary.
- It traverses up the widget tree starting from the given
Then, we create a widget that inherits the data from the ExampleInheritedWidget:
class ExampleChildWidget extends StatelessWidget {
  const ExampleChildWidget({super.key});

  @override
  Widget build(BuildContext context) {
    final inheritedWidget = ExampleInheritedWidget.of(context);

    return Center(
      child: Text('Data from InheritedWidget: ${inheritedWidget?.data}'),
    );
  }
}
In this widget, we will access the data using the method of define in the inherited class above.
Finally, put it in the main class and test it:
void main() => runApp(const MyApp());
class MyApp extends StatelessWidget {
const MyApp({super.key});
@override
Widget build(BuildContext context) {
return MaterialApp(
home: Scaffold(
appBar: AppBar(
title: const Text('InheritedWidget Example'),
),
body: const ExampleInheritedWidget(
data: 42,
child: ExampleChildWidget(),
),
),
);
}
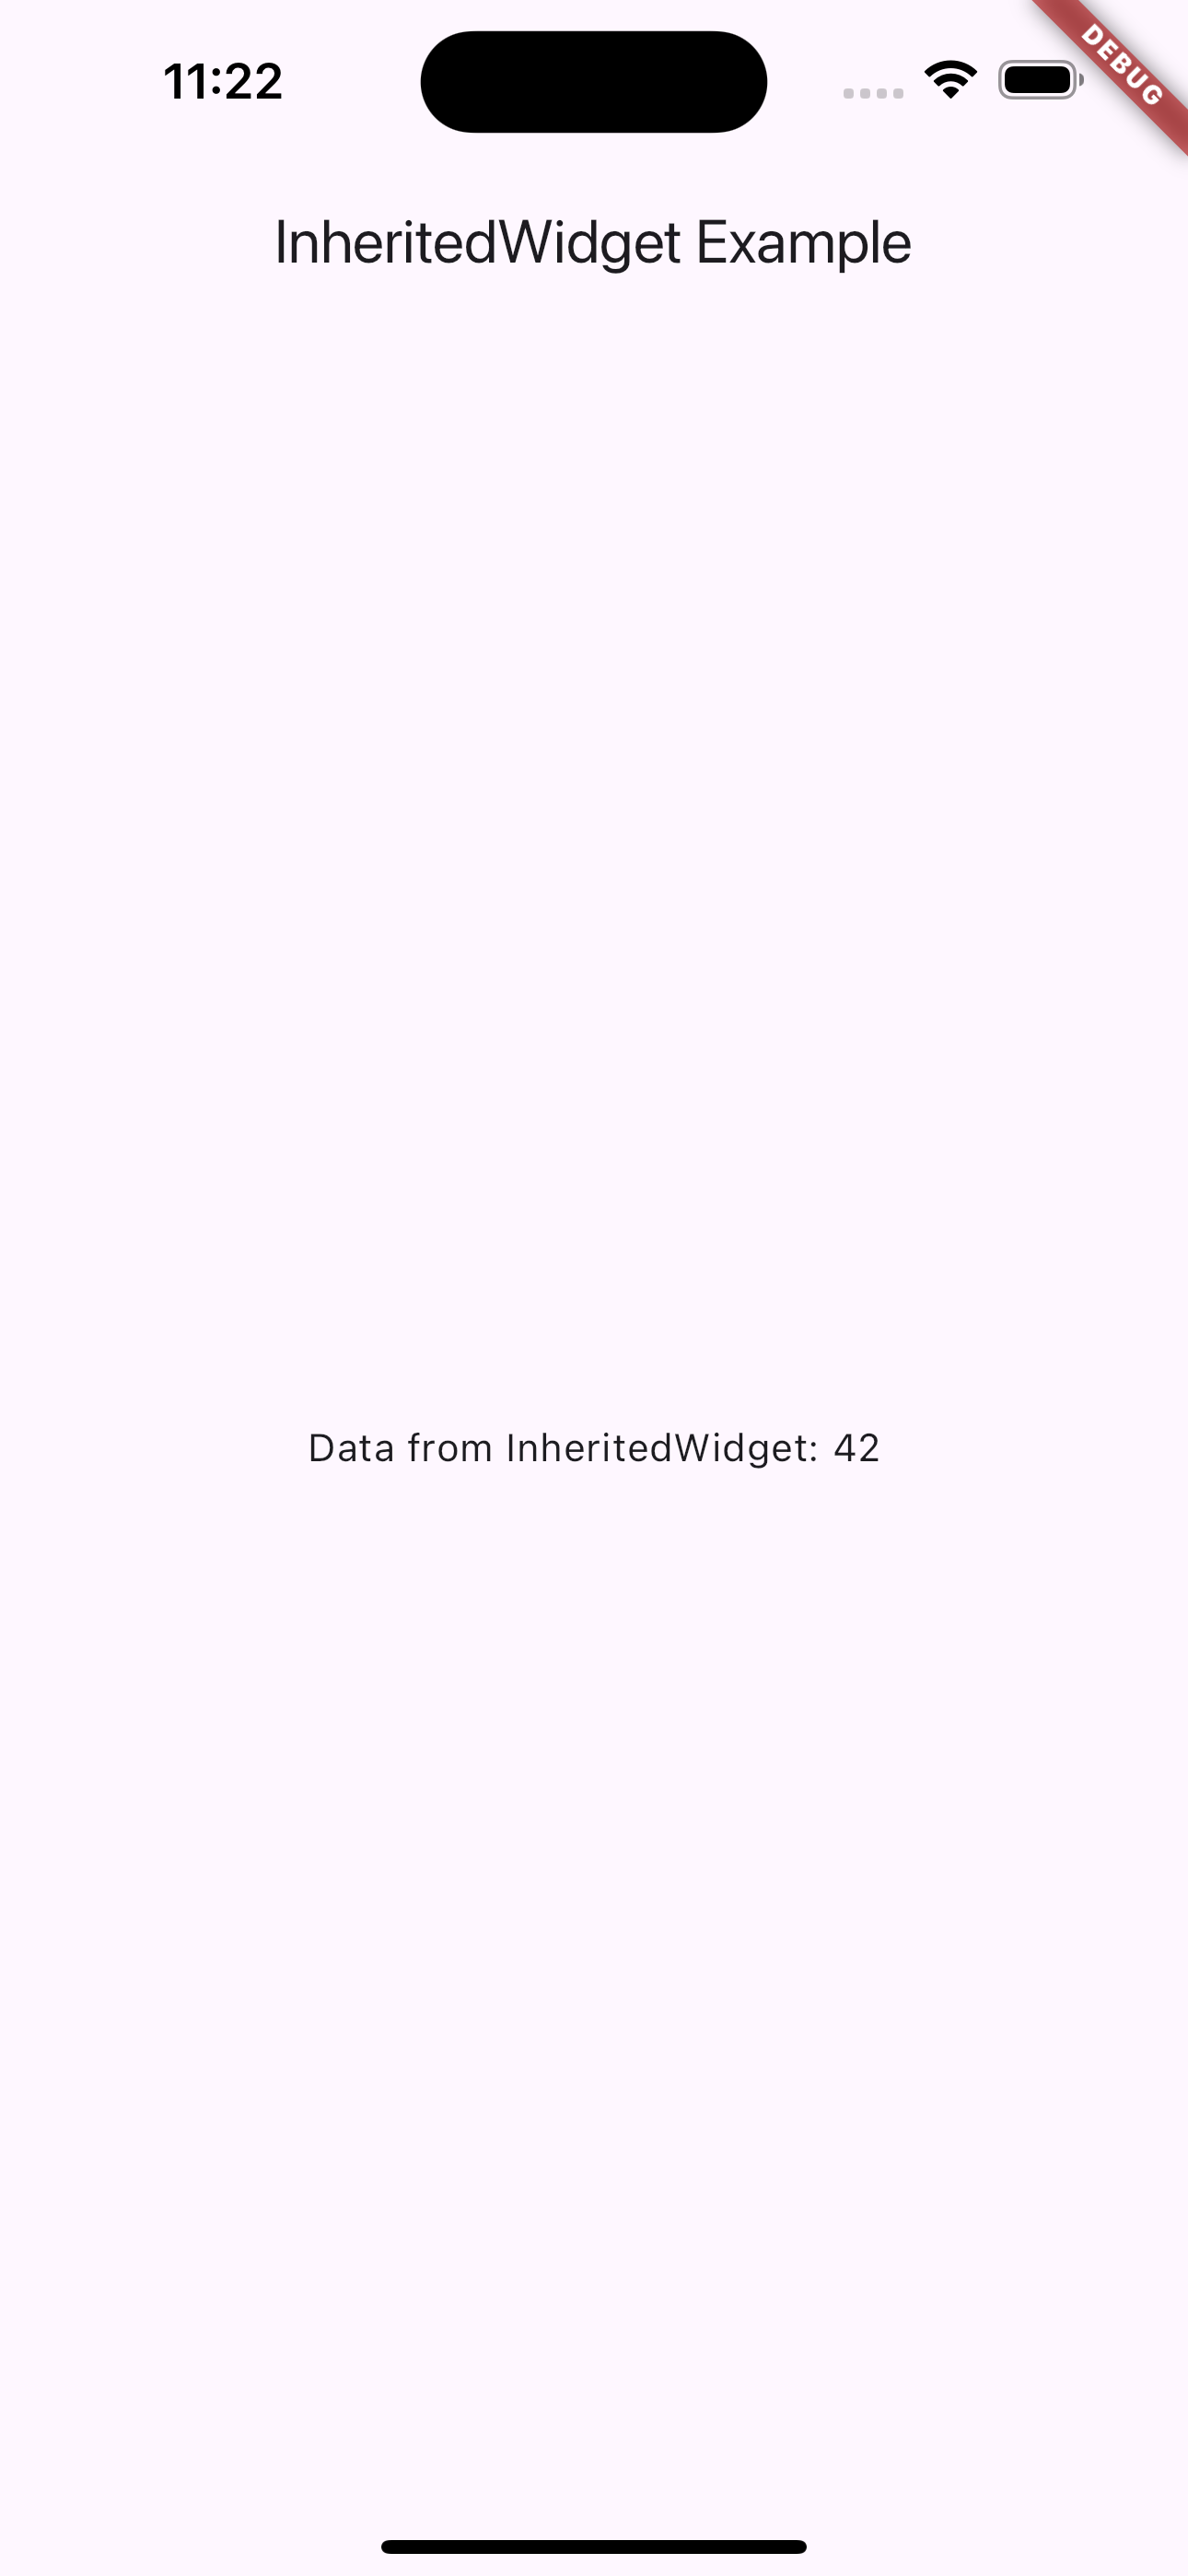
}In the main function and main screen, we pass the data from all the way from the MyApp widget with the data value of 42. And then, as mentioned above, we will try to retrieve the data from the parent class using the of method in the child class. Running the example will give us the following result:
ChangeNotifier
This class is a bit more comprehensible than the previous. It can be extended or mixed in with your model, allowing you to create a simple observable object that can notify listeners when changes occur.
For ChangeNotifier, it will be easier to understand through sample code, below is the example for ChangeNotifier usage.
Using the counter example from Flutter, we can create something like this:
class Counter extends ChangeNotifier {
  int _count = 0;

  int get count => _count;

  void increment() {
    _count++;
    notifyListeners();
  }
}
A little similar to the InheritedWidget, we first create a class that extends from the ChangeNotifier class. We will also create the method *increment()* to change the count value.
Notice here we have the *notifyListeners()* method called after the value is changed. This method is called to notify all the widget that currently listening to this model (class Counter) to go to the nearest *build()* method to update the UI.
Then we will put it in usage:
class MyApp extends StatelessWidget {
  const MyApp({super.key});

  @override
  Widget build(BuildContext context) {
    return const MaterialApp(
      home: CounterScreen(),
    );
  }
}

class CounterScreen extends StatefulWidget {
  const CounterScreen({super.key});

  @override
  State<StatefulWidget> createState() => _CounterScreenState();
}

class _CounterScreenState extends State<CounterScreen> {
  final Counter _counter = Counter();

  @override
  Widget build(BuildContext context) {
    return Scaffold(
      appBar: AppBar(
        title: const Text('ListenableBuilder Example'),
      ),
      body: Center(
        child: Column(
          mainAxisAlignment: MainAxisAlignment.center,
          children: <Widget>[
            const Text('You have pushed the button this many times:'),
            ListenableBuilder(
              listenable: _counter,
              builder: (context, _) {
                return Text(
                  '${_counter.count}',
                );
              },
            ),
          ],
        ),
      ),
      floatingActionButton: FloatingActionButton(
        onPressed: () {
          _counter.increment();
        },
        tooltip: 'Increment',
        child: const Icon(Icons.add),
      ),
    );
  }
}
When the ‘Increment’ button is pressed, the increment method is called and changed the _count variable, therefore trigger the build method of ListenableBuilder class and rebuild the whole widget inside (in this case the Text widget that shows the _counter.count value).
Provider Package
After understanding the principle of Provider through two classes that create the base structure of Provider (InheritedWidget and ChangeNotifier), we will have the simplified structure of Provider as below:
The link to the official provider package can be found here.
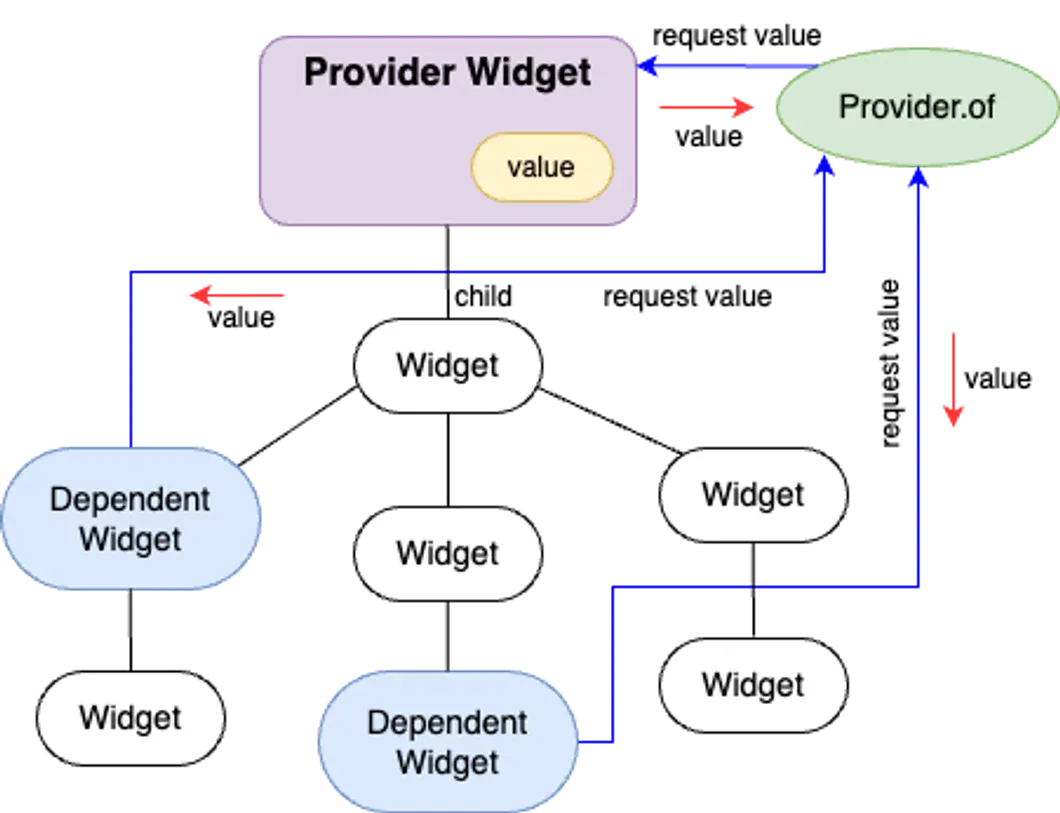
Similar to the InheritedWidget diagram, the Provider widget takes the top of the widget tree to “watch” all its children to provide the requested data. To access the data, the dependent widget can use the method Provider.of to retrieve it from the Provider widget.
Moreover, there are plenty of ways to consume this data like: Consumer, Select, … or, with the fact that the provider package also implements some extension method on BuildContext, we can retrieve the data using context.watch(), context.read() or context.select().
Implementing Provider in A Flutter App
No way to understand something better than diving into an example. In this section, we will do some coding to change a Flutter app theme using provider.
Step 1: Create A Flutter Project
First of all, we will need to create a Flutter project. You can create it from any IDE you want.
- If you are using Android Studio, you can go to
File → New → New Flutter Project. - If you are using VSCode, you can run the command
Flutter: New Projectfrom the command palette. - If you are a terminal type of person, you can go with typing
flutter createin the terminal.

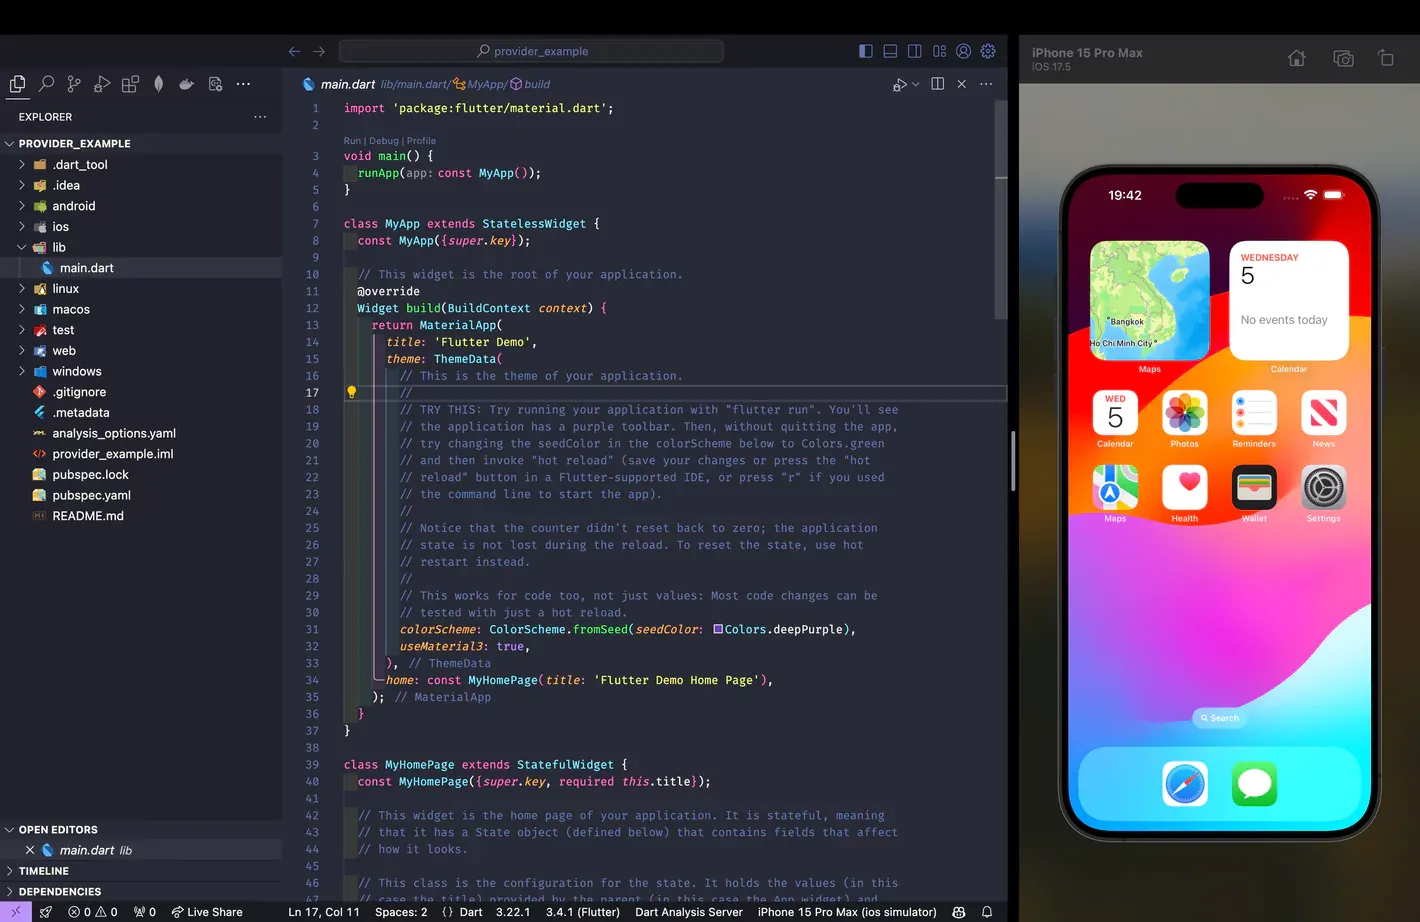
We can create a new Flutter app and call it whatever we want. In this example, I will call it provider_example for clearance.
I used VSCode, so after creating the project, it can look like this:
Step 2: Add the Provider
Let’s add the provider to our project. To do that, add provider: <latest version> to your pubspec.yaml file or open terminal in that project and run flutter pub add provider.
Your pubspec.yaml file should look like this:
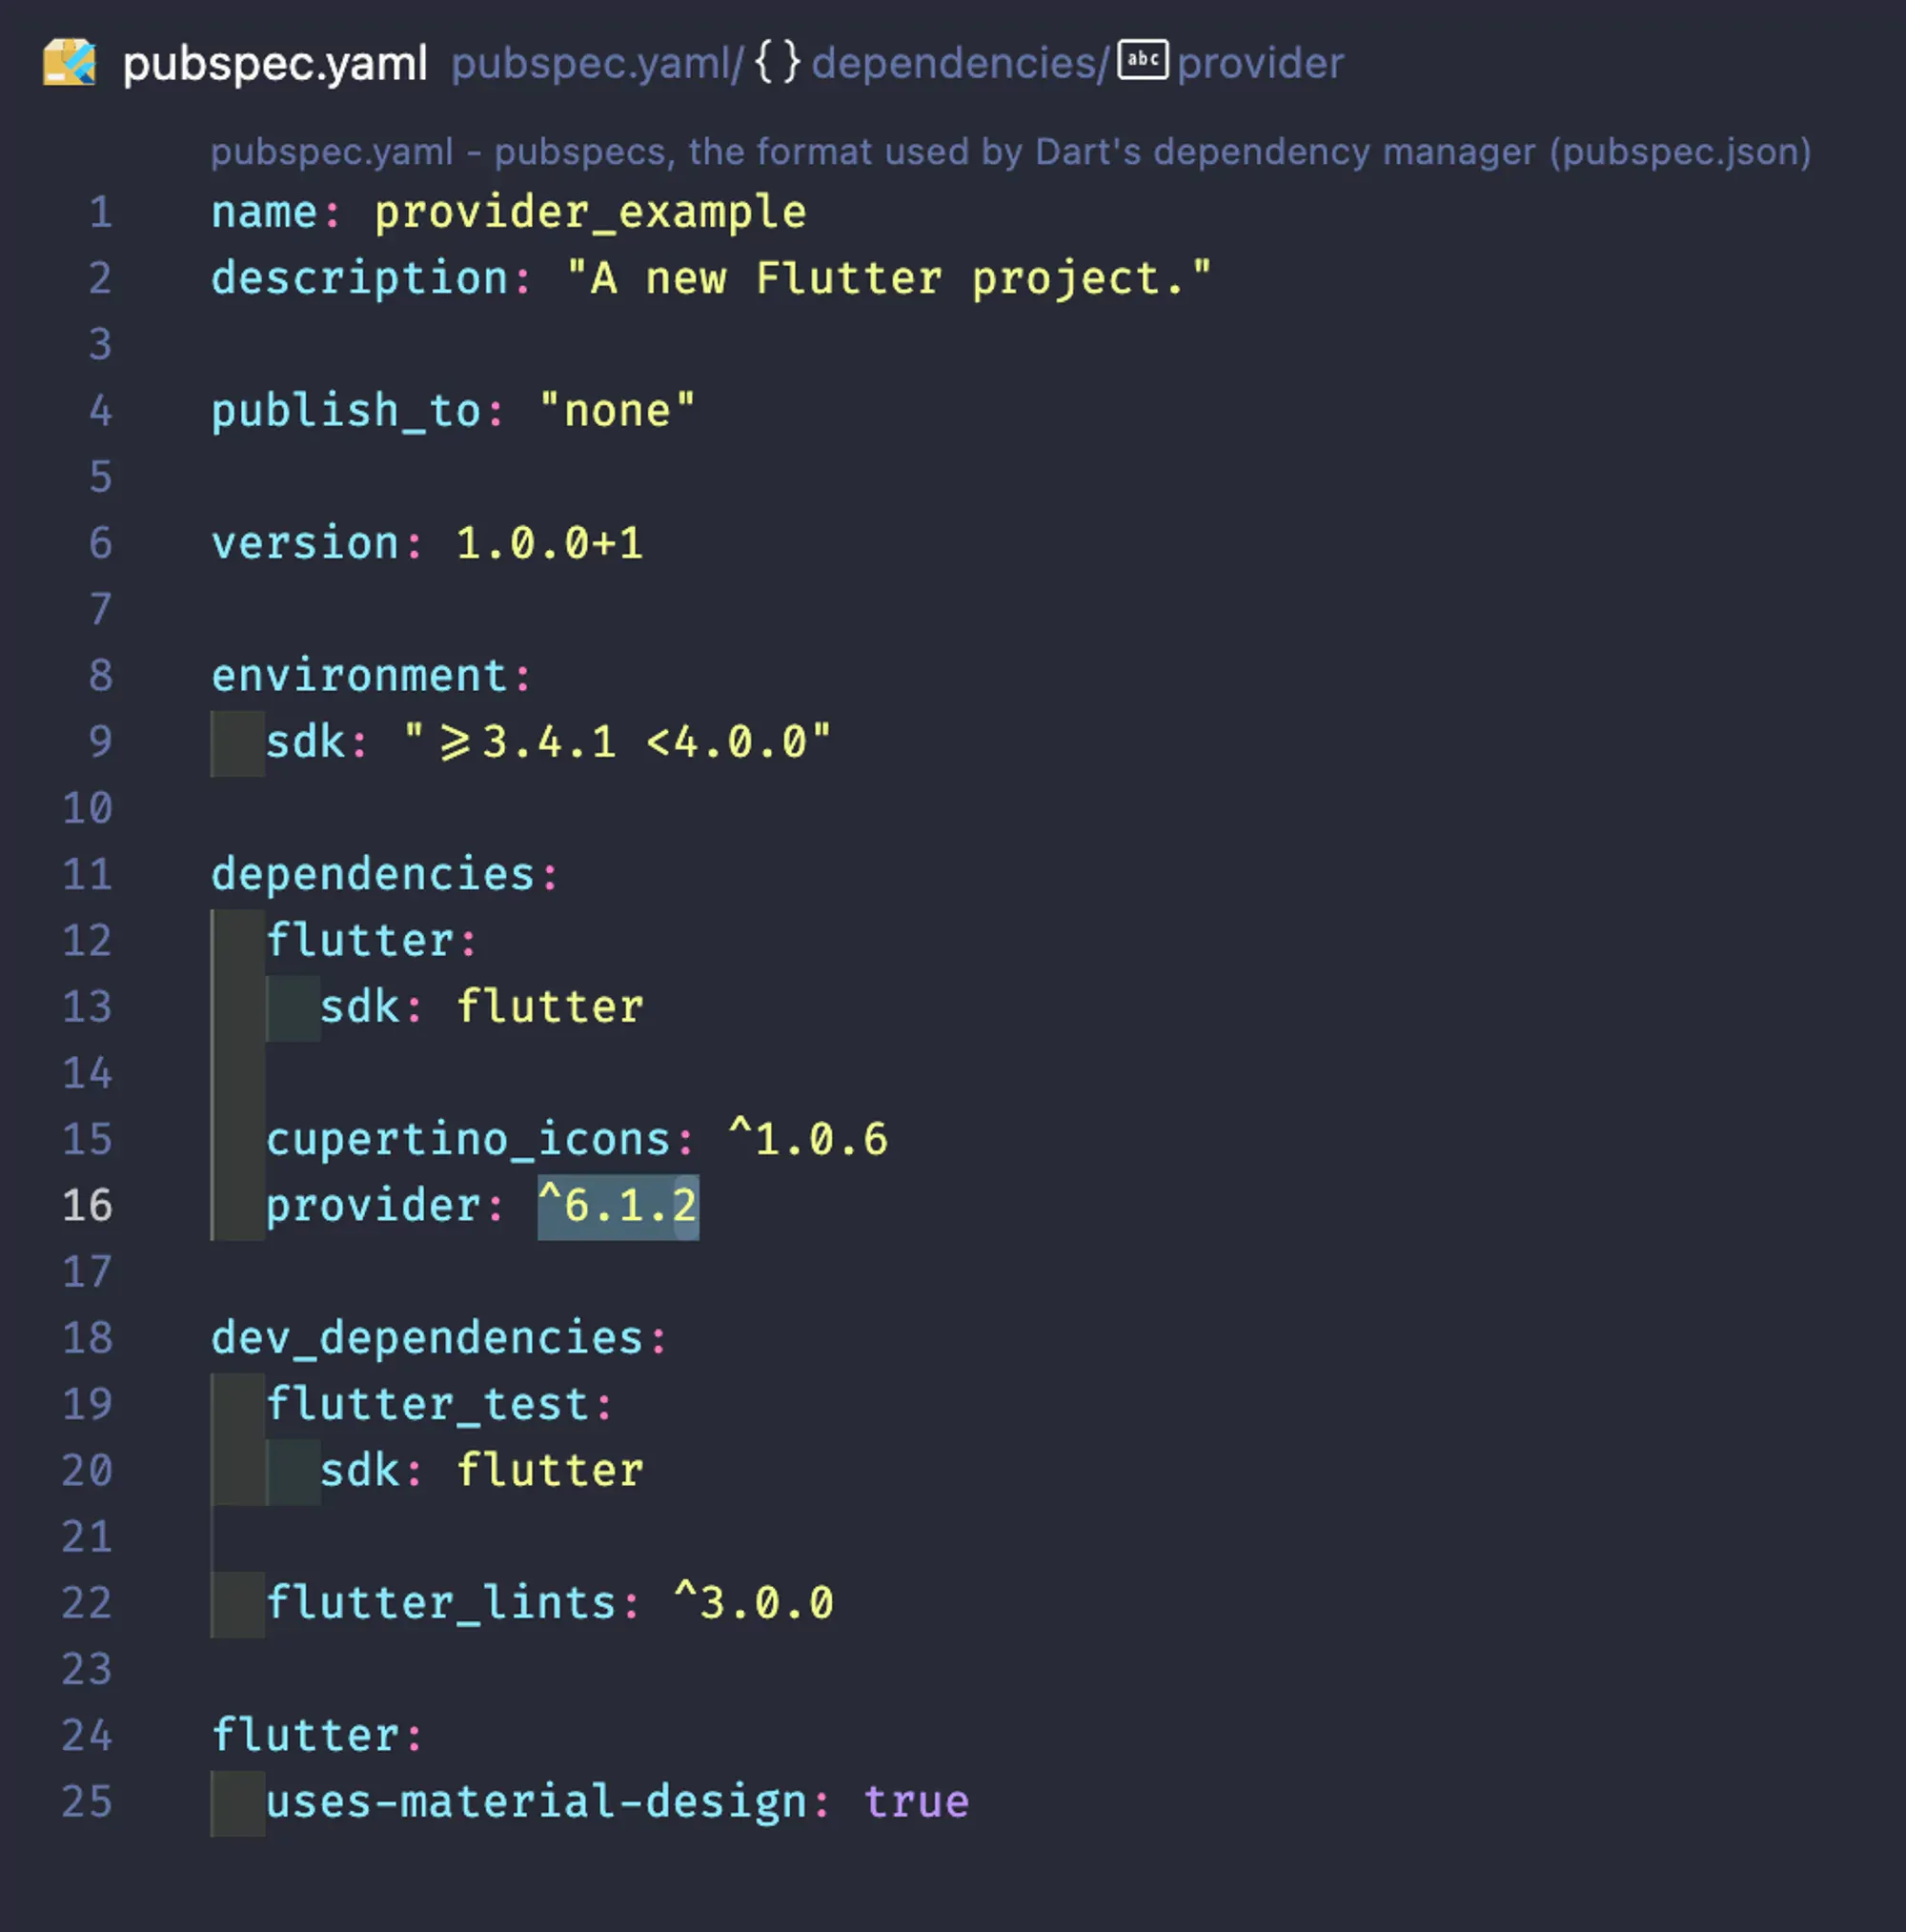
A little note, if you add the dependency typing into the pubspec.yaml file, remember to run flutter pub get.
Step 3: Create A Model Called ThemeModel
ThemeModel (and put it in the theme_model.dart file), which will hold the theme of our app.
import 'package:flutter/material.dart';

class ThemeModel with ChangeNotifier {
  bool _isDark = false;

  bool get isDark => _isDark;

  ThemeData get currentTheme => _isDark ? ThemeData.dark() : ThemeData.light();

  void toggleTheme() {
    _isDark = !_isDark;
    notifyListeners();
  }
}
In this model, we will extend it with ChangeNotifier (just like in the example with ChangeNotifier above). We will have:
- A private (by leaving underscore (’_’) before a variable name) variable
_isDarkset by default to false. - A getter
isDarkto retrieve the value of_isDark(since it’s private). - A getter
currentTheme, which will check on the current value of_isDarkand return the default Material 3 dark and lightThemeData. - A function to change the theme. In this function will we flip the current value of
_isDarkand call*notifyListeners()*to signal the listening widget to rebuild.
Step 4: Create theme_switcher_screen.dart File
We should create file theme_switcher_screen.dart to implement a screen where we can toggle the application theme:
import 'package:flutter/material.dart';
import 'package:provider/provider.dart';
import 'theme_model.dart';

class ThemeSwitcherScreen extends StatelessWidget {
  const ThemeSwitcherScreen({super.key});

  @override
  Widget build(BuildContext context) {
    return Scaffold(
      appBar: AppBar(
        title: const Text('Theme Switcher'),
      ),
      body: Center(
        child: Consumer<ThemeModel>(
          builder: (
            context,
            themeModel,
            child,
          ) {
            return SwitchListTile(
              title: const Text(
                'Dark Theme',
              ),
              value: themeModel.isDark,
              onChanged: (value) {
                themeModel.toggleTheme();
              },
            );
          },
        ),
      ),
    );
  }
}
Here, we will use Consumer<ThemeModel> which means the Consumer listens for changes in ThemeModel and rebuild the widget inside its builder properties. The SwitchListTile widget will provide us with a switch and a label. On toggle, the switch will call the *toggleTheme()* method of the ThemeModel to update the status of _isDark.
Moreover, without Provider, usually to update the SwitchListTile widget, we will have to use *setState()* to trigger the UI update but now we won’t have to use it anymore.
Step 5: Update the main.dart File
Finally, we update the main.dart file as following:
import 'package:flutter/material.dart';
import 'package:provider/provider.dart';
import 'theme_model.dart';
import 'theme_switcher_screen.dart';

void main() {
  runApp(
    ChangeNotifierProvider(
      create: (context) => ThemeModel(),
      child: const MyApp(),
    ),
  );
}

class MyApp extends StatelessWidget {
  const MyApp({super.key});

  @override
  Widget build(BuildContext context) {
    return Consumer<ThemeModel>(
      builder: (
        context,
        themeModel,
        child,
      ) {
        return MaterialApp(
          theme: themeModel.currentTheme,
          home: const ThemeSwitcherScreen(),
        );
      },
    );
  }
}
Here, we will wrap the MaterialApp with Consumer<ThemeModel> to serve two purpose:
- Acquire the instance of
ThemeModel(themeModel) to access thecurrentThemeproperties and assign it toMaterialApptheme properties. - Listen to the change of themeModel to rebuild the
MaterialAppand update the theme of our app.
Our lib folder after creating three files will look like this:
After launching the code, our app should look and function like below:
We can see that the button changes the theme of the whole app. In the underlying layer, when we press the switch button, we called the *changeTheme()* function which updates the value _isDark of ThemeModel and then notify all of the listeners (in this case the MaterialApp and the SwitchListTile widget). After receiving the “notification” of the change in ThemeModel, the widget rebuilds and applies the dark theme just like we wanted.
Beside using Consumer, we can access the data in different way using *Provider.of* method. The usage of this is similar to our example above for the InheritedWidget. Here is the example of how our code will look like using the *Provider.of* method:
Changing the theme_switcher_screen.dart as following:
import 'package:flutter/material.dart';
import 'package:provider/provider.dart';
import 'theme_model.dart';

class ThemeSwitcherScreen extends StatelessWidget {
  const ThemeSwitcherScreen({super.key});

  @override
  Widget build(BuildContext context) {
    final themeModel = Provider.of<ThemeModel>(context);

    return Scaffold(
      appBar: AppBar(
        title: const Text('Theme Switcher'),
      ),
      body: Center(
        child: SwitchListTile(
          title: const Text('Dark Theme'),
          value: themeModel.isDark,
          onChanged: (value) {
            themeModel.toggleTheme();
          },
        ),
      ),
    );
  }
}
As we can see the code doesn’t change much except that now we don’t use Consumer anymore. The ThemeModel is now accessed through Provider.of<ThemeModel>(context). This method of retrieving data works just like InheritedWidget: every time the ThemeModel changes, the method will move backward to the nearest build() method and trigger build to update the according UI.
Advanced Techniques of Provider in Flutter
MultiProvider
MultiProvider simplifies the process of providing multiple providers at once. It allows you to group several providers together and provide them to the widget tree in a more organised and readable manner.
Imagine the previous example, we have two models that need to implement with ChangeNotifier, then we will have two ChangeNotifierProvider nested together. As our app grow larger and larger, it will became a hassle to manage and maintain, and that’s when MultiProvider comes to the rescue.
Using MultiProvider in Flutter offers significant advantages by streamlining state management and enhancing code organisation. It allows developers to group several providers together, making the code more readable and maintainable. This approach avoids the clutter of nested providers, thus improving the overall structure and readability of the application.
Additionally, MultiProvider simplifies the setup process in the main.dart file and makes the codebase more scalable, allowing for easy addition or removal of providers as the application evolves. These benefits collectively facilitate more efficient state management and contribute to a cleaner and more maintainable codebase.
All of this would be easier to understand in code manner. Re-using the previous example, with the following modification, we will have a grasp at how MultiProvider works.
We will now need a new model for Provider to handle, hence come the SettingsModel (create a new setting_model.dart file):
import 'package:flutter/foundation.dart';

class SettingsModel with ChangeNotifier {
  bool _notificationsEnabled = false;

  bool get notificationsEnabled => _notificationsEnabled;

  void toggleNotifications() {
    _notificationsEnabled = !_notificationsEnabled;
    notifyListeners();
  }
}
After adding the file, the folder tree will now look like this:

Similar to the ThemeModel, this model will have a private variable, a getter for that variable and a method to toggle the state of that variable.
Next, we will update our ThemeSwitcherScreen as follow:
import 'package:flutter/material.dart';
import 'package:provider/provider.dart';
import 'theme_model.dart';
import 'settings_model.dart';

class ThemeSwitcherScreen extends StatelessWidget {
  const ThemeSwitcherScreen({super.key});

  @override
  Widget build(BuildContext context) {
    return Scaffold(
      appBar: AppBar(
        title: const Text('Theme Switcher'),
        actions: [
          Consumer<SettingsModel>(
            builder: (
              context,
              settingsModel,
              child,
            ) {
              return Icon(
                settingsModel.notificationsEnabled
		              ? Icons.notifications
	                : Icons.notifications_off_rounded,
              );
            },
          ),
        ],
      ),
      body: Center(
        child: Column(
          mainAxisAlignment: MainAxisAlignment.center,
          children: <Widget>[
            Consumer<ThemeModel>(
              builder: (
                context,
                themeModel,
                child,
              ) {
                return SwitchListTile(
                  title: const Text('Dark Theme'),
                  value: themeModel.isDark,
                  onChanged: (value) {
                    themeModel.toggleTheme();
                  },
                );
              },
            ),
            Consumer<SettingsModel>(
              builder: (
                context,
                settingsModel,
                child,
              ) {
                return SwitchListTile(
                  title: const Text('Enable Notifications'),
                  value: settingsModel.notificationsEnabled,
                  onChanged: (value) {
                    settingsModel.toggleNotifications();
                  },
                );
              },
            ),
          ],
        ),
      ),
    );
  }
}
Here, we will add another SwitchListTile that is wrapped by the Consumer<SettingsModel> and the switch will call the method *toggleNotifications()*. We also have a new notification icon on the application bar to indicate whether the notification is currently on or off.
Finally, we will be using the MultiProvider in the main.dart file:
import 'package:flutter/material.dart';
import 'package:provider/provider.dart';
import 'theme_model.dart';
import 'settings_model.dart';
import 'theme_switcher_screen.dart';

void main() {
  runApp(
    MultiProvider(
      providers: [
        ChangeNotifierProvider(
          create: (context) => ThemeModel(),
        ),
        ChangeNotifierProvider(
          create: (context) => SettingsModel(),
        ),
      ],
      child: const MyApp(),
    ),
  );
}

class MyApp extends StatelessWidget {
  const MyApp({super.key});

  @override
  Widget build(BuildContext context) {
    return Consumer<ThemeModel>(
      builder: (
        context,
        themeModel,
        child,
      ) {
        return MaterialApp(
          theme: themeModel.currentTheme,
          home: const ThemeSwitcherScreen(),
        );
      },
    );
  }
}
In the *runApp()* method, we will now have MultiProvider with properties providers inside which we will now pass into the two models that needed to be listened to: ThemeModel and SettingModel.
Now let’s run the app and see MultiProvider in action, the result should be something like this:
We can verify if each button triggers the rebuild of only its dependent widget using print() or log() statements within their build methods. This helps identify unexpected rebuilds and optimize UI updates.
Selector
Selector is another way to retrieve data like Consumer, but using Selector in Flutter can be more efficient than Consumer when you need to rebuild only specific parts of the widget tree based on particular properties of your model. The Selector widget listens for changes in the specified properties and only rebuilds when those properties change, avoiding unnecessary rebuilds.
For better understanding of this, let’s again update our example code. Now we will update the SettingsModel to have two different properties: notificationsEnabled and autoSyncEnabled. We will use Selector to listen to changes in these properties separately.
import 'package:flutter/foundation.dart';

class SettingsModel with ChangeNotifier {
  bool _notificationsEnabled = false;
  bool _autoSyncEnabled = false;

  bool get notificationsEnabled => _notificationsEnabled;
  bool get autoSyncEnabled => _autoSyncEnabled;

  void toggleNotifications() {
    _notificationsEnabled = !_notificationsEnabled;
    notifyListeners();
  }

  void toggleAutoSync() {
    _autoSyncEnabled = !_autoSyncEnabled;
    notifyListeners();
  }
}
We will now have two properties _autoSyncEnabled and _notificationsEnabled to listen to.
We will also update the ThemeSwitcherScreen to show the state of _autoSyncEnabled property.
import 'package:flutter/material.dart';
import 'package:provider/provider.dart';
import 'theme_model.dart';
import 'settings_model.dart';

class ThemeSwitcherScreen extends StatelessWidget {
  const ThemeSwitcherScreen({super.key});

  @override
  Widget build(BuildContext context) {
    return Scaffold(
      appBar: AppBar(
        title: const Text('Theme Switcher'),
        actions: [
          Selector<SettingsModel, bool>(
            selector: (
              context,
              settingsModel,
            ) =>
                settingsModel.notificationsEnabled,
            builder: (
              context,
              notificationsEnabled,
              child,
            ) {
              return Icon(
                notificationsEnabled
                  ? Icons.notifications
                  : Icons.notifications_off_rounded,
              );
            },
          ),
          Selector<SettingsModel, bool>(
            selector: (
              context,
              settingsModel,
            ) =>
                settingsModel.autoSyncEnabled,
            builder: (
              context,
              autoSyncEnabled,
              child,
            ) {
              return Icon(
                autoSyncEnabled
                  ? Icons.sync
                  : Icons.sync_disabled,
              );
            },
          ),
        ],
      ),
      body: Center(
        child: Column(
          mainAxisAlignment: MainAxisAlignment.center,
          children: <Widget>[
            Consumer<ThemeModel>(
              builder: (
                context,
                themeModel,
                child,
              ) {
                return SwitchListTile(
                  title: const Text('Dark Theme'),
                  value: themeModel.isDark,
                  onChanged: (value) {
                    themeModel.toggleTheme();
                  },
                );
              },
            ),
            Selector<SettingsModel, bool>(
              selector: (
                context,
                settingsModel,
              ) =>
                  settingsModel.notificationsEnabled,
              builder: (
                context,
                notificationsEnabled,
                child,
              ) {
                return SwitchListTile(
                  title: const Text('Enable Notifications'),
                  value: notificationsEnabled,
                  onChanged: (value) {
                    Provider.of<SettingsModel>(
                      context,
                      listen: false,
                    ).toggleNotifications();
                  },
                );
              },
            ),
            Selector<SettingsModel, bool>(
              selector: (
                context,
                settingsModel,
              ) =>
                  settingsModel.autoSyncEnabled,
              builder: (
                context,
                autoSyncEnabled,
                child,
              ) {
                return SwitchListTile(
                  title: const Text('Enable Auto-Sync'),
                  value: autoSyncEnabled,
                  onChanged: (value) {
                    Provider.of<SettingsModel>(
                      context,
                      listen: false,
                    ).toggleAutoSync();
                  },
                );
              },
            ),
          ],
        ),
      ),
    );
  }
}
There are some new things we need to take focus into:
- The previously
Consumerwidget are now changed toSelector. In theSelector, theselectorproperty are assigned withsettingsModel.autoSyncEnabledorsettingsModel.notificationsEnabledcorrespondingly to listen to the change of each property. - The
selectoronly callbacks the property that we “selected”. So, to call the toggle function for theThemeModelproperties, we need to useProvider.of<SettingModel>to be able to access the method.
Now let’s see the result after we applied Selector:
Best Practices for Using Provider in Flutter
When working with the provider package in Flutter, adhering to best practices ensures a robust, maintainable, and efficient application.
Organised Provider
First, organising providers is key to maintaining a clean codebase. Use MultiProvider in your root widget to group and manage multiple providers, making dependencies clear and easily accessible throughout the app. This organisation is especially important as the application scales, keeping related providers together and reducing complexity.
Favor Stateless Widgets
Favouring stateless widgets helps keep the UI code simple and focused solely on rendering, while the state management logic is delegated to providers. This separation makes it easier to test and debug your UI components, as they are not burdened with state management responsibilities. It also aligns with Flutter’s reactive nature, ensuring that the UI is rebuilt in response to state changes managed by providers.
Use Selectors for Performance
To further enhance performance, use Selector to listen to specific properties of your model. Selector ensures that only the necessary parts of the widget tree are rebuilt when those properties change, minimising unnecessary rebuilds and improving the overall efficiency of the app. This selective rebuilding is crucial for maintaining a responsive and performant user interface, especially in complex applications.
Test with Providers
Testing with providers involves injecting providers into your test setup to ensure your state management logic works correctly. Using ChangeNotifierProvider or Provider in your tests allows you to provide the necessary state, while mocking providers helps isolate tests and focus on specific functionalities. This practice ensures that your app remains reliable and that state changes behave as expected under various conditions.
Alternatives for Complex Apps
Finally, for very complex applications, consider alternatives to provider such as Riverpod, Bloc, or Redux. These alternatives offer more structured and scalable ways to manage state.
Riverpodprovides enhanced features and flexibility.Blocoffers a clear separation of business logic.Reduxensures predictable state management.
Evaluating the complexity and scalability needs of your application will help you choose the most appropriate state management solution, ensuring long-term maintainability and scalability.
Conclusion
In conclusion, Provider offers a powerful and approachable solution for state management in Flutter applications. Its core concepts, built around ChangeNotifiers and InheritedWidgets, enable centralized state management with efficient updates.
By leveraging techniques like MultiProvider for organization, Selectors for performance optimization, and best practices like favoring stateless widgets, you can build maintainable and scalable Flutter apps.
While Provider excels in many scenarios, for highly complex applications, consider exploring alternatives like Riverpod or Bloc that offer more intricate data flow patterns. Hope this blog will help you on your Flutter development journey!
>>> Follow and Contact Relia Software for more information!

- coding
- Web application Development
- Mobile App Development