
Navigation is a crucial aspect of app design as it directly impacts how users interact with the app and access its features. In the context of mobile development, Flutter provides a robust mechanism for managing navigation through a concept known as routing. Routing in Flutter is the process of defining and handling different routes (or pages) within the app. Effective routing enhances the user experience and simplifies the development process.
In this blog, we'll delve into the world of navigation in Flutter, from basics to advanced concepts with code examples.
>> Read more:
- 18 Flutter Project Ideas For Newbie & Experts
- 3 Popular Methods to Implement Dependency Injection in Flutter
- Step-by-Step Tutorial to Master Flutter TextField Validation
What is Navigation in Flutter?
Navigation is the act of moving between screens of an app to complete tasks (according to Material Design - Google’s design language). It’s enabled through several means: dedicated navigation components, embedding navigation behaviour into content, and platform affordances.
Smooth and intuitive navigation ensures that users can find what they need quickly and efficiently, leading to a positive experience. Conversely, poor navigation can result in frustration and may cause users to abandon the app altogether.
3 Types of Navigation
Base on the behaviour of a mobile application, there can be three types of navigation:
Lateral Navigation
Lateral navigation refers to movement between screens at the same level of hierarchy. It enables access to different app destinations and features, or pivoting between related items in a set.
The main navigation component of an app should offer access to all top-level destinations. For apps with multiple top-level destinations, lateral navigation can be facilitated using a navigation drawer, bottom navigation bar, or tabs.
|
Tab Navigation |
Bottom Navigation |
Forward Navigation
Whereas lateral navigation utilises specific navigation components, forward navigation is typically integrated into a screen's content using various components.
The easiest example to understand this would be from a page containing a list of items, you will navigate forward (as going deeper into the hierarchy) to the item detail page.
Reverse Navigation
Reverse navigation refers to backward movement between screens. It can move users chronologically through their recent screen history, or upwards through an app's hierarchy.
Reverse chronological navigation involves moving backward through a user's recently viewed screens in the order they were accessed. This navigation can take users between screens within a single app or across multiple apps. An example of this is the Back button on a web browser.
This navigation method is generally provided by the operating system or platform, which determines its behaviour and how users can access it.
Key Concepts of Navigation in Flutter
The Flutter framework provides developers a way to navigate around the app with two main navigating classes that can be understood exactly to their names: Route and Navigator. Route acts as the screen and Navigator acts as the operator to manage Route.
Route
In Flutter, a Route is an abstraction for a screen or page that can be navigated to. It represents the transition from one screen to another and is managed by the Navigator widget, which maintains a stack of routes. Understanding how routes work and how to use them effectively is crucial for creating smooth and intuitive navigation experiences in Flutter applications.
As an abstraction class, Route is extended to provide the base properties and method for navigating. This action creates many different Route types that enable multiple transition style and can automatically adapt to different platforms (Android or iOS).
Here is some common Route implemented class in Flutter:
- MaterialPageRoute
MaterialPageRoute includes built-in transitions that comply with Material Design guidelines, such as a fade transition combined with a scale transition, providing a seamless and smooth user experience. The transitions are subtle and polished, enhancing the overall aesthetics of the application without the need for custom animations.
MaterialPageRoute is particularly suitable for Android applications, which are expected to follow these guidelines. It ensures that the navigation experience feels native to Android users, aligning with their expectations of app behaviour on the platform.
>> Read more: Top 5 Best Languages For Android App Development
Example:
Navigator.push(
  context,
  MaterialPageRoute(
	  builder: (context) => MyNewScreen(),
  ),
);- CupertinoPageRoute
CupertinoPageRoute is specifically intended for apps that adhere to Cupertino design guidelines, which are Apple’s design language for creating elegant, clean, and intuitive user interfaces. It ensures that the app’s navigation behaviour is consistent with other iOS applications, providing a familiar user experience for iOS users.
CupertinoPageRoute implements transitions that mimic the default transitions in iOS, such as the sliding motion from right to left when navigating to a new page and from left to right when popping a page. The transitions are smooth and follow the physics and aesthetic typical of iOS, enhancing the feeling of a native iOS application.
Example:
Navigator.push(
  context,
  CupertinoPageRoute(
	  builder: (context) => MyNewScreen(),
  ),
);
>> Read more: Top 6 Best iOS App Development Languages For Programmers
- PageRouteBuilder
PageRouteBuilder is a powerful and flexible class in Flutter that allows developers to create custom route transitions. Unlike MaterialPageRoute and CupertinoPageRoute, which provide predefined transitions based on Material Design and Cupertino (iOS) design respectively, PageRouteBuilder gives you full control over the transition animations used when navigating between pages.
PageRouteBuilder accepts pageBuilder and transitionsBuilder parameters, giving you the flexibility to define exactly how the new page should appear and disappear. The pageBuilder is used to create the widget for the new route, while the transitionsBuilder is used to define the animation between the current and new route. You can utilise various types of animations such as fading, scaling, sliding, or a combination of these to create complex and visually appealing transitions.
Example:
Navigator.push(
  context,
  PageRouteBuilder(
    pageBuilder: (
      context,
      animation,
      secondaryAnimation,
    ) =>
        const DetailsScreen(),
    transitionDuration: const Duration(seconds: 1),
    transitionsBuilder: (
      context,
      animation,
      secondaryAnimation,
      child,
    ) {
      return FadeTransition(
        opacity: animation,
        child: child,
      );
    },
  ),
);
In this example, we created a new transition to DetailScreen() using a transition builder to create a custom FadeTransition(). We have a beautiful and smooth (and a little slow for better clarity) result as follow:
Navigator
The Navigator widget in Flutter is essential for managing the navigation stack and facilitating transitions between screens (routes). It operates similarly to a stack of plates, where each plate represents a screen. You can push a new screen onto the stack or pop the current screen off the stack to return to the previous one.
Here is some core concepts of Navigator:
- Navigation Stack
The Navigator’s stack-based approach to managing routes provides a robust and flexible system for handling screen transitions in Flutter applications. By maintaining a stack of Route objects, the Navigator ensures that the current screen is always at the top of the stack, simplifying the process of navigating between screens and managing back navigation.
Understanding how to effectively use the Navigator’s stack operations is essential for creating smooth and intuitive user experiences in Flutter apps. Look through the diagram below for further visualization:
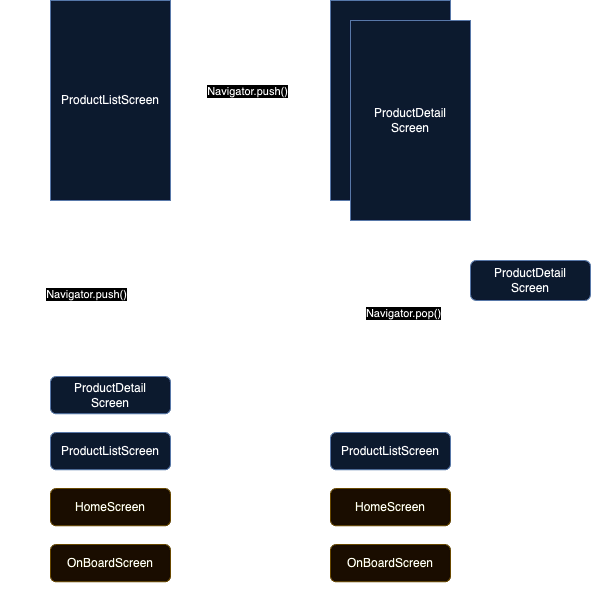
- Push Routes
Push the given route onto the navigator that most tightly encloses the given context. The most common one is Navigator.push().
The new route and the previous route (if any) are notified . If the Navigator has any Navigator.observers, they will be notified as well. Ongoing gestures within the current route are canceled when a new route is pushed.
There are multiple other ways to push a screen: pushNamed, pushReplacement, restorablePush,… with many different purposes of usage. All of these will be explain in the later section of this blog.
Typical usage of Navigator.push():
Navigator.push(
  context,
  MaterialPageRoute(builder:
		(context) => NewScreen(),
	),
);
Or with Navigator.pushNamed():
Navigator.pushNamed(
	context,
	'/newScreen',
);
Navigator.pushNamed() is used for named route navigation in Flutter. This method allows you to navigate to a new screen by referring to the route’s name rather than its constructor. Named routes are typically defined in the MaterialApp or CupertinoApp widget through routes property.
With pushReplacement():
Navigator.pushReplacement(
  context,
  MaterialPageRoute(
	  builder: (context) => AnotherScreen(),
	),
);
Navigator.pushReplacement() is used to replace the current route with a new route. This means that the new route will replace the current route in the navigation stack, and the user won’t be able to navigate back to the original route.
- Pop Routes
Pop the top-most route off the navigator that most tightly encloses the given context.
The current route's Route.didPop method is called first. If that method returns false, then the route remains in the Navigator's history (the route is expected to have popped some internal state). Otherwise, if non-null, result will be used as the result of the route that is popped; the future that had been returned from pushing the popped route will complete with result.
Routes such as dialogs or popup menus typically use this mechanism to return the value selected by the user to the widget that created their route. The type of result, if provided, must match the type argument of the class of the popped route.
There are multiple other ways to pop a screen such as: popUntil, popAndPushNamed… with different purposes of usage. All of these will be explained in the later section of this blog.
Most common method for pop a route is Navigator.pop()
Example:
Navigator.pop(context);Or with Navigator.popUntil():
Navigator.popUntil(
	context,
	ModalRoute.withName('/home'),
);
This method pops routes off the navigation stack until a specified condition is met. This method is useful for navigating back to a specific screen without knowing exactly how many screens have been pushed onto the stack since that screen was last visited.
The code in popUntil() example means that Navigator will pop all the route in stack until it finds a route named “/home” (ModalRoute.withName(’/home’) is a predicate that checks a route name.).
A Practical Example: Implementing Navigation in Flutter
To understand how Navigator and Route work better, nothing beats an example code along each section. In this section, we’ll try to go through as many aspect of Flutter Navigation as possible.
Basic Routing
For the basics, we’ll create a simple app with two screens: HomeScreen() and DetailsScreen(). We’ll demonstrate how to navigate between these screens.
class HomeScreen extends StatelessWidget {
  const HomeScreen({super.key});

  @override
  Widget build(BuildContext context) {
    return Scaffold(
      appBar: AppBar(
        title: const Text('Home Screen'),
      ),
      body: Center(
        child: ElevatedButton(
          onPressed: () {
            Navigator.push(
              context,
              MaterialPageRoute(
                builder: (context) => const DetailsScreen(),
              ),
            );
          },
          child: const Text('Go to Details Screen'),
        ),
      ),
    );
  }
}
First, let’s create a HomeScreen() where we will have a button to navigate to DetailsScreen(). We will try with the basic Navigator.push() method to navigate to DetailsScreen().
To have a DetailScreen() to navigate to, let’s implement it:
class DetailsScreen extends StatelessWidget {
  const DetailsScreen({super.key});

  @override
  Widget build(BuildContext context) {
    return Scaffold(
      appBar: AppBar(
        title: const Text('Details Screen'),
      ),
      body: Center(
        child: ElevatedButton(
          onPressed: () {
            Navigator.pop(context);
          },
          child: const Text('Go back to Home Screen'),
        ),
      ),
    );
  }
}
This will be a simple screen with a “Details Screen” title and a back button on the app bar and in the middle of the screen.
Now let’s put it to our main function and MaterialApp:
import 'package:flutter/material.dart';

void main() {
  runApp(
    const MyApp(),
  );
}

class MyApp extends StatelessWidget {
  const MyApp({super.key});

  @override
  Widget build(BuildContext context) {
    return const MaterialApp(
      home: HomeScreen(),
    );
  }
}
Let’s see how it looks like on our simulator:
Here’s something for us to take a look at:
Navigating with push with a default MaterialPageRoute will create a transition effect (slide new screen from right to left) which will also be the effect when we pop (the screen will go backward from left to right).
By default, when pushed to a MaterialPageRoute, the AppBar widget will have an adaptive icon (left arrow for Android and chevron for iOS) which is assigned with a Navigator.pop() method.
Let’s change our app to name route approach with a few more screens to navigate.
Navigate with Named Routes
Let’s add some more screens to our app and update the old screen.
We will update our DetailsScreen():
class DetailsScreen extends StatelessWidget {
  const DetailsScreen({super.key});

  @override
  Widget build(BuildContext context) {
    return Scaffold(
      appBar: AppBar(
        title: const Text('Details Screen'),
      ),
      body: Center(
        child: Column(
          mainAxisAlignment: MainAxisAlignment.center,
          children: [
            ElevatedButton(
              onPressed: () {
                Navigator.pop(context);
              },
              child: const Text('Go back'),
            ),
            ElevatedButton(
              onPressed: () {
                Navigator.pushReplacementNamed(
                  context,
                  '/',
                );
              },
              child: const Text('Replace with Home Screen'),
            ),
          ],
        ),
      ),
    );
  }
}
In DetailsScreen() we will now have two buttons: back button using Navigator.pop() and Replace with Home Screen button using Navigator.pushReplacementNamed() which will push the ‘/’ route as HomeScreen().
We will add two more screens: ProfileScreen() and SettingScreen():
class ProfileScreen extends StatelessWidget {
  const ProfileScreen({super.key});

  @override
  Widget build(BuildContext context) {
    return Scaffold(
      appBar: AppBar(
        title: const Text('Profile Screen'),
      ),
      body: Center(
        child: Column(
          mainAxisAlignment: MainAxisAlignment.center,
          children: [
            ElevatedButton(
              onPressed: () {
                Navigator.popUntil(
                  context,
                  ModalRoute.withName('/'),
                );
              },
              child: const Text('Go back to Home Screen using popUntil'),
            ),
            ElevatedButton(
              onPressed: () {
                Navigator.pushReplacementNamed(
                  context,
                  '/settings',
                );
              },
              child: const Text('Replace with Settings Screen'),
            ),
          ],
        ),
      ),
    );
  }
}class SettingsScreen extends StatelessWidget {
const SettingsScreen({super.key});
@override
Widget build(BuildContext context) {
return Scaffold(
appBar: AppBar(
title: const Text('Settings Screen'),
),
body: Center(
child: Column(
mainAxisAlignment: MainAxisAlignment.center,
children: [
ElevatedButton(
onPressed: () {
Navigator.pop(context);
},
child: const Text('Go back'),
),
ElevatedButton(
onPressed: () {
Navigator.pushNamed(
context,
'/details',
);
},
child: const Text('Go to Details Screen'),
),
],
),
),
);
}
}In ProfileScreen() will contains a button to use Navigator.popUntil() to return to the HomeScreen() and also demonstrates Navigator.pushReplacementNamed() to replace the current screen with SettingsScreen().
In SettingScreen() contains a button to pop the current route off the stack, returning to the previous screen and demonstrates Navigator.pushNamed() to navigate to DetailsScreen().
We will now update our HomeScreen() and MaterialApp as follow:
class HomeScreen extends StatelessWidget {
  const HomeScreen({super.key});

  @override
  Widget build(BuildContext context) {
    return Scaffold(
      appBar: AppBar(
        title: const Text('Home Screen'),
      ),
      body: Center(
        child: Column(
          mainAxisAlignment: MainAxisAlignment.center,
          children: [
            ElevatedButton(
              onPressed: () {
                Navigator.pushNamed(
                  context,
                  '/details',
                );
              },
              child: const Text('Go to Details Screen'),
            ),
            ElevatedButton(
              onPressed: () {
                Navigator.pushNamed(
                  context,
                  '/profile',
                );
              },
              child: const Text('Go to Profile Screen'),
            ),
            ElevatedButton(
              onPressed: () {
                Navigator.pushNamed(
                  context,
                  '/settings',
                );
              },
              child: const Text('Go to Settings Screen'),
            ),
          ],
        ),
      ),
    );
  }
}
Here, we will just basically use Navigator.pushName() for all three new screens we have. And finally we will update our MaterialApp:
class MyApp extends StatelessWidget {
  const MyApp({super.key});

  @override
  Widget build(BuildContext context) {
    return MaterialApp(
      initialRoute: '/',
      routes: {
        '/': (context) => const HomeScreen(),
        '/details': (context) => const DetailsScreen(),
        '/profile': (context) => const ProfileScreen(),
        '/settings': (context) => const SettingsScreen(),
      },
    );
  }
}
Different from the unnamed route approach, we will need to clarify the routes property in MaterialApp. Accordingly, Flutter can tell which screen we are referring to when we push its name in HomeScreen().
Let’s see how it works:
Send and Return Data To/From A Screen
Question arises! We have a list of items in one screen and want to see the detail of that item in a detail screen. When we change or modify that item, the change will show on the list as we move back. How can we do this?
The solution is to pass some metadata of the item from the list screen to the detail screen and back. This involves sending data from one screen to another. Flutter Navigator helps with this by allowing you to send data as an argument to a different route.
Let’s start with our ItemListScreen():
class ItemListScreen extends StatefulWidget {
  const ItemListScreen({super.key});

  @override
  State<ItemListScreen> createState() => _ItemListScreenState();
}

class _ItemListScreenState extends State<ItemListScreen> {
  List<String> items = ['Item 1', 'Item 2', 'Item 3'];
  String selectedItem = '';

  @override
  Widget build(BuildContext context) {
    return Scaffold(
      appBar: AppBar(
        title: const Text('Item List'),
      ),
      body: ListView.builder(
        itemCount: items.length,
        itemBuilder: (context, index) {
          return ListTile(
            title: Text(items[index]),
            onTap: () async {
              // Navigate to the detail screen and wait for the result
              final result = await Navigator.pushNamed(
                context,
                '/details',
                arguments: items[index],
              );

              // If a result was returned, update the selectedItem
              if (result != null) {
                setState(() {
                  selectedItem = result as String;
                });
              }
            },
          );
        },
      ),
      bottomNavigationBar: Visibility(
        visible: selectedItem.isNotEmpty,
        child: Padding(
          padding: const EdgeInsets.all(32.0),
          child: Text(
            'Selected Item: $selectedItem',
            style: const TextStyle(fontSize: 18),
          ),
        ),
      ),
    );
  }
}
Every “push” related method in Navigator there is a parameter to pass the arguments into. Flutter Navigator will then bring those arguments to the Route (screen) that require the argument. Moreover, to catch the data sent back from the ItemDetailScreen(), push method also returns an Object and we can parse that Object to the desired data.
Let see how we handle the data send from ItemListScreen() and how to send data back to it from ItemDetailScreen().
class ItemDetailScreen extends StatelessWidget {
  const ItemDetailScreen({super.key});

  @override
  Widget build(BuildContext context) {
    // Receive the item data from the previous screen
    final String item = ModalRoute.of(context)?.settings.arguments as String;

    return Scaffold(
      appBar: AppBar(
        title: const Text('Item Detail'),
      ),
      body: Center(
        child: Column(
          mainAxisAlignment: MainAxisAlignment.center,
          children: [
            Text(
              'Details for $item',
              style: const TextStyle(fontSize: 24),
            ),
            const SizedBox(height: 20),
            ElevatedButton(
              onPressed: () {
                // Send data back to the previous screen
                Navigator.pop(context, '$item - Selected');
              },
              child: const Text('Select This Item'),
            ),
          ],
        ),
      ),
    );
  }
}
The ItemDetailScreen() is designed to receive data from the previous screen. This is achieved using the *ModalRoute.of(context)?.settings.arguments* property, which retrieves the arguments passed when navigating to this route. In our example, the argument is a string representing the item selected in the ItemListScreen().
The screen includes a button that allows the user to confirm their selection. When this button is pressed, the screen sends data back to the ItemListScreen() and pops itself off the navigation stack. This is achieved using the Navigator.pop() method, which can also carry a result back to the previous screen.
In this case, Navigator.pop() is used to pass a modified string back to the ItemListScreen(), indicating the item that was selected. The string '$item - Selected' combines the original item name with additional text to create a result string that the ItemListScreen() can process.
Finally let’s add them to our MaterialApp and see the result:
void main() {
  runApp(
    const MyApp(),
  );
}

class MyApp extends StatelessWidget {
  const MyApp({super.key});

  @override
  Widget build(BuildContext context) {
    return MaterialApp(
      initialRoute: '/',
      routes: {
        '/': (context) => const ItemListScreen(),
        '/details': (context) => const ItemDetailScreen(),
      },
    );
  }
}
Our app should look and behave like this:
Advanced Techniques of Navigation in Flutter
Navigation 2.0
Over the time, Flutter has evolved its navigation system to provide more flexibility and control over the navigation flow in applications. With the release of Flutter 1.22, Navigation 2.0 was introduced, bringing significant improvements. Since then, many libraries and updates from the Flutter framework have been introduced to enhance navigation.
Previously, Navigation 1.0 used the Navigator and Route classes to manage navigation stacks imperatively. Developers would push and pop routes to navigate between screens. While this model was straightforward for simple navigation scenarios, it lacked flexibility for more complex navigation patterns, such as deep linking or dynamic routing.
Navigation 1.0's limitations led to the introduction of Navigation 2.0, which uses a Declarative Navigation Model. This model introduces the Router widget and RouteInformationParser, allowing for a more declarative approach to navigation.
Navigation 2.0 is particularly beneficial for web applications, as it synchronizes the browser’s URL with the app’s navigation state. Moreover, Navigation 2.0 makes handling deep linking and dynamic routing more manageable, enabling more complex and flexible navigation flows. Deep linking with Navigation 2.0 will be discused more thorough in the next section.
Let’s go through with an example to have a better understanding!
First we will create some simple screens:
class HomeScreen extends StatelessWidget {
  final ValueChanged<String> onItemSelected;

  const HomeScreen({
    super.key,
    required this.onItemSelected,
  });

  @override
  Widget build(BuildContext context) {
    return Scaffold(
      appBar: AppBar(title: const Text('Home')),
      body: ListView(
        children: [
          ListTile(
            title: const Text('Item 1'),
            onTap: () => onItemSelected('1'),
          ),
          ListTile(
            title: const Text('Item 2'),
            onTap: () => onItemSelected('2'),
          ),
        ],
      ),
    );
  }
}

class ItemDetailScreen extends StatelessWidget {
  final String? id;

  const ItemDetailScreen({
    super.key,
    required this.id,
  });

  @override
  Widget build(BuildContext context) {
    return Scaffold(
      appBar: AppBar(title: Text('Item $id')),
      body: Center(child: Text('Details for Item $id')),
    );
  }
}

class UnknownScreen extends StatelessWidget {
  const UnknownScreen({super.key});

  @override
  Widget build(BuildContext context) {
    return Scaffold(
      appBar: AppBar(title: const Text('Unknown Page')),
      body: const Center(child: Text('404 - Page not found')),
    );
  }
}

void main() {
  runApp(const MyApp());
}

class MyApp extends StatelessWidget {
  const MyApp({super.key});

  @override
  Widget build(BuildContext context) {
    return MaterialApp.router(
      routeInformationParser: MyRouteInformationParser(),
      routerDelegate: MyRouterDelegate(),
    );
  }
}
We will have a list with two items that onTap() will navigate to a ItemDetailScreen. We will also define a UnknownScreen for in case we programmatically navigate to a wrong route.
We need to declare *routerDelegate* and *routeInformationParser* for our MaterialApp. Let’s see the implementation code for them:
class MyRoutePath {
  final String? id;
  final bool isUnknown;

  MyRoutePath.home()
      : id = null,
        isUnknown = false;
  MyRoutePath.details(this.id) : isUnknown = false;
  MyRoutePath.unknown()
      : id = null,
        isUnknown = true;

  bool get isHomePage => id == null && !isUnknown;
  bool get isDetailsPage => id != null;
}

class MyRouteInformationParser extends RouteInformationParser<MyRoutePath> {
  @override
  Future<MyRoutePath> parseRouteInformation(RouteInformation routeInformation) async {
    final uri = Uri.parse(routeInformation.uri.path);
    if (uri.pathSegments.isEmpty) {
      return MyRoutePath.home();
    } else if (uri.pathSegments.length == 2 && uri.pathSegments[0] == 'item') {
      return MyRoutePath.details(uri.pathSegments[1]);
    }
    return MyRoutePath.unknown();
  }

  @override
  RouteInformation restoreRouteInformation(MyRoutePath configuration) {
    if (configuration.isHomePage) {
      return RouteInformation(uri: Uri(path: '/'));
    }
    if (configuration.isDetailsPage) {
      return RouteInformation(uri: Uri(path: '/item/${configuration.id}'));
    }
    return RouteInformation(uri: Uri(path: '/unknown'));
  }
}
The information parser will parse the URL to extract routing information.
Finally is our *routeDelegate*:
class MyRouterDelegate extends RouterDelegate<MyRoutePath>
    with ChangeNotifier, PopNavigatorRouterDelegateMixin<MyRoutePath> {
  @override
  final GlobalKey<NavigatorState> navigatorKey;

  String? _selectedItemId;
  bool show404 = false;

  MyRouterDelegate() : navigatorKey = GlobalKey<NavigatorState>();

  @override
  MyRoutePath get currentConfiguration {
    if (show404) {
      return MyRoutePath.unknown();
    }
    return _selectedItemId == null ? MyRoutePath.home() : MyRoutePath.details(_selectedItemId);
  }

  @override
  Future<void> setNewRoutePath(MyRoutePath configuration) async {
    if (configuration.isUnknown) {
      show404 = true;
      return;
    }
    if (configuration.isDetailsPage) {
      _selectedItemId = configuration.id;
    } else {
      _selectedItemId = null;
    }
    show404 = false;
  }

  @override
  Widget build(BuildContext context) {
    return Navigator(
      key: navigatorKey,
      pages: [
        MaterialPage(
          key: const ValueKey('HomePage'),
          child: HomeScreen(
            onItemSelected: _handleItemSelected,
          ),
        ),
        if (show404)
          const MaterialPage(
            key: ValueKey('UnknownPage'),
            child: UnknownScreen(),
          )
        else if (_selectedItemId != null)
          MaterialPage(
            key: const ValueKey('ItemPage'),
            child: ItemDetailScreen(
              id: _selectedItemId,
            ),
          ),
      ],
      onPopPage: (route, result) {
        if (!route.didPop(result)) {
          return false;
        }
        _selectedItemId = null;
        notifyListeners();
        return true;
      },
    );
  }

  void _handleItemSelected(String id) {
    _selectedItemId = id;
    notifyListeners();
  }
}
This class manages the navigation stack and handles route changes.
Above is a simplified version for implementing Navigation 2.0. Let’s see our code in action:
The route works normally and now we have a simple skeleton for our app to scale up our application.
Deep Linking
Deep linking in Flutter allows your app to be launched via a URL, taking the user directly to a specific screen or content within the app. This is especially useful for directing users to particular sections of your app from emails, social media, or web links.
There are two types of deep linking:
- Basic Deep Linking: Launches the app and opens a specific screen based on the URL.
- Deferred Deep Linking: Opens a specific screen based on the URL even if the app is not installed at the time the link is clicked. The user is directed to install the app first, and then the specific screen is opened.
Flutter supports deep linking on iOS, Android, and the web. Opening a URL displays that screen in your app. You can launch and display routes by using named routes (either with the *routes* parameter or *onGenerateRoute*), or the Router widget.
If you're using the app in a web browser, no extra setup is needed. Route paths function similarly to deep links on iOS or Android. By default, web apps interpret the deep link path from the URL fragment using the pattern: /#/path/to/app/screen. However, you can modify this by configuring your app's URL strategy.
To have a deeper understand on deep linking with native platform (Android and iOS), prefer to the official Flutter document. For our example from the start, we should have an adjustment on our parser in *routeInformationParser* and we are good to go:
class MyRouteInformationParser extends RouteInformationParser<MyRoutePath> {
  @override
  Future<MyRoutePath> parseRouteInformation(RouteInformation routeInformation) async {
    final uri = Uri.parse(routeInformation.uri.path);
    if (uri.pathSegments.isEmpty) {
      return MyRoutePath.home();
    } else if (uri.pathSegments.length == 2) {
      if (uri.pathSegments[0] == 'item') {
        var id = uri.pathSegments[1];
        return MyRoutePath.details(id);
      }
    }
    return MyRoutePath.unknown();
  }

  @override
  RouteInformation restoreRouteInformation(MyRoutePath configuration) {
    if (configuration.isHomePage) {
      return RouteInformation(uri: Uri(path: '/'));
    }
    if (configuration.isDetailsPage) {
      return RouteInformation(uri: Uri(path: '/item/${configuration.id}'));
    }
    return RouteInformation(uri: Uri(path: '/unknown'));
  }
}
Custom Page Transition
Creating a better, smoother, and more visually appealing Flutter application involves making transitions seamless and creative.
Flutter provides many default transition animations, such as FadeTransition(), SlideTransition(), AlignTransition(), etc. Let's take a look at some of these examples to understand how they work.
For custom transition animations, we can wrap our page in the PageRouteBuilder() class with a custom page to achieve the desired animation effects.
class FadeTransitionPageRoute extends PageRouteBuilder {
  final Widget page;

  FadeTransitionPageRoute({
    required this.page,
  }) : super(
          pageBuilder: (
            BuildContext context,
            Animation<double> animation,
            Animation<double> secondaryAnimation,
          ) {
            return page;
          },
          transitionsBuilder: (
            BuildContext context,
            Animation<double> animation,
            Animation<double> secondaryAnimation,
            Widget child,
          ) {
            return FadeTransition(
              opacity: animation,
              child: child,
            );
          },
        );
}
We will use Animation class to handle the animation of our transition. Let’s create the other screen and update our MaterialApp again. This time we will create a simple HomeScreen() and DetailScreen():
class HomeScreen extends StatelessWidget {
  const HomeScreen({super.key});

  @override
  Widget build(BuildContext context) {
    return Scaffold(
      appBar: AppBar(
        title: const Text('Home Screen'),
      ),
      body: Center(
        child: ElevatedButton(
          onPressed: () {
            Navigator.of(context).push(
			        FadeTransitionPageRoute(
                page: const DetailScreen(),
              ),
            );
          },
          child: const Text('Go to Detail Screen'),
        ),
      ),
    );
  }
}

class DetailScreen extends StatelessWidget {
  const DetailScreen({super.key});

  @override
  Widget build(BuildContext context) {
    return Scaffold(
      appBar: AppBar(
        title: const Text('Detail Screen'),
      ),
      body: Center(
        child: ElevatedButton(
          onPressed: () {
            Navigator.of(context).pop();
          },
          child: const Text('Back to Home Screen'),
        ),
      ),
    );
  }
}
Let’s finish it all in the MaterialApp:
import 'package:flutter/material.dart';

void main() {
  runApp(const MyApp());
}

class MyApp extends StatelessWidget {
  const MyApp({super.key});

  @override
  Widget build(BuildContext context) {
    return MaterialApp(
      title: 'Flutter Custom Transition',
      theme: ThemeData(
        primarySwatch: Colors.blue,
      ),
      home: const HomeScreen(),
    );
  }
}
And now we have a fading effect for our application every time we navigate through a screen:
Let’s try with some harder effect, we will create a MatrixTransitionPageRoute() to perform a 3D transition with the screen rotating around the Y-axis:
class MatrixTransitionPageRoute extends PageRouteBuilder {
  final Widget page;

  MatrixTransitionPageRoute({
    required this.page,
  }) : super(
          pageBuilder: (
            BuildContext context,
            Animation<double> animation,
            Animation<double> secondaryAnimation,
          ) {
            return page;
          },
          transitionsBuilder: (
            BuildContext context,
            Animation<double> animation,
            Animation<double> secondaryAnimation,
            Widget child,
          ) {
            return AnimatedBuilder(
              animation: animation,
              builder: (context, child) {
                double value = animation.value;
                return Transform(
                  transform: Matrix4.identity()
                    ..setEntry(3, 2, 0.001)
                    ..rotateY(value * pi * 2), // Rotate 360 degrees
                  alignment: Alignment.center,
                  child: child,
                );
              },
              child: child,
            );
          },
        );
}
Let’s see our code in action:
That’s a very cool (and dizzy) animation effect we got there.
Navigation Packages in Flutter
Flutter provides built-in navigation capabilities through its Navigator and Route classes. However, for more complex navigation scenarios and extended functionalities, several third-party packages can be utilised. These packages offer additional features such as declarative navigation, nested navigation, and more.
go_router

- development