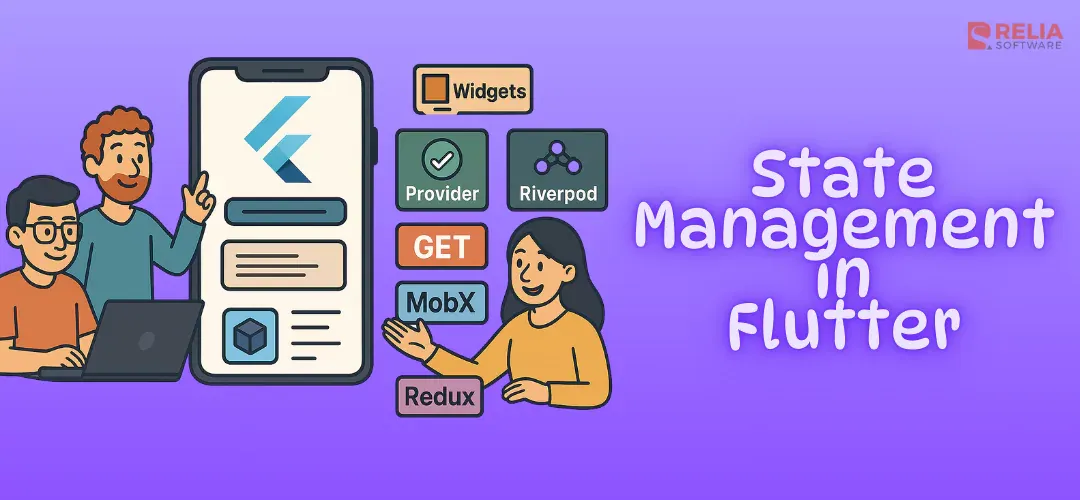
You know, any dynamic Flutter app needs effective state management. But with so many options like Stateful Widgets, Provider, Riverpod, GetX, MobX, Bloc, and Redux, it can be tough to know where to start.
In this guide, we’ll cut through the confusion by breaking down these popular choices. We’ll look at their advantages, their drawbacks, and the types of projects each one suits best. By the end, you’ll have the clarity you need to pick the state management approach that fits your app’s complexity and your team’s style.
>> Read more:
- Is Flutter Good For Web Development? Benefits & Drawbacks
- Flutter or React Native: What to Choose?
- The In-depth Guide for Mastering Navigation in Flutter
- Step-by-Step Tutorial to Master Flutter TextField Validation
What is State Management in Flutter?
State management in Flutter means handling data that affects how the user interface (UI) looks and how it behaves. User actions or external factors can change this data at any time, so the UI should update accordingly.
Consider a shopping cart app, for example. When the user adds or removes items, the displayed number of products should be updated immediately. If it doesn't, the interface won’t match what’s in the cart. Of course, users will be confused and have a poor experience.
7 Popular Approaches for State Management in Flutter
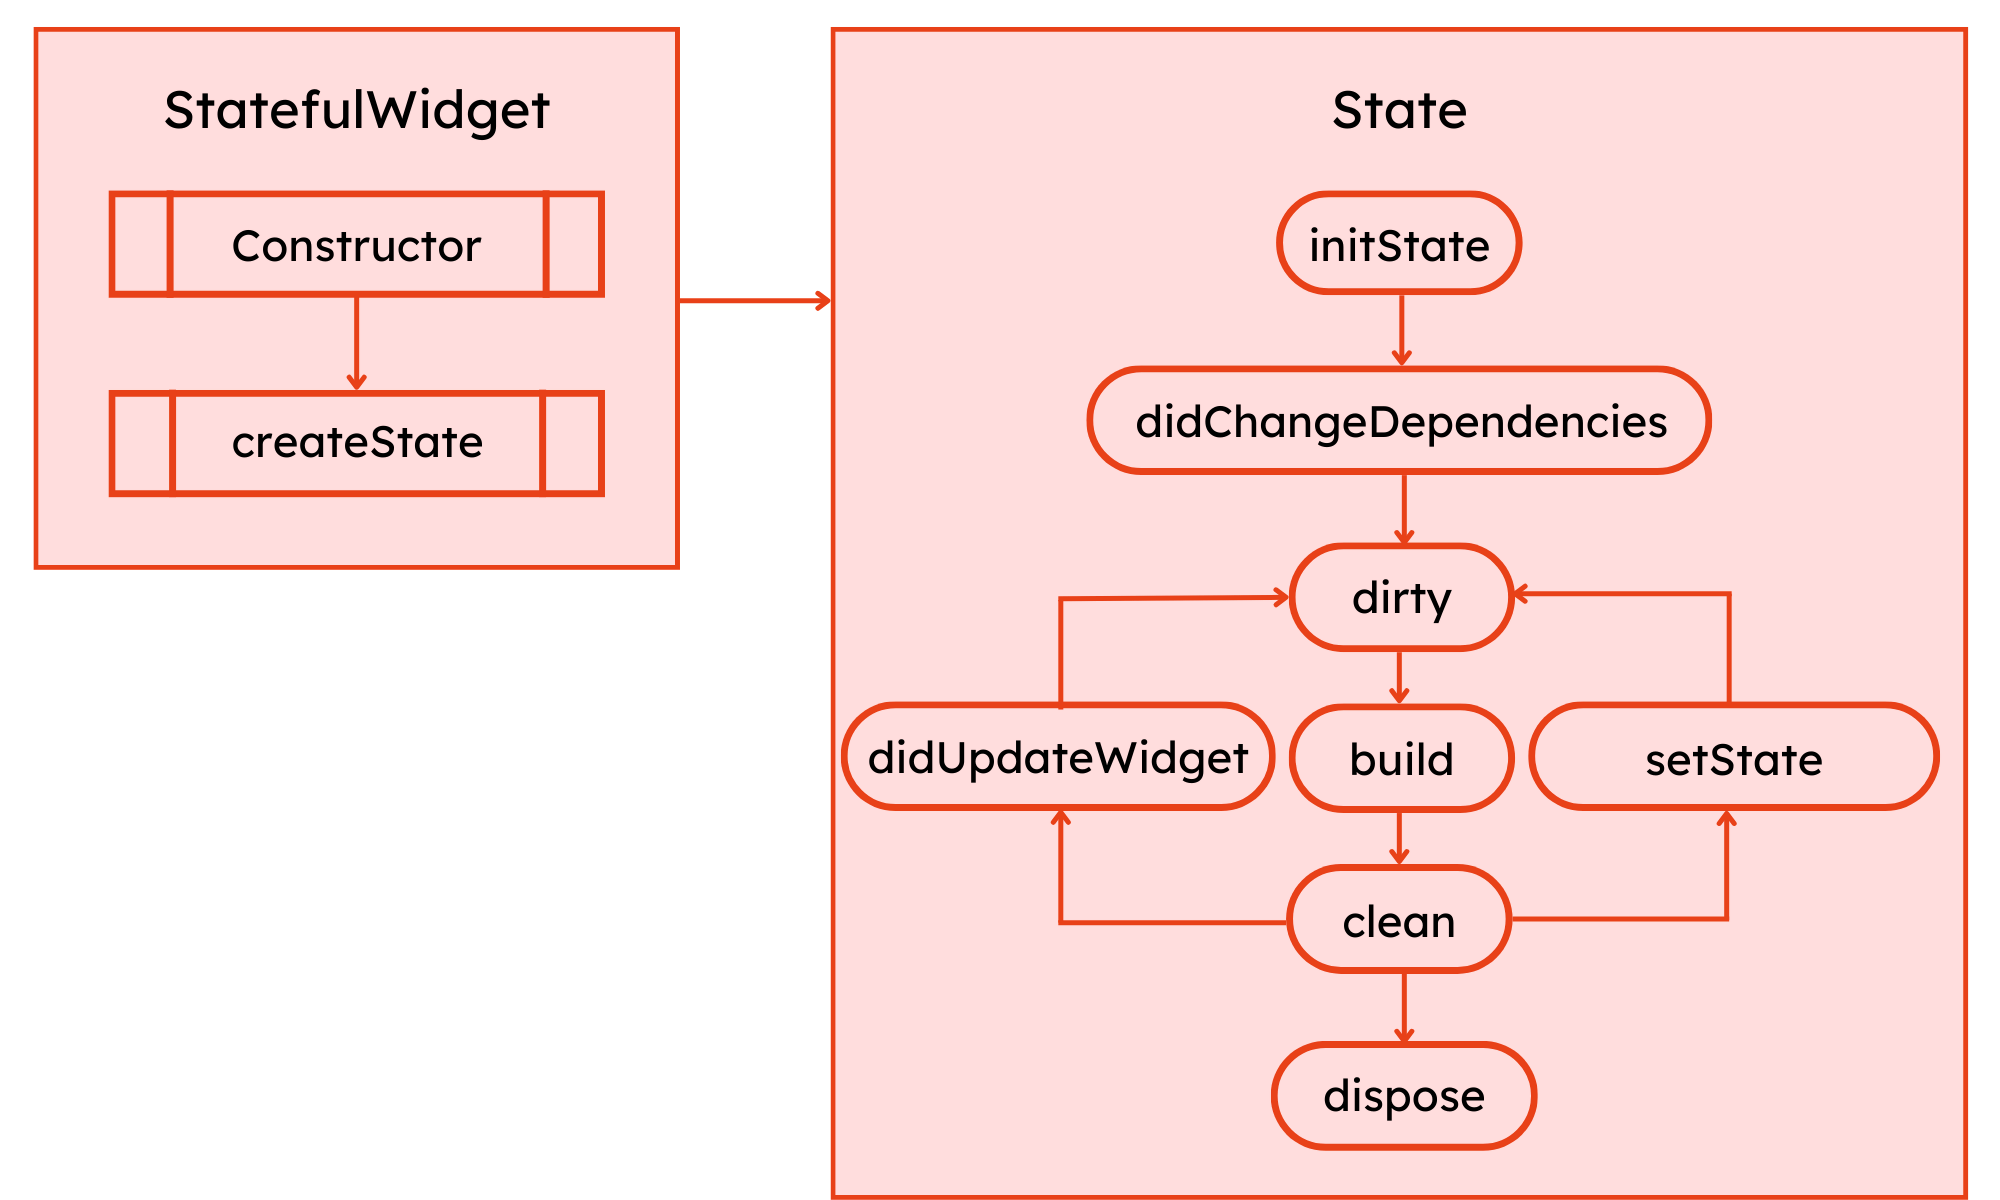
Stateful Widgets
Official Documentation: https://api.flutter.dev/flutter/widgets/StatefulWidget-class.html
Stateful Widgets are Flutter's built-in state management tool. Consider them as containers that store data and use their build method to render the UI based on that data. As the data changes, the widget rebuilds to keep the interface current.
Here's a breakdown of Stateful Widgets in Flutter:
- Stateful Widget Class: This class inherits from the StatefulWidget base class, acting as the blueprint for your stateful widget.
- State Object: Each Stateful Widget instance creates a corresponding state object, responsible for holding and managing the state data. This object inherits from the State base class.
- build() Method: The build() method defines the UI of the widget. This method takes a BuildContext argument and returns a widget tree representing the UI. Importantly, the build() method can access and utilize the state data from the state object.
- setState() Method: The setState() method, available within the state object, allows you to update the state data. When you call setState(), the framework automatically rebuilds the widget tree, ensuring the UI reflects the latest state.
Code example:
import 'package:flutter/material.dart';
    void main() {
      runApp(MyApp());
    }
    class MyApp extends StatelessWidget {
      @override
      Widget build(BuildContext context) {
        return MaterialApp(
          home: CounterPage(),
        );
      }
    }
    class CounterPage extends StatefulWidget {
      @override
      _CounterPageState createState() => _CounterPageState();
    }
    class _CounterPageState extends State<CounterPage> {
      int _counter = 0;
      void _incrementCounter() {
        setState(() {
          _counter++;
        });
      }
      @override
      Widget build(BuildContext context) {
        return Scaffold(
          appBar: AppBar(
            title: Text('Counter App'),
          ),
          body: Center(
            child: Column(
              mainAxisAlignment: MainAxisAlignment.center,
              children: <Widget>[
                Text(
                  'You have pushed the button this many times:',
                ),
                Text(
                  '$_counter',
                  style: Theme.of(context).textTheme.headline4,
                ),
              ],
            ),
          ),
          floatingActionButton: FloatingActionButton(
            onPressed: _incrementCounter,
            tooltip: 'Increment',
            child: Icon(Icons.add),
          ),
        );
      }
    }
Stateful Widgets are great for managing state in simpler Flutter apps. But as your project becomes more complex, handling larger amounts of data and frequent UI updates can get tricky. In these situations, advanced solutions like Provider, Riverpod, or Bloc may offer better structure and scalability.
Provider
Official Documentation: https://pub.dev/packages/provider
While Stateful Widgets work fine for basic state management, Provider steps in when you need more structure and scalability. As a dependency injection tool, it simplifies data flow within your app and makes it easier for UI elements to access and update shared state.
Here's a breakdown of Provider:
- Provider Package: This external package is integrated into your Flutter project to leverage Provider's functionalities.
- State Providers: These are classes or objects that hold and manage the state data you want to share with various widgets.
- Consumers: Widgets that depend on a particular state data act as consumers. They utilize the Provider.of method to access and utilize the state provided by a Provider.
- MultiProvider: For applications with multiple state providers, MultiProvider simplifies managing and providing them together.
Code example:
- Add
providerto yourpubspec.yamlfile:
dependencies:
      flutter:
        sdk: flutter
provider: ^6.0.0- Create a
Counterclass for the state:
import 'package:flutter/foundation.dart';
    class Counter with ChangeNotifier {
      int _count = 0;
      int get count => _count;
      void increment() {
        _count++;
        notifyListeners();
      }
}- Update the
main.dartfile:
import 'package:flutter/material.dart';
    import 'package:provider/provider.dart';
    import 'counter.dart'; // Ensure this path is correct based on your project structure
    void main() {
      runApp(
        ChangeNotifierProvider(
          create: (context) => Counter(),
          child: MyApp(),
        ),
      );
    }
    class MyApp extends StatelessWidget {
      @override
      Widget build(BuildContext context) {
        return MaterialApp(
          home: CounterPage(),
        );
      }
    }
    class CounterPage extends StatelessWidget {
      @override
      Widget build(BuildContext context) {
        final counter = Provider.of<Counter>(context);
        return Scaffold(
          appBar: AppBar(
            title: Text('Counter App with Provider'),
          ),
          body: Center(
            child: Column(
              mainAxisAlignment: MainAxisAlignment.center,
              children: <Widget>[
                Text(
                  'You have pushed the button this many times:',
                ),
                Text(
                  '${counter.count}',
                  style: Theme.of(context).textTheme.headline4,
                ),
              ],
            ),
          ),
          floatingActionButton: FloatingActionButton(
            onPressed: counter.increment,
            tooltip: 'Increment',
            child: Icon(Icons.add),
          ),
        );
      }
    }
Provider has advantages like:
- Flexibility: You can access state from anywhere in the widget tree.
- Testability: You can access state from anywhere in the widget tree.
- Ease of Use: Compared to more complex solutions, Provider is relatively straightforward.
However, Provider can add some boilerplate code for complex state management scenarios. But don't worry, Riverpod can solve this problem with a cleaner, more concise syntax while building on the core ideas of Provider.
Riverpod
Official Documentation: https://riverpod.dev/docs/introduction/getting_started
Riverpod takes the principles of Provider to the next level. It refines the approach to dependency injection and state management for cleaner code, fewer workarounds, and clearer logic. Sharing and updating state in your Flutter app is now easier and more maintainable.
Here's a breakdown of Riverpod:
- Riverpod Package: Similar to Provider, Riverpod is an external package you integrate into your Flutter project.
- State Providers: Just like in Provider, state providers hold and manage the data you want to share with various widgets.
- Consumers: Widgets that need access to this shared data are called consumers. They retrieve the state from Riverpod's providers using Provider.of (inspired by Provider).
- Automatic Dependency Resolution: Riverpod automatically figures out how providers depend on each other. You don’t need to pass providers through your widget tree manually, your code is thus cleaner and easier to maintain.
Code example:
- Add
flutter_riverpodto yourpubspec.yamlfile:
dependencies:
      flutter:
        sdk: flutter
flutter_riverpod: ^2.0.0- Create a
counter_provider.dartfile:
import 'package:flutter_riverpod/flutter_riverpod.dart';
    final counterProvider = StateProvider<int>((ref) {
      return 0;
});- Update the
main.dartfile:
import 'package:flutter/material.dart';
    import 'package:flutter_riverpod/flutter_riverpod.dart';
    import 'counter_provider.dart'; // Ensure this path is correct based on your project structure
    void main() {
      runApp(
        ProviderScope(
          child: MyApp(),
        ),
      );
    }
    class MyApp extends StatelessWidget {
      @override
      Widget build(BuildContext context) {
        return MaterialApp(
          home: CounterPage(),
        );
      }
    }
    class CounterPage extends ConsumerWidget {
      @override
      Widget build(BuildContext context, WidgetRef ref) {
        final counter = ref.watch(counterProvider);
        return Scaffold(
          appBar: AppBar(
            title: Text('Counter App with Riverpod'),
          ),
          body: Center(
            child: Column(
              mainAxisAlignment: MainAxisAlignment.center,
              children: <Widget>[
                Text(
                  'You have pushed the button this many times:',
                ),
                Text(
                  '$counter',
                  style: Theme.of(context).textTheme.headline4,
                ),
              ],
            ),
          ),
          floatingActionButton: FloatingActionButton(
            onPressed: () => ref.read(counterProvider.notifier).state++,
            tooltip: 'Increment',
            child: Icon(Icons.add),
          ),
        );
      }
Riverpod offers benefits like:
- Concise Syntax: Less boilerplate code compared to Provider, making code cleaner and easier to maintain.
- Automatic Dependency Resolution: Riverpod handles dependency resolution for you, reducing manual setup in the widget tree.
- Familiarity: If you’ve used Provider before, moving to Riverpod feels smooth and intuitive.
However, Riverpod is still relatively new, so its community support and ecosystem may not be as established as Provider’s.
GetX
Official Documentation: https://pub.dev/packages/get
GetX is a great option if you’re looking for a blend of simplicity and performance. It offers a lightweight, efficient way to manage state in your Flutter app, making it easier to keep your UI and data in sync.
Here's a breakdown of GetX:
- GetX Package: This external package integrates with your Flutter project, providing functionalities for state management and beyond (routing, dependency injection).
- Observables (Observables & GetXController): Observables automatically notify the UI when their data changes. A GetXController acts like a container for your app’s state and logic, similar to Bloc or Provider.
- GetBuilder & Obx: Use these widgets to react to changes in your observables. GetBuilder provides a traditional approach, while Obx uses Flutter’s reactive system for even more efficient updates.
- Dependency Injection: GetX also includes a simple way to handle dependencies, letting you easily manage and inject them into your controllers and throughout your app.
Code example:
- Add get to your
pubspec.yamlfile:
dependencies:
      flutter:
        sdk: flutter
get: ^4.6.1- Create a
counter_controller.dartfile:
import 'package:get/get.dart';
    class CounterController extends GetxController {
      var count = 0.obs;
      void increment() {
        count++;
      }
}- Update the
main.dartfile:
import 'package:flutter/material.dart';
    import 'package:get/get.dart';
    import 'counter_controller.dart'; // Ensure this path is correct based on your project structure
    void main() {
      runApp(MyApp());
    }
    class MyApp extends StatelessWidget {
      @override
      Widget build(BuildContext context) {
        return GetMaterialApp(
          home: CounterPage(),
        );
      }
    }
    class CounterPage extends StatelessWidget {
      @override
      Widget build(BuildContext context) {
        final CounterController counterController = Get.put(CounterController());
        return Scaffold(
          appBar: AppBar(
            title: Text('Counter App with GetX'),
          ),
          body: Center(
            child: Column(
              mainAxisAlignment: MainAxisAlignment.center,
              children: <Widget>[
                Text(
                  'You have pushed the button this many times:',
                ),
                Obx(() => Text(
                  '${counterController.count}',
                  style: Theme.of(context).textTheme.headline4,
                )),
              ],
            ),
          ),
          floatingActionButton: FloatingActionButton(
            onPressed: counterController.increment,
            tooltip: 'Increment',
            child: Icon(Icons.add),
          ),
        );
      }
    }
Benefits of GetX:
- Performance: GetX is known for its lightweight design and efficient updates.
- Ease of Use: Its simple syntax lets you implement state management with fewer lines of code.
- Versatility: GetX is a comprehensive app architecture tool that handles not only state management, but also routing, dependency injection, and more.
GetX is simpler than some options, but it can still take time to master, especially if you’re used to other methods. Besides, its debugging and testing tools aren’t as robust as Bloc or Redux's.
MobX
Official Documentation: https://pub.dev/packages/mobx
MobX is commonly used for intermediate and complex projects. It offers a compelling alternative with its reactive approach and efficient handling of state changes.
Here's a breakdown of MobX:
- Reactive Programming: MobX embraces a reactive style, so the UI updates automatically whenever the underlying data (state) changes.
- Observables: Think of these as special variables that store your app’s data. When observables change, any widgets that rely on them refresh automatically—no extra steps needed.
- Actions: Actions are how you modify your observables. By controlling when and how changes occur, MobX prevents messy, unpredictable updates.
- Reactions: Reactions are like automated responders. They run whenever an observable they’re watching changes, ensuring your app reacts instantly to new data without extra manual checks.
Code example:
- Add
flutter_mobxandmobxto yourpubspec.yamlfile:
dependencies:
      flutter:
        sdk: flutter
      mobx: ^2.0.4
      flutter_mobx: ^2.0.2
    dev_dependencies:
      build_runner: ^2.1.7
mobx_codegen: ^2.0.4- Create a
counter.dartfile:
import 'package:mobx/mobx.dart';
    // Include generated file
    part 'counter.g.dart';
    // This is the class used by rest of your codebase
    class Counter = _Counter with _$Counter;
    // The store-class
    abstract class _Counter with Store {
      @observable
      int count = 0;
      @action
      void increment() {
        count++;
      }
    }
- Run the build runner to generate the necessary code:
flutter pub run build_runner build- Update the
main.dartfile:
import 'package:flutter/material.dart';
    import 'package:flutter_mobx/flutter_mobx.dart';
    import 'counter.dart'; // Ensure this path is correct based on your project structure
    void main() {
      runApp(MyApp());
    }
    class MyApp extends StatelessWidget {
      @override
      Widget build(BuildContext context) {
        return MaterialApp(
          home: CounterPage(),
        );
      }
    }
    class CounterPage extends StatelessWidget {
      final Counter counter = Counter();
      @override
      Widget build(BuildContext context) {
        return Scaffold(
          appBar: AppBar(
            title: Text('Counter App with MobX'),
          ),
          body: Center(
            child: Column(
              mainAxisAlignment: MainAxisAlignment.center,
              children: <Widget>[
                Text(
                  'You have pushed the button this many times:',
                ),
                Observer(
                  builder: (_) => Text(
                    '${counter.count}',
                    style: Theme.of(context).textTheme.headline4,
                  ),
                ),
              ],
            ),
          ),
          floatingActionButton: FloatingActionButton(
            onPressed: counter.increment,
            tooltip: 'Increment',
            child: Icon(Icons.add),
          ),
        );
      }
    }
Benefits of MobX:
- Improved Developer Experience: The reactive approach simplifies state management, reducing boilerplate code and making UI updates more intuitive.
- Testability: Observables and actions are easily isolated for testing, ensuring the reliability of your state management logic.
- Scalability: MobX can handle complex state management scenarios effectively.
However, MobX might have a slightly steeper learning curve compared to Provider and GetX, especially for basic applications. Developers unfamiliar with reactive programming concepts may face challenges.
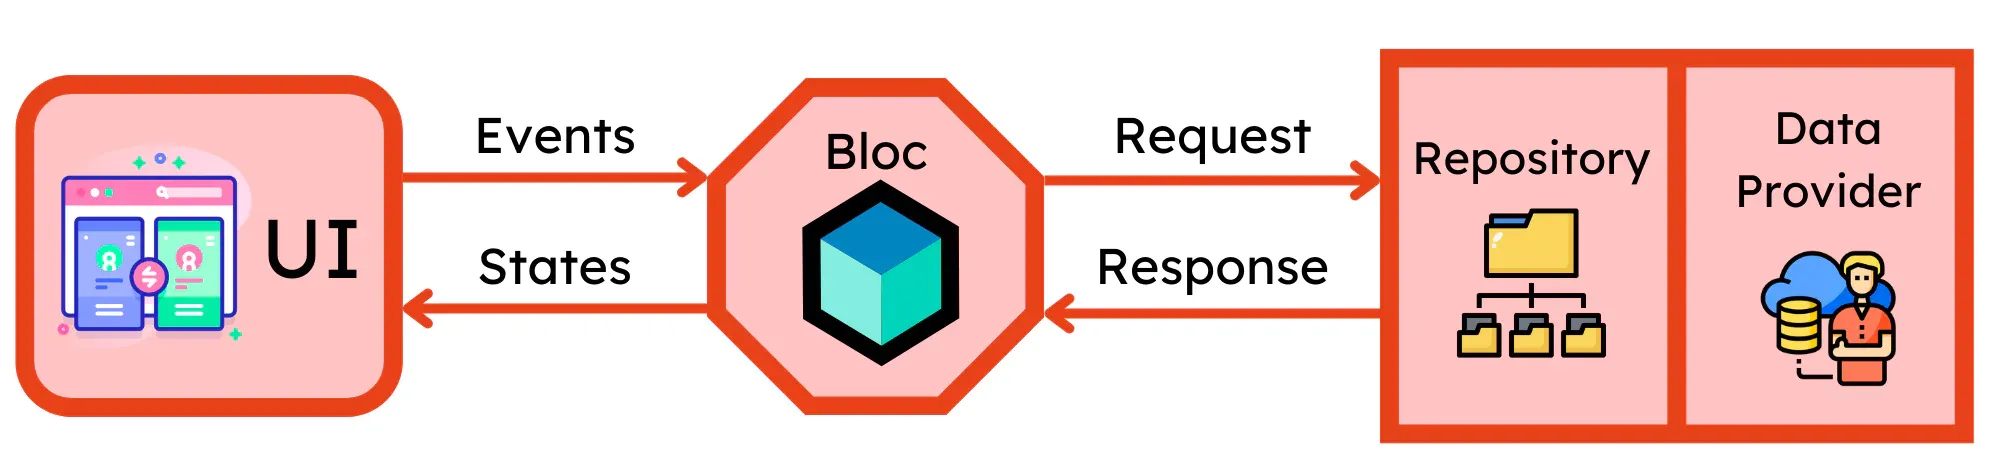
Bloc
Official Documentation: https://bloclibrary.dev/
Bloc is suitable for projects requiring a more structured and predictable approach to state management. It adheres to a unidirectional data flow architecture, ensuring clear separation between presentation logic (UI) and business logic (data handling).
Here's a breakdown of Bloc:
- Bloc Pattern: This architectural pattern defines a clear separation between UI, business logic, and state management.
- Bloc Components:
- Events: These are user interactions or system events that trigger state changes.
- States: These represent the current state of your application data.
- Bloc: This component acts as a mediator, processing events and emitting new states based on the current state and business logic.
- Streams: Events and states are represented as streams, enabling asynchronous data handling and efficient updates.
Code example:
- Add
flutter_blocandblocto yourpubspec.yamlfile:
dependencies:
      flutter:
        sdk: flutter
      flutter_bloc: ^8.1.0
bloc: ^8.0.3- Create a
counter_cubit.dartfile:
import 'package:bloc/bloc.dart';
    class CounterCubit extends Cubit<int> {
      CounterCubit() : super(0);
      void increment() => emit(state + 1);
}- Update the
main.dartfile:
import 'package:flutter/material.dart';
    import 'package:flutter_bloc/flutter_bloc.dart';
    import 'counter_cubit.dart'; // Ensure this path is correct based on your project structure
    void main() {
      runApp(MyApp());
    }
    class MyApp extends StatelessWidget {
      @override
      Widget build(BuildContext context) {
        return MaterialApp(
          home: BlocProvider(
            create: (_) => CounterCubit(),
            child: CounterPage(),
          ),
        );
      }
    }
    class CounterPage extends StatelessWidget {
      @override
      Widget build(BuildContext context) {
        return Scaffold(
          appBar: AppBar(
            title: Text('Counter App with Bloc'),
          ),
          body: Center(
            child: Column(
              mainAxisAlignment: MainAxisAlignment.center,
              children: <Widget>[
                Text(
                  'You have pushed the button this many times:',
                ),
                BlocBuilder<CounterCubit, int>(
                  builder: (context, count) {
                    return Text(
                      '$count',
                      style: Theme.of(context).textTheme.headline4,
                    );
                  },
                ),
              ],
            ),
          ),
          floatingActionButton: FloatingActionButton(
            onPressed: () => context.read<CounterCubit>().increment(),
            tooltip: 'Increment',
            child: Icon(Icons.add),
          ),
        );
      }
    }
Benefits of Bloc:
- Testability: Bloc components (events, states, Bloc) are easily isolated and tested.
- Scalability: The unidirectional data flow promotes clean architecture Flutter and simplifies handling complex state logic.
- Predictability: Bloc ensures clear separation of concerns, leading to more predictable state management.
However, Bloc might have a steeper learning curve compared to other solutions. Additionally, setting up Bloc can involve more boilerplate code for basic scenarios.
Redux
Official Documentation: https://pub.dev/documentation/flutter_redux/latest/
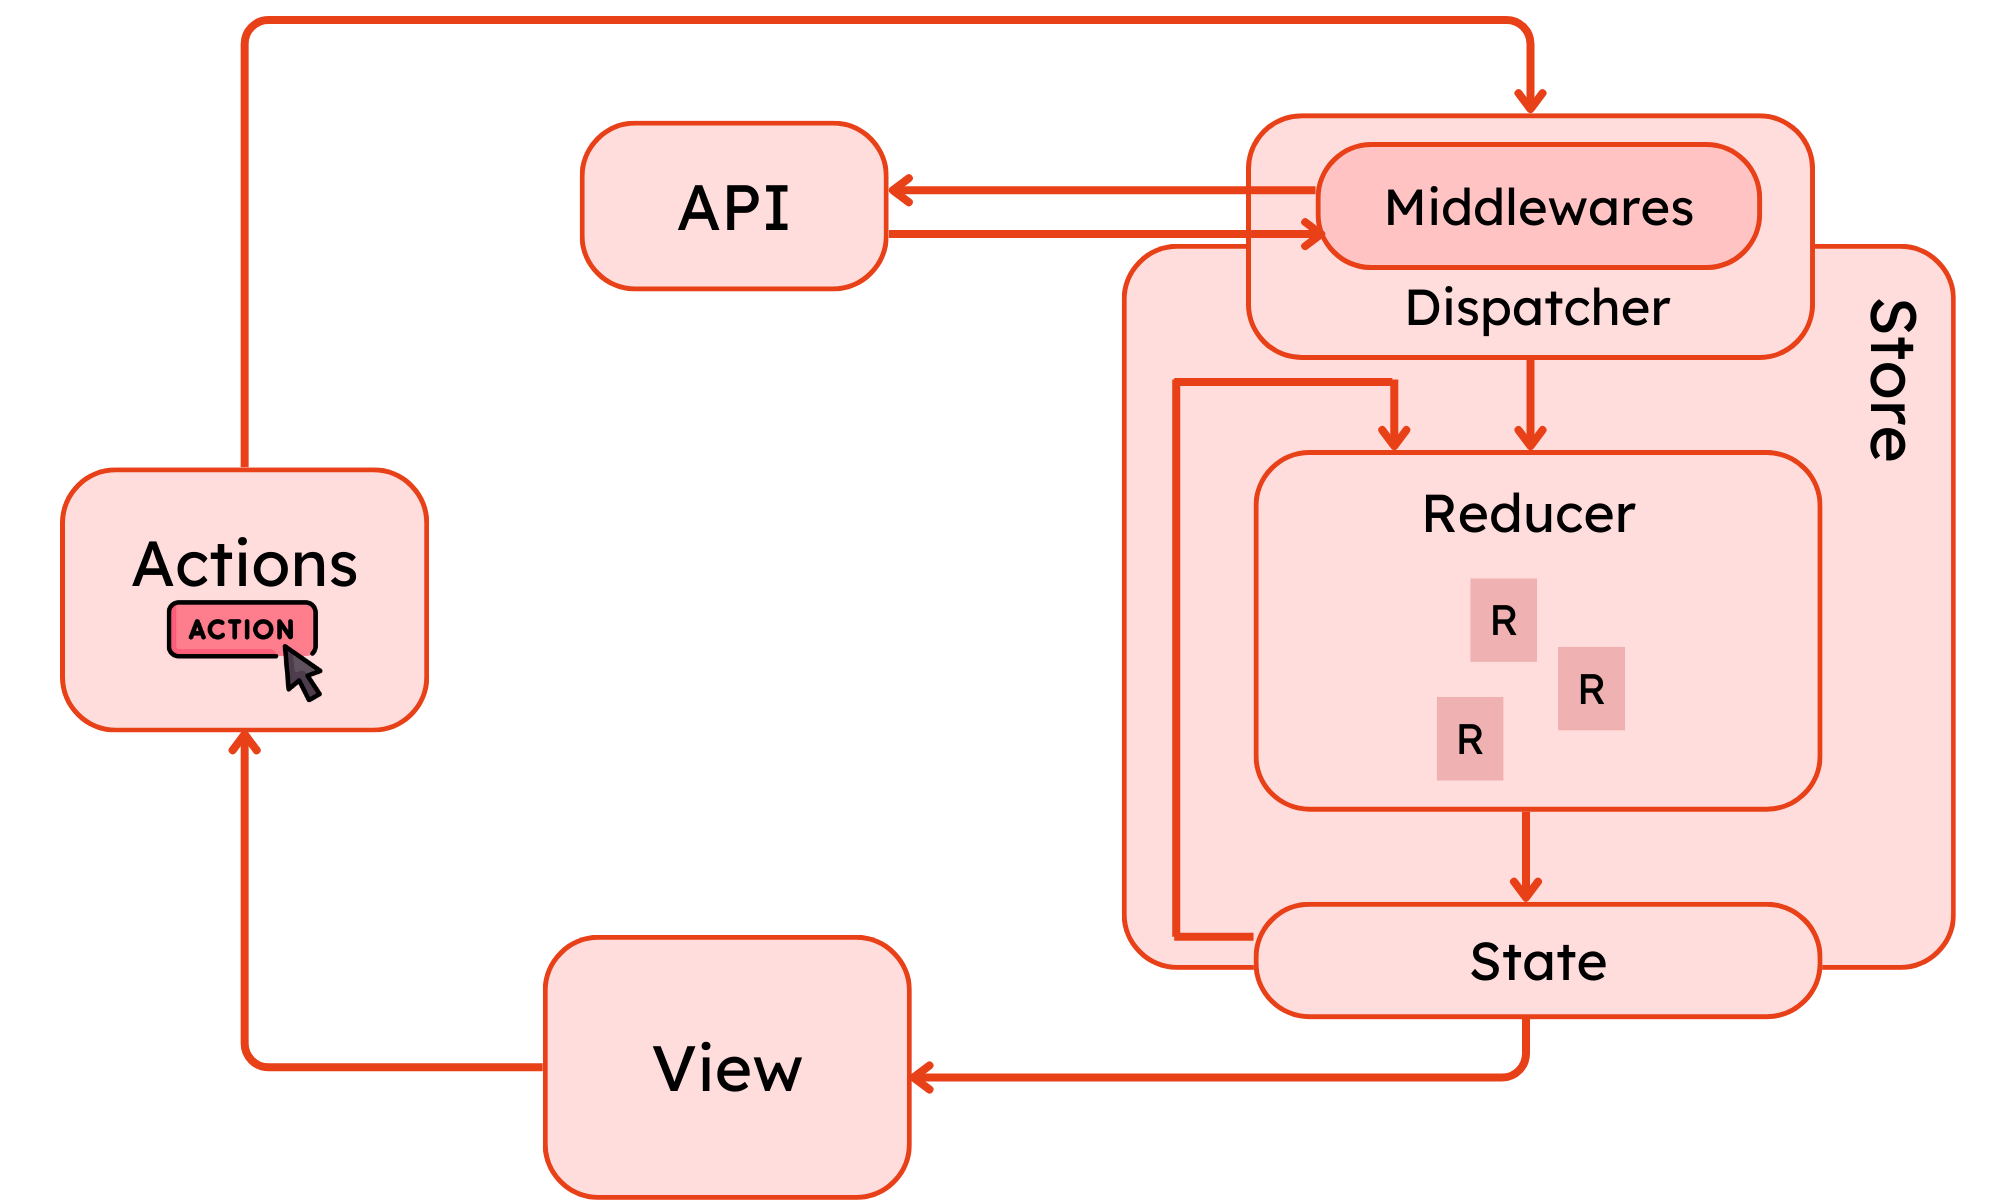
As your Flutter projects scale in complexity, managing application state across various screens and components becomes increasingly challenging. Redux steps in as a powerful solution for centralized state management, offering a predictable and unidirectional data flow.
Here's a breakdown of Redux:
- Centralized Store: A single store stores all app states. This ensures every part of the UI reads from the same source of truth.
- Actions: Simple objects describing events in your app, such as user clicks or data updates. They say what happened, not how to handle it.
- Reducers: Pure functions that figure out how to update the state based on the action. They take the current state and an action, then return the new state.
- Dispatch: When an event occurs, you dispatch an action to the store. The store then uses the corresponding reducer to update the state.
Code example:
- Add
flutter_reduxandreduxto yourpubspec.yamlfile:
dependencies:
      flutter:
        sdk: flutter
      flutter_redux: ^0.8.2
redux: ^5.0.0- Create a
counter_state.dartfile:
class CounterState {
      final int count;
      CounterState(this.count);
}- Create a
counter_actions.dartfile:
class IncrementAction {}- Create a
counter_reducer.dartfile:
import 'counter_state.dart';
    import 'counter_actions.dart';
    CounterState counterReducer(CounterState state, dynamic action) {
      if (action is IncrementAction) {
        return CounterState(state.count + 1);
      }
      return state;
}- Update the
main.dartfile:
import 'package:flutter/material.dart';
    import 'package:flutter_redux/flutter_redux.dart';
    import 'package:redux/redux.dart';
    import 'counter_state.dart';
    import 'counter_actions.dart';
    import 'counter_reducer.dart';
    void main() {
      final store = Store<CounterState>(
        counterReducer,
        initialState: CounterState(0),
      );
      runApp(MyApp(store: store));
    }
    class MyApp extends StatelessWidget {
      final Store<CounterState> store;
      MyApp({required this.store});
      @override
      Widget build(BuildContext context) {
        return StoreProvider<CounterState>(
          store: store,
          child: MaterialApp(
            home: CounterPage(),
          ),
        );
      }
    }
    class CounterPage extends StatelessWidget {
      @override
      Widget build(BuildContext context) {
        return Scaffold(
          appBar: AppBar(
            title: Text('Counter App with Redux'),
          ),
          body: Center(
            child: Column(
              mainAxisAlignment: MainAxisAlignment.center,
              children: <Widget>[
                Text(
                  'You have pushed the button this many times:',
                ),
                StoreConnector<CounterState, int>(
                  converter: (store) => store.state.count,
                  builder: (context, count) {
                    return Text(
                      '$count',
                      style: Theme.of(context).textTheme.headline4,
                    );
                  },
                ),
              ],
            ),
          ),
          floatingActionButton: StoreConnector<CounterState, VoidCallback>(
            converter: (store) {
              return () => store.dispatch(IncrementAction());
            },
            builder: (context, callback) {
              return FloatingActionButton(
                onPressed: callback,
                tooltip: 'Increment',
                child: Icon(Icons.add),
              );
            },
          ),
        );
      }
    }
Benefits of Redux:
- Predictability: The unidirectional data flow ensures predictable state changes.
- Testability: Actions and reducers are pure functions, making them easy to test in isolation.
- Debuggability: Redux offers developer tools for inspecting state changes and identifying potential issues.
However, Redux might introduce some complexity for smaller projects. Setting up the store, actions, and reducers can require more initial effort compared to simpler solutions. Additionally, managing complex state logic within reducers can become challenging for very intricate applications.
Here's a comparison table summarizing the 7 common approaches for state management in Flutter:
| Approach | Complexity | Learning Curve | Data Flow | Key Strengths | Use Cases |
|
Stateful Widgets | Basic | Lowest | Manual | Simplest solution for managing state within a widget or a small group of widgets. | Small, isolated UI components with minimal state management |
| Provider | Basic - Intermediate | Moderate | Manual | Good balance between ease of use and flexibility. | Projects with moderate state management requirements. |
| Riverpod | Basic - Intermediate | Moderate | Manual | Similar to Provider, potentially simpler syntax. | Intermediate projects seeking potential boilerplate reduction. |
| GetX | Intermediate | Moderate | Automatic | Lightweight, efficient, offers routing and dependency injection. | Intermediate projects with focus on performance and ease of use. |
| MobX | Intermediate - Complex | Steeper (Reactive) | Reactive | Automatic updates, clean syntax (after learning curve). | Complex scenarios benefiting from reactive state management. |
| Bloc | Complex | Steeper | Unidirectional | Predictable, testable, good for complex business logic. | Large-scale applications with intricate state management needs. |
| Redux | Highly Complex | Steeper | Unidirectional | Centralized store, predictable state changes. | Very complex applications requiring centralized state management. |
Best Practices for Effective State Management in Flutter
State management plays a vital role in crafting a responsive and efficient Flutter app. Here are some key best practices to keep your app in top shape:
- Choose The Right Tool: State management tools should fit project complexity. For smaller apps, the built-in Stateful Widgets might be enough, but more complex requirements need patterns like Bloc or Redux.
- Separate UI and Logic: Keep your UI code (presentation) separate from your business logic (data handling). By organizing your code this way, you’ll have cleaner, easier-to-maintain components.
- Keep State Lean: Only store data that actually affects the UI. The less state you handle, the fewer unnecessary updates and performance issues.
- Use Stateless Widgets as Possible: For parts of your UI that don’t need to track any data, stick with stateless widgets. They’re simpler and help streamline your code.
- Prefer Immutable Data: Whenever you can, use data structures that don’t change once created. Immutable data makes it easier to understand and debug how your app’s state evolves.
- Test Your State Management Logic: Make testing a regular part of your workflow, so you’ll catch problems early and keep your app stable.
These recommendations will help you build an app that's easy to maintain and fun to use.
>> Read more: Top 9 Flutter App Development Companies
Final Thoughts
State management in Flutter is all about maintaining perfect sync between the UI and data of your app. The correct methods and strategy will enable you to create fast and maintainable apps. Try and choose what fits you best!
>>> Follow and Contact Relia Software for more information!

- coding
- Mobile App Development
- Web application Development