



The Shopify App Store has over 13,000 apps, yet many merchants still can't find one that fully matches how their business operates. Most stores start with off-the-shelf apps, but as they grow, unique workflows, integrations, or business rules often require something more. At that point, they either build a custom app for their own store or a public app for other Shopify merchants.
In this article, we will explain Shopify app development from a business perspective, not only developers’. You’ll learn what a Shopify app is, the types you can build, the languages and tools involved, the development process, how to turn on custom app development, what it costs, and how to choose a development partner.
What Is Shopify App Development?
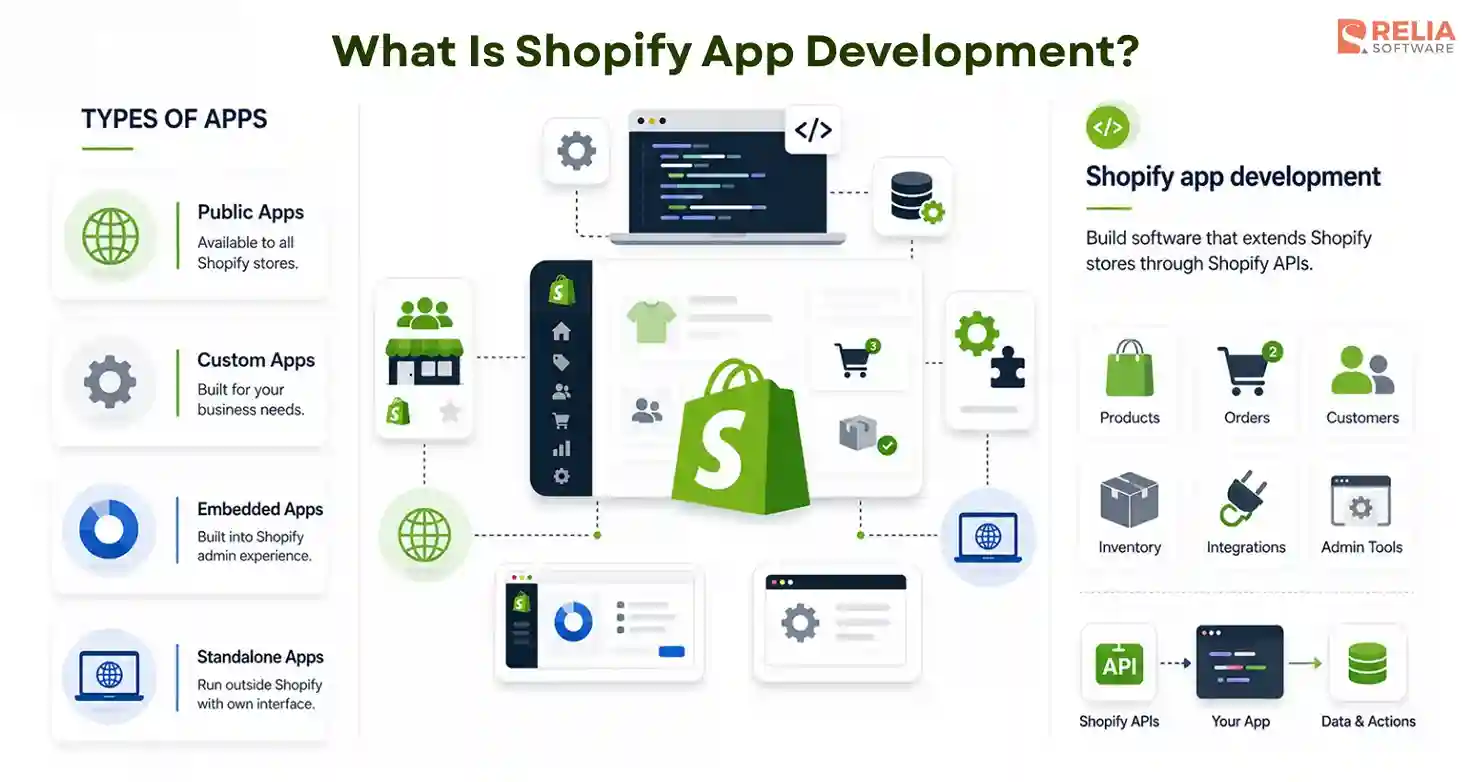
Shopify app development is the process of building software that adds new functionality to a Shopify store through Shopify’s APIs. A Shopify app connects to the store through Shopify's Admin API and related tools, then works with store data such as products, orders, customers, and inventory, or adds new tools or workflows inside the Shopify admin.
Types of Shopify Apps
Shopify apps fall into two types by who can use them: public and custom, and two forms by where the app runs, embedded and standalone. The type decides distribution and audience. The form decides where the merchant sees and uses the app. Most projects start by settling the type, because that choice affects cost, approval, and who the app is for.
Public Apps
Public apps are built for many merchants and listed on the Shopify App Store. A developer builds the app once, publishes it, and any store can install it. This is the path for anyone who wants to sell an app as a product.
Public apps must meet Shopify's technical, security, design requirements, and pass Shopify's review before they go live. In return, they gain App Store visibility, search exposure, and access to Shopify's large merchant base. A public app can be listed for open discovery or kept unlisted, where only merchants with a direct link can install it.
Custom Apps
Custom apps are built for one specific store and are not listed on the Shopify App Store. A merchant commissions a custom app when no existing app matches how their business runs, such as a tie-in to a proprietary ERP, a unique fulfillment rule, or a workflow the platform does not support.
Custom apps are the common choice for established businesses. This app type skips the App Store review process, since it is not distributed to other merchants and can be shaped entirely around one store's needs. Shopify replaced the older "private app" model with custom apps in 2022 to tighten security, so any private app you read about in older guides is now a custom app.
Embedded Apps
Embedded apps run inside the Shopify admin and appear as part of the merchant's dashboard. They use Shopify App Bridge and the Polaris design system, so the app looks and behaves like a native part of Shopify. Shopify recommends this form because merchants never leave the admin to use it, which makes the app feel built-in and keeps the experience consistent. Most apps, both public and custom, are embedded for this reason.
Standalone Apps
Standalone apps run on their own web domain with their own interface, outside the Shopify admin. The merchant connects the app to their store but manages it in a separate place. This form suits apps with complex interfaces that do not fit inside the admin, or tools that serve more than one platform. The trade-off is a less native experience, since the merchant leaves Shopify to use the app.
Shopify App Development Languages & Tech Stack
You can build a Shopify app in almost any programming language, but JavaScript and TypeScript are the default choices, since Shopify's official tools are built around them. Otherwise, Ruby, PHP, and Python all work too.
Besides the developing languages, most of what an app does comes from Shopify's own tools and APIs, so the wider stack matters more than the backend languages alone.
The table below groups the stack by layer.
|
Layer |
Technology |
What it does |
|
Backend language |
JavaScript or TypeScript (matches Shopify's tooling most); also Ruby, PHP, Python |
Runs the app's server-side logic. |
|
Setup and tooling |
Shopify CLI |
Scaffolds a new app, sets up authentication, and creates a local dev environment in minutes. |
|
App framework |
Official app template on React Router (the successor to Remix) |
Gives a production-ready starting point so teams don't build the structure from scratch. |
|
Admin front end |
Polaris design system (Polaris Web Components) and App Bridge |
Provides ready-made UI components and embeds the app inside the Shopify admin so it feels native. |
|
Storefront front end |
Theme app extensions, checkout UI extensions, Storefront API |
Renders app features the shopper sees, styled to match the merchant's live theme. |
|
Data and APIs |
GraphQL Admin API (primary); Storefront API; REST Admin API (legacy) |
Reads and writes store data such as products, orders, and customers. GraphQL is now Shopify's main API. |
|
Events and custom logic |
Webhooks and Shopify Functions |
Notify the app of store events (new orders, uninstalls) and customize checkout logic like discounts and shipping. |
Notes:
- First, Shopify has made GraphQL the definitive API, and since April 1, 2025, all new apps submitted to the App Store must use GraphQL, so the older REST Admin API is legacy.
- Second, Polaris Web Components are a newer version of the React components and will deprecate Polaris React in the future, and they work across frameworks.
An app that ignores GraphQL, skips Polaris, or runs on outdated tooling feels foreign inside Shopify and can be flagged during review. When you evaluate a developer or a software development partner, ask which template, APIs, and design system they build on, since those answers show whether they follow Shopify's current standards.
7 Steps of The Shopify App Development Process
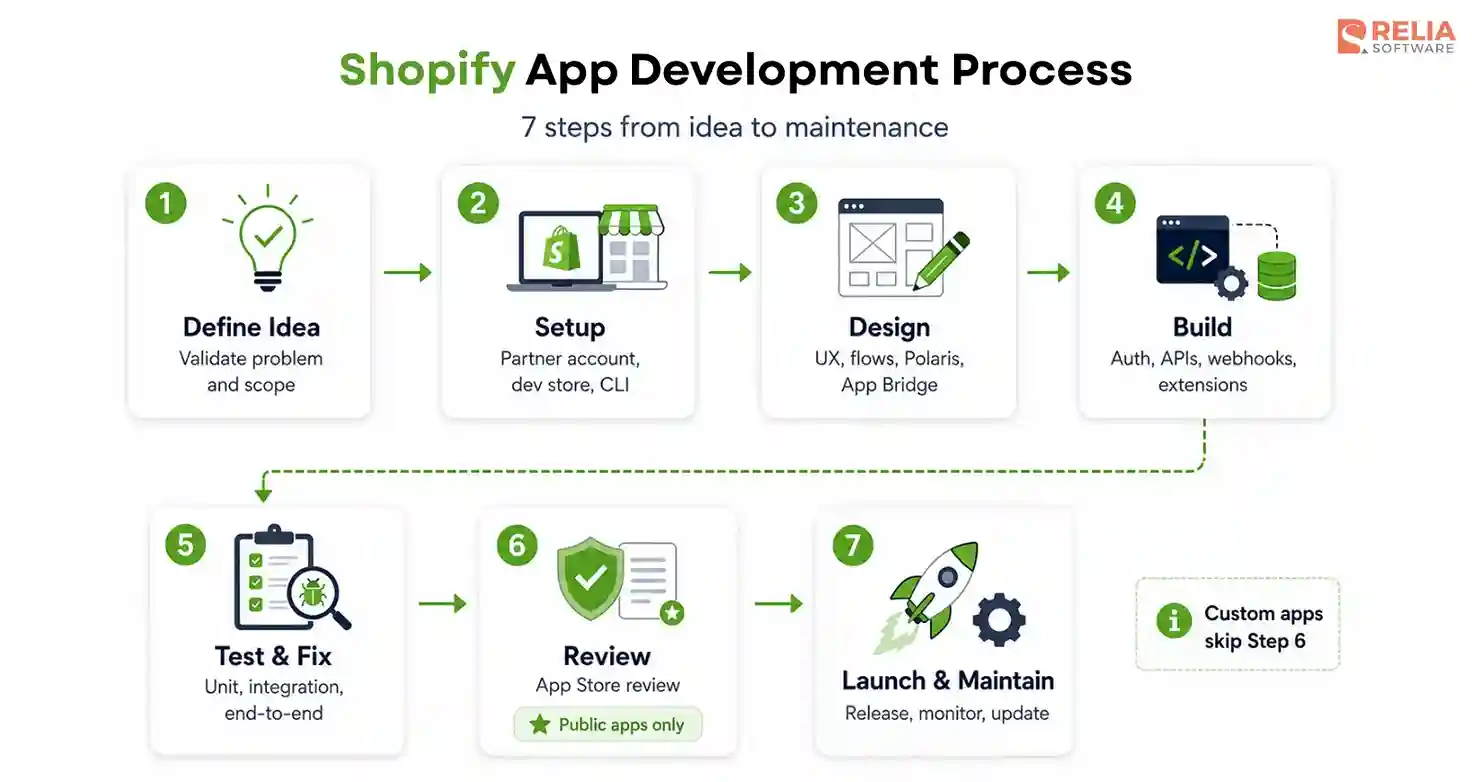
The Shopify app development process runs through seven stages, from validating the idea to maintaining the app after launch. The stages are mostly similar for public and custom apps, except that only public apps go through Shopify's App Store review.
Step 1: Define and validate the idea
Start with the problem the app solves. For a custom app, that means mapping the exact workflow or integration your store needs. For a public app, it means confirming that enough merchants share the problem and would pay for a solution. This stage sets the scope and prevents building features no one uses.
Step 2: Set up the environment
Create a free Shopify Partner account and a development store, then install the Shopify CLI. The development store lets the team build and test safely, without touching a live store or real orders. Before the build begins, a custom app also needs the store to allow custom app development.
Step 3: Design the app
Map the screens and flows before writing code, and design them on the layer the app lives in.
- For an admin app, build the interface with the Polaris design system and App Bridge so it renders inside the Shopify admin and matches Shopify's own patterns.
- For a storefront-based app, design theme app extensions or checkout UI extensions that inherit each merchant's theme styling.
Clear navigation, accessible components, and fast-loading screens are important here, because Shopify checks design and performance during App Store review, and weak design is a common reason apps get sent back.
>> Read more: Successful E-commerce Website Design: Crucial Elements And Tips
Step 4: Build the Shopify app
Development happens in layers, and each one connects the app to Shopify differently:
- Authentication: Set up OAuth to install the app and request only the access scopes it needs, then use App Bridge session tokens to authenticate requests from an embedded app. Use only the permissions the app needs to improve security and speed up approval.
- Backend and data: Build the server on Shopify's app template and add a database for the app's own data, such as settings, logs, or synced records. This layer holds the business logic that Shopify does not provide.
- Shopify data: Read and write store data through the GraphQL Admin API, and design queries around Shopify's rate limits so the app stays responsive under load. Add the Storefront API only if the app serves customer-facing content.
- Events: Register webhooks so the app reacts to store events such as new orders or an app uninstall, and include Shopify's mandatory compliance webhooks. Use Shopify Functions when the app needs custom checkout logic like discounts or shipping rules.
- Extensions: Add app extensions for the surfaces the app touches, such as admin blocks, theme app extensions, or checkout UI, so features appear where merchants and shoppers use them.
Most teams start with a minimum viable product (MVP) first, get a working app in front of real users faster, and keep early scope under control. When a core version works well, they can expand to additional features.
Step 5: Test and fix.
Thorough testing is important because Shopify stores vary widely, and a bug that appears on one store may not appear on another. Developers have to test each layer, not just the final screens. They should run:
- Unit tests on business logic
- Integration tests on API calls and webhook handlers
- End-to-end tests on the full install-and-use flow, ideally as automated tests that run on every change.
Install the app on development stores with different plans, product catalogs, and configurations. Confirm the app handles API errors and rate limits cleanly, retries failed calls, and meets Shopify's performance expectations, because slow or unstable apps fail review and frustrate merchants.
Step 6: Submit for review (public apps only).
This step is applied when you build public apps only. Before submitting, prepare the app to pass Shopify's checks in terms of security, performance, and functionality, not just whether the app works. Cover these areas first:
- Technical requirements: Confirm the app uses the GraphQL Admin API, requests only the scopes it needs, and handles OAuth and session tokens correctly. Apps built on the REST Admin API or asking for excess access are common rejection reasons.
- Mandatory webhooks: Implement Shopify's required compliance webhooks for customer data requests and app uninstalls, which review checks directly.
- Billing: If the app charges merchants, bill through Shopify's Billing API rather than an outside payment system, since Shopify requires it for App Store apps.
- Performance: Meet Shopify's load-time and Web Vitals expectations for embedded apps, because slow apps fail review.
- Listing: Prepare the App Store listing with a clear description, screenshots, a test account, and setup instructions the reviewer can follow.
On average, an app is reviewed within about seven business days, but teams should plan for two to three rounds of feedback and budget four to six weeks from submission to listing. Custom apps skip this stage entirely, since they are not distributed through the App Store.
Step 7: Launch and maintain.
Release the app, then keep it healthy and smooth over time. Shopify updates its APIs on a regular schedule, so an app needs ongoing maintenance to stay compatible, secure, and fast.
The launch timelines vary with complexity. A simple custom app can take a few weeks, while a full public app with integrations and review can run several months. For a custom app, the first hands-on setup step is enabling custom app development in your store, which now happens in the Shopify Dev Dashboard rather than the admin.
How to Enable Custom App Development in Shopify?
Starting January 1, 2026, you can no longer create new custom apps directly in the Shopify admin anymore but through the Shopify Dev Dashboard. Existing custom apps still work, but any new one is built in the Dev Dashboard and then installed on your store. This is a recent change by Shopify to tighten security and standardize how custom apps are built and managed.
Here is the current process to create a custom app for your store:
- Open app settings: From your Shopify admin, go to Settings, then Apps and sales channels.
- Start the Dev Dashboard: Click Develop apps, then choose to build apps using the Dev Dashboard, which opens the Dev Dashboard.
- Create the app: Click Create app, give the app a name, and create it.
- Set API scopes: Choose the Admin API scopes the app needs, such as reading products or writing orders, and add Storefront API scopes if the app is customer-facing.
- Install the app: Install the app on your store to activate it.
- Get the access token: Generate the Admin API access token, which external systems use to connect to your store. Store it safely, since Shopify shows it only once.
Once the app is built and enabled, store owners automatically have full access to create and manage custom apps. A staff member needs the app development permission to create or edit them, so confirm that permission first if a team member will handle the setup. For most businesses, a developer or agency handles these steps and asks only for the access needed.
How Much Does Shopify App Development Service in Vietnam Cost?
Shopify app development usually costs between about $4,000 for a simple custom app and $120,000 or more for a complex one. The table below shows typical offshore outsourcing rates in Vietnam for a Shopify app. Treat the figures as estimates that vary by scope.
|
App type |
Typical cost range |
What it covers |
|
Simple custom app |
$2,000–$6,000 |
One workflow or a single integration for one store, with a basic interface. |
|
Substantial custom app |
$6,000–$25,000 |
Multiple features, deeper integrations, and a more complete admin interface. |
|
Complex custom app |
$25,000–$60,000+ |
Heavy integrations, real-time data sync, or advanced logic for one store. |
|
Public App Store app |
$15,000–$50,000+ to build, plus first-year operations |
A product built for many merchants, including review, support, and multi-store testing. |
Vietnamese developers typically charge between $20 and $35 for junior to mid-level developers and $35 to $50 for senior developers, and specialized senior roles can reach around $65, compared to $100 to $150 in Western markets. The same app can therefore cost far less to build in Vietnam than in North America or Western Europe, which is why many businesses outsource the work to the Vietnamese workforce.
In-House vs. Freelance vs. Outsourcing Shopify App Development
Choosing the right partner starts with deciding how you want to build. The right one depends on your budget, how often you need app work, and how complex the app is. The table below compares the three models:
|
In-house team |
Freelancers |
Outsourcing Team | |
|
Advantages |
Full control and deep product knowledge, with the team always available for ongoing work. |
Lowest commitment and low cost for small, one-off tasks. |
A full team covers design, build, testing, and maintenance, and offshore rates lower the cost. |
|
Disadvantages |
Highest fixed cost, since you pay salaries and benefits between projects, and hiring takes time, too. |
No backup if the freelancer leaves mid-project, and quality varies. |
You depend on an external partner, which needs clear communication and working-hours overlap. |
For most businesses that need a single custom app, a Shopify software outsourcing agency provides a full team, so you get design, development, testing, and maintenance without hiring each role yourself. Moreover, offshore agencies in regions like Vietnam also add the cost advantage, which is why many companies outsource Shopify app development rather than build it locally.
FAQs
1. Is Shopify app development profitable?
Yes, it can, but depending on the app, its pricing, and how many merchants keep using it. Public apps usually earn through recurring subscriptions, and profit depends on demand, retention, and Shopify's revenue-share terms. A custom app pays off differently, through the time or revenue it saves the one business that owns it.
2. Can I build a Shopify app with AI instead of hiring developers?
For simple internal tools, yes. Shopify's Sidekick AI can generate lightweight admin apps from a prompt on the Grow, Advanced, and Shopify Plus plans. But these apps are small and serve simple tasks only. Complex integrations, storefront features, and App Store apps still need a dedicated development team.
>> Read more: A Complete Guide to Ecommerce Automation Software
3. What is the difference between a Shopify app and a Shopify theme?
A theme controls how the store looks, and an app adds what the store can do. Themes are built with Liquid and set layout and design. Apps add features like subscriptions or inventory syncing. The two are built and maintained separately.
4. Should I install an existing app or build a custom one?
You should install an existing app when one already does the job, since it is cheaper and faster. Build a custom app when no existing app fits your workflow or integration needs. Many stores use both: App Store apps for common tasks and a custom app for what makes their operation different.
5. Who owns the code for a custom Shopify app?
Whoever the contract says, so settle it before you start. Reputable agencies assign full code ownership to the client, usually on final payment. Confirm this in writing, along with source code and account access, so you are not locked in to one provider.
Conclusion
Shopify app development comes down to a few clear decisions: whether you need a public app or a custom one, whether an existing App Store app already fits, and whether to build in-house or outsource. Getting those right early saves the most money, because scope, integrations, and the team's hourly rate drive the final cost far more than any single feature.
For most merchants, the practical path is a custom app built by an experienced partner, scoped to one workflow, with the build, hosting, and maintenance costs quoted separately so you can see the full price. Start by writing down the exact problem the app must solve, then use that to get a scoped estimate. A clear problem statement is the difference between an app that pays for itself and one that adds cost without a return.
>>> Follow and Contact Relia Software for more information!

- Mobile App Development
- E-commerce
- Web application Development
- development