Integrating Flutter with AWS Kinesis Video Streams via WebRTC allows you to build real-time video streaming apps with sub-second latency, ideal for use cases like live monitoring, IoT cameras, and interactive video apps. This solution solves 3 primary mobile streaming challenges: latency, scalability, and resource efficiency.
In this blog, you’ll learn how Kinesis Video Streams WebRTC works, why it’s better for low-latency streaming, and how to implement it step by step in a Flutter app. We’ll break down the architecture, signaling flow, and real-world challenges so you can build a stable, production-ready streaming system.
Key Takeaways:
|
What Is AWS Kinesis Video Streams WebRTC?
AWS Kinesis Video Streams WebRTC is a managed service feature that uses WebRTC to deliver audio and video with sub-second latency without managing your own signaling or STUN/TURN servers.
Instead of sending video through traditional streaming pipelines (like HLS), Kinesis Video Streams WebRTC sets up a direct peer-to-peer connection between a viewer (your app) and a source device (like a camera). AWS handles the signaling layer, which helps both sides find each other and establish the connection.
Why Kinesis Video Streams (KVS) Integration?
Designing for mobile streaming requires a practical balance. You are not only managing data, but you are also managing battery use and device heat during playback.
- Sub-second latency: Unlike HLS or DASH, which split video into small segments before delivery, WebRTC sends media in real time through a direct peer-to-peer connection or a TURN relay when needed. By using AWS Kinesis Video Streams as the signaling backbone, we can achieve very low latency that feels almost instant to the end user.
- Massive scalability: AWS handles most of the work in the signaling infrastructure. This means architects do not need to manage a large number of STUN/TURN servers or signaling WebSocket connections by hand. KVS can scale horizontally, which makes it easier to support thousands of concurrent streams.
- Battery and thermal optimization: Mobile devices often overheat during video playback. By using standard WebRTC protocols, we can take advantage of hardware-accelerated decoding available on many modern iOS and Android chipsets to reduce CPU usage and preserve battery life.
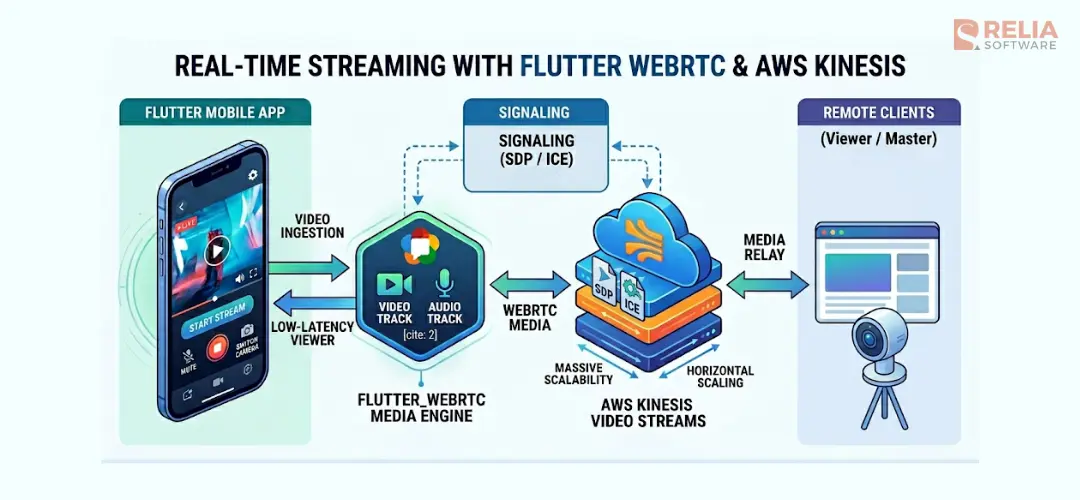
KVS + WebRTC + Flutter: Architecture Overview
In the KVS ecosystem, your Flutter application works in the Viewer role. The process of creating a connection, often called the WebRTC handshake, runs through a KVS signaling channel.
- Authentication: The app gets temporary AWS credentials and connects to a specific signaling channel ARN.
- The handshake: The mobile client sends an SDP offer through the KVS signaling service.
- The response: The remote Master device, such as a camera or edge device, receives the offer through KVS and sends back an SDP answer.
- Connection setup: Both sides exchange ICE candidates, which are possible network paths for the video stream. The goal is to find the most efficient path, ideally a direct peer-to-peer connection, and use a TURN relay only when necessary.
By the end of this process, the signaling channel moves into the background, and a dedicated media connection is created. This connection delivers high-definition, real-time video directly to your Flutter renderers.
A Step-by-Step Guide to Build WebRTC Streaming in Flutter
1. Setup dependencies
To connect Flutter with the AWS signaling protocol, we use a few main components. These components handle both the low-level media process and the AWS-specific signaling flow.
flutter_webrtc: Media Engine
flutter_webrtc is the main plugin that brings WebRTC support to Flutter. From an architecture view, it works as the core engine of the video system.
- Peer connection management: It manages the
RTCPeerConnectionlifecycle, which handles the actual data transfer between the mobile app and the camera. - Video rendering: It provides
RTCVideoRenderer, which lets us show the incoming remote video stream inside the Flutter widget tree. - Media track control: It gives us detailed control over audio and video tracks, which supports features like muting or switching between the front and back camera.
flutter_kinesis_video_webrtc: AWS Signaling Bridge
AWS Kinesis Video Streams uses its own signaling protocol to create the connection while flutter_webrtc handles the media side. This lightweight wrapper helps the app communicate with the KVS backend.
- AWS signaling support: It provides classes like
SignalingClientandSimpleWebSocketto handle the JSON-based message types that KVS expects, such asSDP_OFFER,SDP_ANSWER, andICE_CANDIDATE. - Simpler handshake flow: Instead of manually handling AWS signatures and WebSocket states, this package wraps that logic so we can focus more on the app itself.
By combining these two packages, we separate media handling from cloud signaling. This makes the video architecture more modular and easier to maintain.
dependencies:
  flutter:
    sdk: flutter
  # Core WebRTC engine
  flutter_webrtc: ^0.12.0
  # AWS Kinesis Video Streams signaling wrapper
  flutter_kinesis_video_webrtc: ^1.0.3
  # For decoding signaling payloads
  dart:convert: any
2. Manage state for multi-device streaming
The pattern I implement is the Registry Pattern. Instead of using single variables for your WebRTC objects, use dedicated maps indexed by a unique identifier, such as a hardware ID. This allows the application to scale from one camera to dozens without changing the underlying logic. In our implementation, we maintain several key registries:
rtcVideoRenderers: stores the UI renderer for each camera._peerConnections: stores the active peer connection for each device._webSockets: stores the signaling socket for each KVS stream._localStreams: stores the local microphone stream for two-way audio on each device.
Supporting multiple camera streams requires more than opening a connection for each device. The app also needs a clear way to manage all streaming resources during the full lifecycle. Without a central Flutter state management structure, the app can run into memory leaks, unused WebSocket connections, and audio streams that keep playing after a screen is closed.
>> Read more:
- Guide to Use Flutter Bloc for State Management in Flutter Apps
- Mastering Provider in Flutter for Effective State Management
3. Initialize WebRTC connections
Configuring RTCPeerConnection and ICE Servers
When a new connection starts, the app creates an RTCPeerConnection and configures it with ICE servers, including STUN and TURN, from the AWS KVS backend. This setup helps WebRTC find the best network path between the mobile app and the camera.
Each connection should stay isolated from the others. By storing every connection in its own registry entry, the app can make sure that an error or a disconnect on "Camera A" never impacts the stability of "Camera B".
Binding Remote Tracks to the Flutter UI
After the connection is ready, we must bind the incoming remote media tracks to the local UI component. This is handled through the onTrack callback, or onAddStream in older implementations.
- Dynamic Assignment: When a remote track is received, it is assigned to the
srcObjectof the correspondingRTCVideoRendererfound in the registry - Track Control: By keeping a reference to the renderer, we can dynamically control media track properties such as enabling or disabling audio for "Listening" mode directly through the renderer's
srcObject.
class StreamController {
  // Registries indexed by unique Device ID
  final Map<String, RTCPeerConnection> _peerConnections = {}; [cite: 102]
  final Map<String, RTCVideoRenderer> _videoRenderers = {}; [cite: 103]
  final Map<String, List<RTCIceCandidate>> _pendingIceCandidates = {}; [cite: 103]

  Future<void> initializeDevice(String deviceId) async { [cite: 106]
    // 1. Initialize Renderer
    final renderer = RTCVideoRenderer(); [cite: 108]
    await renderer.initialize(); [cite: 109]
    _videoRenderers[deviceId] = renderer; [cite: 110]

    // 2. Create Peer Connection with ICE Servers from KVS
    final Map<String, dynamic> configuration = { [cite: 112]
      'iceServers': [ [cite: 113]
        {'urls': 'stun:stun.kinesisvideo.us-west-2.amazonaws.com:443'}, [cite: 114, 115]
        // TURN servers should be fetched dynamically from KVS GetIceServerConfig API [cite: 116]
      ], [cite: 117]
      'sdpSemantics': 'unified-plan', [cite: 118]
    }; [cite: 119]

    final pc = await createPeerConnection(configuration); [cite: 120]

    // 3. Bind Remote Tracks to Renderer
    pc.onTrack = (event) { [cite: 122]
      if (event.streams.isNotEmpty) { [cite: 123]
        _videoRenderers[deviceId]?.srcObject = event.streams[0]; [cite: 124, 125]
      } [cite: 126]
    }; [cite: 127]

    _peerConnections[deviceId] = pc; [cite: 130]
  }
}
4. Implement WebRTC signaling
This is where the actual "handshake" happens. While the media engine handles the video frames, the signaling implementation is the conductor ensuring both parties are on the same page before a single pixel is transmitted.
Initializing the Signaling Client
To communicate with the AWS backend, we utilize the SignalingClient and SimpleWebSocket classes from the KVS-specific signaling package. The initialization involves:
- Connecting the Socket: Establishing a secure WebSocket connection to the KVS signaling endpoint.
- Contextual Routing: Each signaling instance is tied to a specific hardware ID, allowing the controller to route messages to the correct peer connection in a multi-camera environment.
void setupSignaling(String deviceId, String wssUri) {
  final signalingClient = SignalingClient(wssUri);
  signalingClient.onMessage = (message) {
    // Route the incoming websocket message to our handler
    handleSignalingMessage(deviceId, jsonDecode(message));
  };
  signalingClient.connect();
}
Handling Incoming Messages
The signaling channel delivers JSON-wrapped payloads that dictate the connection parameters. A robust implementation must handle two primary message types:
The SDP Answer: When the remote master responds to your offer, it sends an SDP_ANSWER. In the Kinesis ecosystem, this payload is typically Base64 encoded.
- Decoding: The payload must be Base64 decoded and then parsed as a UTF-8 JSON string to extract the Session Description Protocol (SDP) and the message type.
- Application: Once decoded, the SDP is applied to the connection using
setRemoteDescription. This informs the mobile app about the remote media capabilities and formats. - State Transition: Setting the remote description is a pivotal state change. Once successful, the app can transition from "negotiating" to "connecting".
ICE Candidates: ICE candidates are the "network maps" that tell the app how to find the camera.
- Parsing: Like the SDP answer, ICE candidates arrive as Base64-encoded payloads containing the candidate string,
sdpMid, andsdpMLineIndex. - Conditional Handling: A common pitfall is attempting to add an ICE candidate before the remote description has been set.
- The Queue: If the SDP has not been processed yet, candidates are added to a
_pendingIceCandidateslist. - The Flush: As soon as the
setRemoteDescriptioncall succeeds, the queue is "flushed," and all pending candidates are added to the peer connection simultaneously.
- The Queue: If the SDP has not been processed yet, candidates are added to a
By strictly managing the sequence of these messages, you ensure a high connection success rate regardless of whether the mobile device is on a restrictive office Wi-Fi or a high-latency cellular network.
void handleSignalingMessage(String deviceId, Map<String, dynamic> message) async {
  final pc = _peerConnections[deviceId];
  if (pc == null) return;

  final String type = message['action']; // e.g., 'SDP_ANSWER' or 'ICE_CANDIDATE'
  final String payloadBase64 = message['payload'];

  // 1. Decode the AWS Base64 payload
  final decodedPayload = utf8.decode(base64.decode(payloadBase64));
  final Map<String, dynamic> data = jsonDecode(decodedPayload);

  if (type == 'SDP_ANSWER') {
    final description = RTCSessionDescription(data['sdp'], 'answer');
    await pc.setRemoteDescription(description);

    // 2. Flush the ICE Queue after the remote description is set
    final pending = _pendingIceCandidates[deviceId] ?? [];
    for (var candidate in pending) {
      await pc.addCandidate(candidate);
    }
    _pendingIceCandidates[deviceId]?.clear();

  } else if (type == 'ICE_CANDIDATE') {
    final candidate = RTCIceCandidate(
      data['candidate'],
      data['sdpMid'],
      data['sdpMLineIndex'],
    );

    // 3. Queue candidates if the Remote Description isn't ready yet
    if (pc.getRemoteDescription() == null) {
      _pendingIceCandidates.putIfAbsent(deviceId, () => []).add(candidate);
    } else {
      await pc.addCandidate(candidate);
    }
  }
}
Solving the Race Condition: ICE Candidate Queueing
In an ideal network, WebRTC signaling would follow a fixed order. In reality, network packets can arrive in any order. A common issue in AWS KVS integration is that ICE candidates (which contain network path information) often arrive before the SDP Answer is fully processed.
If you try to add an ICE candidate before the remote description is set, the connection will fail. To avoid this, the app needs a clear state tracking and queueing mechanism.
The Queue Logic: Handling Early ICE Candidates
To prevent connection failures, we use two main components:
- Candidate Queue: A list (for example,
_pendingIceCandidates) that stores ICE candidates temporarily when the connection is not ready. - State Tracking: A boolean flag (for example,
_hasRemoteDescription) that shows whether the SDP handshake is complete and the connection can accept ICE candidates.
When an ICE_CANDIDATE message arrives, the app checks this flag. If the remote description is not set yet, the candidate is added to the queue and processed later.
The Flush Mechanism: Completing the Handshake
The "flush" step completes the connection after the SDP Answer is applied.
- Process the SDP Answer: The app receives and decodes the payload, then calls
setRemoteDescription. - Update state: Once the description is set,
_hasRemoteDescriptionbecomes true. - Flush queued candidates: All stored ICE candidates are added to the peer connection.
- Clear the queue: The queue is cleared to free memory and prepare for future candidates.
// State variables for synchronization
final List<webrtc.RTCIceCandidate> _pendingIceCandidates = [];
bool _hasRemoteDescription = false;

Future<void> handleSignalingMessage(dynamic data, webrtc.RTCPeerConnection rtcPeerConnection) async {
  final decoded = jsonDecode(data);
  final messageType = decoded['messageType'];

  if (messageType == "SDP_ANSWER") {
    // 1. Decode and set the remote description
    final payload = jsonDecode(utf8.decode(base64.decode(decoded['messagePayload'])));
    await rtcPeerConnection.setRemoteDescription(
      webrtc.RTCSessionDescription(payload['sdp'], payload['type']),
    );
    _hasRemoteDescription = true;

    // 2. Flush queued candidates
    for (final candidate in _pendingIceCandidates) {
      await rtcPeerConnection.addCandidate(candidate);
    }
    _pendingIceCandidates.clear();
  }
  else if (messageType == "ICE_CANDIDATE") {
    // 3. Decode candidate data
    final payload = jsonDecode(utf8.decode(base64.decode(decoded['messagePayload'])));
    final iceCandidate = webrtc.RTCIceCandidate(
      payload['candidate'],
      payload['sdpMid'],
      payload['sdpMLineIndex'],
    );

    // 4. Queue if not ready
    if (!_hasRemoteDescription) {
      _pendingIceCandidates.add(iceCandidate);
      return;
    }

    // 5. Apply directly if ready
    await rtcPeerConnection.addCandidate(iceCandidate);
  }
}
By using this pattern, the app can create a stable connection even when signaling messages arrive out of order.
Bidirectional Audio & Media Control
Moving beyond a view-only setup requires handling both local and remote media streams. This includes controlling audio input, syncing with device commands, and managing user interaction.
Track Management: Handling the Local Microphone
When working with multiple devices, a key challenge is making sure the local microphone stream is mapped to the correct connection, without cross-talk or accidental transmission.
- Per-device local streams: Maintain a registry (for example,
Map<String, MediaStream> _localStreams) to store the microphone stream for each device connection. - Isolation strategy: By separating the local stream from the remote stream, you can enable the microphone for one camera (to talk to a specific room) while keeping it disabled for others within the same session.
API-Driven Control: Push-to-Talk Logic
A common issue is relying only on the WebRTC stream to control audio. For real devices, it is better to use an API to make sure the device is ready before sending audio.
- Command Flow: When a user presses the "Talk" button, the app sends a command (for example, a hex string) to the device through a backend API to enable the local microphone track.
- Synchronized activation: The microphone is enabled only after (or at the same time as) the command is sent. This avoids clipped audio when the user starts speaking too early.
- Release flow: When the button is released, a release command is sent to the device. The microphone track is disabled to protect privacy and reduce bandwidth.
Mute and Unmute Logic
Managing audio requires controlling both what the user hears and what they send.
- Remote audio control: To listen to a room, toggle the
enabledproperty of the remote audio tracks from theRTCVideoRenderersource. This keeps the video visible while muting audio. - Local microphone control: The local microphone is controlled by accessing audio tracks from the stored local stream and switching their enabled state based on user interaction.
- UI state sync: Always sync these track states with UI variables (such as
isLiveAudioEnabledorisMicEnabled) to give clear feedback to the user.
// Managing audio tracks for multiple devices
final Map<String, webrtc.MediaStream> _localStreams = {};
final RxMap<String, bool> isLiveAudioEnabled = <String, bool>{}.obs;

/// Toggles the local microphone for a specific device
void toggleMic(String hardwareId, bool enabled) {
  final localStream = _localStreams[hardwareId];
  if (localStream == null) return;

  final tracks = localStream.getAudioTracks();
  if (tracks.isEmpty) return;

  // Enable/disable track controls audio transmission
  tracks[0].enabled = enabled;
}

/// Push-to-Talk: notify device and enable mic
void pushToTalk(String hardwareId) {
  const pttCommand = 'AB000261009D'; // Example command

  // 1. Send command to device
  _sendMessageByAPI(
    command: pttCommand,
    hardwareId: hardwareId,
  );

  // 2. Enable microphone
  toggleMic(hardwareId, true);
}

/// Release PTT: notify device and disable mic
void releasePushToTalk(String hardwareId) {
  const releaseCommand = 'AB000261019E'; // Example command

  _sendMessageByAPI(
    command: releaseCommand,
    hardwareId: hardwareId,
  );

  toggleMic(hardwareId, false);
}

/// Mute/unmute remote audio
void setLiveAudio(String hardwareId, bool enabled) {
  final renderer = rtcVideoRenderers[hardwareId];
  final tracks = renderer?.srcObject?.getAudioTracks();

  if (tracks != null && tracks.isNotEmpty) {
    for (final track in tracks) {
      track.enabled = enabled;
    }
  }

  isLiveAudioEnabled[hardwareId] = enabled;
}
Performance and Resource Management
In mobile apps, how you stop a process is just as important as how you start it. WebRTC uses a lot of system resources. It uses CPU for decoding, keeps the network active, and uses hardware for audio. If these resources are not released properly, the app may keep running in the background, continue playing audio, and drain battery quickly.
Cleaning Up WebRTC Resources
To keep the app stable, you should use a central reset() function. This function acts as a single place to clean up all WebRTC resources for one device or the whole session.
- Close WebSockets: Close the signaling connection first to stop receiving new messages.
- Stop media tracks: Closing the connection is not enough. You must stop all tracks in the
MediaStream, including both microphone and video, to release device hardware. - Clean up peer connections: Each
RTCPeerConnectionshould be closed and disposed to release internal memory used by the WebRTC engine. - Dispose renderers:
RTCVideoRendererobjects should be disposed to free memory used for displaying video frames. - Clear registries: Remove references from maps such as
_peerConnectionsandrtcVideoRenderersso the system can free memory.
Handling Network Changes and Connection Stability
Mobile networks are not always stable. The app must handle changes between Wi-Fi and mobile data.
- Signaling timeouts: Not all signaling attempts succeed. A timeout (for example, 30 seconds) prevents the app from staying stuck in a "Connecting..." state.
- Network switching: When the network changes, the current connection may stop working. The app should detect states like failed or
disconnectedand restart the signaling process. - Logging for debugging: In production, you cannot directly debug user networks. Implement a structured
WebRTCLogEntrysystem, logging key events, such as when an SDP answer arrives or when an ICE candidate fails, helps identify connection issues across different networks.
Future<void> reset({String? hardwareId}) async {
  // If hardwareId is provided, clean up only that device.
  // Otherwise, clean up everything.
  final ids = hardwareId != null ? [hardwareId] : _peerConnections.keys.toList();

  for (final id in ids) {
    // 1. Close and dispose the Peer Connection
    await _peerConnections[id]?.close();
    await _peerConnections[id]?.dispose();
    _peerConnections.remove(id);

    // 2. Dispose the UI Renderer
    await rtcVideoRenderers[id]?.dispose();
    rtcVideoRenderers.remove(id);

    // 3. Stop all media tracks (Mic/Camera)
    final localStream = _localStreams[id];
    localStream?.getTracks().forEach((track) {
      track.stop();
    });
    await localStream?.dispose();
    _localStreams.remove(id);

    // 4. Close the Signaling Socket
    _webSockets[id]?.close();
    _webSockets.remove(id);

    // 5. Clear pending signaling data
    _pendingIceCandidates.remove(id);
  }
}
Conclusion
Building a WebRTC solution for AWS Kinesis Video Streams in Flutter requires a careful balance. While the flutter_kinesis_video_webrtc package handles the AWS signaling layer, the app still needs to manage state, handle race conditions, and clean up resources correctly.
Take a note:
- Stay decoupled: Keep signaling logic in a controller or repository, separate from UI widgets.
- Queue your candidates: Never assume the SDP answer will arrive before ICE candidates.
- Clean up aggressively: Treat memory and battery as limited resources.
By following these patterns, you can build a low-latency monitoring system that is both stable and efficient.
>>> Follow and Contact Relia Software for more information!

- coding