So, you're building amazing user interfaces with Flutter, crafting beautiful and performant cross-platform apps. But what about the other side – the backend logic, user management, data storage, and real-time communication that can take your app from a cool concept to a fully functional product? That's where Firebase swoops in, and trust me, it's about to become your Flutter app's best friend.
In this guide, we're going to roll up our sleeves and explore some of the most popular and powerful Firebase services, integrating them step-by-step into a Flutter application. We'll focus on:
- Firebase Authentication: Securely signing users up and in.
- Cloud Firestore: Storing and syncing app data in a flexible NoSQL database.
- Firebase Storage: Saving user-generated content like images.
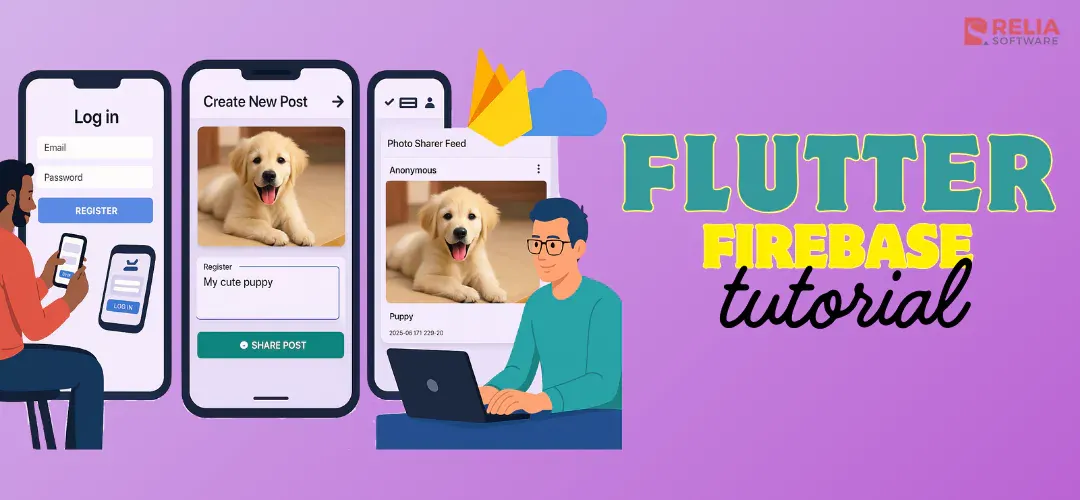
To make things practical and fun, we'll be building a mini “Photo Sharer” application. This example app will allow users to sign up, log in, upload photos with captions and storing them. It shows how these core Firebase services work together seamlessly with Flutter to create a dynamic and interactive user experience.
>> Read more: Flutter Performance Optimization: 3 Common Mistakes & Best Fixes
Setting up
Must-haves
In this blog, we assume you already installed Flutter and have done setting up Flutter as well as able to run your first application with Flutter. If not, heading to Basic Firebase with Flutter 3 https://flutter.dev/ to download, install and start your very first Flutter application.
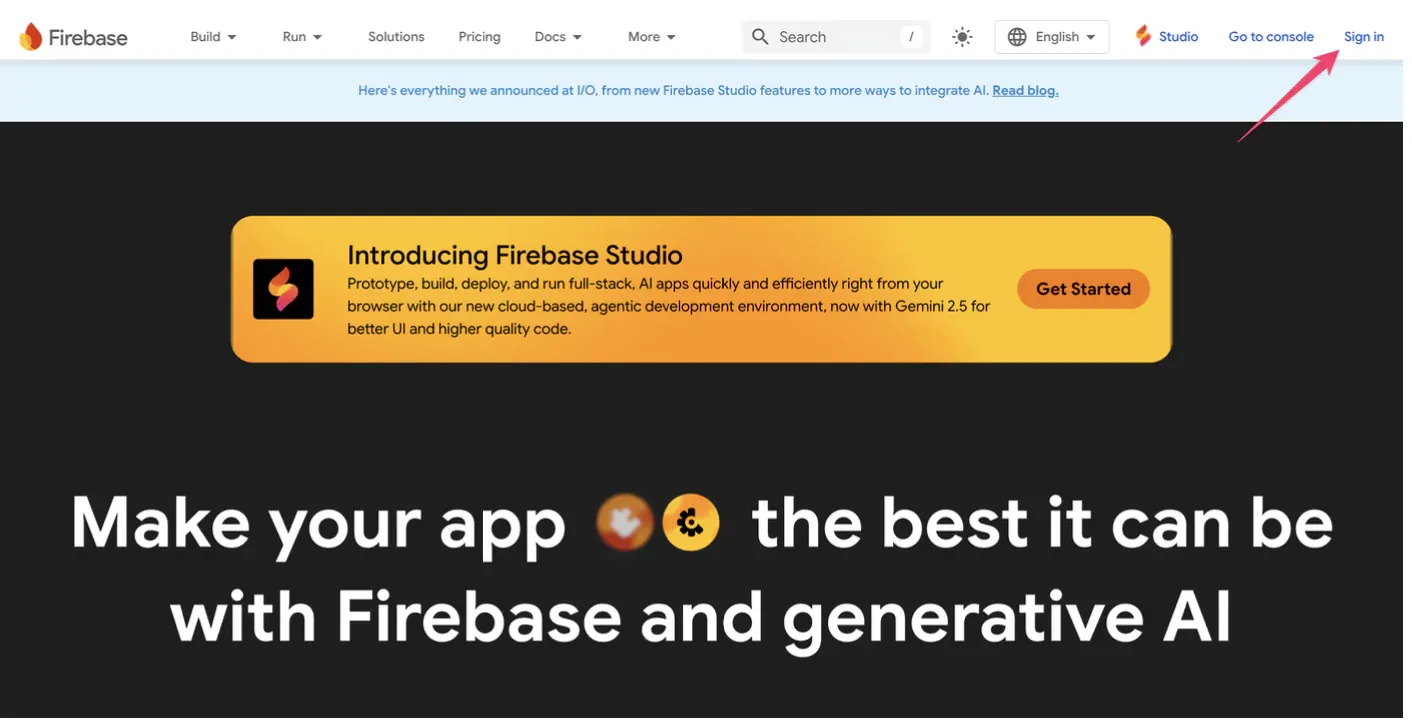
Before getting to it, you will need a Firebase account, which you can register easily (and freely as well) using your Google account. Just head up to https://firebase.google.com/ and sign in (or create a Google account and sign in if you don’t have one yet).
Create a Firebase Project
Before we can integrate any Firebase magic into our Flutter app, we first need a Firebase project. This project will be the central hub for all the Firebase services our "Photo Sharer" app will use. Let's walk through creating one:
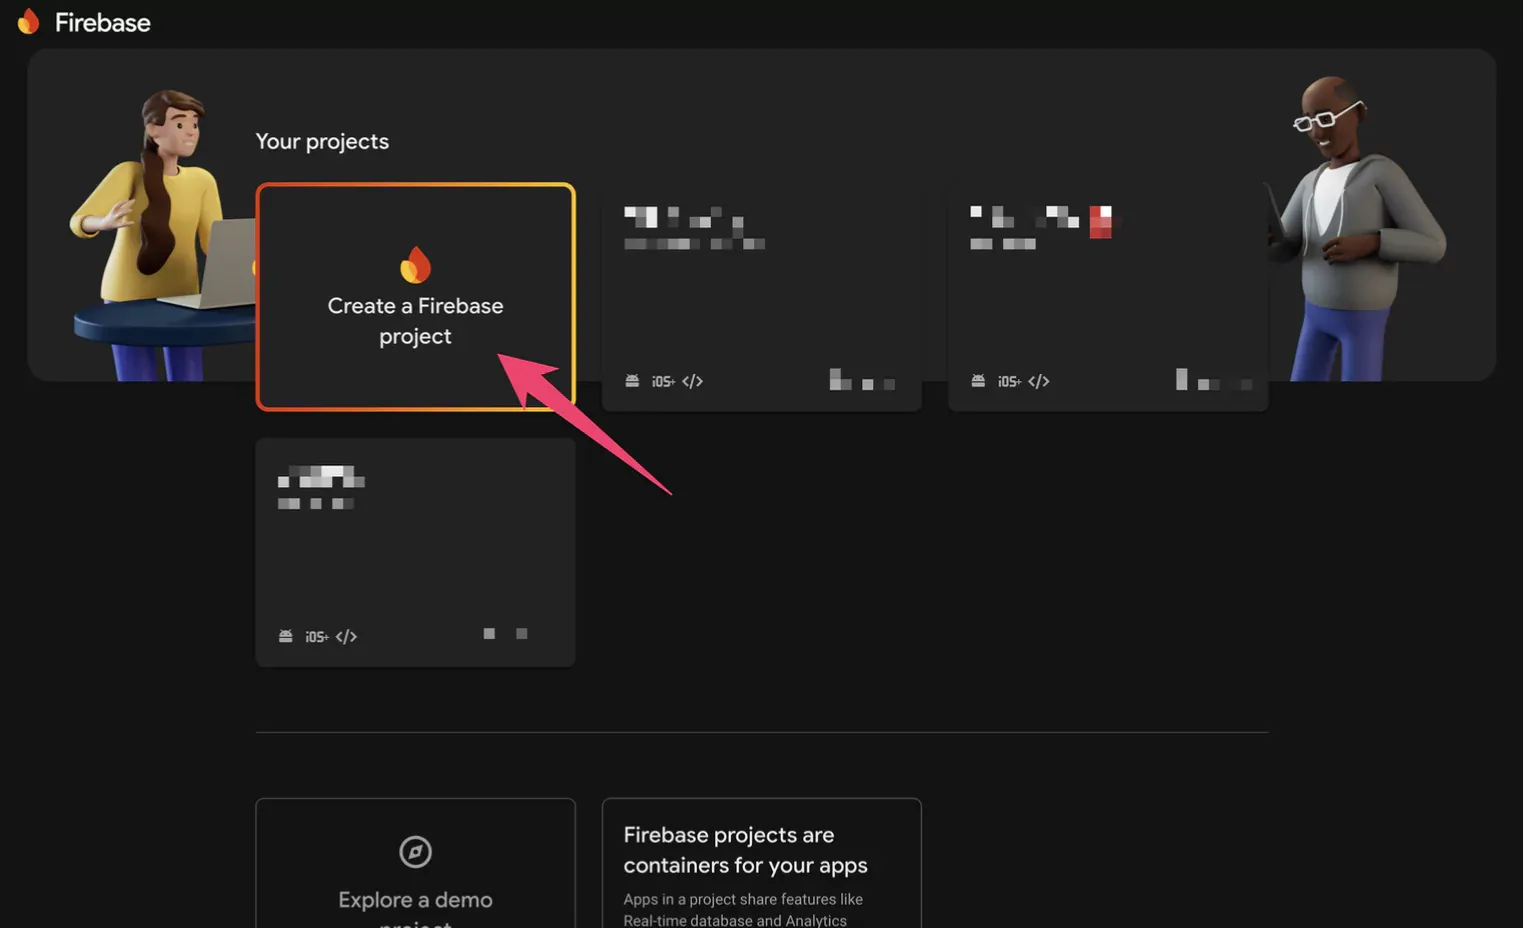
- Navigate to the Firebase Console: Open your web browser and go to the Firebase console.
- Add a New Project: Once you're in the console, you'll see a prominent button or card that says "Create a Firebase project". Click on it. If you already have existing Firebase projects, you might see them listed.
- Enter Your Project Name: You'll be prompted to "Enter your project name." Choose a descriptive name for your project. For this tutorial, I will just go with “Photo Sharer Flutter”.
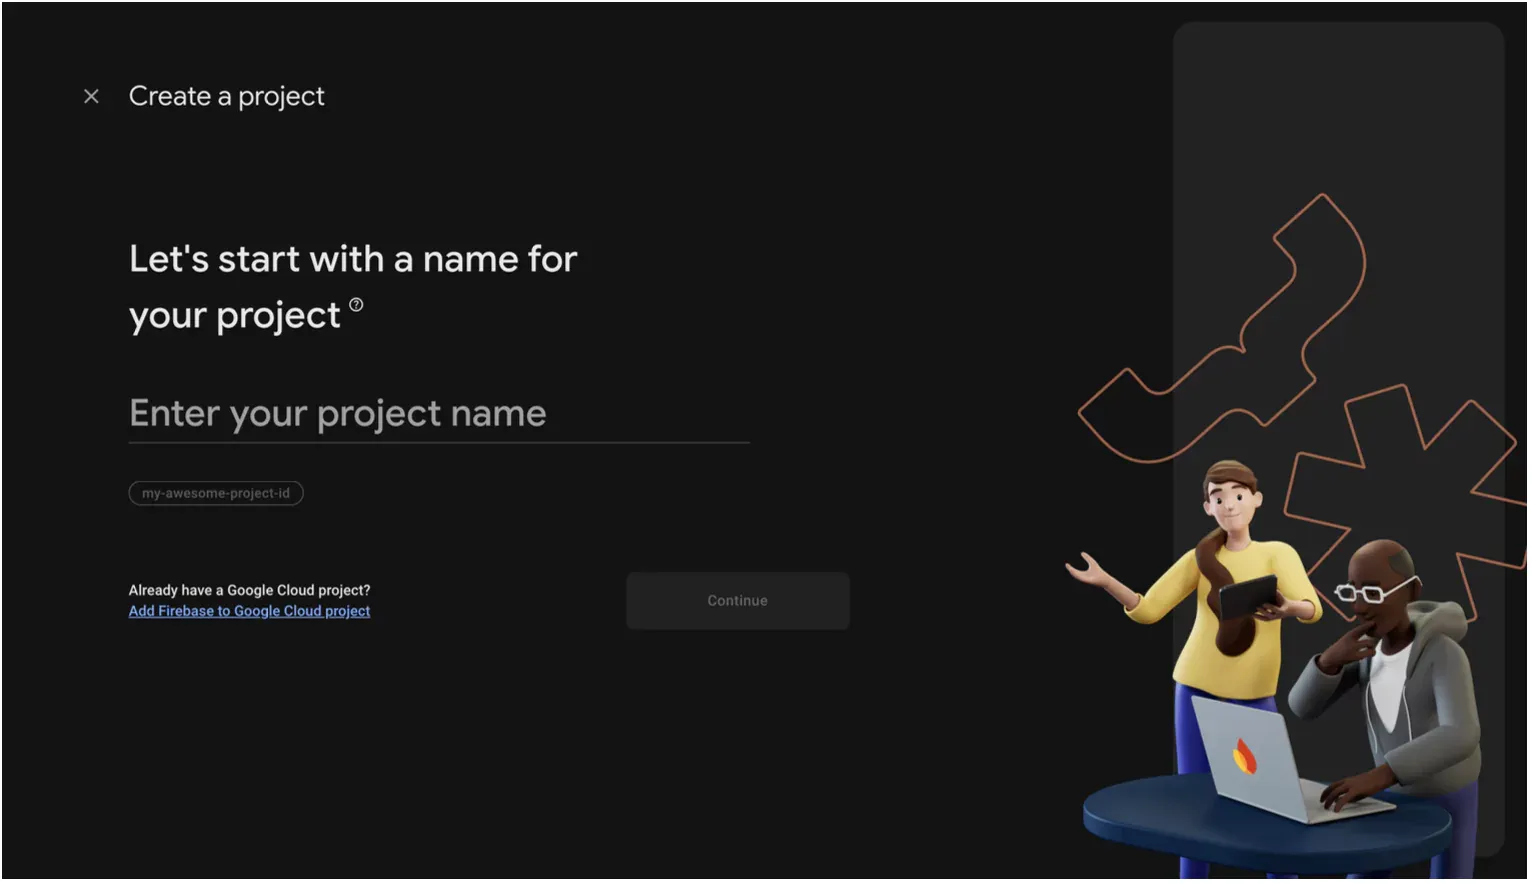
Firebase will automatically generate a unique Project ID below the name (e.g., photo-sharer-flutter). You can usually leave this as is, but you can customize it if needed (it must be globally unique).
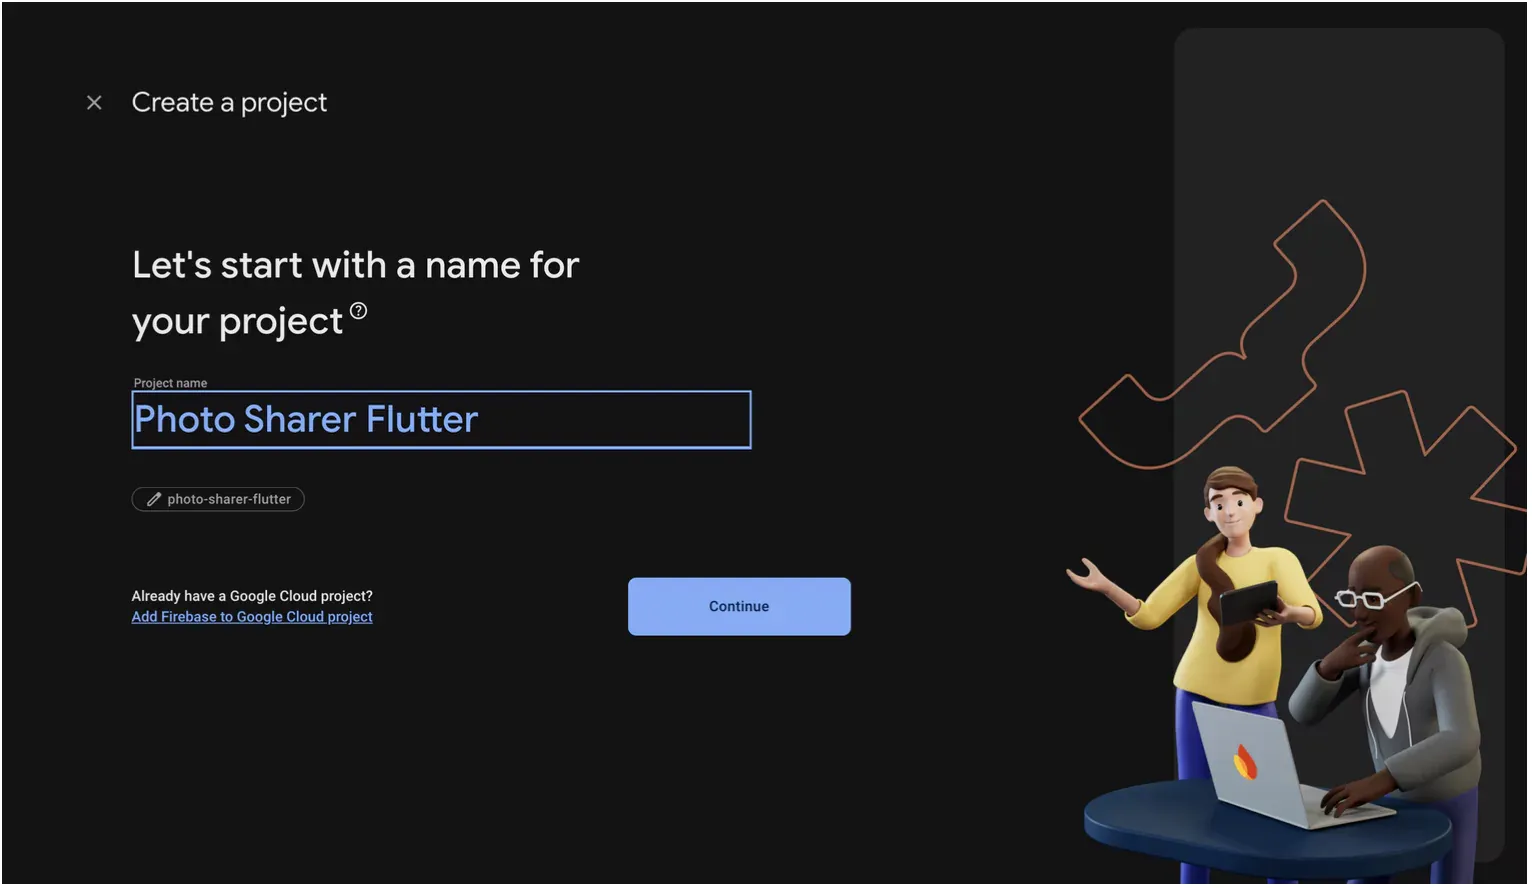
Click “Continue”.
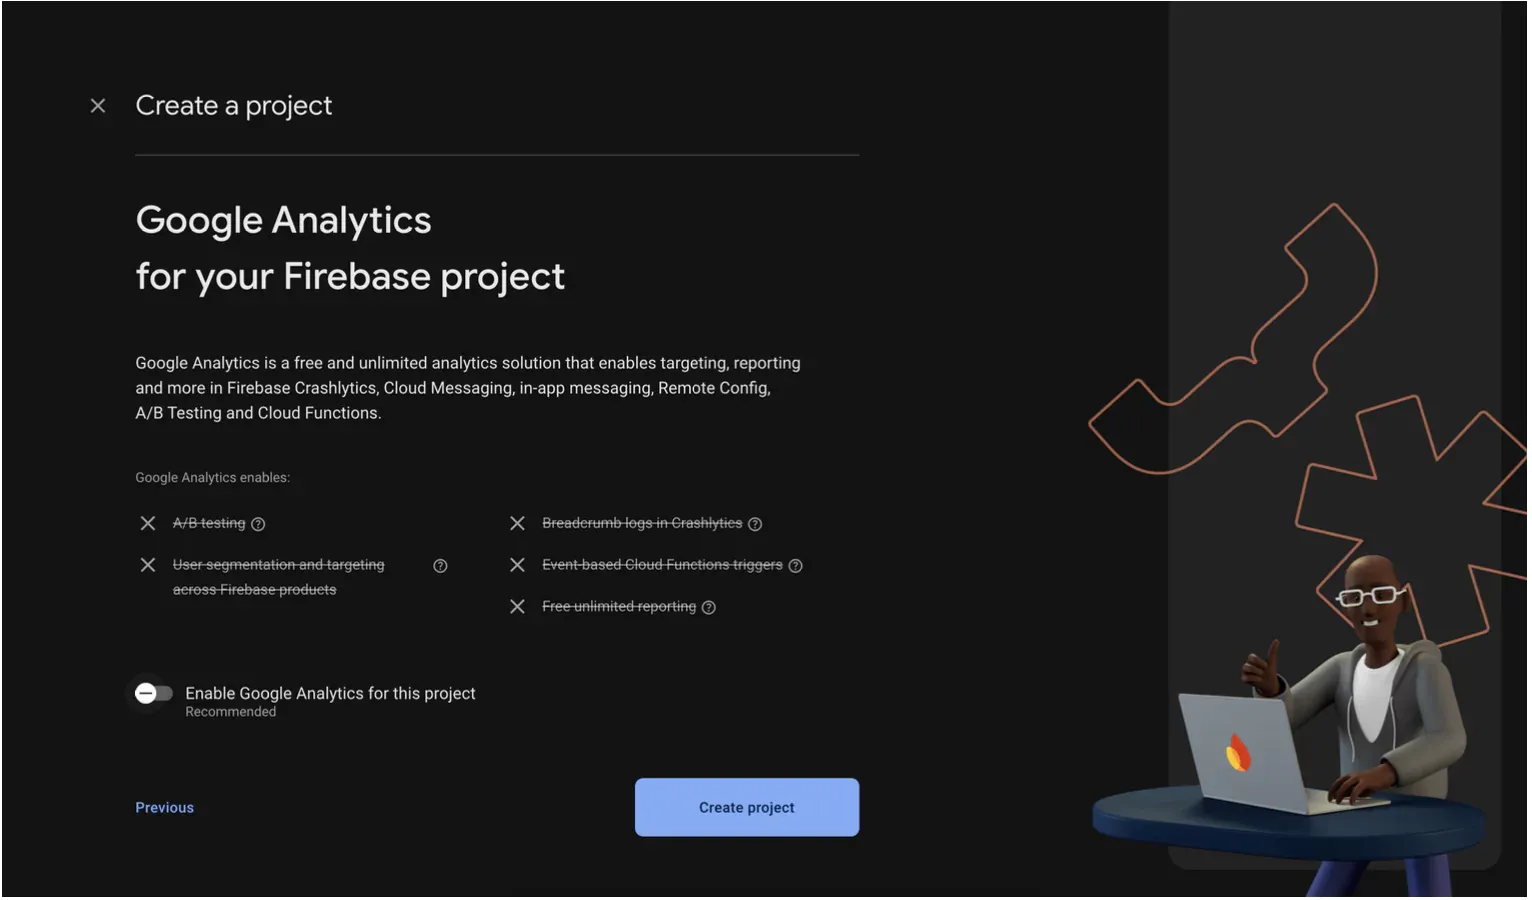
- Google Analytics (Optional but Recommended):
Firebase projects can integrate with Google Analytics to give you powerful insights into your app usage.
It's generally recommended to keep this enabled, especially for production apps. For our learning purposes, you can choose to enable or disable it. If enabled:
- You might be asked to select an existing Google Analytics account or create a new one.
- If creating new, you'll need to specify an Analytics location and accept the data sharing settings and terms.
Make your selection and click "Continue" (if Analytics is enabled) or "Create project" (as stated above, this tutorial will not demonstrate the usage of listed Google Analytics features so it will be disable for now).
- Create Project:
If you enabled Google Analytics, you'll now see the final "Create project" button after configuring Analytics.
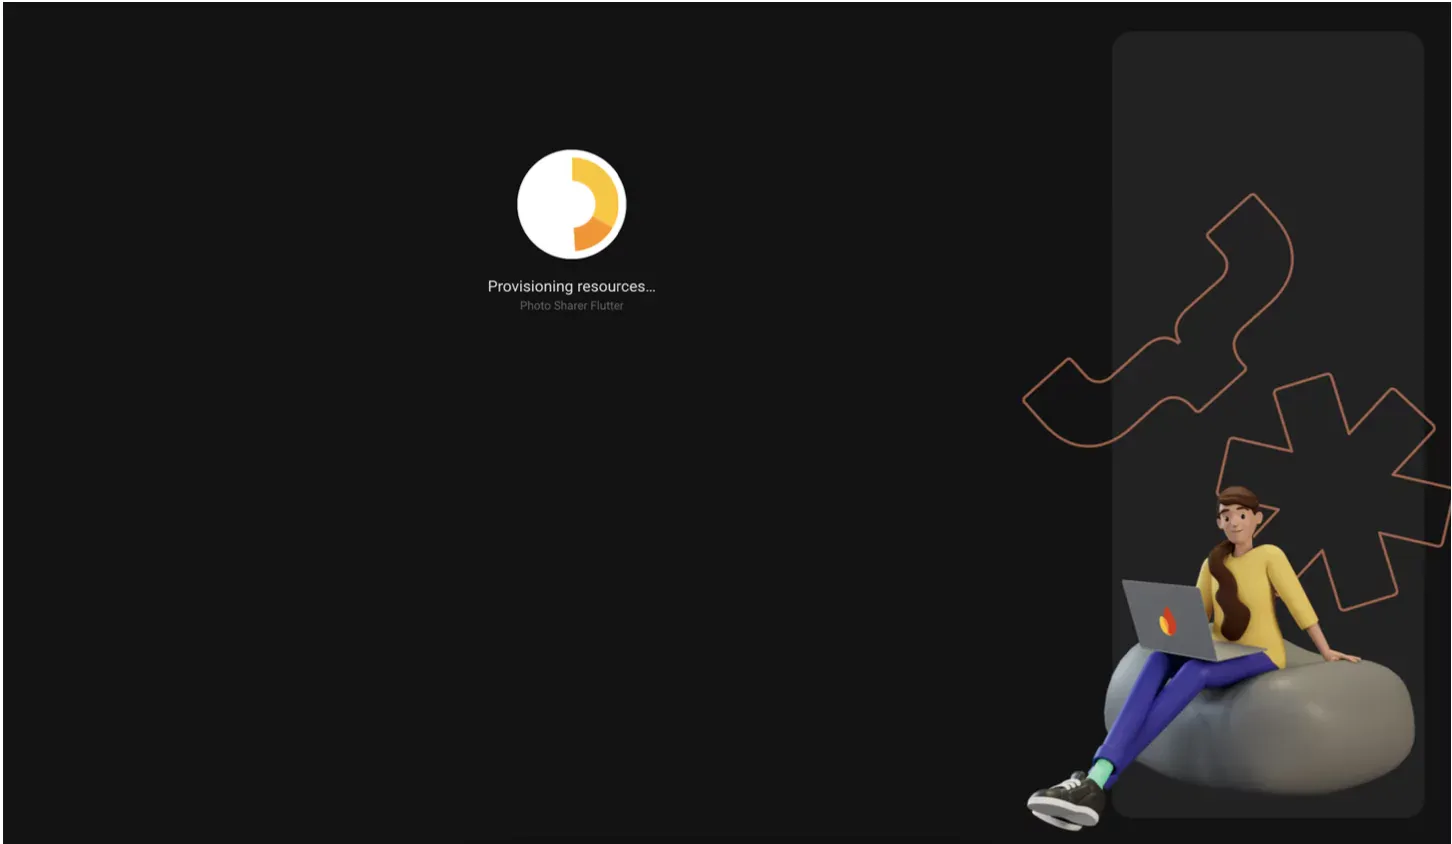
Firebase will take a few moments to provision and set up your new project. You'll see a progress indicator. Let’s wait for Google to create our project.
- Project is Ready.
Once it's done, you'll see a confirmation message like "Your new project is ready". Click "Continue".
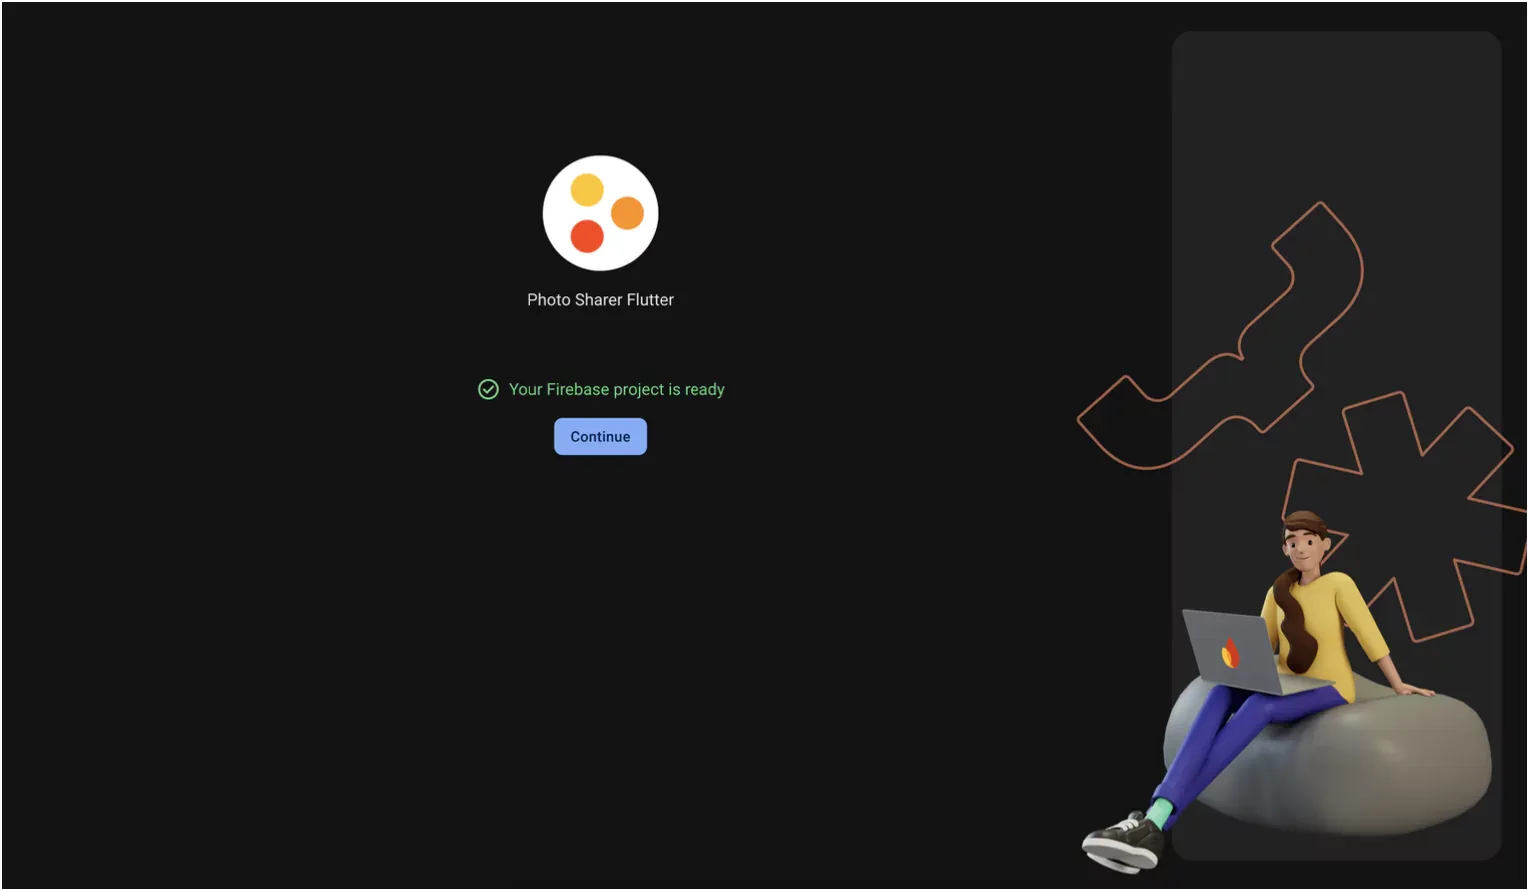
You'll now be redirected to your project's overview page in the Firebase console. Congratulations! You've successfully created your Firebase project. This is where you'll manage all the Firebase services for your app, enable specific features, and monitor usage.
Keep this console window open; we'll need it shortly to connect our Flutter application to this newly created Firebase project.
How to Connect Flutter to Firebase?
With our Firebase project ready in the cloud, the next crucial step is to link it to our local Flutter application. This connection allows our app to communicate with the Firebase services we just set up. FlutterFire, the official collection of Flutter plugins for Firebase, provides a streamlined way to do this.
Create Your Flutter Project
First things first, you need a Flutter project. If you're starting from scratch for our "Photo Sharer" app, open your terminal and run:
flutter create photo_sharer_app
        cd photo_sharer_app
You can replace photo_sharer_app with your preferred project name. This command creates a new Flutter project with all the necessary boilerplate. If you have an existing Flutter project, simply navigate to its root directory.
Configure Using the FlutterFire CLI
The FlutterFire team provides a command-line interface (CLI) tool called flutterfire_cli that simplifies connecting your Flutter app to your Firebase project. It handles the configuration for Android, iOS, and other platforms automatically.
- Install or Update FlutterFire CLI
If you don't have it installed, or want to ensure you have the latest version, run this in your terminal:
dart pub global activate flutterfire_cli- Login to Firebase (if needed)
The CLI may need access to your Firebase account. If you're not already logged in through the Firebase CLI, do so with:
firebase loginFollow the on-screen prompts to authenticate with the Google account associated with your Firebase project.
- Configure Our App
Now, from the root directory of your Flutter project (photo_sharer_app or your existing project), run:
flutterfire configureThis interactive command will:
- List your available Firebase projects. Select the "Photo Sharer Flutter" project (or the one you created earlier).
- Ask which platforms (iOS, Android, Web, macOS, Windows) you want to configure. For our app, ensure at least Android and iOS are selected.
- Automatically download the necessary configuration files (
google-services.jsonfor Android andGoogleService-Info.plistfor iOS) and place them in the correct directories. - Generate a
lib/firebase_options.dartfile that contains Firebase project identifiers for each platform, used to initialize Firebase correctly.
This single command saves a lot of manual setup and potential errors!
After CLI finished the configuration, our terminal should look like this:
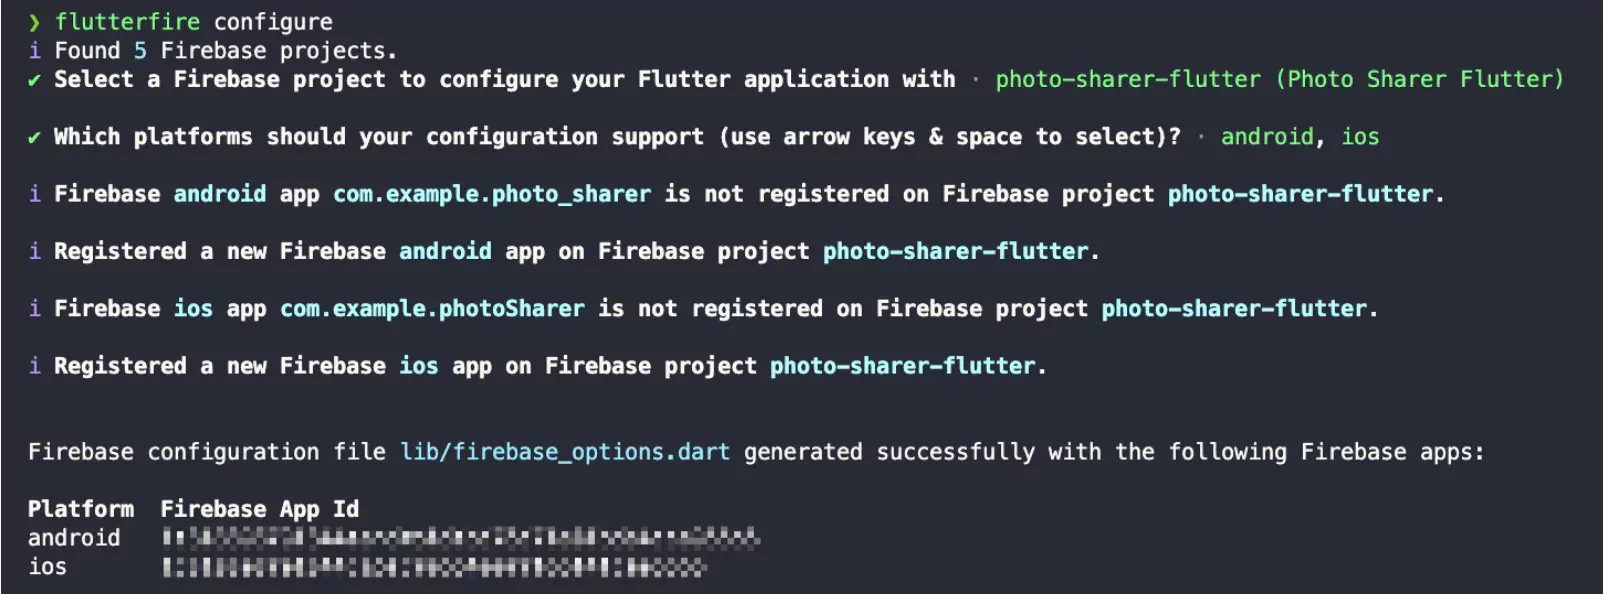
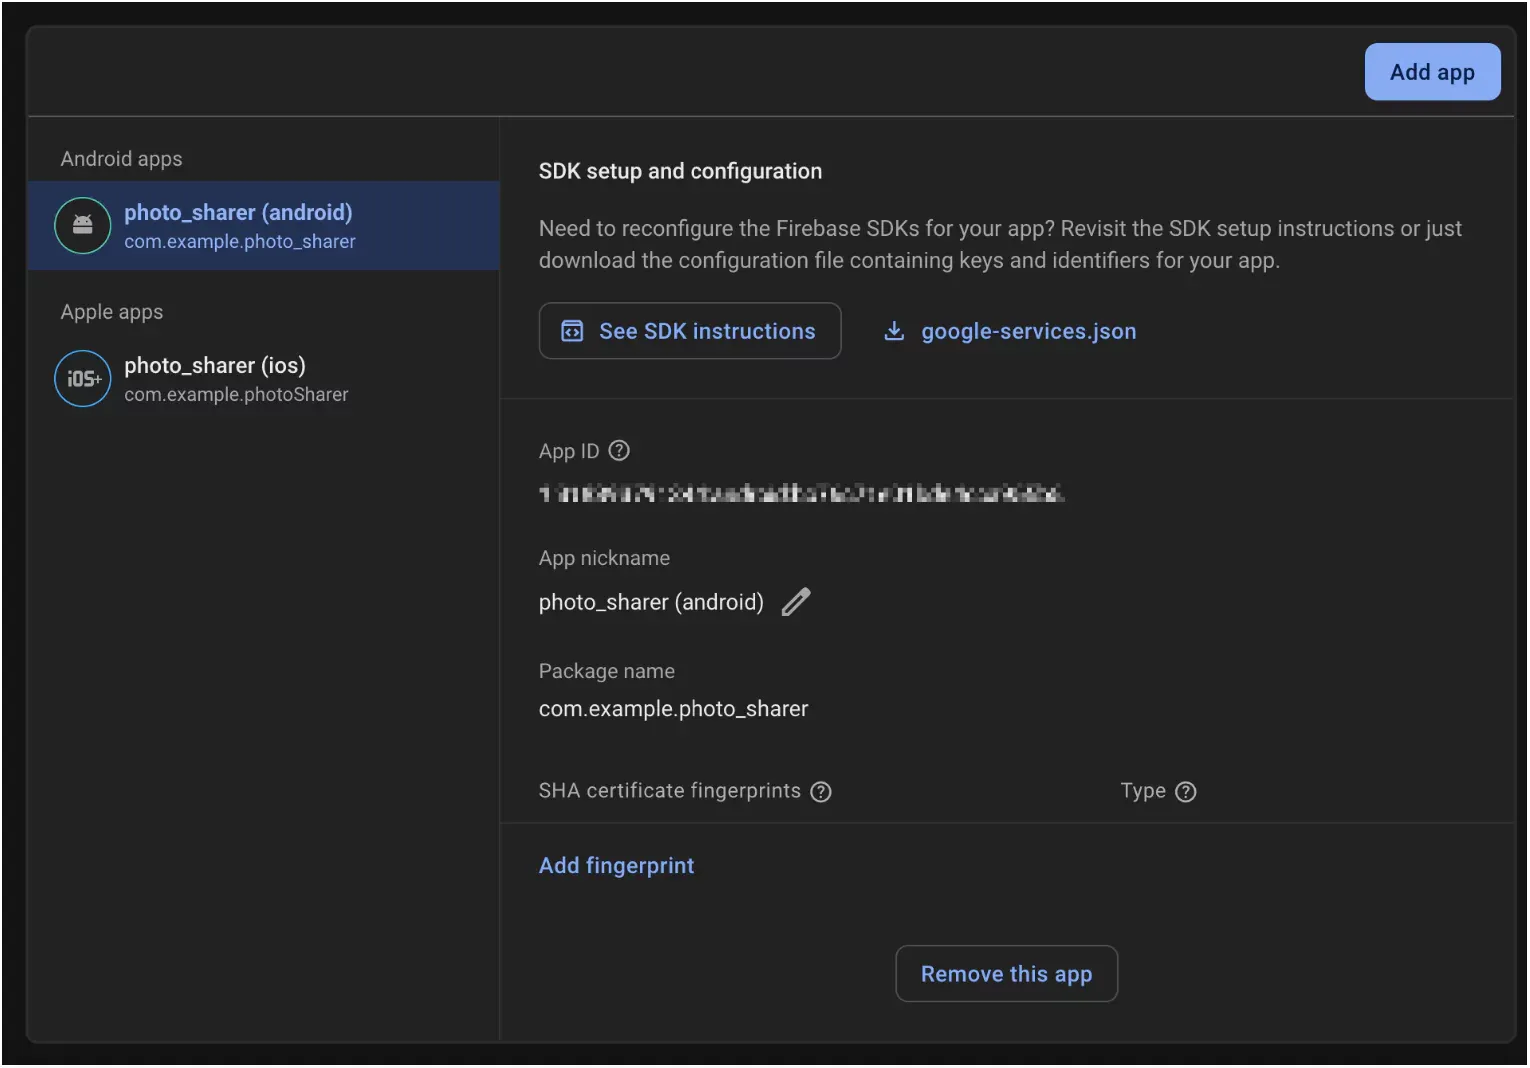
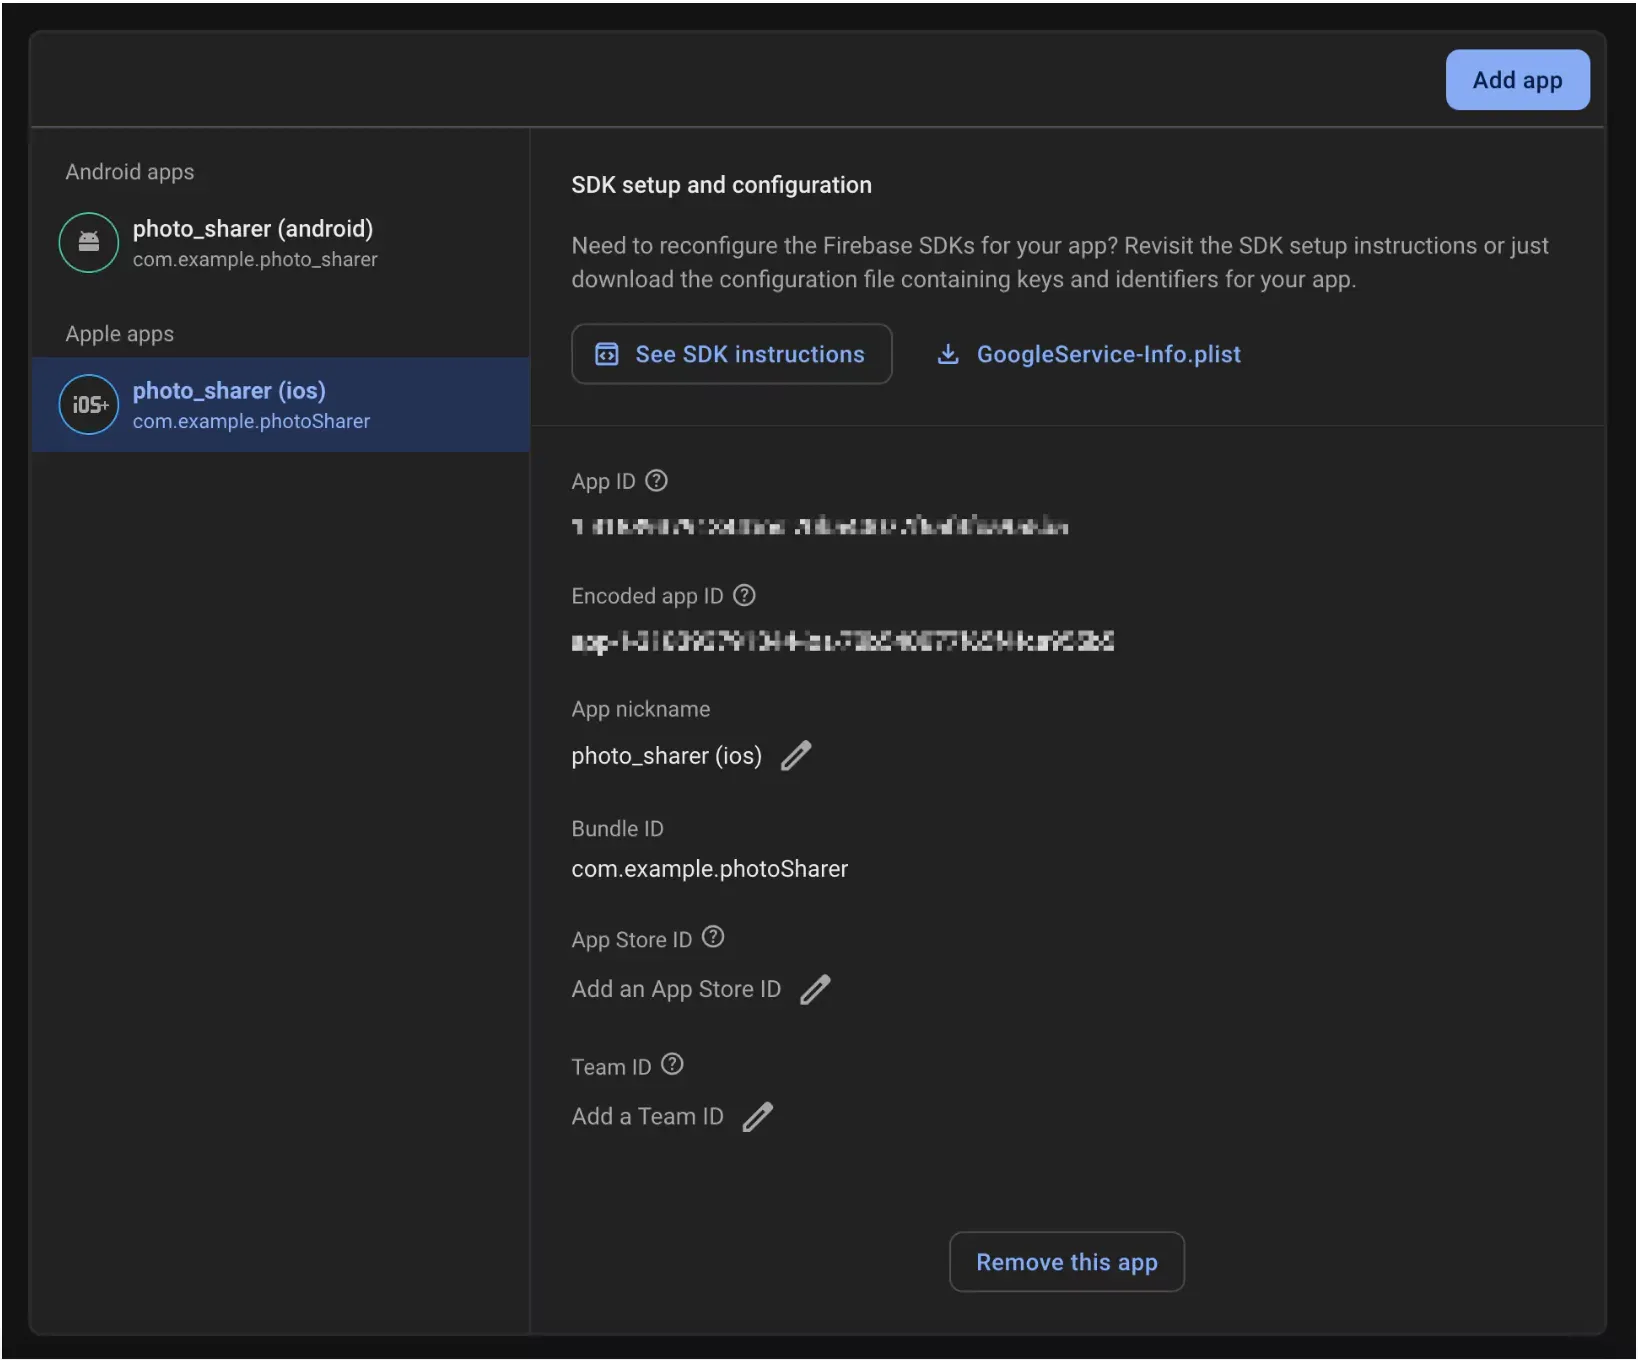
On our firebase project:
- Android:
- iOS
Add Firebase Dependencies
Next, we need to tell our Flutter project which Firebase services it will use. We do this by adding the relevant plugins to our pubspec.yaml file. The flutterfire configure command usually adds firebase_core for you, but you'll need to manually add others for Authentication, Firestore, Storage, and Messaging.
dependencies:
        flutter:
        sdk: flutter
        # Firebase Core - Essential for all Firebase plugins
        firebase_core: ^LATEST_VERSION # Replace with the latest version
        # Firebase Authentication
        firebase_auth: ^LATEST_VERSION # Replace with the latest version
        # Cloud Firestore
        cloud_firestore: ^LATEST_VERSION # Replace with the latest version
        # Firebase Storage
        firebase_storage: ^LATEST_VERSION # Replace with the latest version
        # Firebase Cloud Messaging
        firebase_messaging: ^LATEST_VERSION # Replace with the latest version
Important:
- Replace
^LATEST_VERSIONplaceholders with the latest stable versions you find onpub.devfor each package (I've included example up-to-date versions as of my current knowledge, but always double-check). - After saving
pubspec.yaml, runflutter pub getin your terminal from the project's root directory. This command downloads and installs the new packages into your project.
Initialize Firebase at Runtime
The final step is to initialize Firebase when your app starts. This is typically done in your lib/main.dart file. The flutterfire configure command already generated the firebase_options.dart file, so we can use it directly.
import 'package:flutter/material.dart';
// Import Firebase Core
import 'package:firebase_core/firebase_core.dart';
// Import the generated Firebase options file
import 'firebase_options.dart';
// Your other imports for app pages/widgets

void main() async {
  // Ensure that plugin services are initialized so that `availableCameras()`
  // can be called before `runApp()`
  WidgetsFlutterBinding.ensureInitialized();
  // Initialize Firebase
  await Firebase.initializeApp(
    options: DefaultFirebaseOptions.currentPlatform,
  );
  runApp(MyApp()); // Or your main application widget
}

class MyApp extends StatelessWidget {
  const MyApp({super.key});

  @override
  Widget build(BuildContext context) {
    return MaterialApp(
      title: 'Photo Sharer App',
      home: Scaffold( // Replace with your actual home screen
        appBar: AppBar(
          title: const Text('Photo Sharer with Firebase'),
        ),
        body: const Center(
          child: Text('Firebase Initialized! Ready to build.'),
        ),
      ),
    );
  }
}
Key Points in main.dart
WidgetsFlutterBinding.ensureInitialized();is crucial. Firebase initialization is asynchronous, and this line ensures the Flutter framework's bindings are ready before any plugin code (like Firebase) is executed.await Firebase.initializeApp(options: DefaultFirebaseOptions.currentPlatform,);is the line that actually initializes Firebase. It uses theDefaultFirebaseOptions.currentPlatformgetter from thegenerated firebase_options.dartfile to load the correct configuration for the platform your app is currently running on.
Once these steps are completed, try building and running your Flutter app on an emulator or a physical device. If everything is configured correctly, your app should launch without any Firebase-related errors. You’re now ready to start implementing Firebase features!
How to Use Firebase Authentication in Flutter App?
Flutter Firebase Auth provides backend services, easy-to-use SDKs, and ready-made UI libraries (though we'll build our own UI in Flutter) to authenticate users in your app. It supports authentication using passwords, phone numbers, and popular federated identity providers like Google, Facebook, Twitter, and more.
Essentially, it handles the complexities of user management, so you don't have to build it from scratch. For our "Photo Sharer" app, we'll start with the classic email and password method.
Enable Authentication Methods in the Firebase Console
Before we write any Flutter code for authentication, we need to tell Firebase which sign-in methods our app will support.
- Go to your Firebase Project: Open the Firebase console and navigate to your "Photo Sharer Flutter" project.
- Navigate to Authentication: In the left-hand navigation pane, under "Build," click on Authentication.
- Go to the "Sign-in method" tab: Click on this tab to view available authentication providers.
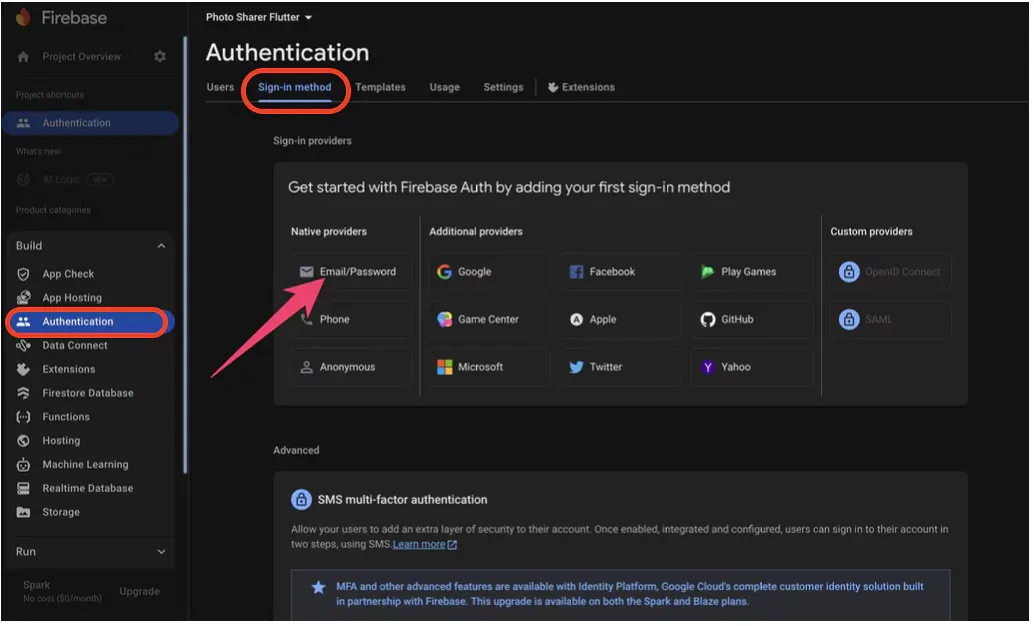
- Enable Email/Password:
- Click on Email/Password from the list of providers.
- Toggle the Enable switch to ON.
- Click Save.
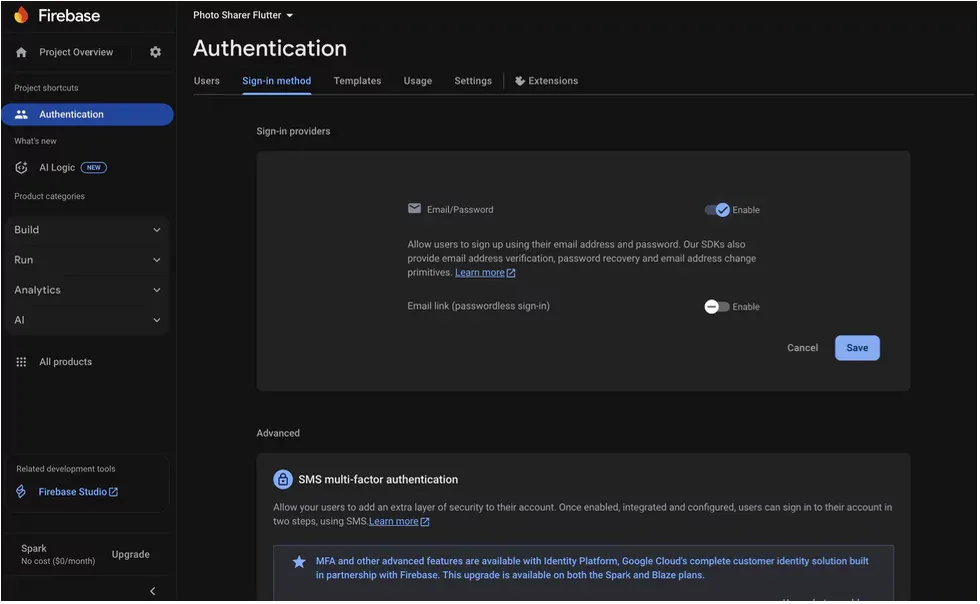
That's it! Firebase is now configured to handle users signing up and signing in with their email addresses and passwords.
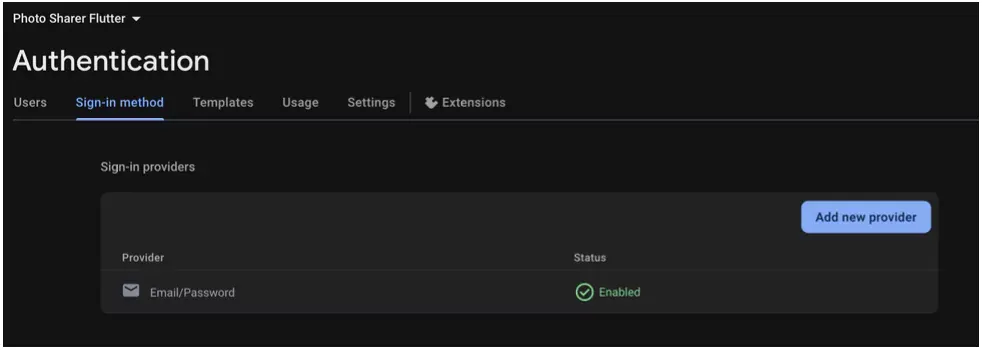
While you're on this page, you'll notice many other providers like “Google,” "Facebook," and "Apple." Integrating these follows a similar pattern of enabling them in the console and using the corresponding FlutterFire plugin (e.g.,
google_sign_in). For this tutorial, we’ll stick to Email/Password for simplicity, but it's good to know these options are readily available for future enhancements!
Implement FirebaseAuth in Flutter
Ensure you’ve added firebase_auth to your pubspec.yaml and run flutter pub get.
First, obtain an instance of FirebaseAuth:
import 'package:firebase_auth/firebase_auth.dart';
final FirebaseAuth _auth = FirebaseAuth.instance;
You’ll use this _auth object for all authentication operations.
- Sign-Up: Creating New Users
When a new user wants to register:
Future<User?> signUpWithEmailPassword(String email, String password) async {
  try {
    UserCredential userCredential = await _auth.createUserWithEmailAndPassword(
      email: email.trim(), // Use trim to remove leading/trailing white spaces
      password: password,
    );
    // User successfully created
    User? user = userCredential.user;
    // You can now store additional user info in Firestore if needed
    // For example: await FirebaseFirestore.instance.collection('users').doc(user?.uid).set({'email': user?.email, 'displayName': 'New User'});
    print('Successfully signed up: ${user?.uid}');
    return user;
  } on FirebaseAuthException catch (e) {
    if (e.code == 'weak-password') {
      print('The password provided is too weak.');
      // Display this to the user
    } else if (e.code == 'email-already-in-use') {
      print('The account already exists for that email.');
      // Display this to the user
    } else {
      print('An error occurred during sign up: ${e.message}');
    }
    return null;
  } catch (e) {
    print('An unexpected error occurred: $e');
    return null;
  }
}- Sign-In: Authenticating Existing Users
When an existing user wants to log in:
Future<User?> signInWithEmailPassword(String email, String password) async {
  try {
    UserCredential userCredential = await _auth.signInWithEmailAndPassword(
      email: email.trim(),
      password: password,
    );
    // User successfully signed in
    User? user = userCredential.user;
    print('Successfully signed in: ${user?.uid}');
    return user;
  } on FirebaseAuthException catch (e) {
    if (e.code == 'user-not-found') {
      print('No user found for that email.');
    } else if (e.code == 'wrong-password') {
      print('Wrong password provided for that user.');
    } else if (e.code == 'invalid-credential') { // More generic error for recent SDK versions
      print('Invalid credentials. Please check your email and password.');
    }
    else {
      print('An error occurred during sign in: ${e.message}');
    }
    return null;
  } catch (e) {
    print('An unexpected error occurred: $e');
    return null;
  }
}
- Listen to Auth State: The Gateway to Your App
How do you know if a user is currently logged in or not? FirebaseAuth provides a stream that notifies you of authentication state changes. This is incredibly useful for determining whether to show a login screen or the main app content. You'd typically use this in a root widget or a state management solution:
// In your main.dart or a wrapper widget
StreamBuilder<User?>(
  stream: FirebaseAuth.instance.authStateChanges(),
  builder: (BuildContext context, AsyncSnapshot<User?> snapshot) {
    if (snapshot.connectionState == ConnectionState.waiting) {
      return CircularProgressIndicator(); // Or some loading screen
    }
    if (snapshot.hasData && snapshot.data != null) {
      // User is logged in, show the main app (e.g., Photo Feed Screen)
      print('User is logged in: ${snapshot.data!.uid}');
      return PhotoFeedScreen(); // Your main app screen
    } else {
      // User is not logged in, show the Login/Register screen
      print('User is logged out');
      return LoginScreen(); // Your authentication screen
    }
  },
)
This stream will emit a User object if someone is signed in, or null if not. It also updates automatically when the user signs in or out.
>> Read more: Guide to Use Flutter Bloc for State Management in Flutter Apps
- Sign-Out: Logging Users Out
It's as simple as:
Future<void> signOut() async {
  try {
    await _auth.signOut();
    print('User signed out successfully');
  } catch (e) {
    print('Error signing out: \$e');
  }
}
Calling this will clear the user's session, and the authStateChanges() stream will emit null, automatically navigating the user (if you've set up the StreamBuilder correctly) to the login screen.
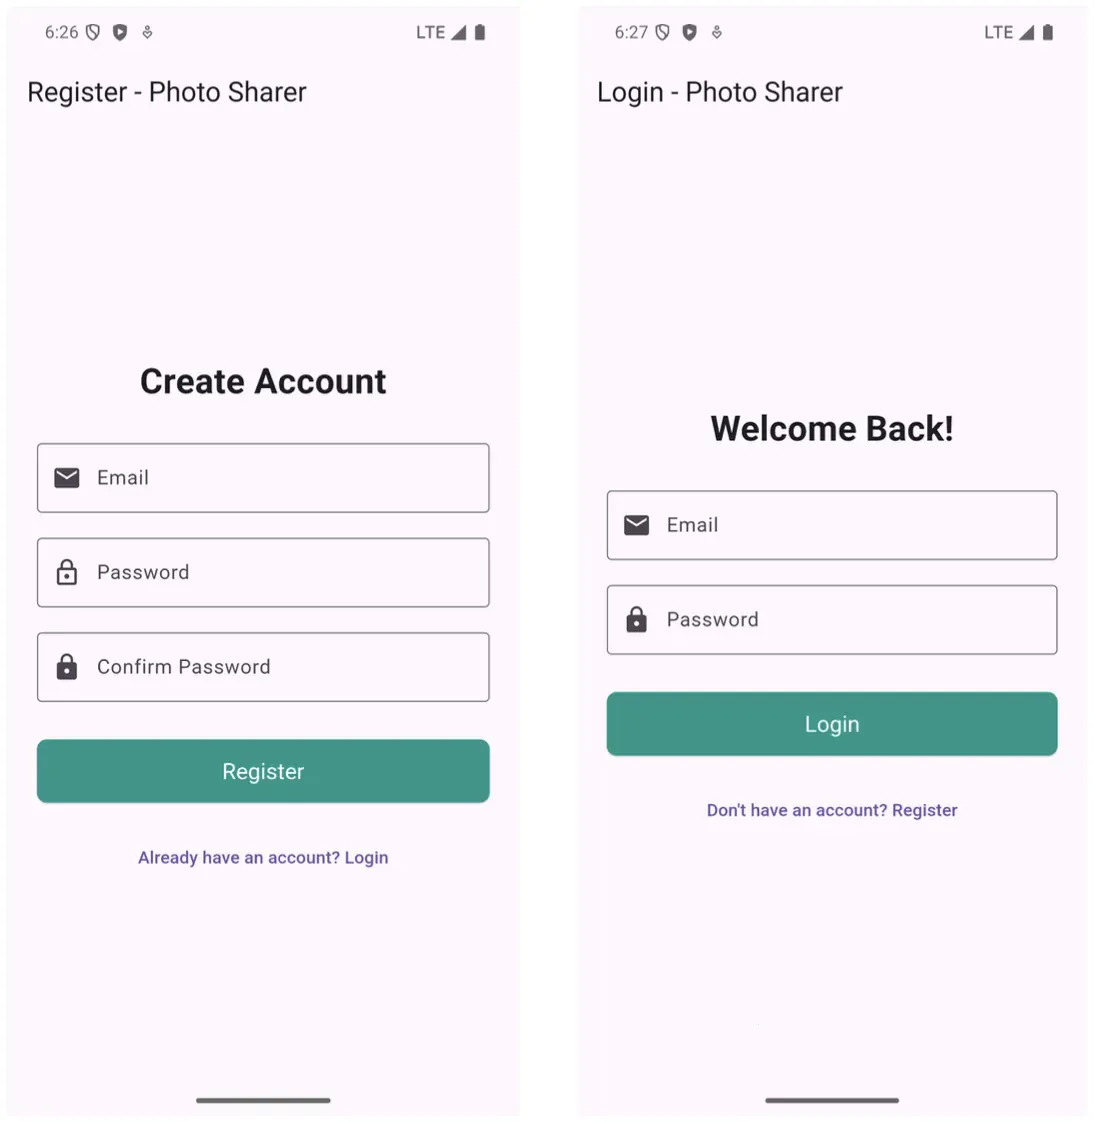
Example Integration: Login/Register Screens and Logout
For our "Photo Sharer" app, we'll need a couple of UI screens to handle this:
1. Registration Screen:
- Input fields for email and password.
- A "Register" button that calls our
signUpWithEmailPasswordfunction. - Display appropriate feedback (e.g., success message, error messages like "Email already in use").
- On successful registration, the
authStateChanges()stream will automatically navigate them to the main app content (e.g.,PhotoFeedScreen).
2. Login Screen:
- Input fields for email and password.
- A "Login" button that calls our
signInWithEmailPasswordfunction. - Display feedback (e.g., "Invalid credentials").
- A link/button to navigate to the Registration Screen if the user doesn't have an account.
- On successful login,
authStateChanges()takes over.
These screens are typically implemented using StatefulWidgets that manage TextEditingControllers for user input and call the relevant Firebase Auth functions when buttons are pressed.
By implementing these UI pieces, you’ll have a robust authentication system that ensures only registered users can access the core features of your Photo Sharer app.
Two of our screens should look something like this (you don’t have to make it similar 1:1, go with your style)
Your Data's New Home: Cloud Firestore
With users signing in and out, the next big step for our "Photo Sharer" app is managing data. Where will we store user profiles? Where will the photo posts live? The answer is Cloud Firestore, Firebase's flexible and scalable NoSQL cloud database.
>> Explore more: Top 10 Most Popular NoSQL Databases for Developers
Structuring Data for Photo Sharer
For our "Photo Sharer" app, we’ll define two main collections:
1. users collection:
- Document ID:
userID(This will be theuidobtained from Firebase Authentication). - Fields:
displayName: (String) The user's chosen display name.email: (String) The user's email (also from Firebase Auth).profileImageUrl: (String, Optional) URL to the user’s profile picture (we’ll integrate this later with Firebase Storage).createdAt: (Timestamp) When the user profile was created.
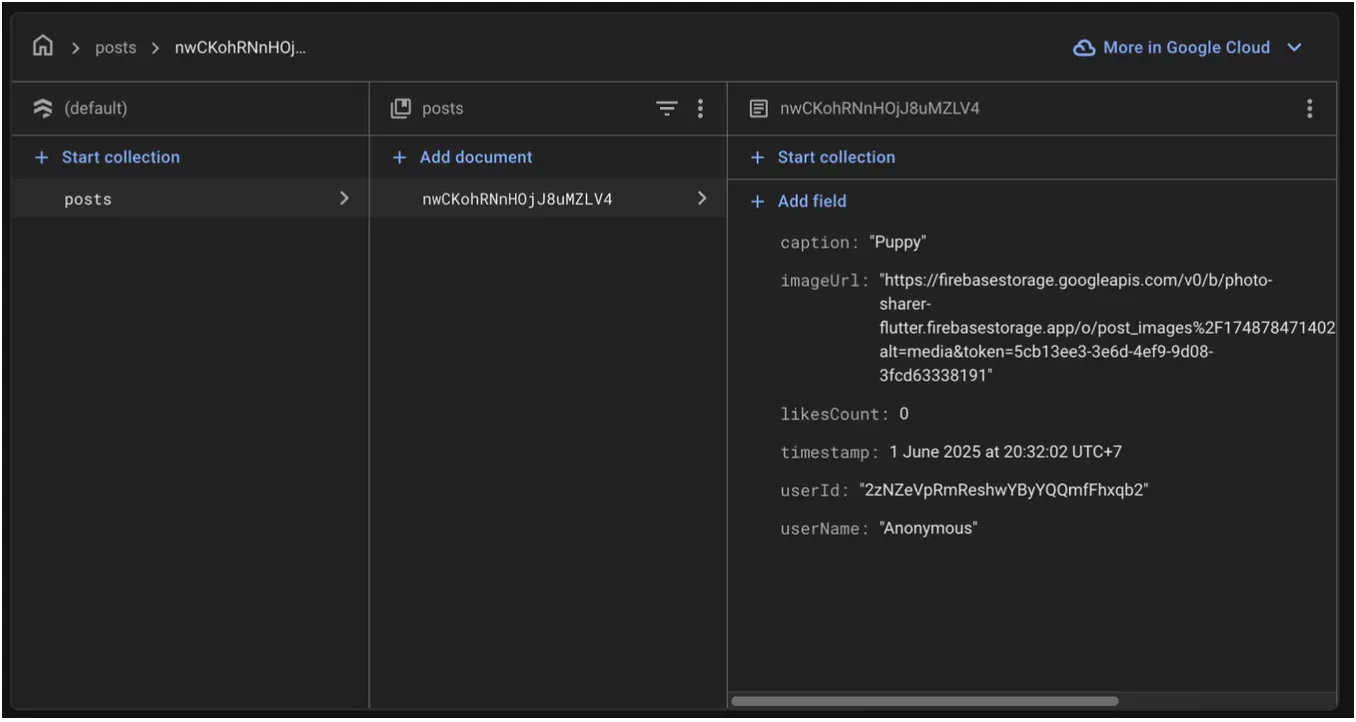
2. posts collection:
- Document ID: Auto-generated by Firestore.
- Fields:
imageUrl: (String) URL of the uploaded photo (from Firebase Storage).caption: (String) User-provided caption for the photo.userId: (String) Theuidof the user who created the post (links to the users collection).userName: (String) The display name of the user who created the post (denormalized for easy display, can be fetched from the user's profile).timestamp: (Timestamp) When the post was created, for sorting.likes: (Map or Number, Optional) For implementing a like feature later.
CRUD Operations in Flutter
Let’s see how to perform these operations with Cloud Firestore in Flutter.
Make sure you have cloud_firestore in your pubspec.yaml and initialize Firestore:
import 'package:cloud_firestore/cloud_firestore.dart';
import 'package:firebase_auth/firebase_auth.dart'; // To get current user

final FirebaseFirestore _firestore = FirebaseFirestore.instance;
final FirebaseAuth _auth = FirebaseAuth.instance; // Assuming you also need user
Create: Adding Data
- Creating a User Profile (e.g., during Sign-Up):
After a user successfully signs up (as shown in the Authentication section), you can create a document for them in the users collection.
 // In your AuthService or after successful registration
Future<void> createUserProfile(User user, String displayName) async {
  if (user == null) return;
  DocumentReference userDocRef = _firestore.collection('users').doc(user.uid);
  // Check if document already exists (e.g. if user signed up then quit before profile was made)
  // For simplicity, we'll just set/overwrite here.
  // In a real app, you might want to check userDocRef.get().then((doc) => !doc.exists)
  await userDocRef.set({
    'displayName': displayName,
    'email': user.email,
    'profileImageUrl': null, // Initially no profile image
    'createdAt': FieldValue.serverTimestamp(), // Uses server time
  });
  print('User profile created for ${user.uid}');
}
You would call this function after a successful
_auth.createUserWithEmailAndPasswordand perhaps after asking the user for adisplayNameon the registration screen.
- Adding a New Photo Post:
When a user uploads a photo and adds a caption (FieldValue.serverTimestamp() ensures the timestamp is set by Firebase servers, providing consistency):
Future<void> addPost({
  required String imageUrl,
  required String caption,
  // Assuming userName is fetched from the current user's profile or passed in
  required String userName,
}) async {
  User? currentUser = _auth.currentUser;
  if (currentUser == null) {
    print("No user logged in to create a post.");
    return;
  }
  try {
    await _firestore.collection('posts').add({
      'imageUrl': imageUrl,
      'caption': caption,
      'userId': currentUser.uid,
      'userName': userName, // You might fetch this from the user's profile document
      'timestamp': FieldValue.serverTimestamp(),
      'likesCount': 0, // Example for a like feature
    });
    print('Post added successfully!');
  } catch (e) {
    print('Error adding post: $e');
  }
}
Read: Fetching Data
- Fetching All Posts for a Feed (Real-time):
To display a live-updating feed of posts, use a StreamBuilder with snapshots():
// In your PhotoFeedScreen widget's build method:
StreamBuilder<QuerySnapshot>(
stream: _firestore.collection('posts').orderBy('timestamp', descending: true).snapshots(),
builder: (context, snapshot) {
if (snapshot.hasError) {
return Center(child: Text('Something went wrong: ${snapshot.error}'));
}
if (snapshot.connectionState == ConnectionState.waiting) {
return const Center(child: CircularProgressIndicator());
}
if (!snapshot.hasData || snapshot.data!.docs.isEmpty) {
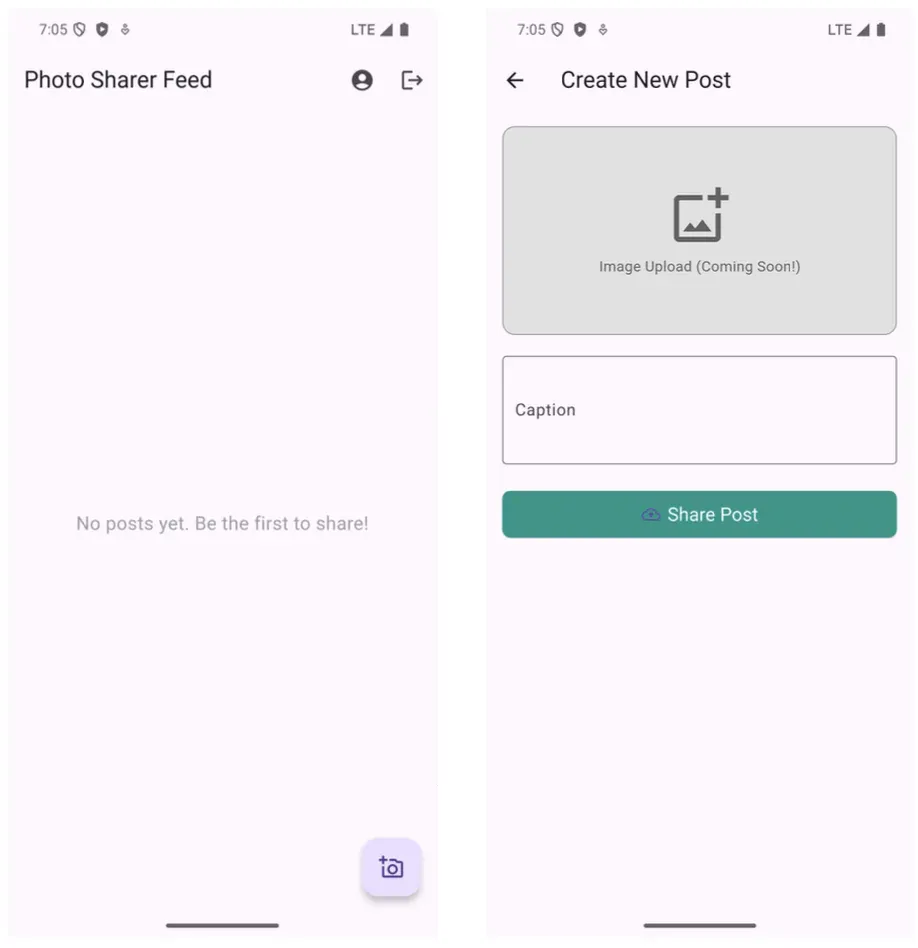
return const Center(child: Text('No posts yet. Be the first to share!'));
}
// We have data!
final posts = snapshot.data!.docs;
return ListView.builder(
itemCount: posts.length,
itemBuilder: (context, index) {
Map<String, dynamic> postData = posts[index].data() as Map<String, dynamic>;
String postId = posts[index].id; // Get the document ID
//Timestamp postTimestamp = postData['timestamp'] as Timestamp; // Handle null if necessary
//DateTime dateTime = postTimestamp.toDate();
return Card( // Example of how you might display a post
margin: const EdgeInsets.symmetric(vertical: 8, horizontal: 16),
child: Column(
crossAxisAlignment: CrossAxisAlignment.start,
children: [
if (postData['imageUrl'] != null)
Image.network(
postData['imageUrl'],
width: double.infinity,
height: 250,
fit: BoxFit.cover,
errorBuilder: (context, error, stackTrace) => const Icon(Icons.broken_image, size: 100),
loadingBuilder: (BuildContext context, Widget child, ImageChunkEvent? loadingProgress) {
if (loadingProgress == null) return child;
return SizedBox(
height: 250,
child: Center(
child: CircularProgressIndicator(
value: loadingProgress.expectedTotalBytes != null
? loadingProgress.cumulativeBytesLoaded / loadingProgress.expectedTotalBytes!
: null,
),
),
);
},
),
Padding(
padding: const EdgeInsets.all(12.0),
child: Column(
crossAxisAlignment: CrossAxisAlignment.start,
children: [
Text(
postData['userName'] ?? 'Anonymous',
style: const TextStyle(fontWeight: FontWeight.bold, fontSize: 16),
),
const SizedBox(height: 4),
Text(postData['caption'] ?? 'No caption'),
// You can add more like timestamp, like button etc.
],
),
),
],
),
);
},
);
},
)
- Fetching a Specific User's Profile:
If you need to get details for a particular user:
Future<DocumentSnapshot?> getUserProfile(String userId) async {
  try {
    DocumentSnapshot userDoc = await _firestore.collection('users').doc(userId).get();
    if (userDoc.exists) {
      return userDoc;
    } else {
      print('User profile not found for $userId');
      return null;
    }
  } catch (e) {
    print('Error fetching user profile: $e');
    return null;
  }
}

// Example usage:
// DocumentSnapshot? profile = await getUserProfile(someUserId);
// if (profile != null && profile.data() != null) {
//   Map<String, dynamic> data = profile.data() as Map<String, dynamic>;
//   String displayName = data['displayName'];
// }
Update and Delete (Optional)
Let's say a user wants to edit their post's caption. You'd need the postId.
Future<void> updatePostCaption(String postId, String newCaption) async {
  try {
    await _firestore.collection('posts').doc(postId).update({
      'caption': newCaption,
    });
    print('Post caption updated successfully!');
  } catch (e) {
    print('Error updating post caption: $e');
  }
}
Allowing a user to delete their own post.
Future<void> deletePost(String postId, String postUserId) async {
  User? currentUser = _auth.currentUser;
  if (currentUser == null || currentUser.uid != postUserId) {
    print("Cannot delete post: Not authorized or not logged in.");
    // Optionally, show an error to the user
    return;
  }
  try {
    await _firestore.collection('posts').doc(postId).delete();
    print('Post deleted successfully!');
    // Also, consider deleting the associated image from Firebase Storage here
  } catch (e) {
    print('Error deleting post: $e');
  }
}
Important for Delete: You'd also want to delete the associated image from Firebase Storage to avoid orphaned files. We'll cover Storage next.
Example Integration: Storing Profiles, Posts, and Displaying the Feed
- User Profiles: As shown, user profiles are created upon sign-up (or through a separate profile edit screen). This data (
displayName,email) can be used throughout the app. - Photo Post Details: When a user uploads a photo (covered in Firebase Storage section) and adds a caption, the
addPostfunction is called. This creates a new document in thepostscollection, linking the photo's URL, caption, user info, and timestamp. - Displaying Feed: The
PhotoFeedScreenwill use theStreamBuilderexample to listen to thepostscollection in real-time, displaying each post (image, caption, username) in a list. As new posts are added by any user, the feed will automatically update.
Cloud Firestore provides a powerful and easy-to-use database solution for your Flutter app. By structuring your data thoughtfully and utilizing its real-time capabilities, you can build dynamic and engaging experiences for your users.
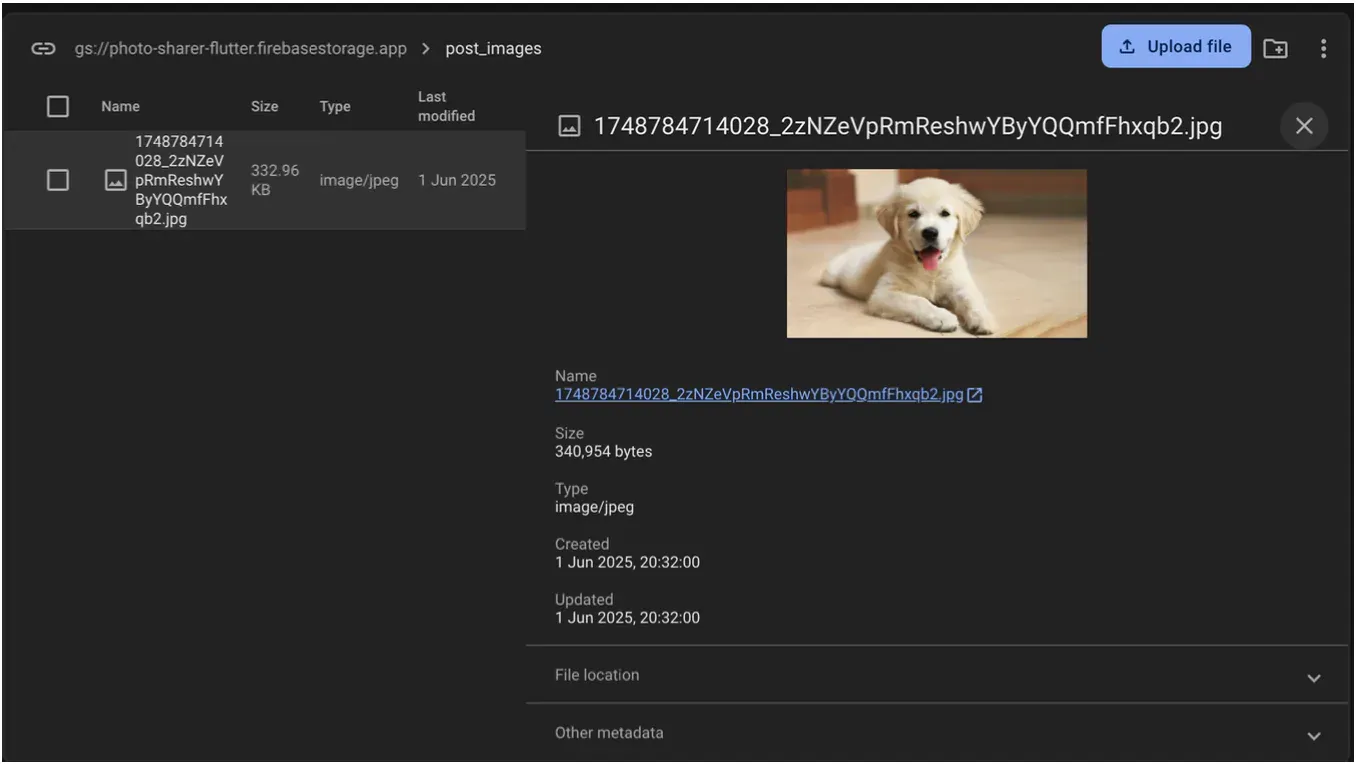
How to Use Firebase Storage in Flutter?
Our "Photo Sharer" app wouldn't be complete without actual photos! Users need a way to upload their images, and those images need a place to live in the cloud.
Let's use Firebase Storage which is built for storing and serving user-generated content like images, videos, audio files, and other binary data. Each file is stored in a Google Cloud Storage bucket, and Firebase SDKs, making it easy to upload and download these files directly from your Flutter app.
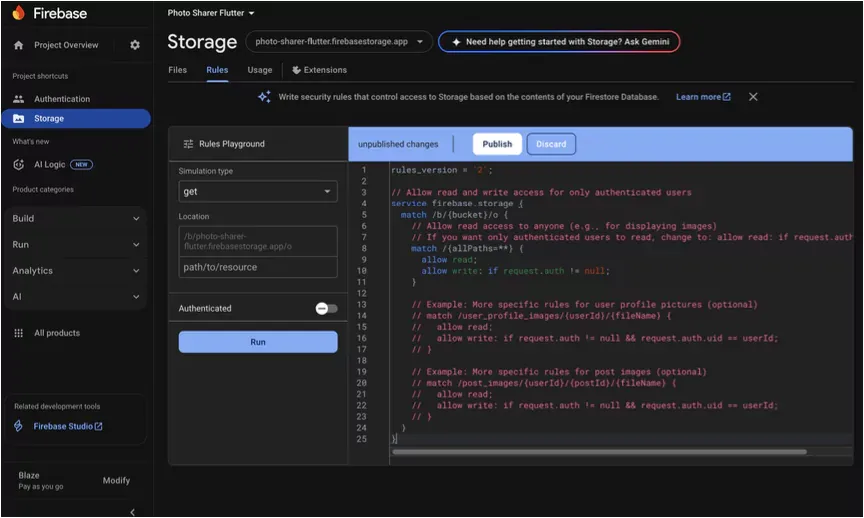
Set Up Storage Rules in the Firebase Console
Before users can upload anything, we need to define security rules for our Firebase Storage bucket. These rules determine who can read and write files and under what conditions. For our app, a common starting point is to allow authenticated users to read and write files.
Note: While Firebase offers a generous free “Spark” plan to get you started, services like Firebase Storage have usage limits (e.g., for storage space and download bandwidth). For a small personal project or during development, the free tier is often sufficient. However, as your "Photo Sharer" app grows and users start uploading many images, you might approach these limits.
Always keep an eye on your usage in the Firebase console and be prepared to upgrade to the "Blaze" (pay-as-you-go) plan to ensure uninterrupted service and accommodate a larger user base. You can find detailed information on Firebase pricing and plan limits on their official website.
- Go to your Firebase Project: Open the Firebase console and navigate to your "Photo Sharer Flutter" project.
- Navigate to Storage: In the left-hand navigation pane, under "Build," click on Storage.
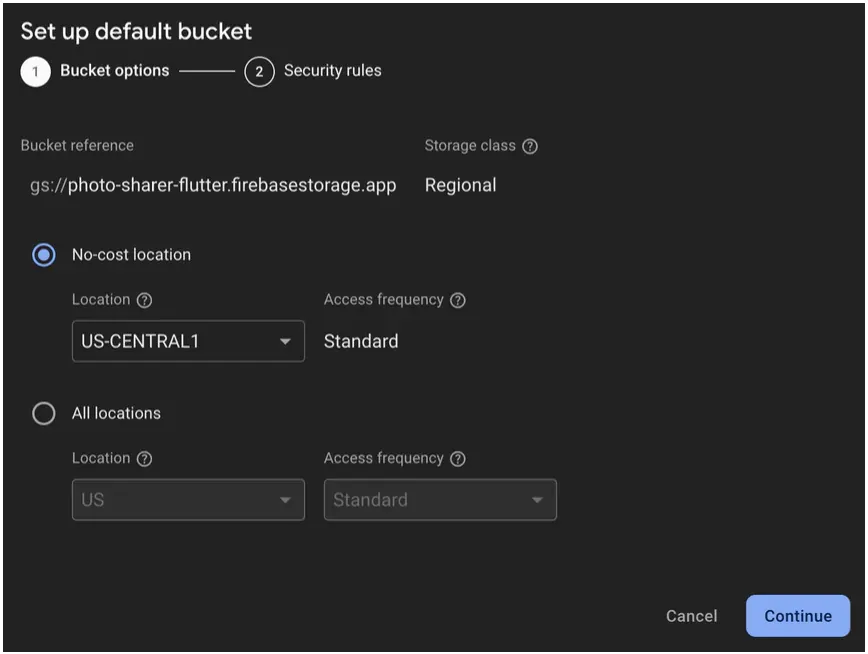
- Get Started (if first time): If this is your first time using Storage for this project, you might see a "Get Started" button. Click it and follow the prompts to set up your default storage bucket (usually choosing a location).
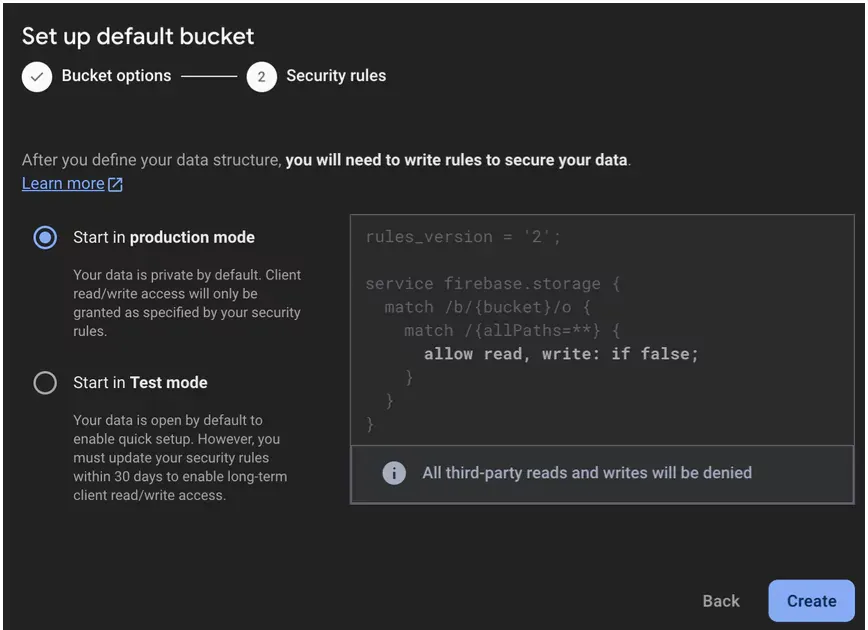
- Go to the "Rules" Tab: Once your bucket is set up, navigate to the "Rules" tab within the Storage section.
- Edit Rules: You'll see some default rules. We'll modify them. A good basic rule set for allowing authenticated users to read and write is:
rules_version = '2';
// Allow read and write access for only authenticated users
service firebase.storage {
  match /b/{bucket}/o {
    // Allow read access to anyone (e.g., for displaying images)
    // If you want only authenticated users to read, change to: allow read: if request.auth != null;
    match /{allPaths=**} {
      allow read;
      allow write: if request.auth != null;
    }

    // Example: More specific rules for user profile pictures (optional)
    // match /user_profile_images/{userId}/{fileName} {
    //   allow read;
    //   allow write: if request.auth != null && request.auth.uid == userId;
    // }

    // Example: More specific rules for post images (optional)
    // match /post_images/{userId}/{postId}/{fileName} {
    //   allow read;
    //   allow write: if request.auth != null && request.auth.uid == userId;
    // }
  }
}
allow read;: This allows anyone (even unauthenticated users) to read files if they have the URL. This is common for public images in a feed. If you want to restrict reads to only authenticated users, change it toallow read: if request.auth != null;.allow write: if request.auth != null;: This ensures that only users who are signed into your app can upload files.
- Publish Rules: After editing, click the "Publish" button to save your changes.
Your Firebase Storage is now ready to securely accept uploads from authenticated users!
Implement Firebase Storage in Flutter
Let's integrate image picking and uploading into our Flutter app.
Pick an Image from Device
This function uses the image_picker package to let the user select an image from their gallery or camera.
import 'dart:io'; // For File
import 'package:image_picker/image_picker.dart';

Future<File?> pickImageFromDevice(ImageSource source) async {
  final ImagePicker picker = ImagePicker();
  try {
    final XFile? pickedFile = await picker.pickImage(source: source);
    if (pickedFile != null) {
      return File(pickedFile.path);
    }
  } catch (e) {
    print("Error picking image: $e");
    // Handle error, e.g., show a message to the user
  }
  return null;
}

// Example usage (e.g., in an onPressed callback):
// File? imageFile = await pickImageFromDevice(ImageSource.gallery);
// if (imageFile != null) {
//   // Proceed with upload
// }
You would typically call this from a button press, perhaps after showing an option to choose between gallery or camera.
Upload the Image File to Firebase Storage
This function takes the selected File, uploads it to a specified path in Firebase Storage, and returns the download URL.
import 'dart:io'; // For File
import 'package:firebase_storage/firebase_storage.dart';
import 'package:firebase_auth/firebase_auth.dart'; // If using user-specific paths

Future<String?> uploadFileToStorage(File imageFile, String storagePath) async {
  // Example storagePath: "post_images/${FirebaseAuth.instance.currentUser?.uid}/${DateTime.now().millisecondsSinceEpoch}.jpg"
  // Or more simply for this snippet: "uploads/${DateTime.now().millisecondsSinceEpoch}_${imageFile.path.split('/').last}"
  try {
    final Reference storageRef = FirebaseStorage.instance.ref().child(storagePath);
    UploadTask uploadTask = storageRef.putFile(imageFile);
    // Wait for the upload to complete
    final TaskSnapshot snapshot = await uploadTask;
    if (snapshot.state == TaskState.success) {
      final String downloadUrl = await snapshot.ref.getDownloadURL();
      return downloadUrl;
    } else {
      print("Error from upload task: ${snapshot.state}");
      // Handle unsuccessful upload
    }
  } on FirebaseException catch (e) {
    print("Firebase Storage Error: ${e.message}");
    // Handle Firebase specific errors
  } catch (e) {
    print("General Error uploading file: $e");
    // Handle other errors
  }
  return null;
}

// Example usage:
// if (imageFile != null) {
//   String uniqueFileName = "post_images/${FirebaseAuth.instance.currentUser!.uid}/${DateTime.now().millisecondsSinceEpoch}_${imageFile.path.split('/').last}";
//   String? imageUrl = await uploadFileToStorage(imageFile, uniqueFileName);
//   if (imageUrl != null) {
//     // Now save this imageUrl to Firestore along with other post details
//   }
// }
In this snippet, storagePath should be a unique path for each file, often including a folder name, user ID (if applicable), and a unique file name (e.g., using a timestamp or UUID).
Get the Download URL (Integrated in uploadFileToStorage)
As shown in the uploadFileToStorage function above, after the UploadTask completes successfully, you get the download URL using:
// (Inside uploadFileToStorage, after successful upload)
final TaskSnapshot snapshot = await uploadTask;
final String downloadUrl = await snapshot.ref.getDownloadURL();
return downloadUrl;
This downloadUrl is the public URL you'll store in Cloud Firestore to reference the image.
Display Images
Once you have the downloadUrl (retrieved from Firestore, which originally came from Storage), displaying it is done using Flutter's Image.network() widget:
// Assuming 'postImageUrl' is the URL retrieved from Firestore
Image.network(
postImageUrl,
fit: BoxFit.cover, // Adjust fit as needed
loadingBuilder: (BuildContext context, Widget child, ImageChunkEvent? loadingProgress) {
if (loadingProgress == null) return child;
return Center(
child: CircularProgressIndicator(
value: loadingProgress.expectedTotalBytes != null
? loadingProgress.cumulativeBytesLoaded / loadingProgress.expectedTotalBytes!
: null,
),
);
},
errorBuilder: (BuildContext context, Object exception, StackTrace? stackTrace) {
return const Icon(Icons.broken_image, size: 40.0); // Placeholder for error
},
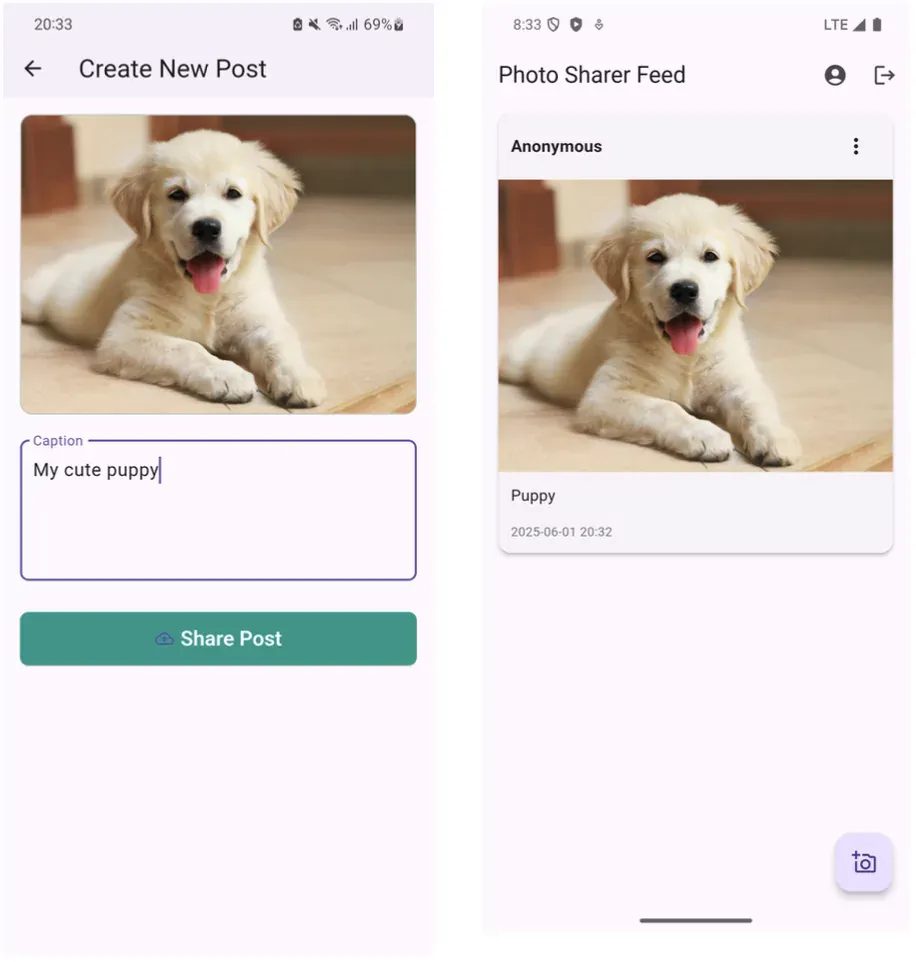
)Here is our result:
>> Read more:
- The In-depth Guide for Mastering Navigation in Flutter
- How to Implement Pagination in Flutter?
Wrap it up
Congratulations! You've successfully journeyed through the fundamentals of integrating some of Firebase's most powerful features into a Flutter application. We've seen firsthand how to build a functional "Photo Sharer" app by leveraging:
- Firebase Authentication
- Cloud Firestore
- Firebase Storage
These services, when combined with Flutter's expressive UI framework, accelerate development. They handle complex backend infrastructure, allowing you to focus on creating unique user experiences, innovate faster, and scale your applications with confidence.
If you'd like to dive into the complete source code for the “Photo Sharer” example app built in this tutorial, you can find it here. We hope this tutorial has equipped you with the confidence to start building powerful, scalable, and feature-rich Flutter applications with Firebase.
Keep experimenting, keep building, and happy coding!
>>> Follow and Contact Relia Software for more information!

- Mobile App Development
- coding
- mobile applications