
Real-time communication has become an essential feature of modern web applications, powering everything from customer support widgets to collaborative tools and social platforms. WebSocket technology enables instant messaging, live collaboration, and interactive experiences that traditional HTTP requests cannot provide efficiently.
In this comprehensive tutorial, we'll walk through the process of building a real-time chat application using React for the front-end and Socket.io for handling WebSocket communication. By the end, you'll have a fully functional chat app and understand the fundamental concepts of implementing WebSockets in a React environment.
Prerequisites
Before starting this project, make sure you have:
- Basic knowledge of JavaScript and React fundamentals (components, hooks, state management)
- Node.js installed on your system (version 14.x or higher recommended - check with
node -v) - npm (Node Package Manager) or yarn installed (check with
npm -voryarn -v) - A code editor like VS Code, Sublime Text, or Atom
If you need to brush up on React basics, the official React documentation is an excellent resource.
>> Explore more: How to Install Node.js on Ubuntu 22.04?
Tech Stack Overview
Let's understand the key technologies we'll use in this project:
- React: A JavaScript library for building user interfaces, perfect for handling the dynamic updates required in a chat application
- Socket.io: A powerful library that enables real-time, bidirectional event-based communication between web clients and servers
- Node.js & Express: Our backend foundation that will manage WebSocket connections and message broadcasting
- CSS: For styling the chat interface (we'll use inline styles for simplicity, but you could extend this with styled-components or CSS modules)
>> Read more: Tailwind CSS for React UI Components: Practical Code Examples
Application Architecture:
Our chat application follows a straightforward client-server architecture:
- The React front-end handles user interaction and maintains a Socket.io connection to receive real-time updates
- The Node.js server uses Socket.io Server to manage connected clients and broadcast messages
- WebSockets provide continuous two-way communication, eliminating the inefficient polling approach
Here's a simplified diagram of the full stack React chat app flow:
User A (React) <----> Socket.io Server (Node.js) <----> User B (React)
    |                         |                            |
Sends message        Broadcasts to all clients      Receives message instantly
6 Steps to Build Real-Time React Chat App with Socket.io
Let's start by setting up the backend (Node.js + Socket.io Server). I mean, create the server that will manage our WebSocket connections and message broadcasting.
Step 1: Initialize a Node.js Project
First, create a new directory for your server and initialize it with npm:
mkdir chat-server && cd chat-server
npm init -y
npm install express socket.io cors
These packages will:
- express: Provide a web server framework
- socket.io: Enable WebSocket functionality
- cors: Allow cross-origin requests (necessary for development)
Step 2: Create the WebSocket Server
Create an index.js file inside the chat-server folder with the following code:
const express = require("express");
const http = require("http");
const { Server } = require("socket.io");
const cors = require("cors");

// Initialize Express app
const app = express();
app.use(cors());

// Create HTTP server and Socket.io instance
const server = http.createServer(app);
const io = new Server(server, {
  cors: {
    origin: "http://localhost:3000", // React app location
    methods: ["GET", "POST"],
    credentials: true
  }
});

// Track active users (optional enhancement)
let activeUsers = 0;

// Socket.io connection handling
io.on("connection", (socket) => {
  activeUsers++;
  console.log(`User connected: ${socket.id}`);
  console.log(`Active users: ${activeUsers}`);

  // Broadcast current user count to all clients
  io.emit("userCount", activeUsers);

  // Handle incoming messages
  socket.on("message", (data) => {
    // Add timestamp to message
    const messageWithTimestamp = {
      text: data,
      time: new Date().toISOString(),
      userId: socket.id.substr(0, 5) // First 5 chars of socket ID as user identifier
    };

    // Broadcast message to all connected clients
    io.emit("message", messageWithTimestamp);
    console.log(`Message received: ${data}`);
  });

  // Handle user disconnection
  socket.on("disconnect", () => {
    activeUsers--;
    console.log(`User disconnected: ${socket.id}`);
    console.log(`Active users: ${activeUsers}`);
    io.emit("userCount", activeUsers);
  });

  // Handle error events
  socket.on("error", (error) => {
    console.error(`Socket error from ${socket.id}:`, error);
  });
});

// Start the server
const PORT = process.env.PORT || 5000;
server.listen(PORT, () => console.log(`Server running on port ${PORT}`));
What's happening in this code:
- We create an Express server and wrap it with Socket.io to enable WebSocket communication
- We configure CORS to allow our React app to connect during development
- When a user connects, we track their connection with a unique
socket.id - We listen for message events from clients and broadcast them to all connected users
- We've added timestamps and basic user identification to messages for better UX
- We track and broadcast the number of active users (a simple enhancement)
- We handle disconnections and errors properly for stability
Step 3: Create a React App
Now, let's build the front-end (React + Socket.io Client) where users can send and receive messages in real time.
npx create-react-app chat-client
cd chat-client
npm install socket.io-client
Step 4: Create a Chat Component
Inside the src folder, create a file named Chat.js with this enhanced code:
import React, { useState, useEffect, useRef } from "react";
import io from "socket.io-client";
// Initialize Socket.io connection
const socket = io("http://localhost:5000");
const Chat = () => {
// State management
const [message, setMessage] = useState("");
const [messages, setMessages] = useState([]);
const [connected, setConnected] = useState(false);
const [userCount, setUserCount] = useState(0);
// Reference for the message container to auto-scroll
const messageContainerRef = useRef(null);
// Effect for Socket.io event listeners
useEffect(() => {
// Handle connection status
socket.on("connect", () => {
setConnected(true);
console.log("Connected to server");
});
socket.on("disconnect", () => {
setConnected(false);
console.log("Disconnected from server");
});
// Handle incoming messages
socket.on("message", (data) => {
setMessages((prevMessages) => [...prevMessages, data]);
});
// Handle user count updates
socket.on("userCount", (count) => {
setUserCount(count);
});
// Clean up event listeners
return () => {
socket.off("connect");
socket.off("disconnect");
socket.off("message");
socket.off("userCount");
};
}, []);
// Auto-scroll to bottom when new messages arrive
useEffect(() => {
if (messageContainerRef.current) {
messageContainerRef.current.scrollTop = messageContainerRef.current.scrollHeight;
}
}, [messages]);
// Send message function
const sendMessage = (e) => {
e.preventDefault(); // Prevent form submission refresh
if (message.trim()) {
socket.emit("message", message);
setMessage(""); // Clear input after sending
}
};
// Handle Enter key press
const handleKeyPress = (e) => {
if (e.key === "Enter" && !e.shiftKey) {
e.preventDefault();
sendMessage(e);
}
};
// Format timestamp
const formatTime = (timestamp) => {
if (!timestamp) return "";
const date = new Date(timestamp);
return date.toLocaleTimeString([], { hour: '2-digit', minute: '2-digit' });
};
return (
<div style={styles.container}>
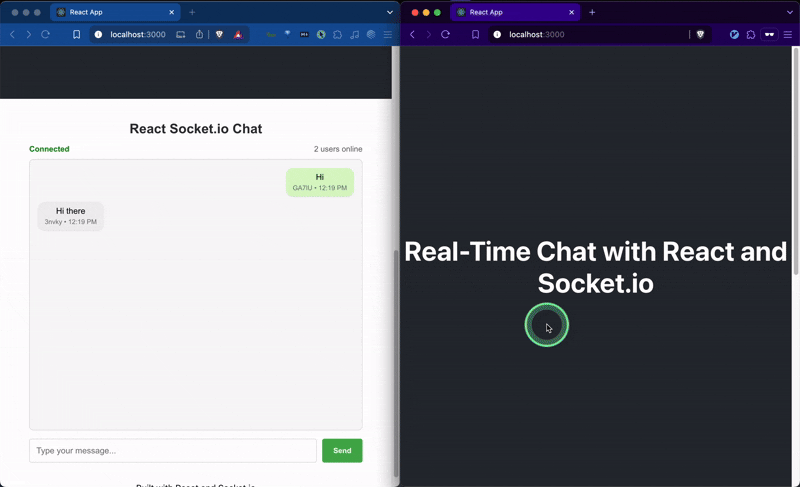
<h2 style={styles.header}>React Socket.io Chat</h2>
<div style={styles.statusBar}>
<span style={connected ? styles.connected : styles.disconnected}>
{connected ? "Connected" : "Disconnected"}
</span>
<span style={styles.userCount}>
{userCount} user{userCount !== 1 ? "s" : ""} online
</span>
</div>
<div
ref={messageContainerRef}
style={styles.messageContainer}
aria-live="polite" // Accessibility enhancement
>
{messages.length === 0 ? (
<p style={styles.emptyState}>No messages yet. Start the conversation!</p>
) : (
messages.map((msg, index) => (
<div
key={index}
style={{
...styles.message,
alignSelf: msg.userId === socket.id.substr(0, 5) ? "flex-end" : "flex-start",
backgroundColor: msg.userId === socket.id.substr(0, 5) ? "#DCF8C6" : "#F1F0F0"
}}
>
<div style={styles.messageText}>{msg.text}</div>
<div style={styles.messageTime}>
{msg.userId?.substr(0, 5)} • {formatTime(msg.time)}
</div>
</div>
))
)}
</div>
<form onSubmit={sendMessage} style={styles.form}>
<input
type="text"
value={message}
onChange={(e) => setMessage(e.target.value)}
onKeyPress={handleKeyPress}
placeholder="Type your message..."
style={styles.input}
disabled={!connected}
aria-label="Message input"
/>
<button
type="submit"
style={styles.button}
disabled={!connected || !message.trim()}
>
Send
</button>
</form>
</div>
);
};
// Styles
const styles = {
container: {
padding: "20px",
maxWidth: "600px",
margin: "auto",
fontFamily: "Arial, sans-serif",
display: "flex",
flexDirection: "column",
height: "80vh"
},
header: {
textAlign: "center",
marginBottom: "15px",
color: "#333"
},
statusBar: {
display: "flex",
justifyContent: "space-between",
marginBottom: "10px",
fontSize: "14px"
},
connected: {
color: "green",
fontWeight: "bold"
},
disconnected: {
color: "red",
fontWeight: "bold"
},
userCount: {
color: "#666"
},
messageContainer: {
border: "1px solid #ddd",
borderRadius: "8px",
padding: "15px",
height: "100%",
overflowY: "auto",
display: "flex",
flexDirection: "column",
gap: "10px",
marginBottom: "15px",
backgroundColor: "#f9f9f9"
},
message: {
padding: "8px 12px",
borderRadius: "12px",
maxWidth: "70%",
wordBreak: "break-word",
boxShadow: "0 1px 2px rgba(0,0,0,0.1)"
},
messageText: {
fontSize: "15px",
marginBottom: "4px"
},
messageTime: {
fontSize: "12px",
color: "#777",
textAlign: "right"
},
emptyState: {
textAlign: "center",
color: "#999",
margin: "auto"
},
form: {
display: "flex",
gap: "10px"
},
input: {
flex: 1,
padding: "12px",
borderRadius: "4px",
border: "1px solid #ddd",
fontSize: "15px"
},
button: {
padding: "0 20px",
backgroundColor: "#4CAF50",
color: "white",
border: "none",
borderRadius: "4px",
cursor: "pointer",
fontWeight: "bold",
transition: "background-color 0.2s"
}
};
export default Chat;
Key improvements in this component:
- Enhanced UI with better styling and user experience
- Connection status indicator to show server connection state
- Active user count display
- Message timestamps and user identification
- Auto-scrolling to the latest message
- Empty state handling when no messages are present
- Form submission handling with Enter key support
- Visual distinction between your messages and others'
- Accessibility attributes for better screen reader support
- Proper cleanup of Socket.io event listeners
Step 5: Add Chat Component to App.js
Modify src/App.js to include the chat interface:
import React from "react";
import Chat from "./Chat";
import "./App.css";

function App() {
  return (
    <div className="App">
      <header className="App-header">
        <h1>Real-Time Chat with React and Socket.io</h1>
      </header>
      <main>
        <Chat />
      </main>
      <footer>
        <p>Built with React and Socket.io</p>
      </footer>
    </div>
  );
}

export default App;
Step 6: Run the Application
Now launch both the backend and frontend in separate terminal windows to run your real-time chat app locally.
# Terminal 1: Run the Node.js backend
cd chat-server
node index.js

# Terminal 2: Run the React frontend
cd ../chat-client
npm start
Navigate to http://localhost:3000 in multiple browser windows to see real-time communication in action!
Troubleshooting Common Issues
When building your React chat application, you might encounter these common issues:
Connection Problems
If the chat client can't connect to the server:
- Ensure the server is running and listening on port 5000
- Check CORS configuration on the server
- Verify the Socket.io URL in the client matches the server location
- Check browser console for connection errors
Messages Not Appearing
If messages aren't appearing in the chat:
- Ensure event names match exactly (
messageon both client and server) - Check console logs to see if messages are being sent/received
- Verify the message state update in React is working correctly
Performance Issues
If your chat becomes slow with many messages:
- Implement pagination or limit the number of displayed messages
- Consider using virtual scrolling for large message histories
- Optimize re-renders with
React.memoorshouldComponentUpdate
Extending Your React Chat App
Here are some ways to enhance your chat application for production use:
User Authentication
Add user authentication to identify users properly:
- Implement signup/login with JWT authentication
- Store user profiles in a database
- Display profile pictures and usernames in the chat
Message Persistence
Currently, messages are lost when the server restarts. Add persistence with:
- MongoDB or Firebase to store message history
- Message loading on initial connection
- Read receipts and message status
Chat Rooms
Implement multiple chat rooms or private messaging:
// Server-side
socket.on("joinRoom", (roomId) => {
  socket.join(roomId);
  io.to(roomId).emit("userJoined", socket.id);
});

socket.on("roomMessage", ({ roomId, message }) => {
  io.to(roomId).emit("message", { text: message, userId: socket.id });
});
Real-Time Features
Add more interactive features to enhance engagement:
- Typing indicators ("User is typing...")
- Online/offline status
- Message reactions and emoji support
- File and image sharing
Deployment Considerations
When deploying to production:
- Set up proper environment variables for server URLs
- Implement error handling and reconnection strategies
- Add logging and monitoring for performance issues
- Consider using a service like Socket.io Cloud for large-scale applications
Performance Optimization
For a production-ready chat application, consider these optimizations:
- Message Batching: Group multiple rapid messages to reduce server load
- Debouncing Events: Implement debouncing for events like "user typing" indications
- Lazy Loading: Load message history in chunks as users scroll up
- Server Scaling: Use Redis adapter for Socket.io to handle multiple server instances
- Connection State Management: Implement robust reconnection logic
Frequently Asked Questions
Q: What are the advantages of Socket.io over raw WebSockets?
A: Socket.io provides automatic fallbacks to polling when WebSockets aren't available, built-in reconnection logic, room-based broadcasting, and a cleaner event-based API.
Q: Can I use Socket.io with other frontend frameworks like Angular or Vue?
A: Yes, Socket.io works with any JavaScript framework. The connection logic remains similar, though the integration with UI components will differ.
Q: How many concurrent connections can Socket.io handle?
A: A single Socket.io server can handle thousands of concurrent connections, limited mainly by your server's resources. For larger applications, you can scale horizontally using Redis adapter.
Q: Is Socket.io secure for transmitting sensitive data?
A: While Socket.io supports secure WebSocket connections (WSS), you should implement additional authentication and encryption for sensitive data. Never transmit passwords or personal information without proper security measures.
Q: How can I implement file sharing in the chat?
A: You can implement file sharing by converting files to Base64 strings or by using Socket.io's binary data support. For larger files, consider using a separate HTTP upload endpoint and simply sharing the download link via Socket.io.
Conclusion
In this comprehensive tutorial, we've built a fully functional real-time chat application using React and Socket.io. You've learned how to:
- Configure a Socket.io server with Node.js and Express
- Implement a React client with real-time capabilities
- Handle bidirectional communication between clients and server
- Create a responsive UI for message exchange
- Implement connection status and user presence features
This foundation gives you the tools to build sophisticated real-time applications beyond just chat – from collaborative editors to live dashboards, multiplayer games, and more.
Next Steps?
To continue your learning journey:
- Explore Socket.io's documentation for advanced features like rooms and namespaces
- Add a database to persist messages and user information
- Implement authentication for secure, personalized experiences
- Deploy your application to a hosting service
Happy coding! 🚀
>>> Follow and Contact Relia Software for more information!

- coding