Ubuntu is a popular choice for running Node.js applications because of its strong package management and reliable security features. It's widely used by Node.js developers for both development and production environments. In this guide, I’ll walk you through the steps to install Node.js on Ubuntu 22.04. Whether you’re a beginner or experienced, this simple setup will help you get started easily.
>> Read more:
- Top 7 Best Node.js Frameworks For Web App Development
- Top 12 Best Javascript Frameworks for Your Projects
- How Can Node.js Clustering Boost Your App Performance?
Prerequisites
Basic Knowledge of the Linux Command Line
Running commands in Linux-based systems such as Ubuntu needs a powerful tool that is the command line, or known as terminal. Installing software, navigating directories, modifying files, and running scripts all depend on a fundamental grasp of command line use.
Being familiar with basic commands like cd (change directory), ls (list directory contents), mkdir (make directory), and rm (remove files or directories) is very helpful. Additionally, installing Node.js also requires understanding permissions and how to use sudo (superuser do) to run commands with administrative privileges.
Ubuntu System Access
To install Node.js, you'll need access to a system running Ubuntu. This guide applies to various Ubuntu versions, but it's best to use a recent version to ensure compatibility and security. Open a terminal and type cat /etc/lsb-release to check your Ubuntu version. You can see the Ubuntu version as below:
DISTRIB_ID=Ubuntu
DISTRIB_RELEASE=22.04
DISTRIB_CODENAME=jammy
DISTRIB_DESCRIPTION="Ubuntu 22.04.3 LTS"
Sudo Privileges
Sudo privileges let you run commands with higher-level permissions, usually as the superuser (root). Installing software on Ubuntu typically requires these privileges to modify system settings or install packages globally. If you’re not the system administrator, you might need to ask them to give you sudo access or handle the installation steps that require elevated permissions for you.
Meeting these prerequisites gives you the skills and access needed to install Node.js on your Ubuntu system with confidence. It also helps you troubleshoot any issues that might arise, thus your setup process is smoother and easier.
3 Methods for Node.js Installation on Ubuntu
We will go over 3 ways to install Node.js on your Ubuntu system. Each method is designed to different needs with its own benefits. You look for the easiest option, need to manage multiple Node.js versions, or want a specific version not available through your package manager, you’ll find an approach that works for you here.
>> Read more: A Type-Safe Backend with NestJS, Prisma, Pothos, & GraphQL
Method 1: Installing Node.js with Ubuntu Package Manager
The Ubuntu package manager, apt, is the easiest and most straightforward method for installing Node.js. This approach is best suited for users who want a quick setup and don't need to manage multiple Node.js versions. The version of Node.js installed via apt is determined by the Ubuntu package repository, which might not always be the latest. However, it is tested and maintained by Ubuntu developers, ensuring stability and security.
Step 1: Update Package Repository
Before installing new software, you should update your package repository to have the latest software versions and security updates. This prevents conflicts and making the installation process smoother.
- Open your terminal.
- Run the following command to update your package repository.
sudo apt updateThis command contacts the software repositories configured on your system and updates the package lists to reflect the latest available version.
Step 2: Install Node.js
Once your package repository is updated, you can proceed to install Node.js.
- In the terminal, run the following command to install Node.js
sudo apt install nodejsThis command installs the Node.js package from the Ubuntu repository. Note that the version available in the repository may not be the latest version Node.js, but it is tested and maintained for Ubuntu, ensuring stability and security.
Step 3: Verify Installation
After the installation is complete, it is a good idea to verify that Node.js was successfully installed and to check the installed version.
- To verify the installation and check the version of Node.js, run:
node -vThis command displays the version of Node.js that is currently installed on your system. For example, you might see output similar to v12.22.9, indicating that version v12.22.9 of Node.js is installed.
Method 2: Installing Node.js with NVM (Node Version Manager)
Installing Node.js using NVM (Node Version Manager) offers flexibility in managing multiple Node.js versions on a single system. This method is particularly useful for developers who work on various projects requiring different Node.js versions. Here’s how to install Node.js with NVM:
Step 1: Install NVM
First, you'll need to install NVM itself. NVM allows you to install multiple versions of Node.js and switch between them as needed.
- Open your terminal.
- Run the following command to download and install NVM.
curl -o- https://raw.githubusercontent.com/nvm-sh/nvm/v0.39.7/install.sh | bashThis script clones the NVM repository from GitHub to ~/.nvm and adds the script to your profile (~/.bash_profile, ~/.zshrc, ~/.profile, or ~/.bashrc), so it's available when you open a new terminal session.
Note: Always check the https://github.com/nvm-sh/nvm repository for the latest installation instructions and version.
Step 2: Activate NVM
After installing, you need to activate NVM by sourcing your profile script.
- If NVM does not automatically active, you might need to close and re-open your terminal; or run the appropriate file for your shell (
~/.profile,~/.zshrc, etc.) or:
source ~/.bashrcStep 3: Install Node.js Using NVM
Now that NVM is installed and activated, you can install Node.js.
- To install the latest version of Node.js, run:
nvm install nodeIf you see that screen on your computer. You have installed successfully Node.js with version v21.6.2:

- To install a specific version of Node.js, specify the version. For example, to install Node.js version 18.12.0, run:
nvm install 18.12.0Let see the results here to make sure you are successful:

Step 4: Switch Between Node.js Versions
NVM makes it easy to switch between installed Node.js versions depending on your project's needs.
- To switch to a version you have installed, use:
nvm use <version>For example, to switch to Node.js version 18.12.0, you would run:
nvm use 18.12.0Here we are if the statement are run successfully:
![]()
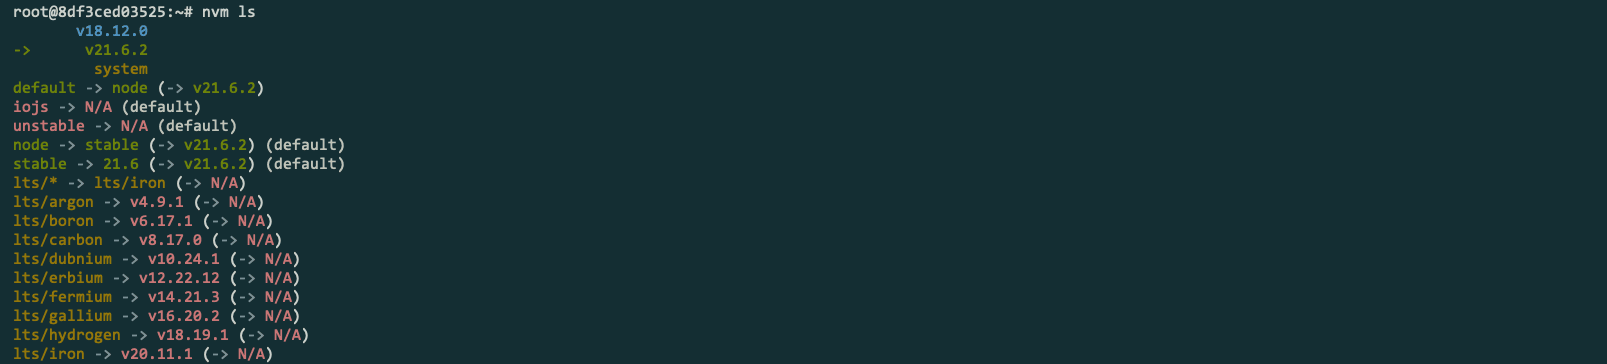
- To see all installed Node.js versions and which version you're currently using, run:
mvn lsHere are the Node.js versions which are installed on my machine:
By following these steps, you’ve not only installed Node.js using NVM but also gained the flexibility to manage multiple Node.js versions easily. This setup is perfect for development environments where projects need different Node.js versions for running or testing.
Method 3: Installing Node.js from Official Node.js Binary Distributions
Step 1: Download Node.js Binaries
First, you'll need to download the Node.js binaries.
- Visit the official Node.js download page at https://nodejs.org/en/download.
- Select the "Linux Binaries (x64)" for the version of Node.js you wish to install.
Step 2: Extract Node.js Archive
Once the download is complete, you'll need to extract the Node.js archive to a directory on your system.
- Open your terminal.
- Navigate to the directory where the Node.js archive was downloaded.
- Use the following command to extract the archive (replace
node-vXX.XX.X-linux-x64.tar.xzwith the actual file name of the downloaded archive):
tar -xJvf node-vXX.XX.X-linux-x64.tar.xz -C /usr/local/lib/nodejsThis command extracts the Node.js binaries to /usr/local/lib/nodejs.
Step 3: Set Up Environment Variables
Next, you'll need to add Node.js to your PATH to make it accessible from anywhere in your terminal.
- Open your
~/.bashrc,~/.profile, or~/.bash_profilefile in a text editor. - Add the following lines at the end of the file (replace
node-vXX.XX.Xwith the actual directory name you extracted):
export PATH=/usr/local/lib/nodejs/node-vXX.XX.X-linux-x64/bin:$PATHThis command adds the Node.js binary directory to your PATH.
Step 4: Reload Profile
For the changes to take effect, you'll need to reload your profile.
- In your terminal, run the appropriate profile file you edited or:
source ~/.bashrcStep 5: Verify Installation
Finally, verify that Node.js was installed successfully and check the installed version.
- In your terminal, run:
node -vThis command displays the version of Node.js that is currently installed, confirming that the installation process was successful.
>> Read more: How to Choose the Right NodeJS Development Company?
Conclusion
This blog covers 3 ways to install Node.js on Ubuntu based on different needs and interests. They are: the Ubuntu Package Manager is for simplicity; NVM (Node Version Manager) is for versatility; and installing directly from the official Node.js binary distributions is for precision.
If you are working on multiple projects or need to test your applications across different versions of Node.js, I recommend using NVM. It is flexible to switch between versions seamlessly, without affecting the global system configuration. Thus, feel your workflow and productivity are improved.
Otherwise, installing Node.js from the official binary distributions is ideal if you need a specific version of Node.js that is not available in other ways. This solution gives you full control over your system's Node.js version and configuration, but it needs extra steps.
Finally, choose the method that best suits your development needs.
>>> Follow and Contact Relia Software for more information!

- development
- coding