Hey there, React developers! If you're building apps that need to communicate with servers (and let's face it, who isn't?), you've probably encountered the challenge of managing API requests.
But worry not; Axios is here to save the day! This superhero of HTTP clients for JavaScript is promise-based, super flexible, and packed with features that make API management a breeze. Let's explore why Axios is the perfect replacement for fetch and how it can boost your confidence in writing cleaner and more effective code.
>> Read more about React:
- An In-Depth Guide for Front-End Development with React
- 7 Best React State Management Libraries for Any Project Size
- Top 6 Best React Component Libraries for Your Projects
What Makes Axios the Perfect Replacement for fetch?
The fetch API is a standard go-to when handling HTTP requests in JavaScript. But let's be honest, fetch can be a bit… bare-bones. Here's why Axios is often a better choice.
>> Read more: Fetch API vs Axios: Detailed Comparison in Practical Scenarios
Ease of Use and Simplicity
With fetch, you have to handle response parsing manually, which can become cumbersome. Axios, on the other hand, automatically transforms JSON data. Here's a quick comparison:
- Using
fetch
fetch('<https://dummyjson.com/users>')
  .then(response => response.json())
  .then(data => console.log(data))
  .catch(error => console.error('Error:', error));
- Using Axios
axios.get('<https://dummyjson.com/users>')
  .then(response => console.log(response.data))
  .catch(error => console.error('Error:', error));
It's clear to see that Axios offers a concise way to handle HTTP requests, reducing redundant code. It returns promises for better asynchronous code readability, improving web development efficiency.
Built-in Features
Axios, superior to fetch, streamlines HTTP requests with built-in features like automatic JSON data transformation, request and response interceptors, robust error handling, and default configuration settings. While both support request cancellation via AbortController, Axios simplifies API management with its flexible API.
The table below highlights the key differences between Axios and fetch, showcasing why Axios is often the better choice for managing API requests in JavaScript applications:
| Feature | Axios | fetch |
| Automatic JSON Data Transformation | Yes | No, manual transformation required |
Request and Response Interceptors | Yes | No, must handle manually |
Error Handling | Powerful error handling with catch blocks | Limited to basic error handling |
Request Cancellation | Supports AbortController | Supports AbortController |
Default Configurations | Allows setting default base URLs and headers | No, must configure manually for each request |
Why Axios is Considered Effective?
Consistent and Clean API Calls
Axios allows you to create instances with custom configurations, ensuring consistent and clean API calls throughout your application.
Creating an Axios instance:
import axios from 'axios';

const api = axios.create({
  baseURL: '<https://api.example.com>',
  timeout: 1000,
  headers: {'Authorization': 'Bearer yourToken'}
});

export default api;
With this setup, every request you make with this instance will have the same base URL, timeout, and headers.
Interceptors for Request and Response Manipulation
Interceptors in Axios act like the secret agents of your HTTP requests, allowing you to intercept and modify requests and responses. This is perfect for adding authentication tokens or handling specific status codes globally.
Example:
api.interceptors.request.use(
  config => {
    config.headers['Authorization'] = 'Bearer yourToken';
    return config;
  },
  error => {
    return Promise.reject(error);
  }
);

api.interceptors.response.use(
  response => response,
  error => {
    if (error.response.status === 401) {
      // Handle unauthorized errors
    }
    return Promise.reject(error);
  }
);
Cancellation of Requests
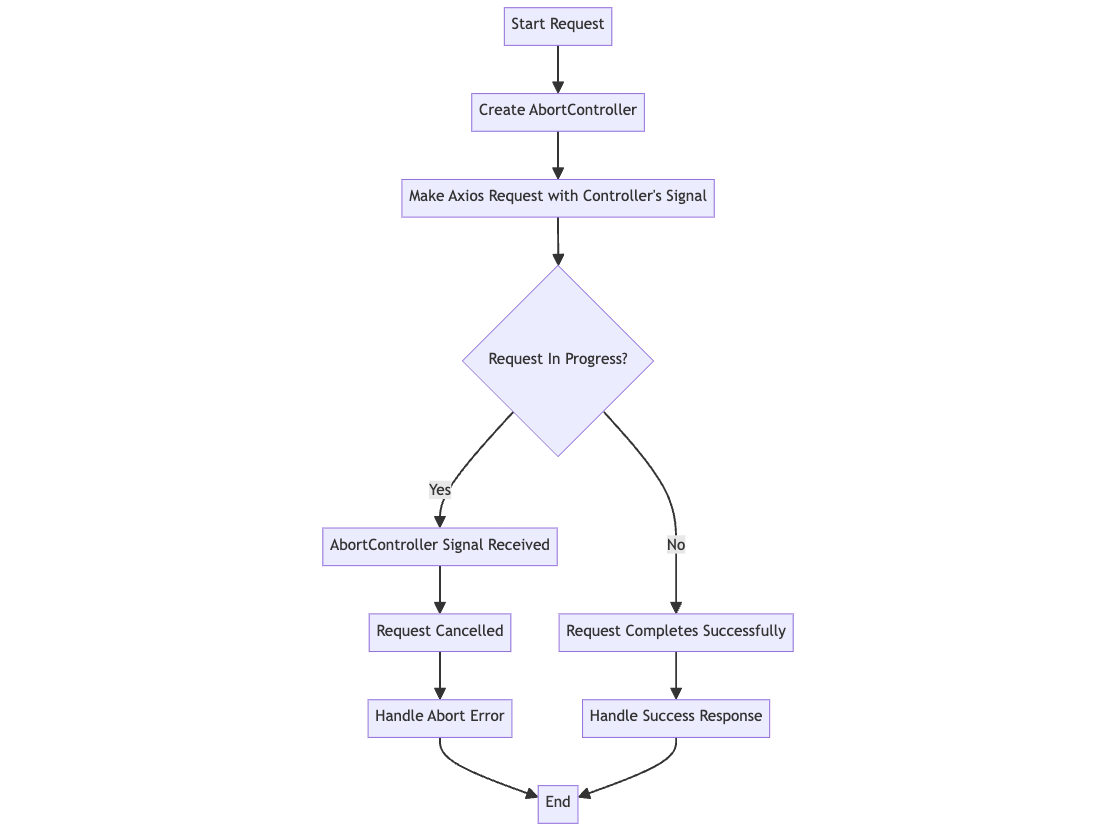
Axios supports AbortController for request cancellation, making it easier and more aligned with modern JavaScript practices.
Example using AbortController:
// Create an instance of AbortController
const controller = new AbortController();

// Make an Axios GET request with the AbortController's signal
api.get('/users', {
  signal: controller.signal
})
.then(response => {
  console.log(response.data);
})
.catch(error => {
  if (error.name === 'AbortError') {
    // Handle the request cancellation error
    console.log('Request was canceled');
  } else {
    // Handle other errors
    console.error('Error:', error);
  }
});

// Cancel the request by calling the abort method on the controller
controller.abort();
This functionality is handy for scenarios where you might need to cancel outdated or unnecessary API calls, improving the overall performance and responsiveness of your React application.
Refer to the flowchart below to further illustrate how request cancellation works in Axios using AbortController. This diagram visualizes the process, from creating the AbortController and making the request with the controller's signal to handling both the successful completion and the cancellation of the request.

Default Configurations
Are you tired of repeating yourself? Set up default configurations in Axios to maintain consistency and reduce redundancy in your code.
Example:
axios.defaults.baseURL = '<https://api.example.com>';
axios.defaults.headers.common['Authorization'] = 'Bearer yourToken';
axios.defaults.headers.post['Content-Type'] = 'application/json';
With these defaults, your API requests will always be configured correctly, reducing boilerplate code and streamlining your development process.
Structuring Code Effectively with Axios
Creating and Exporting an Axios Instance
Setting up a custom Axios instance helps maintain consistency across your application.
Example:
import axios from 'axios';

const api = axios.create({
  baseURL: process.env.REACT_APP_API_URL,
  headers: {
    'Content-Type': 'application/json',
  },
});

export default api;
Using Interceptors for Cross-Cutting Concerns
Interceptors are perfect for handling tasks like adding authentication tokens to every request or managing global response scenarios.
Example:
api.interceptors.request.use(
  config => {
    const token = localStorage.getItem('token');
    if (token) {
      config.headers['Authorization'] = `Bearer ${token}`;
    }
    return config;
  },
  error => {
    return Promise.reject(error);
  }
);
Organizing API Calls into Services
Structure your API calls into service modules for better maintainability.
Example of a User Service Module:
// userService.js
import api from './api';

const getUsers = () => api.get('/users');
const getUserById = (id) => api.get(`/users/${id}`);
const createUser = (userData) => api.post('/users', userData);
const updateUser = (id, userData) => api.put(`/users/${id}`, userData);
const deleteUser = (id) => api.delete(`/users/${id}`);

export { getUsers, getUserById, createUser, updateUser, deleteUser };
Real-World Example
Integrating Axios with a Backend API
Let's integrate Axios with a backend API, focusing on authentication and token management. Suppose we have an authentication endpoint that returns a token, and we need to refresh this token periodically.
Example:
// api.js
import axios from 'axios';

const api = axios.create({
  baseURL: '<https://api.example.com>',
});

// Request Interceptor: Check for a stored token and inject it into the Authorization header
api.interceptors.request.use(
  config => {
    const token = localStorage.getItem('token');
    if (token) {
      config.headers['Authorization'] = `Bearer ${token}`;
    }
    return config;
  },
  error => {
    return Promise.reject(error);
  }
);

// Response Interceptor: Handle 401 errors by refreshing the token and retrying the request
api.interceptors.response.use(
  response => response,
  async error => {
    const originalRequest = error.config;
    if (error.response.status === 401 && !originalRequest._retry) {
      originalRequest._retry = true;
      const refreshToken = localStorage.getItem('refreshToken');
      const { data } = await axios.post('<https://api.example.com/refresh>', { token: refreshToken });
      localStorage.setItem('token', data.token);
      api.defaults.headers.common['Authorization'] = `Bearer ${data.token}`;
      return api(originalRequest);
    }
    return Promise.reject(error);
  }
);

export default api;
In this example, we set up two crucial interceptors to manage token authentication effectively:
Request Interceptor: This interceptor checks for a stored token in the local storage and, if found, injects it into the Authorization header of every outgoing request. This ensures that all API calls made through this Axios instance are authenticated without requiring manual intervention for each request.
Response Interceptor: This interceptor handles cases where the server responds with a 401 Unauthorized error. When such an error occurs, and if a refresh token exists, the interceptor attempts to refresh the access token by calling a separate API endpoint.
If the token refresh is successful, the new token is stored in local storage, and the original request is retried with the new token. This automatic token refresh mechanism ensures seamless authentication without user intervention, providing a smoother user experience.
By incorporating these interceptors, you can ensure that your API requests remain authenticated and handle token expiration gracefully. This setup reduces the need for repetitive code and makes your application more robust and secure.
>> You may be interested in React coding topics:
- The Best React Design Patterns with Code Examples
- Demystifying React Redux for Centralized State Management
- A Comprehensive Guide for React Server Components
- Mastering React Test Renderer for Streamlined Testing
- Mastering React Hooks: Fundamentals for Beginners
- Mastering React Higher-Order Components (HOCs)
- Tailwind CSS for React UI Components: Practical Code Examples
Conclusion
And there you have it! Axios makes managing API requests in React a walk in the park. With powerful features like interceptors, request cancellation using AbortController, and default configurations, Axios helps you keep your application efficient, clean, and reliable.
Whether you're dealing with complex scenarios like token management or want a hassle-free way to handle HTTP requests, Axios is the tool you need. So go ahead, give it a try, and watch your API management become a whole lot easier and more fun!
By incorporating these advanced features and structuring your code effectively, you can leverage the full power of Axios to build robust and responsive React applications. Happy coding!
>>> Follow and Contact Relia Software for more information!
- development
- Web application Development

