
Have you ever hit a blank screen in a React app and had no idea what just broke? It’s usually because of an unhandled error somewhere in the component tree. And in React, when an error isn't caught properly, the entire UI can crash.
In that cases, React Error Boundaries is a leading solution. This is a nice way to catch those unexpected errors and display a fallback UI instead of letting your app crash.
Well, I'll go over what React Error Boundaries are, how they function internally, and how to use them to improve the robustness and usability of your apps in this blog. We'll also go over real-world examples and best practices so you can confidently put them into practice.
>> Read more:
- Mastering React Higher-Order Components (HOCs)
- Tailwind CSS for React UI Components: Practical Code Examples
- Unlock the Power of GraphQL with React to Master Data Fetching
What are React Error Boundaries?
React Error Boundaries are specialized components that act as guardians within your component tree. They have the ability to catch errors that occur anywhere within their child component hierarchy. They like safety nets, preventing errors from propagating upwards and disrupting unrelated parts of your application.
Error boundaries can render a user-friendly fallback UI in place of the crashed component. This prevents a frustrating user experience with a blank screen and provides valuable clues about the error's location for debugging.
By incorporating error boundaries within your React components, your app is more stable and user-friendly.
Benefits of Using React Error Boundaries
React applications, by default, lack a mechanism to handle errors during rendering. When an error happens, the only choice is to remove the whole app. This results in the entire application crashing and displaying a blank screen to the user. Fortunately, React Error Boundaries come to the rescue! Here are some typical benefits of Error Boundaries:
- Enhanced User Experience: When something breaks, you can provide a useful error message or a fallback user interface (UI) in place of a blank screen. It makes things feel less broken and keeps the user informed.
- Streamlined Debugging: Error boundaries can log helpful information when something goes wrong. Developers can identify and fix the problem more quickly and easily as a result.
- Granular Control: You can wrap just parts of your app in error boundaries. This lets you decide exactly where you want to handle errors, like a single component or a larger section of your app.
- Error Isolation: Error boundaries excel at containing errors within their designated boundaries. This means that an error in a specific component won't bring down the entire application. Other parts of your app can keep working normally, which stops failures from spreading.
- Retry Mechanisms: In advanced setups, you can even try again, like retrying a failed request without requiring the user to reload the page.
How Do React Error Boundaries Work?
React Error Boundaries offer a superhero-like ability to catch errors within your component hierarchy. But how exactly do they work? Let's delve into the technical details:
Catching Errors Within the Tree
Error boundaries use special React lifecycle methods to detect problems:
getDerivedStateFromError(optional): This runs during rendering if something goes wrong. It lets the component update its state so it can show a fallback UI instead of crashing.componentDidCatch(required): This one runs after the error happens. It doesn’t change the UI, but it gives you a chance to log the error or report it to a service like Sentry.
Rendering the Fallback UI
Once an error is caught, the error boundary switches to an “error state”. This tells React to stop showing the broken component and instead render the fallback UI you’ve defined. That could be a friendly message like “Oops! Something went wrong.”
Error Boundary Lifecycle Summary
- Error occurs: An error is thrown within a component inside the error boundary's subtree.
getDerivedStateFromError(optional): If present, this method is invoked during rendering and can return a new state to trigger the fallback UI.componentDidCatch(required): This method is invoked after the error, allowing you to log or report the error.- Fallback UI Renders: The error boundary transitions to its error state, rendering the custom fallback UI you've defined.
By understanding this error lifecycle and effectively utilizing getDerivedStateFromError and componentDidCatch, you can create robust error boundaries that gracefully handle errors within your React applications.
Implementing React Error Boundaries: A Practical Example
This repo will explain how to use react-error-boundary in React, you can find it in here.
First, clone the project
git clone https://github.com/nvkhuy/examples.gitNavigate to react-error-boundary example:
cd react-error-boundaryTo Install:
npm installTo Run:
npm run devProject structure:
examples/react-error-boundaries/src
├── App.css
├── App.tsx
├── assets
│   └── react.svg
├── components
│   ├── CartItem.tsx
│   ├── CartItems.tsx
│   ├── CheckoutButton.tsx
│   ├── CheckoutPage.tsx
│   ├── CheckoutSummary.tsx
│   └── errors
│       ├── ErrorBoundrayComponent.tsx
│       └── ProductsFetchingError.tsx
├── errorHanlding
│   ├── usingErrorBoundaries.tsx
│   ├── usingState.tsx
│   └── usingTheRightWay.tsx
├── fetchers
│   └── products.ts
├── index.css
├── main.tsx
└── vite-env.d.ts
React Error Boundary implementation is on this file: errorHandling/usingErrorBoundaries.tsx
export class StandardErrorBoundary extends React.Component<any, any> {
  state: {
    hasError: boolean;
    error?: Error;
  };

  constructor(props: any) {
    super(props);

    // to keep track of when an error occurs
    // and the error itself
    this.state = {
      hasError: false,
      error: undefined,
    };
  }

  // update the component state when an error occurs
  static getDerivedStateFromError(error) {
    // specify that the error boundary has caught an error
    return {
      hasError: true,
      error: error,
    };
  }

  // Log the error to some sort of a service logger
  componentDidCatch(error: any, errorInfo: any) {
    console.log("Error caught!");
    console.error(error);
    console.error(errorInfo);
  }

  render() {
    // if an error occurred
    if (this.state.hasError) {
      return <ProductsFetchingError error={this.state.error?.message || ""} />;
    } else {
      // default behavior
      return this.props.children;
    }
  }
}
Here’s a breakdown of the code:
state: This is the state of the component, which includeshasError(a boolean indicating if an error has occurred) anderror(the error that occurred).constructor(props: any): This is the constructor of the component, which initializes the state.getDerivedStateFromError(error): This is a static method that updates the state so the next render will show the fallback UI. When an error is thrown, this lifecycle method is invoked with the error thrown as the argument.componentDidCatch: This method is called after an error has been thrown by a descendant component. It’s used to log the error information for debugging purposes.render(): This method returns the UI of the component. If an error occurred (this.state.hasErroristrue), it renders aProductsFetchingErrorcomponent with the error message. If no error occurred, it renders the children components normally (this.props.children).
Here the child component that React Error Boundary will wrap:
export const UsingErrorBoundaries = () => {
  const [cartItems, setCartItems] = useState([]);

  const handlePayClick = () => {
    // Handle the payment process here
  };

  const subtotal = cartItems.reduce(
    (sum, item: any) => sum + item.price * item.quantity,
    0
  );
  const discount = 0;
  const total = subtotal - discount;

  useEffect(() => {
    const fetchItems = async () => {
      try {
        const items = await fetchCartItems();
        setCartItems(items);
      } catch (err) {}
    };
    fetchItems();
  }, []);

  return (
    <div className="checkout-page min-h-screen py-8 px-4">
      <div className="max-w-2xl mx-auto">
        <h1 className="text-3xl font-bold text-white mb-6">Checkout</h1>
        <CartItems items={cartItems} />
        <CheckoutSummary
          subtotal={subtotal}
          discount={discount}
          total={total}
        />
        <div className="mt-4">
          <CheckoutButton onClick={handlePayClick} />
        </div>
      </div>
    </div>
  );
};
Here’s a breakdown of what it does:
- State Initialization: It initializes a state variable
cartItemswith an empty array. This state will hold the items in the cart. - Payment Handler: It defines a function
handlePayClickwhich will be called when the payment button is clicked. The actual payment process should be implemented inside this function. - Calculating Subtotal, Discount, and Total: It calculates the subtotal of the cart by reducing the
cartItemsarray, summing up the product of the price and quantity of each item. The discount is set to 0, and the total is calculated as the difference between the subtotal and the discount. - Fetching Cart Items: It uses the
useEffecthook to fetch the cart items when the component is mounted. ThefetchItemsfunction is defined as an asynchronous function inside theuseEffecthook. It fetches the cart items using thefetchCartItemsfunction (which is not defined in the provided code) and updates thecartItemsstate. - Rendering: It returns a JSX that represents the checkout page. This includes the title “Checkout”, a list of cart items, a summary of the checkout including the subtotal, discount, and total, and a checkout button that calls the
handlePayClickfunction when clicked.
Here the result when you run npm run dev in terminal:
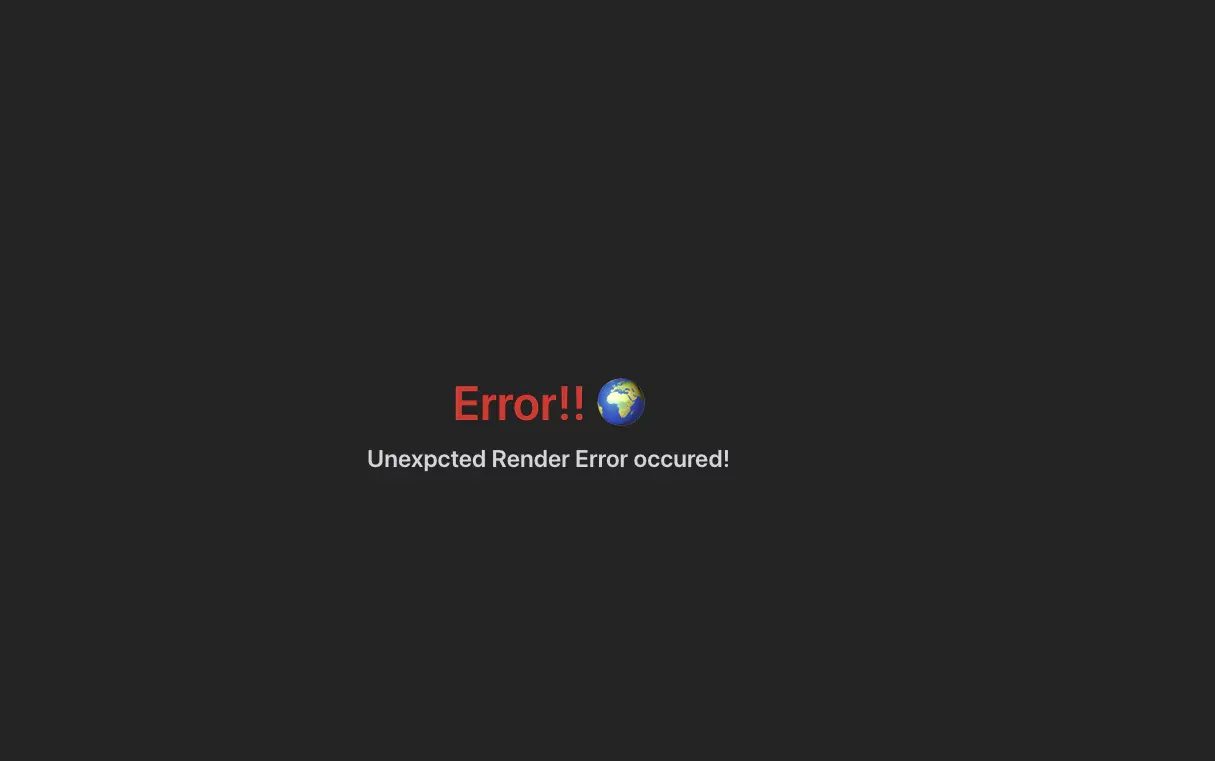
The code below demonstrates how to intentionally throw an error within the CheckoutSummary.tsx component to simulate an error scenario. However, for robust testing, consider utilizing libraries or frameworks that simulate various error conditions (e.g., network errors, API failures).
const CheckoutSummary = ({ subtotal, discount, total }) => {
  // intend to throw errror
  throw new Error("Unexpcted Render Error occured!");

  return (
    <div className="checkout-summary p-4 bg-gray-900 border-2 border-slate-200 shadow-md rounded-md">
      <p className="text-lg font-semibold mb-2">Summary</p>
      <p className="text-sm text-gray-500">Subtotal: ${subtotal}</p>
      <p className="text-sm text-gray-500">Discount: ${discount}</p>
      <p className="text-lg font-semibold">Total: ${total}</p>
    </div>
  );
};
Here is where react error boundary is used. You can find it in App.tsx:
function App() {
return (
<div className="App">
<StandardErrorBoundary>
<UsingErrorBoundaries/>
</StandardErrorBoundary>
</div>
);
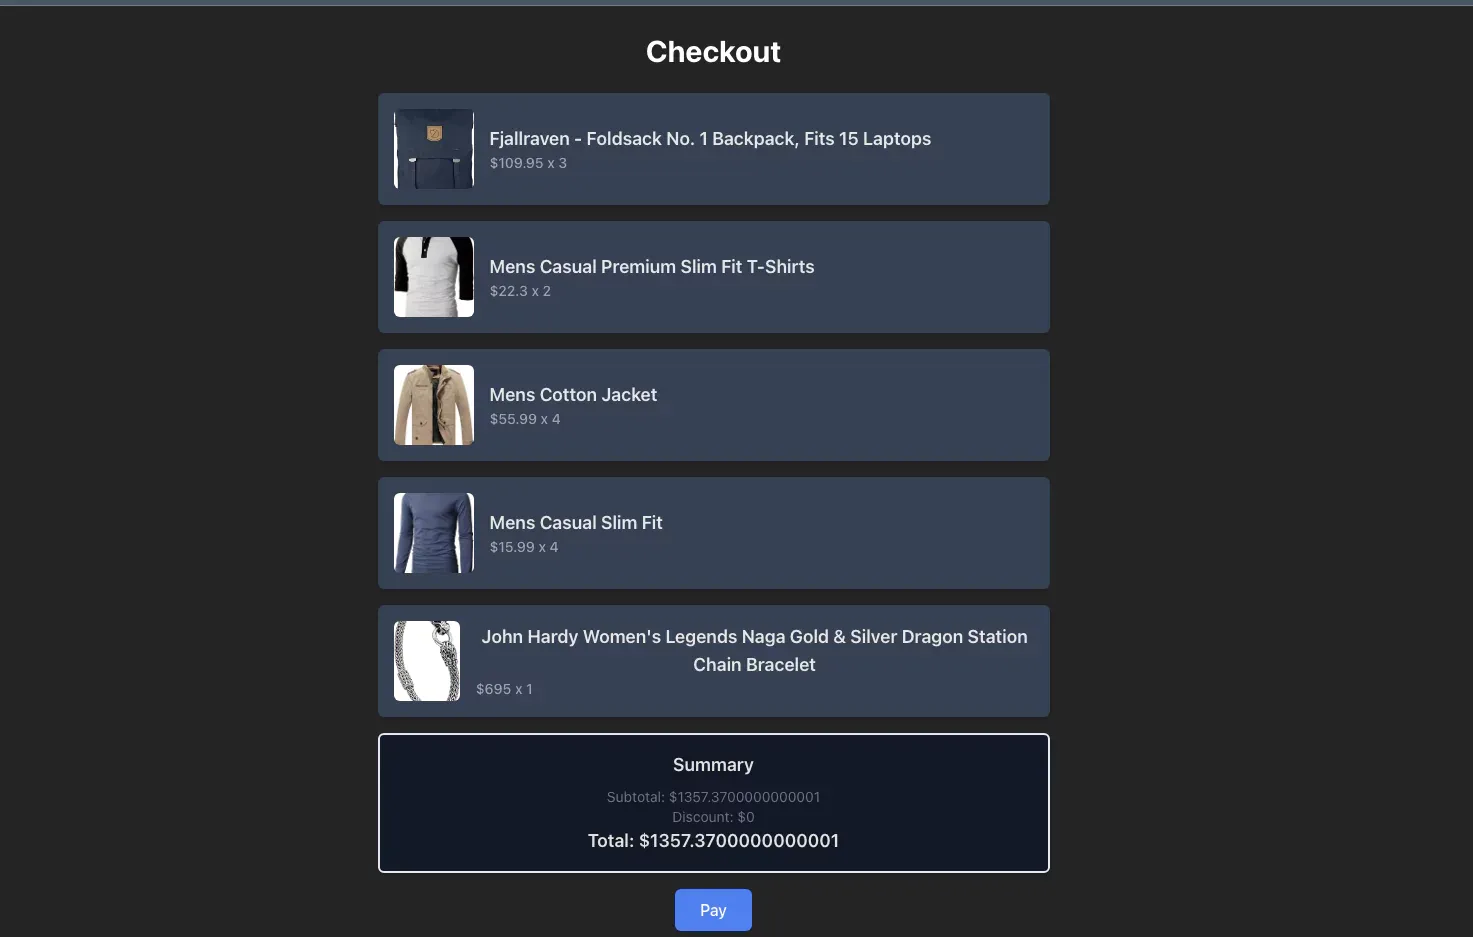
}To stop throwing error and see how app renders when CheckoutSummary succeeds, you comment like this:
const CheckoutSummary = ({ subtotal, discount, total }) => {
  // comment line below to have succeed checkout summary
  // throw new Error("Unexpcted Render Error occured!");

  return (
    <div className="checkout-summary p-4 bg-gray-900 border-2 border-slate-200 shadow-md rounded-md">
      <p className="text-lg font-semibold mb-2">Summary</p>
      <p className="text-sm text-gray-500">Subtotal: ${subtotal}</p>
      <p className="text-sm text-gray-500">Discount: ${discount}</p>
      <p className="text-lg font-semibold">Total: ${total}</p>
    </div>
  );
};
And here is the result when the app succeeds in rendering:
>> You may consider: Mastering React Test Renderer for Streamlined Testing
Alternative Error Handling Approaches for React Error Boundary
Apart from using Error Boundary, there are other ways to handle errors in React. We will mention 3 typical ways in this part.
Try-Catch Blocks
You can use try-catch blocks to handle errors that occur within a component’s render method or during API calls. Here’s an example:
import React, { useState } from 'react';

const MyComponent = () => {
  const [data, setData] = useState(null);
  const [error, setError] = useState(null);

  try {
    // make API call to fetch some data
    const response = await fetch('https://api.example.com/data');
    const json = await response.json();
    setData(json);
  } catch (error) {
    setError(error);
  }

  return (
    <div>
      {error ? <p>An error occurred: {error.message}</p> : null}
      {data ? <p>Data: {data}</p> : null}
    </div>
  );
}
The component makes an API call to fetch some data and stores the result in the data state variable. If there is an error during the API call, the error is caught by the catch block and stored in the error state variable.
However, they have limitations:
- Scope: They only catch errors within the
tryblock, not in asynchronous code (e.g., promises) or event handlers. - Propagation: Uncaught errors within the
tryblock will still propagate up the component tree.
Logging Errors
Always log errors with meaningful messages and stack traces to aid in debugging. Use tools like the JavaScript console or third-party error monitoring services.
Testing
Implement unit tests, integration tests, and end-to-end tests to catch errors early in the development process.
Try-Catch vs. React Error Boundary: Detailed Comparison
Try-catch and React Error Boundaries are two important error handling methods for React projects. Each serves a purpose, but in various ways. Let's investigate.
Scope of Error Handling
- Try-Catch: This method is useful for handling errors within a single component. It works well for imperative code, such as API calls.
- Error Boundaries: Built for catching UI-related errors that happen during rendering. You can wrap sections of your component tree to stop those parts from breaking the whole app.
Type of Errors Caught
- Try-Catch: This method can catch errors that occur during the execution of synchronous code.
- Error Boundaries: Catch errors in rendering, lifecycle methods, and component constructors within their child tree. But they don’t catch errors in event handlers (like button clicks), async errors (like Promises or setTimeout), server-side rendering errors, errors inside the error boundary component itself.
Fallback UI
- Try-Catch: You can decide what to show based on the error, but you need to write that logic manually.
- Error Boundaries: Let you show a nice fallback UI automatically. Users do not thus experience a blank screen.
Error Propagation
- Try-Catch: If an error is thrown inside a try block and is not caught, it will propagate up the call stack.
- Error Boundaries: These prevent unhandled errors from propagating and affecting the overall user experience. They can be set up around the entire app or individual components for more granular control.
React Error Boundaries are made to handle errors in React's declarative code and offer a better user experience by showing a fallback UI when an error arises. Whereas, try-catch blocks are great for handling errors in imperative code.
Limitations of React Error Boundaries
React Error Boundaries have several limits to be mindful of even if they have a strong error handling mechanism:
Limited Scope: Error Boundaries can only catch errors that occur within their child component tree. This means they won't catch:
- Errors originating from the error boundary component itself.
- Errors thrown within event handlers of child components.
Asynchronous Code Challenges: If you have an error in a setTimeout, fetch call, or Promise, the error boundary won’t catch it. You still need try-catch or .catch() in those places.
Server-Side Rendering (SSR) Considerations: If there are errors during SSR (Server-Side Rendering), Error Boundaries can't catch them. For SSR, you need to handle errors in a different way.
Debugging Difficulties: Even though componentDidCatch lets you log errors, the problem could come from a component that is very deep in the tree. So, it can be hard to pinpoint the exact source.
Fallback UI Is Often Too Simple: Most of the time, error Boundaries will show a general fallback UI when something goes wrong. It will be better for users if the error messages or user guides in the fallback UI are more useful.
>> Read more about React:
- The Best React Design Patterns with Code Examples
- Demystifying React Redux for Centralized State Management
- Mastering React Context API for Streamlined Data Sharing
- An In-Depth Guide for Front-End Development with React
- React Suspense for Mastering Asynchronous Data Fetching
Final Thoughts
Whether you're using class-based or functional components, react-error-boundary offers a versatile toolkit. It provides components, advanced components, and custom Hooks, enabling you to implement robust error handling strategies within your React components. Additionally, it supports custom fallback UIs, error reset features, and error reporting to make sure a seamless user experience even when errors arise.
Adding react-error-boundary to your React app improves the final product, makes it easier to debug, and improves how errors are handled. Using this tool will help you spend less time fixing mistakes and more time on what really matters: making great features for your users.
>>> Follow and Contact Relia Software for more information!

- coding
- development