Building performant and user-friendly React applications often involves managing asynchronous data fetching. This can lead to choppy loading states and a frustrating user experience. But fear not, React Suspense is here to rescue! In this blog, we'll delve into React Suspense's functionalities, implementing approaches, and common pitfulls with practical code examples.
>> Read more about React:
- Mastering React Higher-Order Components (HOCs)
- Top 6 Best React Component Libraries for Your Projects
- Unlock the Power of GraphQL with React to Master Data Fetching
What is React Suspense?
React Suspense is a powerful feature introduced in React 16.6 that allows components to pause rendering while they wait for asynchronous operations to complete, such as fetching data from an API or loading external resources. This mechanism is built on top of React's new concurrent rendering engine, which enables the app to prioritize and render different parts of the UI independently.
By using Suspense, developers can create applications with smoother user experiences. Suspense helps manage loading states and prevents the app from rendering incomplete UI.
To demonstrate, let's see how React Suspense simplifies handling asynchronous data fetching in the example below. We have a CountryList component that displays a list of countries fetched from an API:
- Before Suspense:
In the traditional approach, we'd manage the loading state using useState and conditionally render the UI based on whether data is available:
function CountryList() {
      const [data, setData] = useState();
      const [isLoading, setIsLoading] = useState(true);
      useEffect(() => {
        setIsLoading(true);
        fetchCities().then((res) => {
          setData(res);
          setIsLoading(false);
        });
      }, []);
      if (isLoading) {
        return <div>Loading...</div>;
      }
      return (
        <ul>
          {data.map((country) => (
            <li key={country.id}>{country.name}</li>
          ))}
        </ul>
      );
    }
This approach works, but it can lead to complex state management and conditional logic, especially as your application grows.
- With Suspense:
import { Suspense } from 'react';
    const fetchCountries = () => {
      // This is a placeholder for your actual data fetching logic
    };
    const CountryList = React.lazy(() => import('./CountryList'));
    function App() {
      return (
        <Suspense fallback={<div>Loading...</div>}>
          <CityList />
        </Suspense>
      );
    }
    function CountryList() {
      const data = fetchCountries();
      return (
        <ul>
          {data.map((country) => (
            <li key={country.id}>{country.name}</li>
          ))}
        </ul>
      );
    }
React Suspense offers a cleaner way to handle this scenario. CountryList is now a lazy-loaded component that fetches its own data. We can:
- Wrap the
CountryListcomponent in aSuspensecomponent: This tells React to pause rendering untilCountryListfinishes fetching data. - Provide a fallback UI: Inside the
Suspensecomponent, we specify a fallback UI (e.g., "Loading...") to display while data is being fetched.
This example demonstrates how Suspense can streamline asynchronous data handling in React applications, leading to cleaner, more maintainable code with a better user experience.
Benefits of Using React Suspense
From the aforementioned example, we can draw typical benefits when applying Suspense:
- Simplified Code: Suspense eliminates the need for manual loading state management, making your code cleaner and easier to maintain.
- Improved User Experience: Users see a loading indicator while data is fetched, preventing a blank screen and enhancing perceived performance.
- Performance Optimization: Suspense ensures components only render once the required data is available, avoiding unnecessary re-renders and improving overall application performance.
- Modular and Maintainable Code: Each component manages its own data fetching logic, promoting better code organization and testability.
By effectively utilizing React Suspense, you can create applications that provide a more responsive and visually appealing user experience while maintaining clean and efficient code.
A Practical Example for Implementing React Suspense
In this section, we'll focus on how Suspense operates during asynchronous data fetching with support of React Error Boundaries for error handling. We'll explore how these two concepts work together to provide a smooth user experience and handle potential errors gracefully.
React Suspense Installation
Here’s how you can install @suspensive/react:
- Install by
npm
cd react-suspense
- Install by
yarn
yarn add @suspensive/react
Import Suspense from React and use it in your components. Here’s an example of how to use it:
import { Suspense } from 'react';
    function MyComponent() {
      return (
        <Suspense fallback={<div>Loading...</div>}>
          <OtherComponent />
        </Suspense>
      );
    }
Getting Started
Git clones this project, it contains example of this article and is ready to use:
git clone https://github.com/nvkhuy/examples.git
Navigate to react-suspense:
cd react-suspense
Checkout branch:
git checkout -b react-suspense-seprate-error
To install:
npm install
To run:
npm run dev
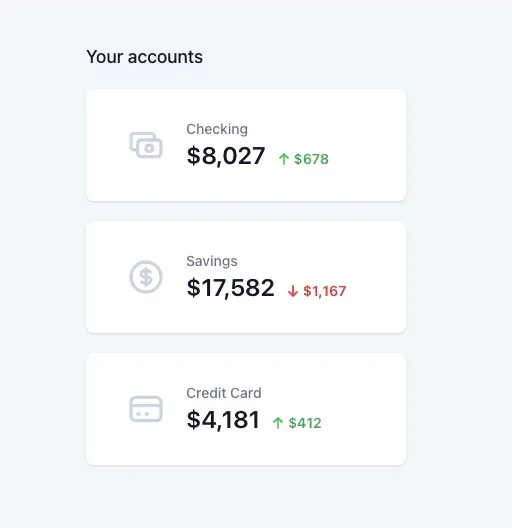
Open browser at http://localhost:3000 and UI would be like this:

Project structure:
├── README.md
    ├── mirage.js
    ├── next.config.js
    ├── package-lock.json
    ├── package.json
    ├── postcss.config.js
    ├── public
    │   ├── favicon.ico
    │   └── vercel.svg
    ├── src
    │   ├── components
    │   │   ├── card.js
    │   │   ├── error.js
    │   │   ├── spinner.js
    │   │   └── stat.js
    │   └── pages
    │       ├── _app.js
    │       └── index.js
    ├── tailwind.config.js
    └── yarn.lock
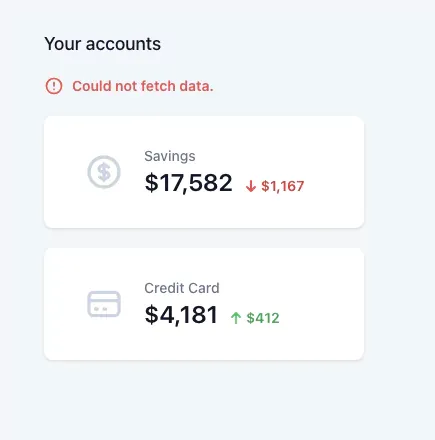
To see how Suspense and Error Boundary handling error, force an error on mirage.js to experience:
this.get(
            "/checking",
            () => {
              // Force an error
              return new Response(500);
              return {
                stat: "$8,027",
                change: "$678",
                changeType: "increase",
              };
            },
            { timing: 500 }
          );
Then, it would be like this in http://localhost:3000 on your browser:

Implementing React Suspense and Error Boundaries
Focus on index.js to understand what is happening:
import {Suspense} from "react";
    import {ErrorBoundary} from "react-error-boundary";
    import Card from "../components/card";
    import Error from "../components/error";
    import Stat from "../components/stat";
    import * as Icons from "@heroicons/react/outline";
    import Spinner from "../components/spinner";
    export default function Home() {
        return (
            <>
                <h3 className="mt-2 mb-5 text-lg font-medium leading-6 text-slate-900">
                    Your accounts
                </h3>
                <div className="grid grid-cols-1 gap-5">
                    <ErrorBoundary fallback={<Error>Could not fetch data.</Error>}>
                        <Suspense fallback={<Spinner/>}>
                            <Card>
                                <Stat
                                    label="Checking"
                                    endpoint="/api/checking"
                                    Icon={Icons.CashIcon}
                                />
                            </Card>
                        </Suspense>
                    </ErrorBoundary>
                    <ErrorBoundary fallback={<Error>Could not fetch data.</Error>}>
                        <Suspense fallback={<Spinner/>}>
                            <Card>
                                <Stat
                                    label="Savings"
                                    endpoint="/api/savings"
                                    Icon={Icons.CurrencyDollarIcon}
                                />
                            </Card>
                        </Suspense>
                    </ErrorBoundary>
                    <ErrorBoundary fallback={<Error>Could not fetch data.</Error>}>
                        <Suspense fallback={<Spinner/>}>
                            <Card>
                                <Stat
                                    label="Credit Card"
                                    endpoint="/api/credit"
                                    Icon={Icons.CreditCardIcon}
                                />
                            </Card>
                        </Suspense>
                    </ErrorBoundary>
                </div>
            </>
        )
            ;
    }
Here's a breakdown of the key concepts:
Components:
- Home: Renders the main UI with account information.
- Card: Displays individual account details. (Functionality depends on specific implementation)
- Error: Handles and displays error messages in a user-friendly way.
- Stat: Renders account statistics with labels and icons. (Functionality depends on specific implementation)
- Spinner: Displays a loading indicator while data is being fetched.
Suspense: Wraps components that rely on asynchronous data fetching. It displays a fallback UI (e.g., spinner) while data is loading.
Error Boundary: Catches errors within its child component tree, preventing the entire application from crashing, and displays a fallback UI (e.g., error message).
Code walkthrough:
- Error Handling: Each Card component is wrapped in an ErrorBoundary. This ensures that if data fetching for a specific account fails, only that card displays an error message, while other cards continue functioning normally.
- Suspense for Data Fetching: Inside each ErrorBoundary, the Card component is further wrapped in a Suspense component. This tells React to pause rendering of that card until the data for the specific account is fetched. While waiting, the Suspense component displays the Spinner as a fallback UI.
- Data Fetching with Stat: The Stat component retrieves data for each account from a designated API endpoint. The fetched data is then used to populate the card's content.
Other Data Fetching Approaches with React Suspense
Integration with Data Fetching Libraries
React Suspense is a powerful tool for managing asynchronous data fetching, but it doesn't dictate how you actually retrieve that data. Popular data fetching libraries like React Query and Axios seamlessly integrate with Suspense to streamline the process. To be more specific, explore the following example:
React Query offers a robust solution for data fetching with built-in caching, automatic refetching, and optimistic updates. Here's how to use it with Suspense:
import { useQuery } from 'react-query';
    import { Suspense } from 'react';
    import { Spinner } from './Spinner'; // Replace with your loading indicator component
    function MyComponent() {
      const { data, isLoading, error } = useQuery('accounts', fetchAccounts);
      if (isLoading) return <Suspense fallback={<Spinner />} />;
      if (error) return <div>Error fetching accounts: {error.message}</div>;
      // Render data here
    }
    async function fetchAccounts() {
      const response = await fetch('/api/accounts');
      return response.json();
    }
In this example, useQuery manages the data fetching logic. Suspense takes over while data is loading, displaying the Spinner component. Once data is available or an error occurs, Suspense renders the appropriate content.
>> You may be interested in:
- Mastering React Context API for Streamlined Data Sharing
- Demystifying React Redux for Centralized State Management
Lazy Loading with Suspense
Loading everything at once can lead to performance issues, especially with a large application with numerous components. Lazy loading allows you to load components only when needed, improving initial load times and overall user experience.
The example below shows a great combination between Suspense and lazy loading:
import { lazy, Suspense } from 'react';
    import { Spinner } from './Spinner'; // Replace with your loading indicator component
    const MyLazyComponent = lazy(() => import('./MyLazyComponent')); // Replace with your actual component path
    function MyComponent() {
      return (
        <Suspense fallback={<Spinner />}>
          <MyLazyComponent />
        </Suspense>
      );
    }
In this example, MyLazyComponent is defined as a lazy import using React.lazy. Suspense takes care of the loading state while the component is fetched asynchronously.
Code Splitting with Suspense
Suspense provides fine-grained control over code splitting beyond traditional bundle splitting techniques. You can split code within a single component using techniques like dynamic imports (import() statements within the component). This allows for even more granular control over what gets loaded when, potentially reducing bundle sizes further.
Here's a simplified example:
import { Suspense, lazy } from 'react';
    function MyComponent() {
      const [showDetails, setShowDetails] = useState(false);
      const Details = lazy(() => import('./Details')); // Dynamic import for details component
      return (
        <div>
          <button onClick={() => setShowDetails(true)}>Show Details</button>
          {showDetails && (
            <Suspense fallback={<Spinner />}>
              <Details />
            </Suspense>
          )}
        </div>
      );
    }
In this example:
- The
Detailscomponent is loaded dynamically usinglazywithinMyComponentonly when the user clicks the button. - Suspense manages the loading state when
Detailsis fetched.
Common Pitfalls When Using React Suspense
- Excessive Suspense Boundaries: Overusing Suspense can negatively impact performance. Wrap components in Suspense only when they rely on asynchronous data.
- Improper Error Handling: Relying solely on Suspense for error handling is insufficient. Use Error Boundaries to catch errors during data fetching and display appropriate fallback UI.
- Unnecessary Re-renders: Avoid unnecessary re-renders within Suspense boundaries. Techniques like memoization can help optimize rendering behavior.
- Neglecting User Experience: Don't forget about user experience during the loading state. Provide clear feedback through the fallback UI to avoid confusing users.
>> Read more:
- Mastering React Test Renderer for Streamlined Testing
- The Best React Design Patterns with Code Examples
- Tailwind CSS for React UI Components: Practical Code Examples
- An In-Depth Guide for Front-End Development with React
Final Thoughts
Significantly enhanced in React 18, React Suspense has emerged as a powerful tool for managing asynchronous data fetching in React applications. By enabling components to gracefully pause rendering while data loads, it empowers React developers to create smoother user experiences and prevent jarring loading states.
Throughout this article, we've explored the core functionalities of Suspense, along with best practices for its implementation and potential pitfalls to avoid. Whether you're a seasoned React developer or just starting out, effectively leveraging Suspense can significantly enhance your application's performance and user experience.
>>> Follow and Contact Relia Software for more information!
- coding
- development

