We talked about the prototype model. Let’s move to the next part to test it out, which is also called prototype testing. In software development, it’s risky to spend a lot of time and money building something before knowing if it really works or not. That’s where prototype testing helps. It lets you spot problems early and make sure your product solves real user needs.
In this article, we'll explain the prototype testing definition, practical techniques, and discuss when to use this method. The aim is to help you refine your design and able to build a product that truly meets user needs.
What is Prototype Testing?
Prototype testing is the process of checking an early version of a software product to find and fix issues before creating the final version. It allows teams to test their ideas, design, and usability to see what works best.
Some key characteristics of prototype testing include:
- Clear requirements: Gives a better idea of what the final product needs.
- Early issue detection: Helps find product problems before the full software development process.
- User-friendly design: Ensures the final version is easy to use and fits user needs.
- Product overview: Provides a clear picture of how the actual product will look and work.
Why is Prototype Testing Important?
Prototype testing is important because it helps you and your teams understand how users interact with your product before it’s fully built. By testing early, you can collect useful feedback and make improvements faster.
In detail, you can learn about:
- Usability and accessibility: See if users can easily navigate and use your product.
- Design, fonts, and colors: Check if the visual style feels clear and appealing to users.
- User experience (UX): Understand how users feel while using your product.
- Copy and messaging: Test if your words and instructions make sense.
- Ideas and concepts: Find out if your main idea actually works for users.
Your prototype doesn’t need to be perfect, just functional enough to show how it solves the user’s main problem. You can test it manually in person or use online prototype testing tools to collect feedback and refine your design.
Prototype Testing Methods
There are several main types of prototype testing methods, which are categorized into qualitative and quantitative, and can be further broken down by the approach, such as:
Fidelity Prototype Testing
Before spending months on development, you need to know if users actually understand and enjoy your design. Fidelity prototype testing helps you do that, letting you test visuals, flow, and usability step by step. Common methods include:
- Moderated/Unmoderated usability testing: Observe how users complete key tasks.
- Think-aloud sessions: Let users share their thoughts while using your design.
- Paper prototype testing: Use quick sketches to validate early ideas.
- First-click and tree testing: Check how intuitive your layout and navigation are.
- A/B or preference testing: Compare two versions to see which works better.
- Heuristic evaluation/Cognitive walkthrough: Let experts review your prototype for usability.
- Accessibility and heatmap analysis: Ensure inclusive design and see where users focus most.
This stage helps you refine the experience before coding begins, reducing rework and ensuring your design truly connects with users.
>> Read more: Top 15 Best Usability Testing Tools For Businesses
Feasibility Prototype Testing
Feasibility prototype testing checks whether your ideas can work in practice. Developers build small, functional versions to validate core features and integrations. You can use methods like:
- Functional testing and performance testing: See if the feature runs smoothly and reliably.
- Wizard-of-Oz testing: Simulate advanced behavior, like AI responses, before real coding.
- Integration testing: Ensure APIs and systems connect without errors.
Once feasibility is proven, your team moves forward confidently, knowing the product’s foundation is solid and realistic to develop.
>> Read more:
- 7 Leading Performance Testing Tools for Developers
- Testing Beyond Features: Unlock Non-Functional Testing (NFT)
- Differences Between Functional and Non-Functional Testing
Live Data Prototype Testing
A design that looks great in mockups might behave differently when real data flows through it. Live data prototype testing lets you see how the system handles real-time inputs like prices, stock levels, or user data. Test with methods such as:
- Scenario-based testing: Follow real user journeys using live or staging data.
- End-to-end testing: Check how real content and interactions perform together.
- Data validation and load testing: Verify data accuracy, speed, and system stability under heavy use.
This testing ensures your product stays fast, stable, and trustworthy once it goes live, giving users a seamless, real-world experience.
>> Read more:
- React Form Validation: Advanced Techniques and Best Practices
- Step-by-Step Tutorial to Master Flutter TextField Validation
- Top 10 Best End-to-End Testing Tools and Frameworks

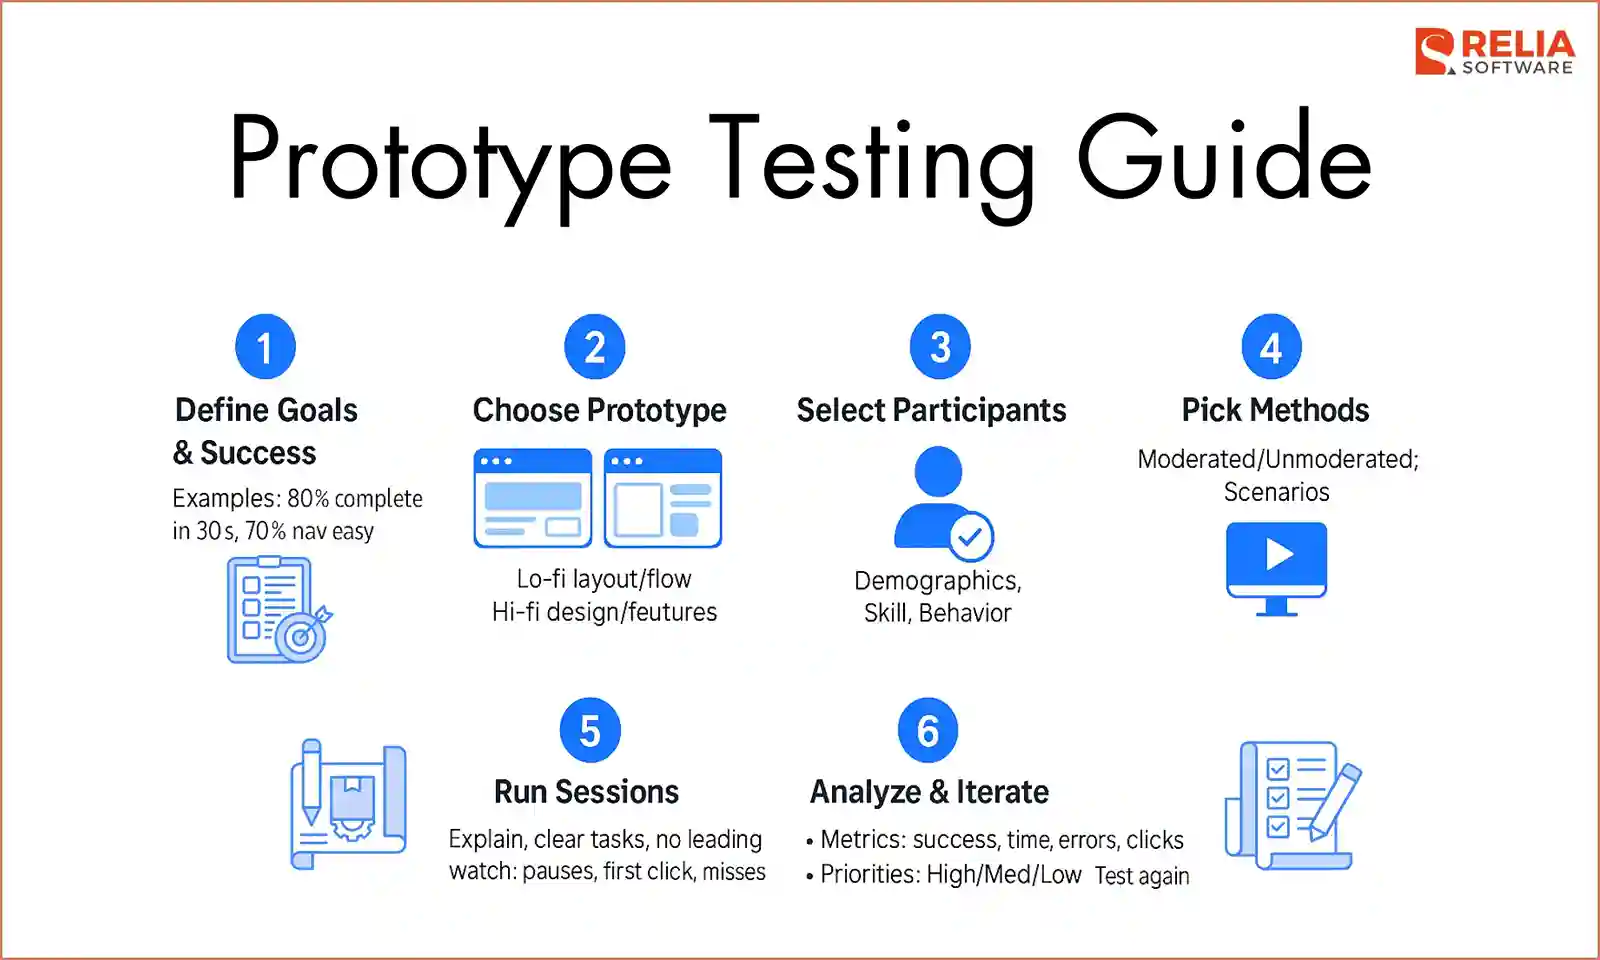
6 Steps to Conduct Prototype Testing
>> Read more: The UX Design Process: 7 Steps for UX Designers
Prototype testing follows a clear process to help teams gather feedback and improve their design effectively.
Step 1: Define Your Goals
Before testing, teams should be clear about what they want to learn, whether it’s how easy the product is to use, how well a feature works, or which design users prefer. Having clear goals helps you collect useful feedback instead of random opinions.
Once the goal is set, define what success looks like. For example, “80% of users can finish the main task in 30 seconds” or “70% find the navigation easy without help.” Setting specific targets makes the feedback more meaningful and helps improve the product faster.
Step 2: Choose the Right Type of Prototype
The amount of detail in a prototype should match what you want to test. Low-fidelity prototypes like sketches or wireframes are great for checking layouts and user flow, while high-fidelity prototypes, such as clickable mockups, help test design and features in detail.
If you test a high-fidelity prototype too early, you might waste time on details that don’t matter yet. But if you test a low-fidelity one too late, you won’t get enough helpful feedback. Choosing the right level keeps testing focused, efficient, and useful.
Step 3: Select Participants
The success of prototype testing depends on who you test with. Participants should represent your real target users so their feedback truly matters. When choosing, think about:
- Demographics: Age, location, profession, income level, etc.
- Technical Skill Level: Beginners, intermediate users, or experts, depending on the product’s complexity.
- Behavior & Interests: How often users engage with similar products or competitors’ platforms.
Selecting the right people with the right quantity helps you get accurate feedback, avoid bias, and make smarter product decisions.
Step 4: Decide on Testing Methods
Depending on the prototype and goals, teams need to choose the right testing method. Each method gives different insights; some reveal usability issues or navigation problems, while others show what features users like most.
For example, moderated testing is great when you want to ask follow-up questions during the session, while unmoderated testing helps gather feedback from more people at once.
Choosing the right method, tools, and test scenarios helps teams collect clear, useful feedback to improve the prototype before full development begins.
>> Read more:
- An Ultimate Guide to Different Test Case Design Techniques
- 10 Popular Prototyping Tools For UI/UX Developers
Step 5: Run the Test
Once the testing method is chosen and participants are ready, it’s time to run the sessions. This step is about watching how users interact with the prototype, collecting feedback, and spotting usability issues as they happen.
To keep testing clear and consistent:
- Start by explaining the purpose of the test.
- Give simple instructions for each task, but avoid leading users toward certain answers.
- Let them move at their own pace for more natural feedback.
When observing, focus on what users do, not just what they say. Watch for:
- Where they pause or hesitate
- Where they click first
- What they skip or struggle to find
Sometimes users say everything’s fine, but their actions tell another story. Paying attention to their behavior gives you more honest and useful insights than words alone.
Step 6: Analyze the Results & Iterate
Testing only matters if it leads to real product improvements. After each session, gather all feedback and data to see what worked and what didn’t. Focus on key metrics like:
- Success rate: How many users completed key tasks?
- Time on task: How long each task took?
- Error rate: Where users got stuck?
- Heatmaps and clicks: Which areas drew attention or confused?
Review both user feedback and numbers to understand usability issues clearly.
Not every issue needs fixing right away. To stay efficient, sort them by priority:
- High: Critical problems that block users.
- Medium: Minor issues that slow users down.
- Low: Cosmetic tweaks that improve the look or feel.
Example:
- High: Most users can’t finish checkout.
- Medium: Some take too long to add items to the cart.
- Low: Users prefer a different font style.
Testing shouldn’t happen just once. Run small, repeated tests to refine the product step by step until it’s easy and enjoyable to use.
Benefits & Drawbacks of Prototype Testing
Benefits
Prototype testing helps teams save time, reduce development costs, and improve the overall experience before launch through:
- Early issue detection: Find design and usability problems before coding begins.
- Better user experience: Real user feedback helps shape intuitive designs.
- Cost savings: Fixing issues in prototypes is far cheaper than after release.
- Faster decision-making: Clear data and insights guide design improvements quickly.
- Team alignment: Designers, developers, and stakeholders share the same understanding of what works.
Drawbacks
Despite its advantages, prototype testing also has some limits. Common drawbacks include:
- Time-consuming setup: Recruiting users and preparing tests can slow progress.
- Limited accuracy: A prototype may not fully reflect final product performance.
- Cost of tools and participants: Testing software and incentives can add expenses.
- Biased feedback: Small or unrepresentative user groups may give misleading results.
- Iteration fatigue: Continuous changes can cause confusion if not managed well.
In short, prototype testing helps teams design smarter and avoid costly mistakes, but it works best when planned carefully and supported by the right participants and tools.
When To Test Your Prototype?
Prototype testing should happen early and often, not just before launch. The goal is to get feedback at every major stage of development, so your team can fix problems before they become costly.
You should test your prototype when:
- After creating the first concept: Test low-fidelity sketches or wireframes to see if the layout and flow make sense.
- During the design phase: Use mid-fidelity or clickable prototypes to validate navigation, interactions, and key features.
- Before development: Run usability tests on high-fidelity designs to confirm that users can complete important tasks easily.
- After design updates: Test again whenever you make big design or feature changes to ensure improvements actually work.
In short, don’t wait until the end. You should test small, test early, and test often. Continuous testing helps you catch mistakes early, refine designs faster, and build a product users truly enjoy.
Common Mistakes in Prototype Testing
- Testing with the wrong audience: Feedback from users who don’t match your target group leads to poor design decisions. You should define your ideal users and use screening questions to find the right testers.
- Asking leading questions: Biased questions make users agree instead of sharing real opinions. Try to ask neutral, open-ended questions like “What was difficult about this task?”
- Skipping usability testing for high-fidelity prototypes: A polished design can still be confusing to use. Let’s test at every stage, low-fi for layout, mid-fi for flow, hi-fi for detailed usability.
- Ignoring qualitative feedback: Data shows what users do, but not why they do it. Try to combine numbers with user feedback to understand real pain points.
- Testing too late in the process: Waiting until the end makes fixes costly and delays release. You should start testing early, even with simple sketches or wireframes.
>> Read more:
- MVP in Software Development: A Proven Path to Market Success
- Proof of Concept (POC): A Guide to Validating Your Ideas
- Proof of Concept (PoC) vs Prototype: What Are The Differences?
Conclusion
Prototype testing is an important step in software development. It helps teams find and fix problems early, saving time and costs for businesses. Testing at each stage, from simple sketches to interactive prototypes, ensures the design is clear, functional, and easy to use.
Skipping this step can lead to expensive mistakes, while regular testing improves usability, reduces risks, and boosts user satisfaction. Teams that test early and often create products that truly work for their users and achieve better long-term results.
>>> Follow and Contact Relia Software for more information!

- Designing an application
- development
- testing