Chatbots are now a must-have for websites, powering customer support, sales, and user engagement. In 2025, users expect fast, personalized, and AI-driven conversations — and React JS is one of the best tools to deliver them.
With its component-based design, strong ecosystem, and flexibility, React is ideal to build interactive chatbot UIs and connect them to AI APIs like OpenAI GPT or Google Gemini.
There are 2 parts in the series, you'll learn how to:
- Set up a modern React environment for chatbot development
- Build a responsive chatbot UI with Tailwind CSS and Shadcn UI
- Manage chat state and conversation context with Zustand
- Create a secure Node.js backend with Express
- Integrate with AI APIs (OpenAI GPT-4o and Google Gemini)
- Implement real-time streaming responses
- Add comprehensive error handling and user feedback
- Deploy your chatbot to production
- Implement advanced features like RAG and plugin integrations
By the end, you'll have a production-ready chatbot that can compete with commercial solutions.
>> Read more: Top 5 React AI Chatbot Templates You Should Know
In this first part, you’ll set up a fast React project with Vite, style it with Tailwind and Shadcn UI, and build a clean chat window that handles messages, context, and smooth UX. We’ll also add state management with Zustand.
Everything here happens on the frontend only. When you’re ready to connect real AI models, jump to Part 2: Node.js Chatbot AI for the backend and deployment.
Prerequisites
Before diving into the tutorial, ensure you have everything ready:
- Node.js (v20 or later) installed (Download here) and a package manager (npm/yarn/pnpm)
- Git configured on your system
- OpenAI API key obtained (Get your key)
- Code editor with TypeScript support (VS Code recommended)
- Basic React knowledge (components, hooks, props)
- Terminal/command line familiarity
- Internet connection for downloading dependencies
- Modern web browser (Chrome, Firefox, Safari, Edge)
Quick verification:
# Check Node.js version
        node -v
        # Check npm version
        npm -v
        # Check Git installation
        git --version
Setup
Create a New Vite Project
Run the following commands in your terminal:=
# Create a new React + TypeScript project
        npm create vite@latest my-chatbot -- --template react-ts
        # Move into the project folder
        cd my-chatbot
        # Install dependencies
        npm install
This generates a lightweight React project with TypeScript ready to go.
In the past, many developers used Create React App (CRA) to scaffold projects. But by 2025, CRA is outdated because it’s slower, heavier, and less flexible. Being able to solve these issues, Vite has become the standard for React development.
Install Tailwind CSS
Tailwind will handle our styling, while Shadcn UI builds on top of it with polished, accessible React components.
npm install tailwindcss @tailwindcss/viteNow replace everything in src/index.css with:
@import "tailwindcss";Configure TypeScript Paths
Vite splits TypeScript configs into multiple files. I’ll add path aliases (@/) to make imports cleaner.
Update tsconfig.json and tsconfig.app.json with:
{
          "files": [],
          "references": [
            { "path": "./tsconfig.app.json" },
            { "path": "./tsconfig.node.json" }
        -  ]
        +  ],
        +  "compilerOptions": {
        +    "baseUrl": ".",
        +    "paths": {
        +      "@/*": ["./src/*"]
        +    }
        +  }
} "noUnusedParameters": true,
"erasableSyntaxOnly": true,
"noFallthroughCasesInSwitch": true,
- "noUncheckedSideEffectImports": true
+ "noUncheckedSideEffectImports": true,
+
+ "baseUrl": ".",
+ "paths": {
+ "@/*": ["./src/*"]
+ }
},
"include": ["src"]
}Update Vite Configuration
Next, configure path resolution in vite.config.ts:
npm install -D @types/node import { defineConfig } from 'vite'
import react from '@vitejs/plugin-react'
+import tailwindcss from '@tailwindcss/vite';
+import path from 'path';
// https://vite.dev/config/
export default defineConfig({
- plugins: [react()],
-})
+ plugins: [react(), tailwindcss()],
+ resolve: {
+ alias: {
+ "@": path.resolve(__dirname, "./src"),
+ },
+ },
+});Initialize Shadcn UI
Finally, set up Shadcn UI, which will give us prebuilt, themeable components like buttons, inputs, and cards, perfect for our chatbot UI.
npx shadcn@latest initYou’ll be asked a few questions, like choosing a base color. For example:
Which color would you like to use as base color? › NeutralOnce setup is complete, you can start adding components:
npx shadcn@latest add buttonNow you can import and use Shadcn components in your app:
import { Button } from "@/components/ui/button"
        export default function App() {
          return (
            <div className="flex min-h-screen items-center justify-center">
              <Button>Click me</Button>
            </div>
          )
        }
At this point, our project is set up with Vite, Tailwind CSS, and Shadcn UI, we can start building the actual chatbot interface. Use the following command to run up the project and access it at http://localhost:5173.
npm run devBuild the React AI Chatbot UI
A good React chatbot UI should include:
- A chat window to display the conversation.
- Message bubbles styled differently for the user and the bot.
- An input field + send button for user interaction.
I’ll build a reusable ChatWindow.tsx component that manages messages using React state and uses Shadcn UI components for styling.
Create a ChatWindow Component
Install these Shadcn components first.
npx shadcn@latest add card inputCreate a file src/components/ChatWindow.tsx with the following code:
import React, { useState } from "react"
import { Card, CardContent } from "@/components/ui/card"
import { Input } from "@/components/ui/input"
import { Button } from "@/components/ui/button"
type Message = {
role: "user" | "assistant"
content: string
}
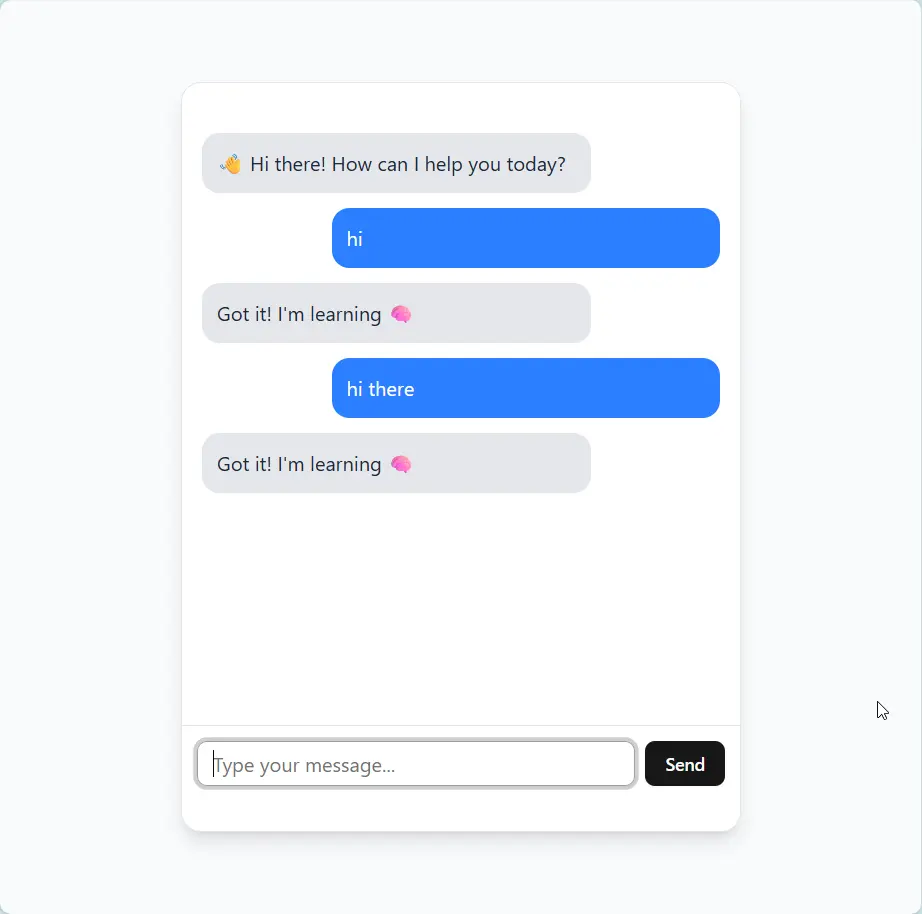
export default function ChatWindow() {
const [messages, setMessages] = useState<Message[]>([
{ role: "assistant", content: "👋 Hi there! How can I help you today?" },
])
const [input, setInput] = useState("")
const sendMessage = () => {
if (!input.trim()) return
const newMessage: Message = { role: "user", content: input }
setMessages([...messages, newMessage])
setInput("")
// Temporary bot reply (later we'll integrate AI)
setTimeout(() => {
setMessages((prev) => [
...prev,
{ role: "assistant", content: "Got it! I'm learning 🧠" },
])
}, 800)
}
const handleKeyDown = (e: React.KeyboardEvent<HTMLInputElement>) => {
if (e.key === "Enter" && !e.shiftKey) {
e.preventDefault()
sendMessage()
}
}
return (
<Card className="w-full max-w-md mx-auto h-[600px] flex flex-col rounded-2xl shadow-lg">
<CardContent className="flex-1 overflow-y-auto space-y-3 p-4">
{messages.map((msg, i) => (
<div
key={i}
className={`p-3 rounded-xl max-w-[75%] ${
msg.role === "user"
? "bg-blue-500 text-white ml-auto"
: "bg-gray-200 text-gray-800 mr-auto"
}`}
>
{msg.content}
</div>
))}
</CardContent>
<div className="flex items-center gap-2 border-t p-3">
<Input
value={input}
onChange={(e) => setInput(e.target.value)}
onKeyDown={handleKeyDown}
placeholder="Type your message..."
className="flex-1"
/>
<Button onClick={sendMessage}>Send</Button>
</div>
</Card>
)
}Use It in App.tsx
Open src/App.tsx and update it:
import ChatWindow from "@/components/ChatWindow"
        export default function App() {
          return (
            <div className="flex min-h-screen items-center justify-center bg-gray-50">
              <ChatWindow />
            </div>
          )
        }
What’s Happening Here?
- Messages State → I use
useStateto store all chat messages (both user and bot). - Dynamic Styling → Messages are styled differently depending on who sent them.
- Modern UI → Shadcn UI components (
Card,Input,Button) + Tailwind utilities handle the design. - Simulated Bot Reply → For now, the chatbot just echoes a dummy response. In the next section, I’ll replace this with real AI-powered responses.
You now have a fully working React chatbot UI where users can type messages, see them appear in a chat bubble, and get bot responses. Here is the result:
Manage Chatbot State and Add Conversation Context
To manage state in React, we can use either React Context or a lightweight state management library like Zustand. Zustand is a great choice because it’s minimal, easy to use, and works well for handling chat messages and user session data.
Install Zustand
Since our project only includes TailwindCSS and Shadcn so far, let’s install Zustand:
npm install zustandAfterward, cancel the running application and restart it again.
Create a Chat Store with Zustand
Here’s a simple store to manage chatbot messages:
// src/store/chatStore.ts
    import { create } from "zustand";
    interface Message {
      id: string;
      sender: "user" | "assistant";
      text: string;
    }
    interface ChatState {
      messages: Message[];
      addMessage: (message: Message) => void;
      clearMessages: () => void;
    }
    export const useChatStore = create<ChatState>((set) => ({
      messages: [],
      addMessage: (message) =>
        set((state) => ({ messages: [...state.messages, message] })),
      clearMessages: () => set({ messages: [] }),
    }));
By using a store like this, your chatbot can:
- Remember user details (like name, preferences, or session data).
- Track ongoing conversations so replies are relevant.
- Provide continuity instead of answering each prompt independently.
For example, if a user says “My name is Sarah”, your chatbot can store that and later reply with “Nice to see you again, Sarah!”. This makes your chatbot feel more human and helpful.
Without context management, your chatbot will act statelessly, responding to each message in isolation.
Extend the Chat Window with State and Context
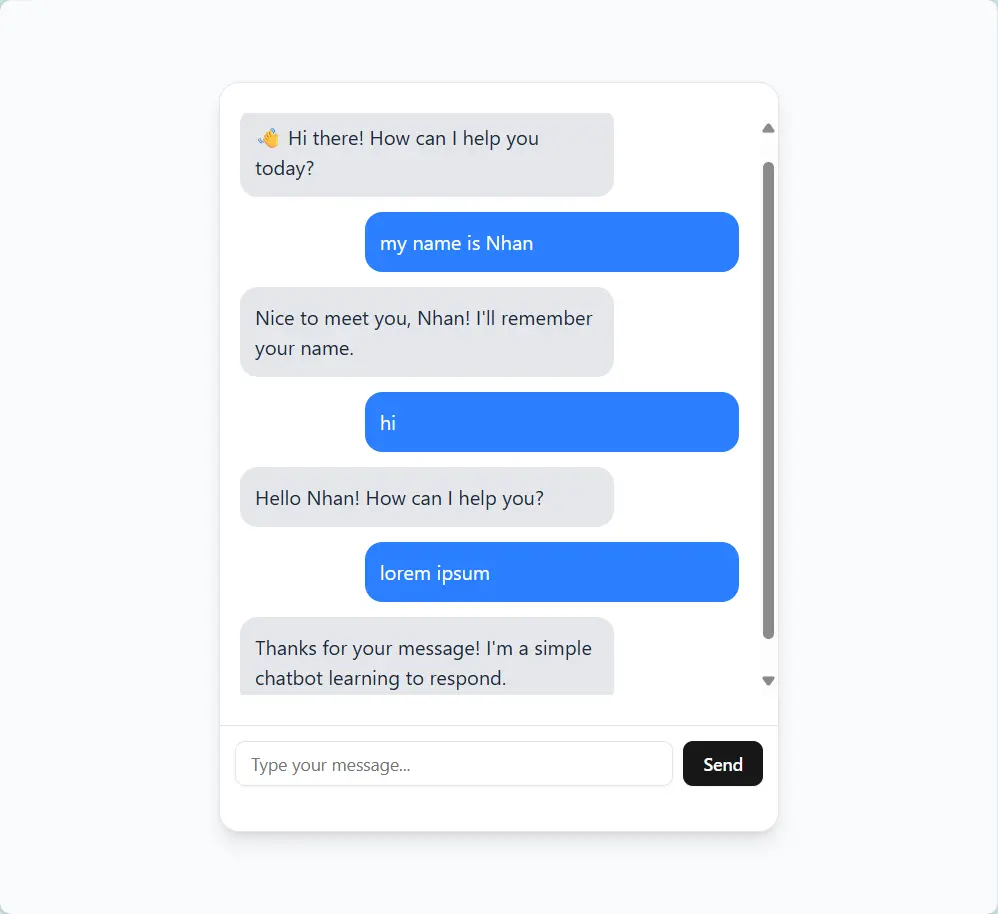
In the last step, you created a global store using Zustand to manage messages and user details. Now, let’s connect that store to our chatbot UI and make the bot context-aware. This means the chatbot can “remember” details (like the user’s name) across the conversation — which is key when you want to add context to chatbot experiences.
Below is an enhanced ChatWindow.tsx component. It uses the useChatStore hook we built earlier, handles user input, and simulates bot replies. Notice how the bot can remember your name once you introduce yourself, and greet you personally in future messages.
import React, { useState } from "react";
    import { Card, CardContent } from "@/components/ui/card";
    import { Input } from "@/components/ui/input";
    import { Button } from "@/components/ui/button";
    import { useChatStore } from "@/store/chatStore";
    export default function ChatWindow() {
      const { messages, userName, addMessage, setUserName } = useChatStore();
      const [input, setInput] = useState("");
      const sendMessage = () => {
        if (!input.trim()) return;
        addMessage({ sender: "user", text: input });
        setInput("");
        setTimeout(() => {
          const botResponse = getBotResponse(input);
          addMessage({ sender: "assistant", text: botResponse });
        }, 800);
      };
      // Example bot reply (with context awareness)
      const getBotResponse = (userMessage: string) => {
        const message = userMessage.toLowerCase();
        if (message.includes("my name is")) {
          const name = userMessage.split("my name is")[1].trim();
          setUserName(name);
          return `Nice to meet you, ${name}! I'll remember your name.`;
        }
        if (message.includes("hello") || message.includes("hi")) {
          if (userName) {
            return `Hello ${userName}! How can I help you?`;
          }
          return "Hello! How can I help you?";
        }
        return "Thanks for your message! I'm a simple chatbot learning to respond.";
      };
      const handleKeyDown = (e: React.KeyboardEvent<HTMLInputElement>) => {
        if (e.key === "Enter" && !e.shiftKey) {
          e.preventDefault();
          sendMessage();
        }
      };
      return (
        <Card className="w-full max-w-md mx-auto h-[600px] flex flex-col rounded-2xl shadow-lg">
          <CardContent className="flex-1 overflow-y-auto space-y-3 p-4">
            {messages.map((msg) => (
              <div
                key={msg.id}
                className={`p-3 rounded-xl max-w-[75%] ${
                  msg.sender === "user"
                    ? "bg-blue-500 text-white ml-auto"
                    : "bg-gray-200 text-gray-800 mr-auto"
                }`}
              >
                {msg.text}
              </div>
            ))}
          </CardContent>
          <div className="flex items-center gap-2 border-t p-3">
            <Input
              value={input}
              onChange={(e) => setInput(e.target.value)}
              onKeyDown={handleKeyDown}
              placeholder="Type your message..."
              className="flex-1"
            />
            <Button onClick={sendMessage}>Send</Button>
          </div>
        </Card>
      );
    }
And here is the result after implementing the above changes.
By combining Zustand for state management with a context-aware chatbot UI, you’ve built the foundation for a React chatbot UI that feels more natural and interactive. This approach scales easily — you can extend the bot to remember preferences, track conversation history, or even connect to an AI API.
Here’s a simple diagram showing how messages move between the user, the chatbot UI, and the global state store.
sequenceDiagram
    participant U as User
    participant UI as ChatWindow (React UI)
    participant S as Zustand Store
    participant B as Bot Logic

    U->>UI: Types message + presses Enter
    UI->>S: addMessage({ sender: "user", text })
    Note over S: Stores user message
    UI->>B: getBotResponse(userMessage)
    Note over B: Bot logic runs<br/>and may call setUserName()
    B->>S: setUserName(name) [if name detected]
    B->>S: addMessage({ sender: "bot", text })
    Note over S: Stores bot message<br/>and remembers userName
    S->>UI: Updated messages render automatically
    UI->>U: Displays conversation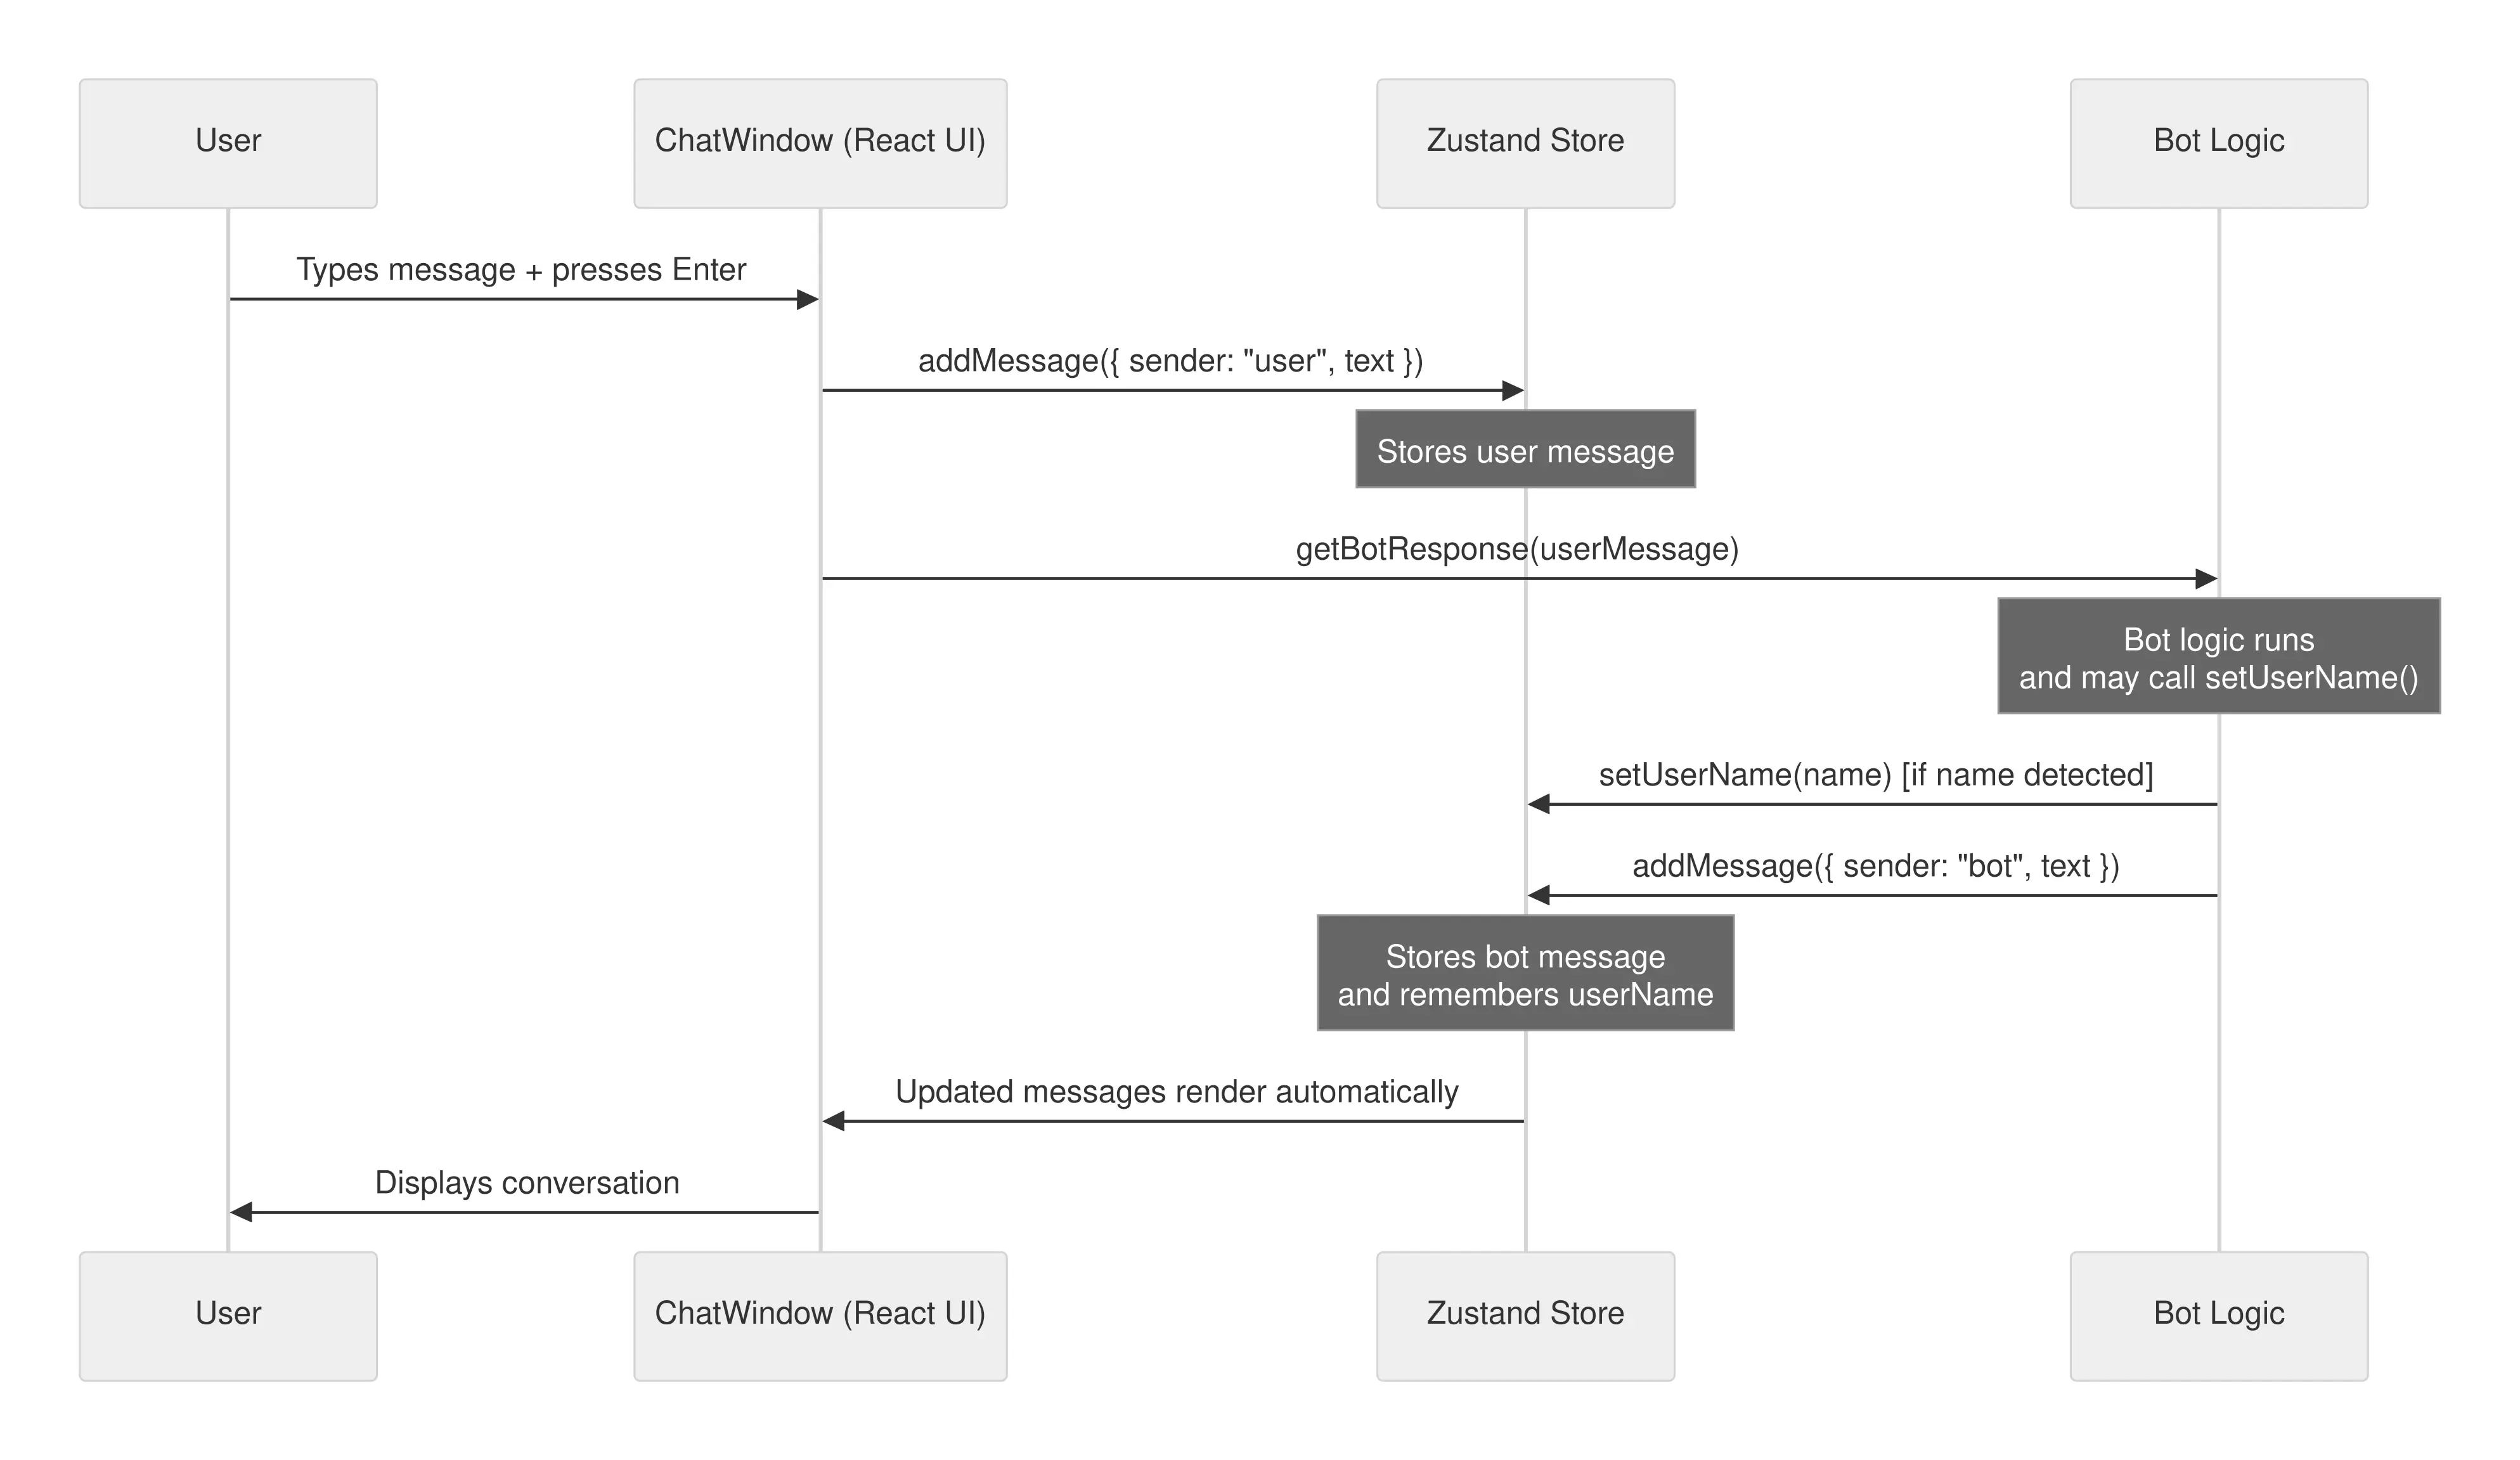
>> Explore more: How to Build an MCP Server and Integrate it with a React App?
Conclusion
You’ve now built the foundation of a modern React chatbot UI — fast, lightweight, and easy to extend. With Vite, Tailwind, and Shadcn UI, your interface loads instantly and looks professional out of the box. Through Zustand, your chatbot now remembers messages and context locally, giving users a smoother experience.
At this stage, your chatbot can display messages, manage state, and handle user interaction — all on the frontend.
In the next phase, we’ll bring it to life by connecting it to a real backend, streaming AI responses, and deploying it as a full-stack application.
Let's continue with the upcoming part: Node.js Chatbot AI to integrate your frontend with OpenAI or Gemini APIs and deliver real-time, intelligent conversations.
>>> Follow and Contact Relia Software for more information!

- coding
- Web application Development