React's synchronous rendering model creates a critical limitation: when applications render large datasets or complex components, the main thread blocks, causing UI freezes and poor user experience.
Concurrent Rendering, introduced in React 18 and enhanced in React 19, solves this by enabling:
- Interruptible rendering: Higher-priority updates can interrupt ongoing renders
- Progressive updates: Non-critical changes can be deferred without blocking user interactions
- Time-sliced rendering: Large rendering tasks are broken into manageable chunks
- Automatic optimization: React 19's Compiler eliminates manual performance tuning
For modern applications with real-time dashboards, collaborative editing, or large data grids, concurrent rendering is essential for responsive user experiences across diverse device capabilities.
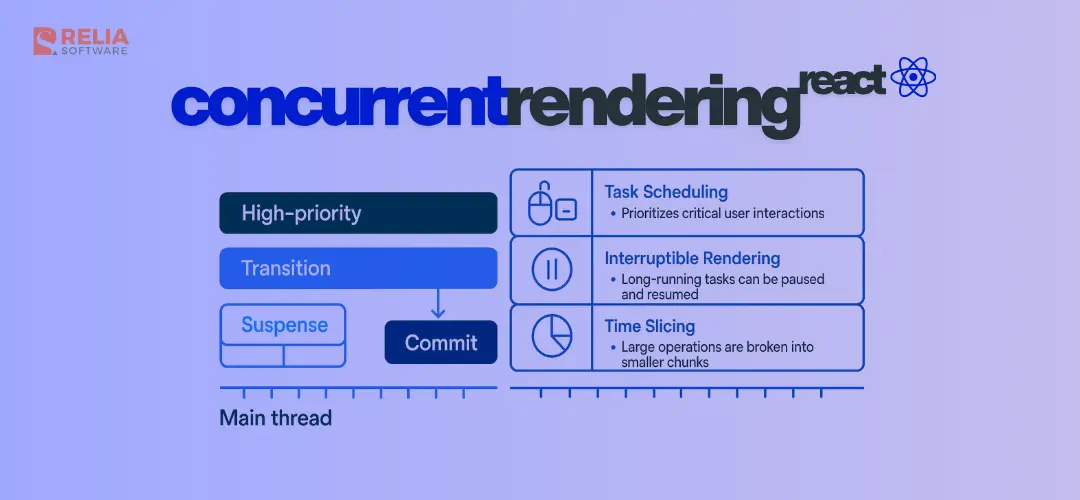
What Is Concurrent Rendering?
Concurrent rendering enables React to work on multiple tasks simultaneously while prioritizing user interactions. Key features include:
- Task Scheduling: Prioritizes critical user interactions (clicks, keystrokes) over background work
- Interruptible Rendering: Long-running tasks can be paused and resumed
- Time Slicing: Large operations are broken into smaller chunks
Comparison with Traditional Rendering:

React's priority system ensures user interactions always take precedence:
- Immediate Priority: User interactions (clicks, input, scrolling)
- Normal Priority: Visible UI updates and state changes
- Low Priority: Background updates and non-critical renders
React 19: The Concurrency Revolution
React 19 introduces groundbreaking features that fundamentally change performance optimization:
The React Compiler: Automatic Performance Optimization
The React Compiler automatically optimizes React code by transforming it into standard JavaScript, eliminating manual performance tuning:
// Before React 19: Manual optimization required
const ExpensiveComponent = ({ items, filter }: { items: Item[], filter: string }) => {
  const filteredItems = useMemo(() => {
    return items.filter(item => item.name.includes(filter));
  }, [items, filter]);

  const handleClick = useCallback((id: string) => {
    onItemClick(id);
  }, [onItemClick]);

  return (
    <div>
      {filteredItems.map(item => (
        <ItemCard key={item.id} item={item} onClick={handleClick} />
      ))}
    </div>
  );
};

// After React 19: Compiler handles optimization automatically
const ExpensiveComponent = ({ items, filter }: { items: Item[], filter: string }) => {
  const filteredItems = items.filter(item => item.name.includes(filter));

  const handleClick = (id: string) => {
    onItemClick(id);
  };

  return (
    <div>
      {filteredItems.map(item => (
        <ItemCard key={item.id} item={item} onClick={handleClick} />
      ))}
    </div>
  );
};
The React Compiler automatically memoizes expensive calculations, optimizes callback functions, prevents unnecessary re-renders, and maintains referential stability.
New Hooks for Enhanced Concurrency
React 19 introduces powerful new hooks:
useActionState: Simplified form handling with built-in loading statesuseOptimistic: Optimistic UI updates for immediate user feedbackuseFormStatus: Access form state from nested components
import { useOptimistic } from 'react';

function TodoList({ todos }: { todos: Todo[] }) {
  const [optimisticTodos, addOptimisticTodo] = useOptimistic(
    todos,
    (state, newTodo: Todo) => [...state, newTodo]
  );

  const handleAddTodo = async (text: string) => {
    const newTodo = { id: Date.now(), text, completed: false };

    // Optimistically add the todo immediately
    addOptimisticTodo(newTodo);

    try {
      await addTodoToServer(newTodo);
    } catch (error) {
      console.error('Failed to add todo:', error);
    }
  };

  return (
    <div>
      {optimisticTodos.map(todo => (
        <div key={todo.id}>{todo.text}</div>
      ))}
    </div>
  );
}
Why Use Concurrent Rendering in React Apps?
Improving Perceived Performance
Concurrent rendering fundamentally changes how users experience application performance. Users rate applications higher when they feel responsive, even if total processing time remains unchanged.

Concurrent rendering delivers this perceived performance improvement by ensuring immediate feedback to user interactions.
Handling Complex Data Scenarios
Modern applications encounter scenarios that challenge traditional rendering approaches:
- Large Data Sets: Enterprise applications rendering 10,000+ rows in data grids
- Real-time Updates: Live dashboards with constant data streams
- Complex Calculations: Financial applications with heavy computational requirements
- Cross-device Compatibility: Applications targeting diverse hardware capabilities
Concurrent rendering addresses these challenges by maintaining UI responsiveness regardless of computational complexity.
Business Impact and User Experience
The benefits extend beyond technical improvements to measurable business outcomes:
- Reduced Bounce Rates: Responsive applications retain users longer
- Improved Conversion: Smooth interactions increase user engagement
- Enhanced Accessibility: Better performance on lower-end devices expands user base
- Developer Productivity: Fewer performance-related bug reports and support tickets
Getting Started with Concurrent Rendering
Step 1: Understanding React 19 Requirements
Concurrent rendering is available in React 18+ and significantly enhanced in React 19. For the best experience with automatic optimizations, upgrade to React 19:
# Upgrade to React 19 (recommended)
pnpm add react@19 react-dom@19

# Enable React Compiler (optional but recommended)
pnpm add @babel/plugin-react-compiler
Step 2: Enable Concurrent Features
// src/main.tsx
import React from 'react';
import { createRoot } from 'react-dom/client';
import App from './App';

// Use createRoot instead of ReactDOM.render
const container = document.getElementById('root');
const root = createRoot(container!);
root.render(<App />);
Step 3: Implement useTransition for Non-Urgent Updates
The useTransition hook allows you to mark state updates as non-urgent, enabling React to interrupt them if higher-priority updates occur:
// src/components/Dashboard.tsx
import React, { useState, useTransition } from 'react';

export function Dashboard({ data }: DashboardProps) {
  const [tab, setTab] = useState("overview");
  const [isPending, startTransition] = useTransition();

  const switchTab = (newTab: string) => {
    // Mark tab switching as non-urgent
    startTransition(() => {
      setTab(newTab);
    });
  };

  return (
    <div>
      <nav>
        <button onClick={() => switchTab("overview")} disabled={isPending}>
          Overview
        </button>
        <button onClick={() => switchTab("analytics")} disabled={isPending}>
          Analytics
        </button>
      </nav>

      {isPending && <div className="loading-indicator">Loading...</div>}
      <TabContent tab={tab} data={data} />
    </div>
  );
}
Step 4: Optimize Expensive Computations with
useDeferredValue
For scenarios involving expensive computations (like filtering large datasets), useDeferredValue provides a way to defer updates without blocking user interactions:
// src/components/ProductSearch.tsx
import React, { useMemo, useDeferredValue } from 'react';

export function ProductSearch({ products, query }: ProductSearchProps) {
  // Defer the expensive filtering operation
  const deferredQuery = useDeferredValue(query);

  const filteredProducts = useMemo(() => {
    if (!deferredQuery.trim()) return products;

    return products.filter(product =>
      product.name.toLowerCase().includes(deferredQuery.toLowerCase()) ||
      product.category.toLowerCase().includes(deferredQuery.toLowerCase())
    );
  }, [products, deferredQuery]);

  return (
    <div>
      <div className="search-results">
        {filteredProducts.map(product => (
          <div key={product.id} className="product-card">
            <h3>{product.name}</h3>
            <p>{product.category}</p>
            <span>${product.price}</span>
          </div>
        ))}
      </div>
    </div>
  );
}
The query updates immediately for the input field, while the expensive filtering operation happens for the deferred value, maintaining UI responsiveness.
Concurrent Rendering + React: Stronger Together
Concurrent rendering dramatically improves developer experience by providing fine-grained control over rendering priorities. The key benefit is defining rendering behavior once and letting React handle the complex scheduling automatically.
Hooks That Enable Concurrency
Concurrent rendering introduces several new hooks that give developers precise control over rendering behavior:
// Core concurrent rendering hooks
const [isPending, startTransition] = useTransition();
const deferredValue = useDeferredValue(expensiveValue);
const [isLoading, setIsLoading] = useState(false);useTransition: Marks state updates as non-urgent, allowing React to interrupt them for higher-priority updates.
useDeferredValue: Defers expensive computations without blocking user interactions.
Suspense: Manages async loading states gracefully, working seamlessly with concurrent rendering.
Enhanced Developer Experience

Modern React DevTools provide comprehensive insights into concurrent rendering behavior:
- Profiler Tab: Visualizes rendering priorities and interruption patterns
- Flamegraph Visualizations: Identifies slow or blocked rendering operations
- Suspense Tracing: Tracks async boundaries and loading states
- Performance Metrics: Measures the impact of concurrent optimizations
Mental Model Evolution
Adopting concurrent rendering requires a fundamental shift in how developers think about React's rendering process:
- Traditional Model: "Every state change triggers an immediate, synchronous render."
- Concurrent Model: "Every state change is scheduled with priority, and React optimizes the rendering timeline."
This evolution encourages developers to prioritize user experience over implementation details, leading to more responsive applications by design.
Practical Examples
Search Input with Real-time Filtering
Concurrent rendering excels at handling expensive search operations while maintaining input responsiveness:
// src/components/SearchInput.tsx
import React, { useState, useDeferredValue, useMemo } from 'react';

export function SearchInput({ items, onSelect }: SearchInputProps) {
  const [query, setQuery] = useState('');
  const deferredQuery = useDeferredValue(query);

  const filteredItems = useMemo(() => {
    if (!deferredQuery.trim()) return items;

    return items.filter(item =>
      item.title.toLowerCase().includes(deferredQuery.toLowerCase()) ||
      item.description.toLowerCase().includes(deferredQuery.toLowerCase()) ||
      item.category.toLowerCase().includes(deferredQuery.toLowerCase())
    );
  }, [items, deferredQuery]);

  return (
    <div className="search-container">
      <input
        type="text"
        value={query}
        onChange={(e) => setQuery(e.target.value)}
        placeholder="Search items..."
        className="search-input"
      />

      <div className="search-results">
        {filteredItems.map(item => (
          <div
            key={item.id}
            className="search-result"
            onClick={() => onSelect(item)}
          >
            <h3>{item.title}</h3>
            <p>{item.description}</p>
            <span className="category">{item.category}</span>
          </div>
        ))}
      </div>
    </div>
  );
}
The query updates immediately for the input field, while the expensive filtering operation happens for the deferred value, ensuring the UI remains responsive during search.
Dashboard with Live Data Updates
Concurrent rendering is crucial for applications that receive frequent API updates:
// src/components/LiveDashboard.tsx
import React, { useState, useTransition, useEffect } from 'react';

export function LiveDashboard() {
  const [data, setData] = useState<DashboardData | null>(null);
  const [isPending, startTransition] = useTransition();
  const [lastUpdate, setLastUpdate] = useState<Date | null>(null);

  useEffect(() => {
    const interval = setInterval(async () => {
      try {
        const response = await fetch('/api/dashboard-data');
        const newData = await response.json();

        // Mark data updates as non-urgent
        startTransition(() => {
          setData(newData);
          setLastUpdate(new Date());
        });
      } catch (error) {
        console.error('Failed to fetch dashboard data:', error);
      }
    }, 5000); // Update every 5 seconds

    return () => clearInterval(interval);
  }, []);

  if (!data) return <div>Loading dashboard...</div>;

  return (
    <div className="dashboard">
      <div className="dashboard-header">
        <h1>Live Dashboard</h1>
        {isPending && <span className="updating-indicator">Updating...</span>}
        {lastUpdate && (
          <span className="last-update">
            Last updated: {lastUpdate.toLocaleTimeString()}
          </span>
        )}
      </div>

      <div className="metrics-grid">
        <div className="metric-card">
          <h3>Revenue</h3>
          <p>${data.metrics.revenue.toLocaleString()}</p>
        </div>
        <div className="metric-card">
          <h3>Users</h3>
          <p>{data.metrics.users.toLocaleString()}</p>
        </div>
        <div className="metric-card">
          <h3>Orders</h3>
          <p>{data.metrics.orders.toLocaleString()}</p>
        </div>
      </div>

      <div className="activity-feed">
        <h3>Recent Activity</h3>
        {data.recentActivity.map(activity => (
          <div key={activity.id} className="activity-item">
            <span className="activity-type">{activity.type}</span>
            <span className="activity-description">{activity.description}</span>
            <span className="activity-time">{activity.timestamp}</span>
          </div>
        ))}
      </div>
    </div>
  );
}
This implementation ensures that dashboard updates don't interfere with user interactions, maintaining responsiveness even with frequent data refreshes.
Common Pitfalls and Best Practices
Over-optimizing vs Under-optimizing
Don't defer everything: Avoid using useTransition for critical UI updates that users expect to be immediate.
// ❌ Unnecessary deferring
const handleFormSubmit = (formData: FormData) => {
  startTransition(() => {
    setFormErrors(validateForm(formData)); // Should be immediate
  });
};

// ✅ Appropriate deferring
const handleTabSwitch = (newTab: string) => {
  startTransition(() => {
    setCurrentTab(newTab); // Can be deferred
  });
};
Optimize at the right boundaries: Focus on expensive operations, large data sets, and non-critical updates.
Handling Loading States
Transitions may delay updates, so always provide user feedback:
const DataGrid = ({ data }: { data: any[] }) => {
  const [filter, setFilter] = useState('');
  const [isPending, startTransition] = useTransition();

  const handleFilterChange = (newFilter: string) => {
    startTransition(() => {
      setFilter(newFilter);
    });
  };

  return (
    <div>
      <input
        onChange={(e) => handleFilterChange(e.target.value)}
        placeholder="Filter data..."
      />
      {isPending && <div className="loading">Filtering...</div>}
      <DataTable data={data} filter={filter} />
    </div>
  );
};
Performance Optimization Strategies
For applications with heavy computational requirements, combine concurrent rendering with proper memoization:
const ExpensiveComponent = ({ items, query }: { items: Item[], query: string }) => {
  const deferredQuery = useDeferredValue(query);

  // Memoize expensive calculations
  const processedItems = useMemo(() => {
    return items
      .filter(item => item.name.includes(deferredQuery))
      .map(item => ({
        ...item,
        score: calculateRelevanceScore(item, deferredQuery)
      }))
      .sort((a, b) => b.score - a.score);
  }, [items, deferredQuery]);

  return (
    <div>
      {processedItems.map(item => (
        <ItemCard key={item.id} item={item} />
      ))}
    </div>
  );
};
When Not to Use Concurrent Rendering?
Cases Where Traditional Rendering is Sufficient
For simple applications with minimal user interactions and small data sets:
// ❌ Overkill for simple static content
const SimpleBlogPost = ({ title, content }: { title: string; content: string }) => {
  const [isPending, startTransition] = useTransition();

  const handleTitleChange = (newTitle: string) => {
    startTransition(() => {
      setTitle(newTitle); // Unnecessary for simple text
    });
  };

  return <article><h1>{title}</h1><p>{content}</p></article>;
};

// ✅ Simple rendering is sufficient
const SimpleBlogPost = ({ title, content }: { title: string; content: string }) => {
  return <article><h1>{title}</h1><p>{content}</p></article>;
};
Performance Trade-offs
For applications with strict performance requirements where every millisecond matters:
- Real-time gaming applications with frame-rate dependencies
- High-frequency trading interfaces requiring microsecond precision
- Embedded systems with extremely limited resources
- Legacy applications where migration costs outweigh benefits
Making the Decision
The key question: "What happens if the UI becomes unresponsive?"
- If the answer is "users abandon the application" → Concurrent rendering is essential.
- If the answer is "minimal impact on user experience" → Traditional rendering may suffice.
Conclusion
React's concurrent rendering represents a fundamental evolution in how modern web applications handle user interactions and data processing. With React 19, this evolution reaches new heights through automatic optimization, stable Server Components, and revolutionary new APIs.
Pro tip for tech leads: Start your React 19 adoption with the React Compiler—it provides immediate performance benefits with zero code changes. Then gradually introduce new hooks like useActionState for forms and useOptimistic for real-time features.
Migration strategy: If you're upgrading from React 18, focus on enabling the React Compiler first, then gradually adopt new hooks in high-impact areas like forms, real-time updates, and data-heavy components. The backward compatibility ensures a smooth transition while unlocking React 19's powerful new capabilities.

- coding