What if you have not just one but dozens or hundreds of services that need to be deployed? Manual deployment would be extremely time-consuming. The answer to this problem is the Docker application. Using Docker, we can easily automate deployment for all services. In the world of microservices, containers make it easier and more independent to deploy microservices. It makes microservices more self-sufficient by encapsulating them.
>> Read more:
- Cloud Success Blueprint: Why Go Is A Perfect Match?
- Docker Networking Fundamentals: Types, Working and Usage
- 5 Best Practices for Enhancing CI/CD Pipeline Security
What are containers?
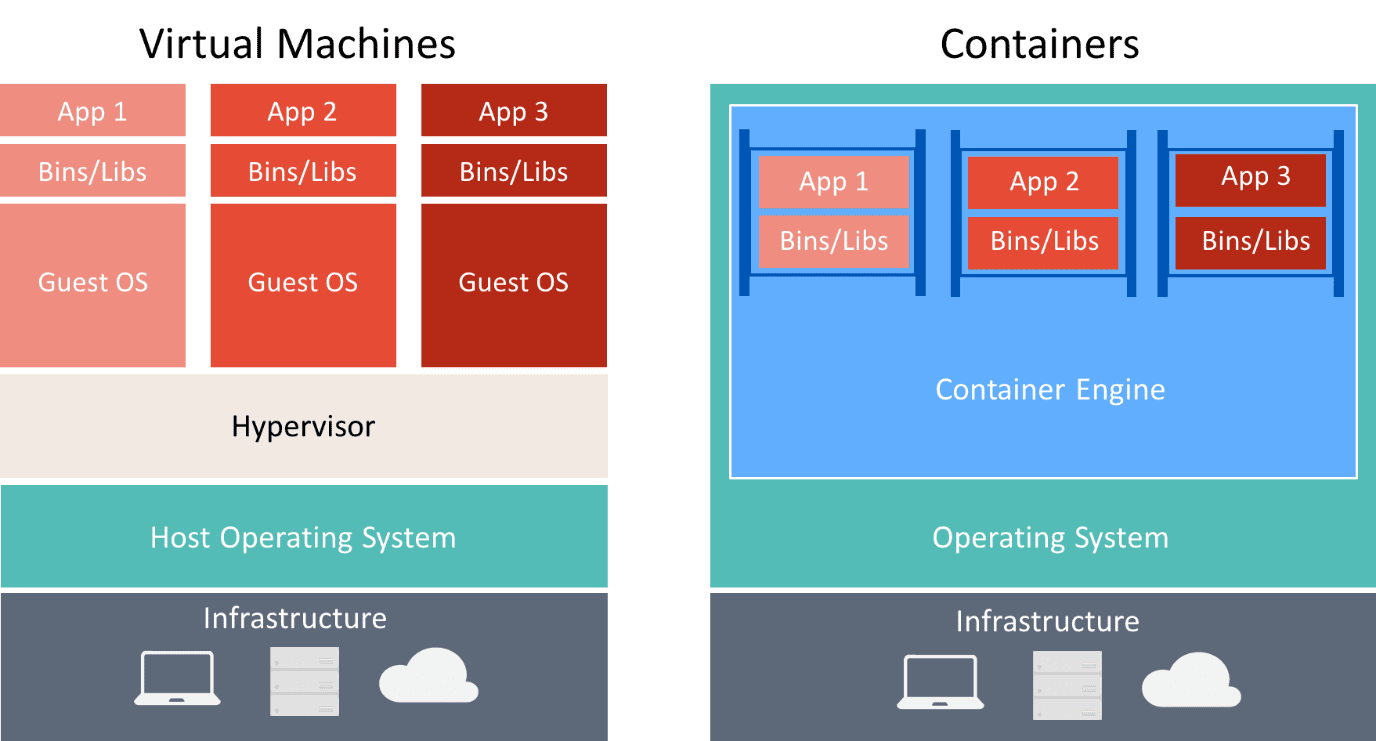
This concept seems to be a hot thing to you, doesn't it? There are many definitions of containers but the easiest way to understand it is something built on top of the operating system. It is simply understood as the virtualization of the operating system.
Speaking of containers, some programmers will wonder what is the difference between a VM and a container? The answer will be illustrated by the figure below:

Benefits of containers:
- Self-containing (allows self-packaging)
- Lightweight
- Scalability (allows containers to be easily scaled)
- Portability (allows containers to be carried and built on other systems easily)
- DevOps
What is Docker?
Docker is a platform that allows you to build, ship, and run containers based on the Linux kernel. Docker is supported by default for Linux platforms.

Basic components of Docker:
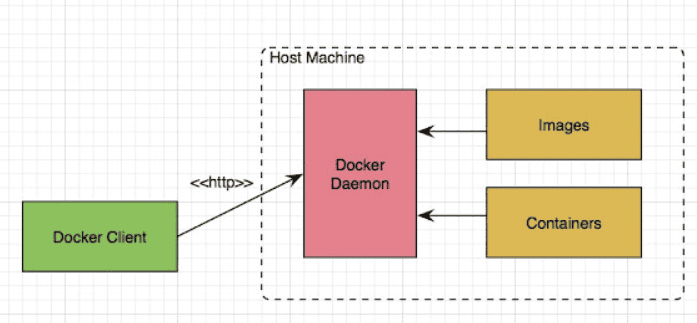
1. The Docker daemon
A docker daemon is a server component that runs on a virtual machine and is hot as a server responsible for building, running, and distributing Docker containers. The Docker client interacts with this daemon through the Rest API.
2. The Docker client
Docker client is a CLI that allows interaction with Docker daemon via socket or Rest API. The Docker client can be run on the same host as the daemon or run on a different host and connect to the daemon using the CLI.
3. The Docker image
The most important concept about Docker is the Docker image. It is a clone for the operating system libraries as well as the related applications in that OS. In the context of microservices that are built on top of Spring Boot, Docker images can be bundled in a Linux distribution such as Alpine, JRE8 and a Spring Boot microservice jar.
4. The Docker container
In simple terms it is instances of Docker images. The Docker container will use the Linux kernel and it will have its filesystem and network configurations.
5. Dockerfile
A file that contains scripts that instruct how to build a Docker image. It is basically a text file and is named Dockerfile.

Deploying microservices on Docker
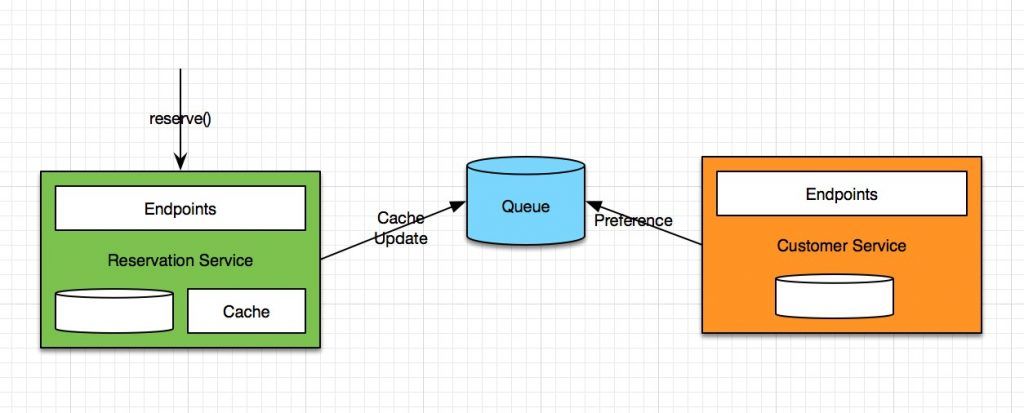
I assume that we have a booking application developed in microservices architecture using Spring Boot platform as shown in the diagram below:
1. Install Docker
To deploy microservices by Docker, you must install Docker from https://www.docker.com/ and follow the instructions given during installation.
2. Prepare Dockerfile
Next step I assume that you are designing services using Spring Boot and talking through RabbitMQ. Then you need to change the application.properties to declare the configuration related to rabbitmq connection by using the IP address instead of using localhost. Why not, because localhost is not identifiable inside Docker containers. In the real application, this will be pointed by DNS or through the load balancer.
Create a docker file (filename is Dockerfile) and put in the root directory containing the source code of the microservice you will develop. This file will basically be:
server.port=8090
// Replace the IP address of your machine, not using localhost
spring.rabbitmq.host=192.168.0.101
spring.rabbitmq.port=5672
spring.rabbitmq.username=guest
spring.rabbitmq.password=guestFROM frolvlad/alpine-oraclejdk8
VOLUME /tmp
ADD target/reservation-1.0.jar reservation.jar
EXPOSE 8090
ENTRYPOINT ["java","-jar","/reservation.jar"]
3. Build Docker
Done with the declaration, now to build them (that is, download the JDK8 image and execute the commands in the Dockerfile), simply run the docker build command at the directory containing the Dockerfile.
$ docker build –t reservation:1.0
Here we will have 2 microservices, reservation and customer. Repeat steps 2->3 for the microservice customer.
4. Run a Docker container
Finally, they will execute a Docker container with the docker run command. This command will load the container and execute the jar file you declared in the Dockerfile.
$ docker run -p 8090:8090 -t reservation:1.0
To check if all services are started, use the command
$ docker ps
5. Run RabbitMQ
As you know, RabbitMQ is used a lot in microservices architecture. So, to setup RabbitMQ as a Docker container, the easy way to update is to get an image that is already available on Docker Hub. So you can easily use rabbitmq to talk between microservices.
6. Docker Registry
Docker Hub is the repository of Docker images. However, images can be stored in a private hub (local hub) for security reasons. We can do this easily with Docker by registering your own Docker Registry.
Create a private registry with port 3000
$ docker run -d -p 3000:3000 --restart=always --name registry registry:latest
Create tags
$ docker tag reservation:1.0 localhost:3000/reservation:1.0
Finally, push the image you want to the registry.
$ docker push localhost:3000/reservation:1.0
>> Read more:
Conclusion
Relia has already introduced to you about Microservices, the steps to deploy a Microservice system, as well as how to apply Docker with this architectural solution. Hopefully you will have more experience to confidently deploy in your future projects.
>>> Follow and Contact Relia Software for more information!
- coding
- development

