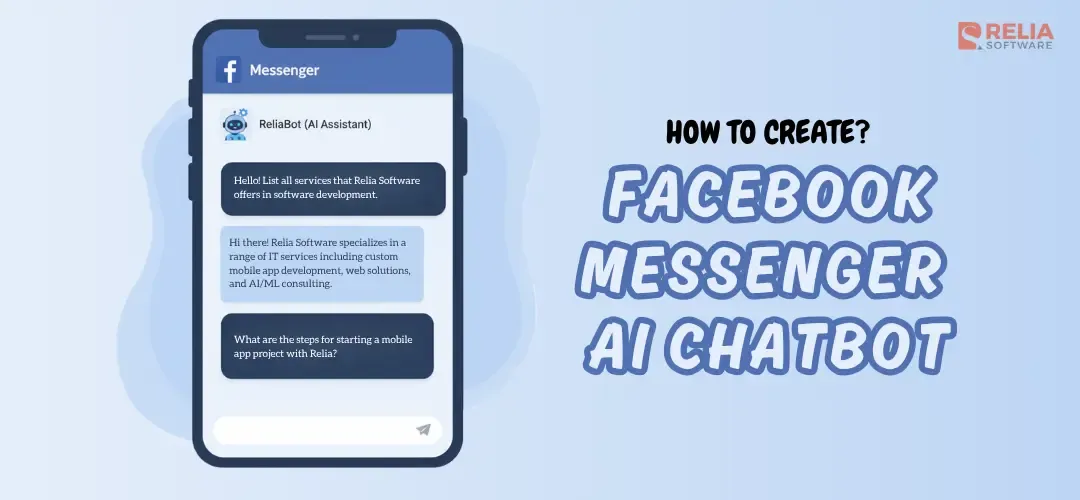
The world of tech is buzzing with AI chatbots and smart assistants, and they're popping up everywhere. And the exciting part is that you don’t need to be a tech expert to build one for your own, both personal and business use.
In this tutorial, I’ll walk you through the process of building a Facebook Messenger AI chatbot using OpenAI’s GPT models. To make it relatable, I’m sharing this from the perspective of a small coffee shop owner. This AI assistant can do important things like:
Customer Experience:
- Quickly reply to their common questions like opening hours, best-selling products, etc.
- Remember the conversations and suggest users what to order.
Business Management:
- Track popular items: What sells best during morning vs afternoon rush?
- Monitor customer sentiment: Are people complaining about wait times?
- Inventory Tracking: The number of items remaining, and if there are any low stock items.
- Sales analytics: Which promotions actually drive revenue?
There are a lot of things you can do and set up with this Assistant, but in this blog, I'll show you how to setup a local Chatting environment which can receive and send the messages through your Facebook Business Page. Let's start.
>> Explore further:
- A Hands-on Guide to Build a Golang AI Chatbot with OpenAI
- How to Build a React Chatbot UI with Vite, Tailwind, Shadcn?
- Build A Production-Ready React AI Chatbot
What Is a Facebook Messenger AI Chatbot?
A Facebook Messenger AI chatbot is an automated chat system built for Messenger that uses AI to understand user questions and generate more natural, relevant replies. Unlike rule-based chatbots that follow fixed scripts, AI chatbots can handle a wider range of questions, respond with more flexibility, and support more natural back-and-forth conversations.
In simple terms, it combines two parts. The first part is the Messenger chatbot layer, which receives messages from users and sends replies through Meta’s Messenger platform. The second part is the AI layer, which helps the chatbot understand meaning, generate responses, and decide what action to take next.
Prerequisites
Set up a Facebook page
To get this assistant up and running, you'll firstly need a Facebook page. This page is super important because it's where users and you (shop owners) will directly chat with the Facebook Messenger chatbot. It's all about real-time interactions, so queries and requests get answered fast.
Go to the website https://www.facebook.com/ and click on your avatar in the right corner to create a Facebook page.
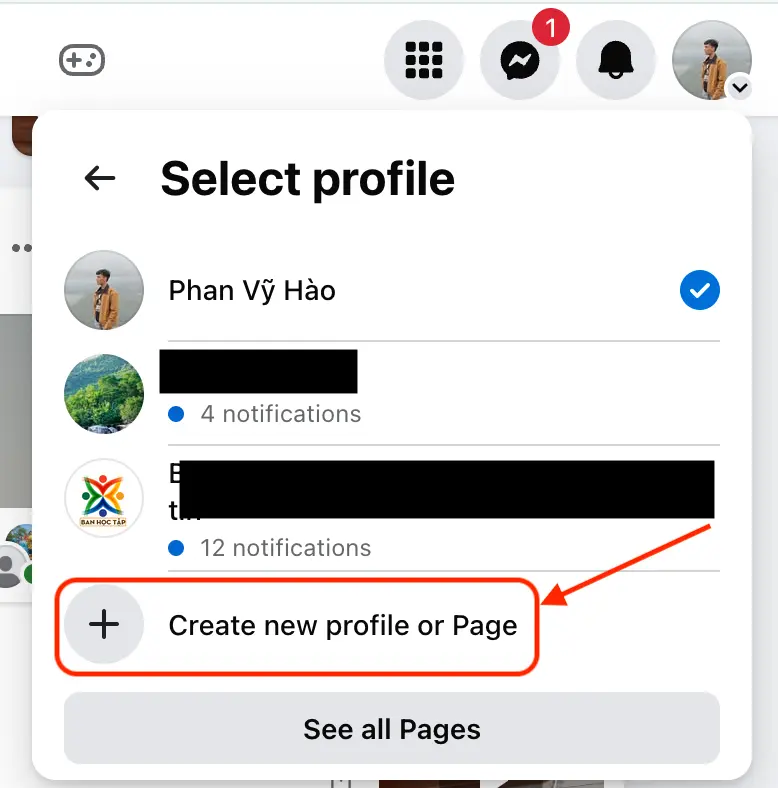
We will create a Page.
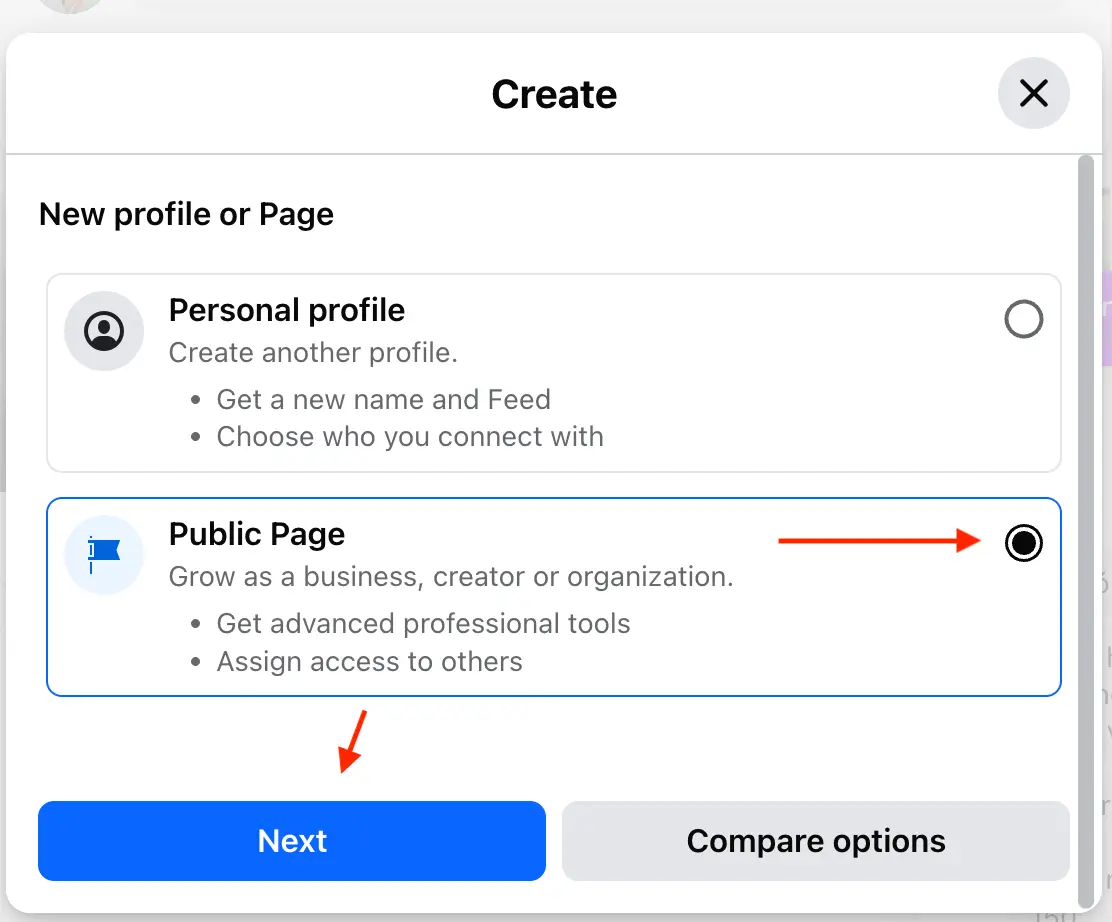
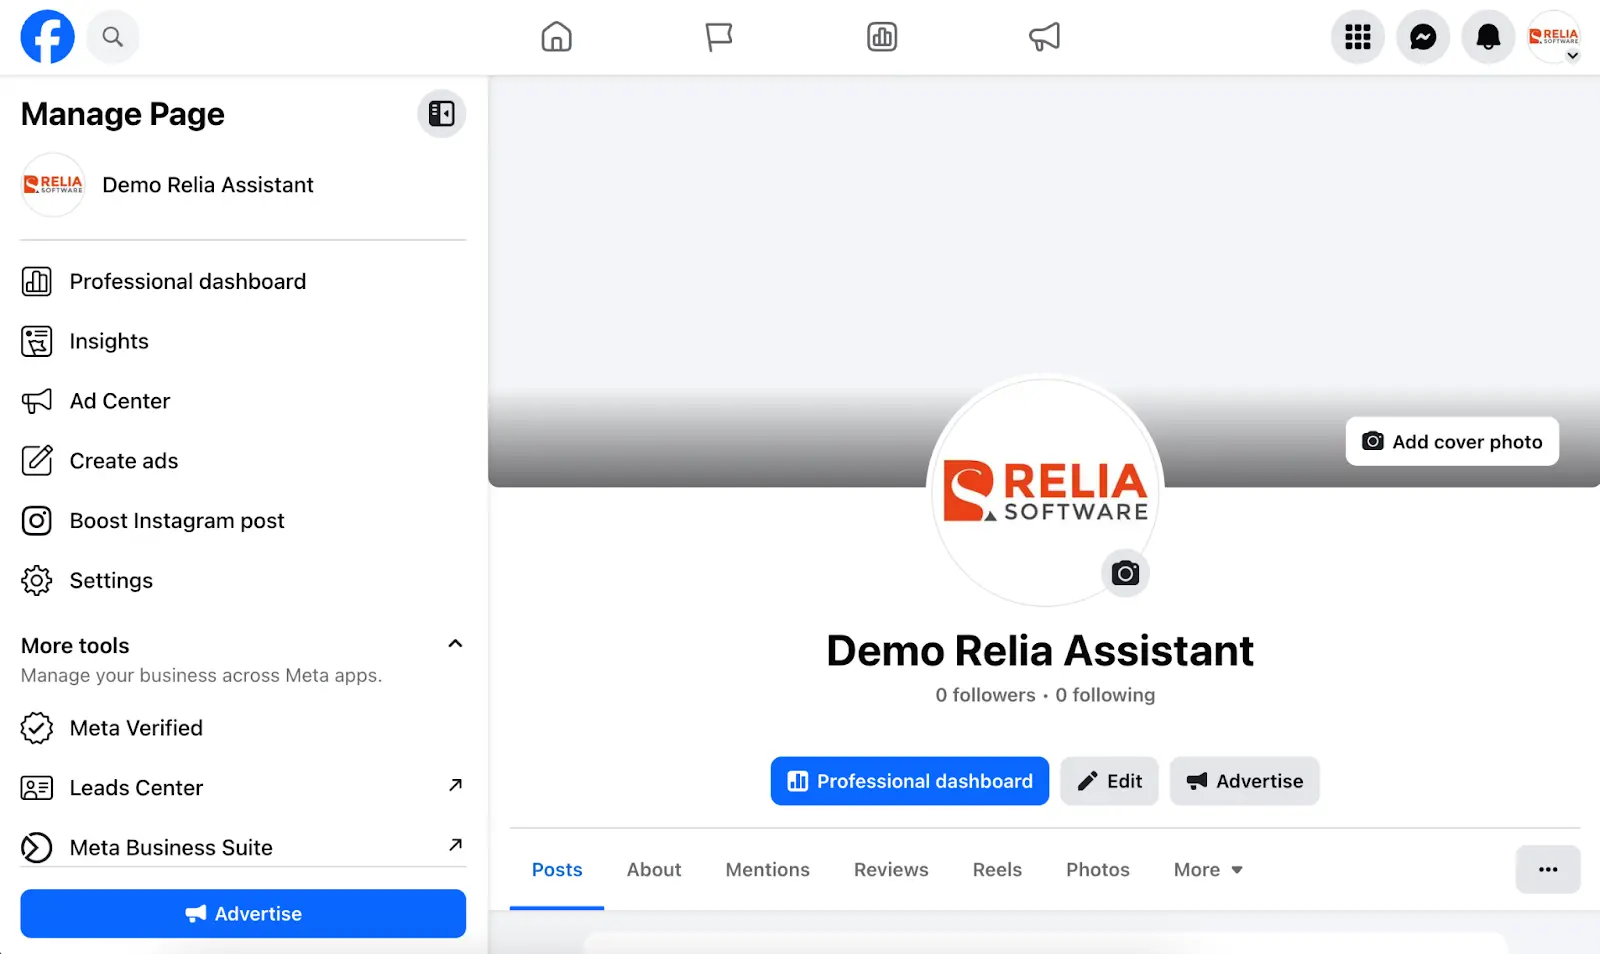
Fill out the necessary information and follow the later steps as instructed. After that, you would have a complete Facebook page. Let's say I have successfully created a Facebook page named Demo Relia Assistant.
Set up your development environment
Install an IDE
You should choose an IDE (Integrated Development Environment) that you favor and install it in your device. In my case, I would go for the Visual Studio Code which you can find how to install here https://code.visualstudio.com/.
Set up your coding environment
Here are some other prerequisites you need to install.
- Python. Version 3.12+ is recommended: https://www.python.org/
- Ngrok. https://ngrok.com/
- Redis. https://redis.io/download
Here are some services that you need to subscribe to.
- OpenAI API.
- Visit https://platform.openai.com and log in to your account. Then set up your billing account.
- Navigate to the API Keys section and create your new secret key there.
Facebook developer setup
Firstly, please create a developer account at the website https://developers.facebook.com. Then you should follow the instructions on completing the developer registration process. This process could last one or a few days, so please wait until they announce that your registration is successfully completed.
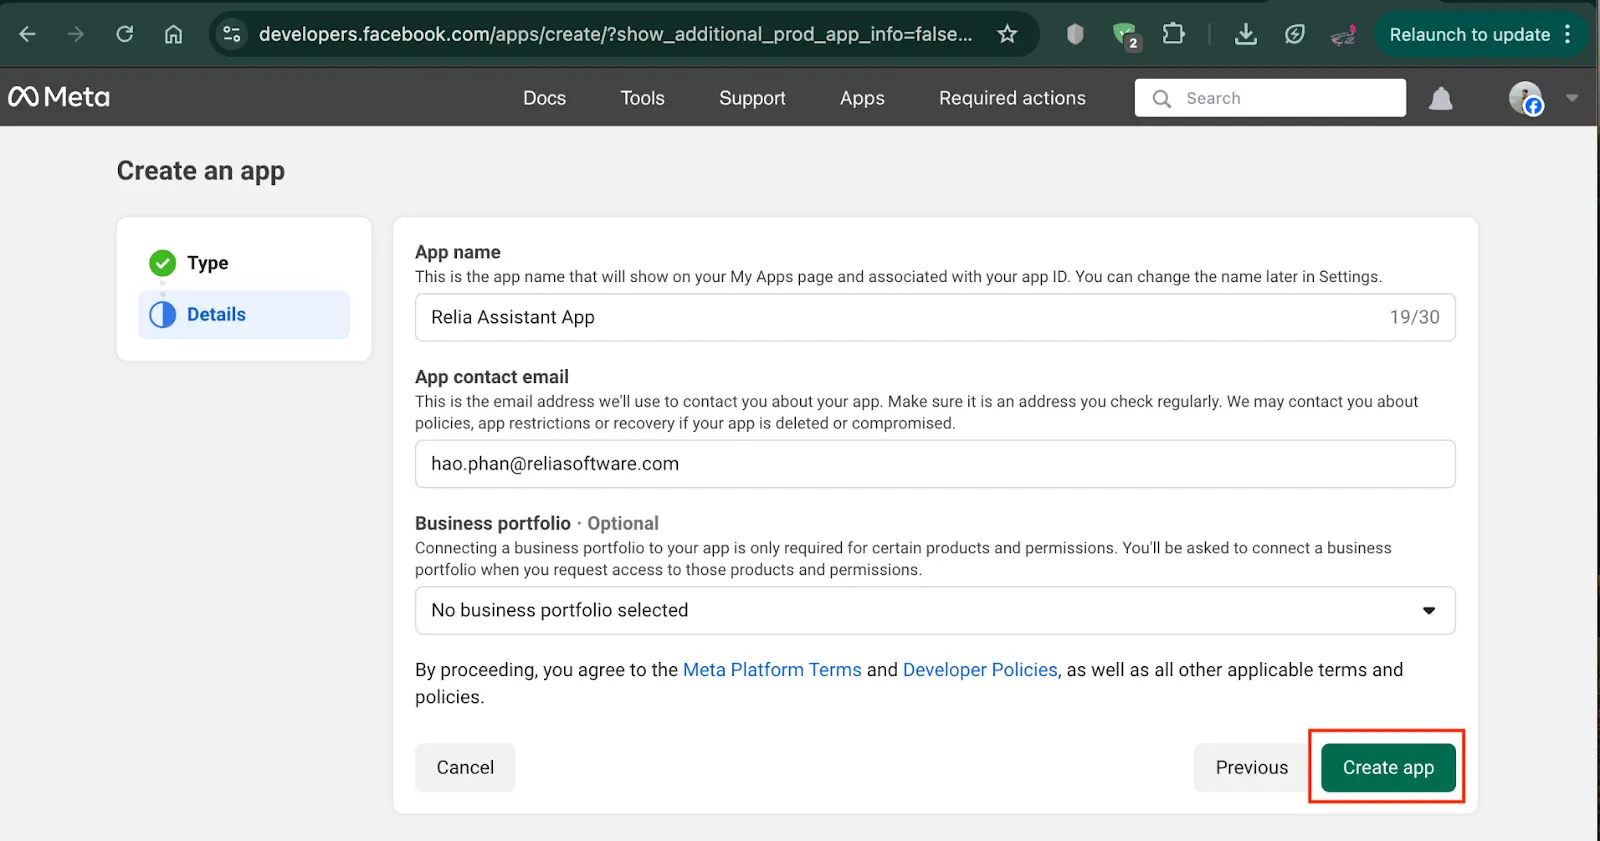
Secondly, after having a Facebook developer account, go to create a new app here https://developers.facebook.com/apps/
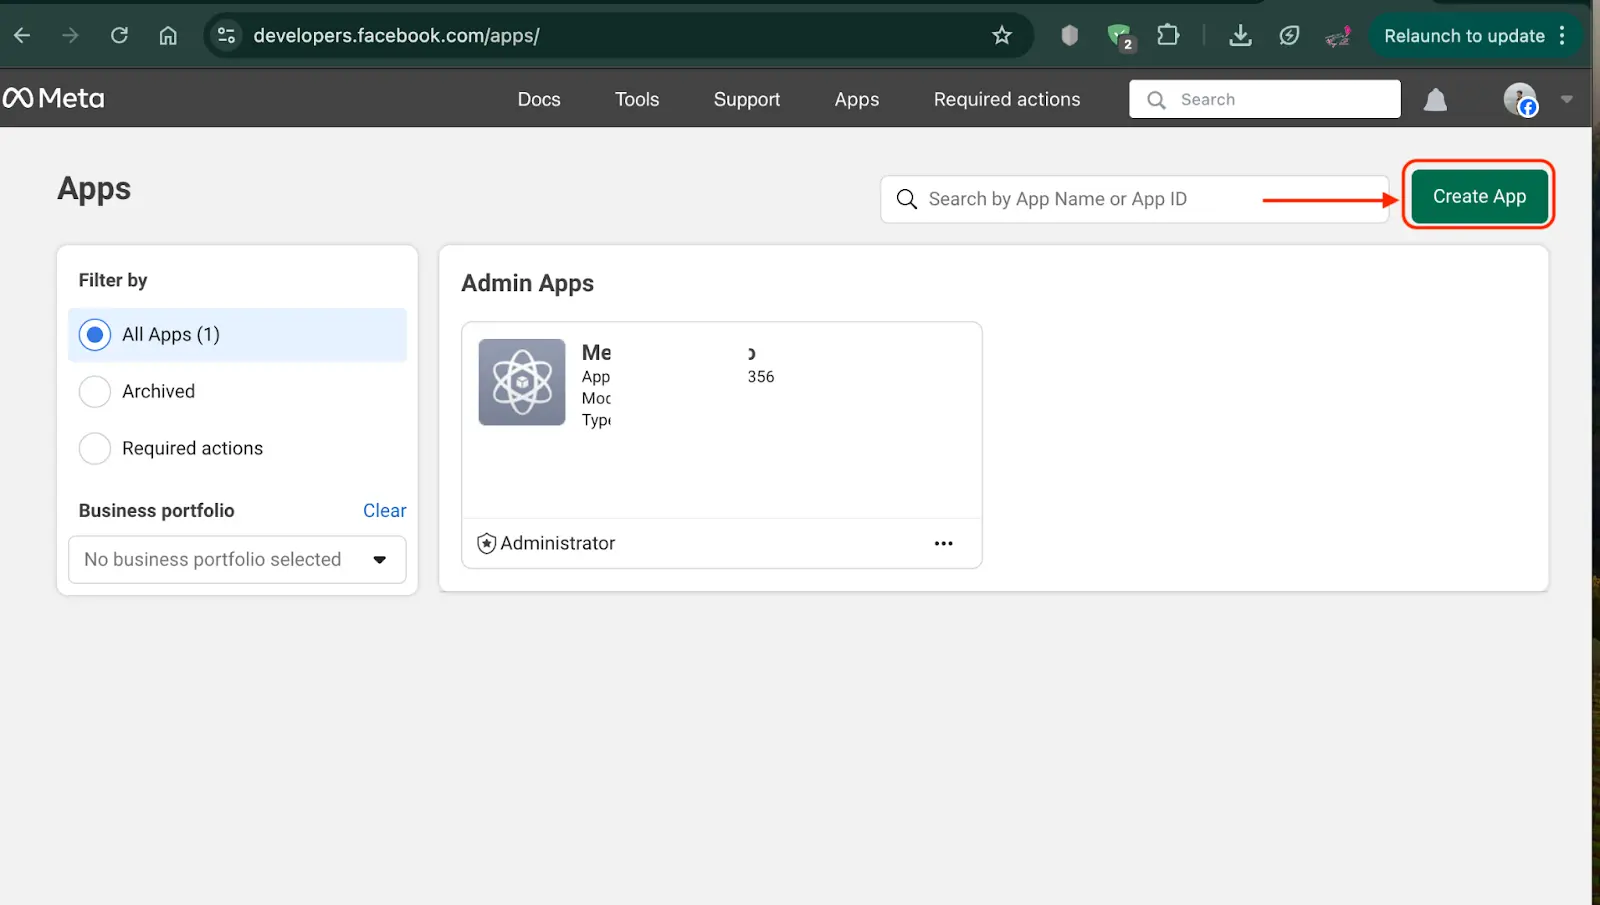
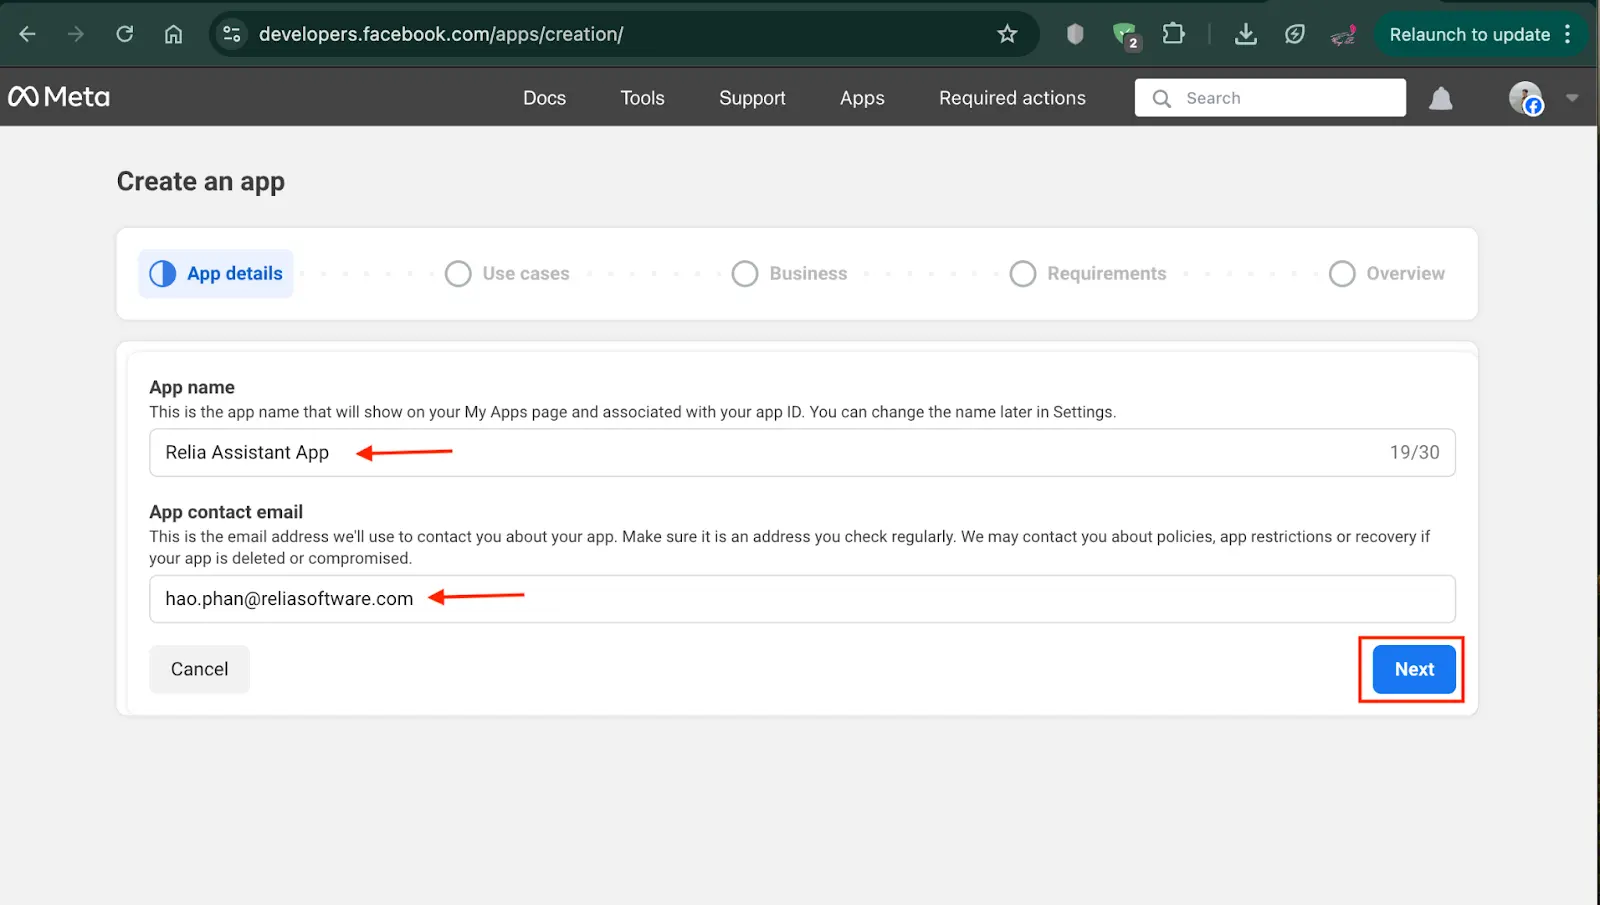
Fill out the app name and your contact email address.
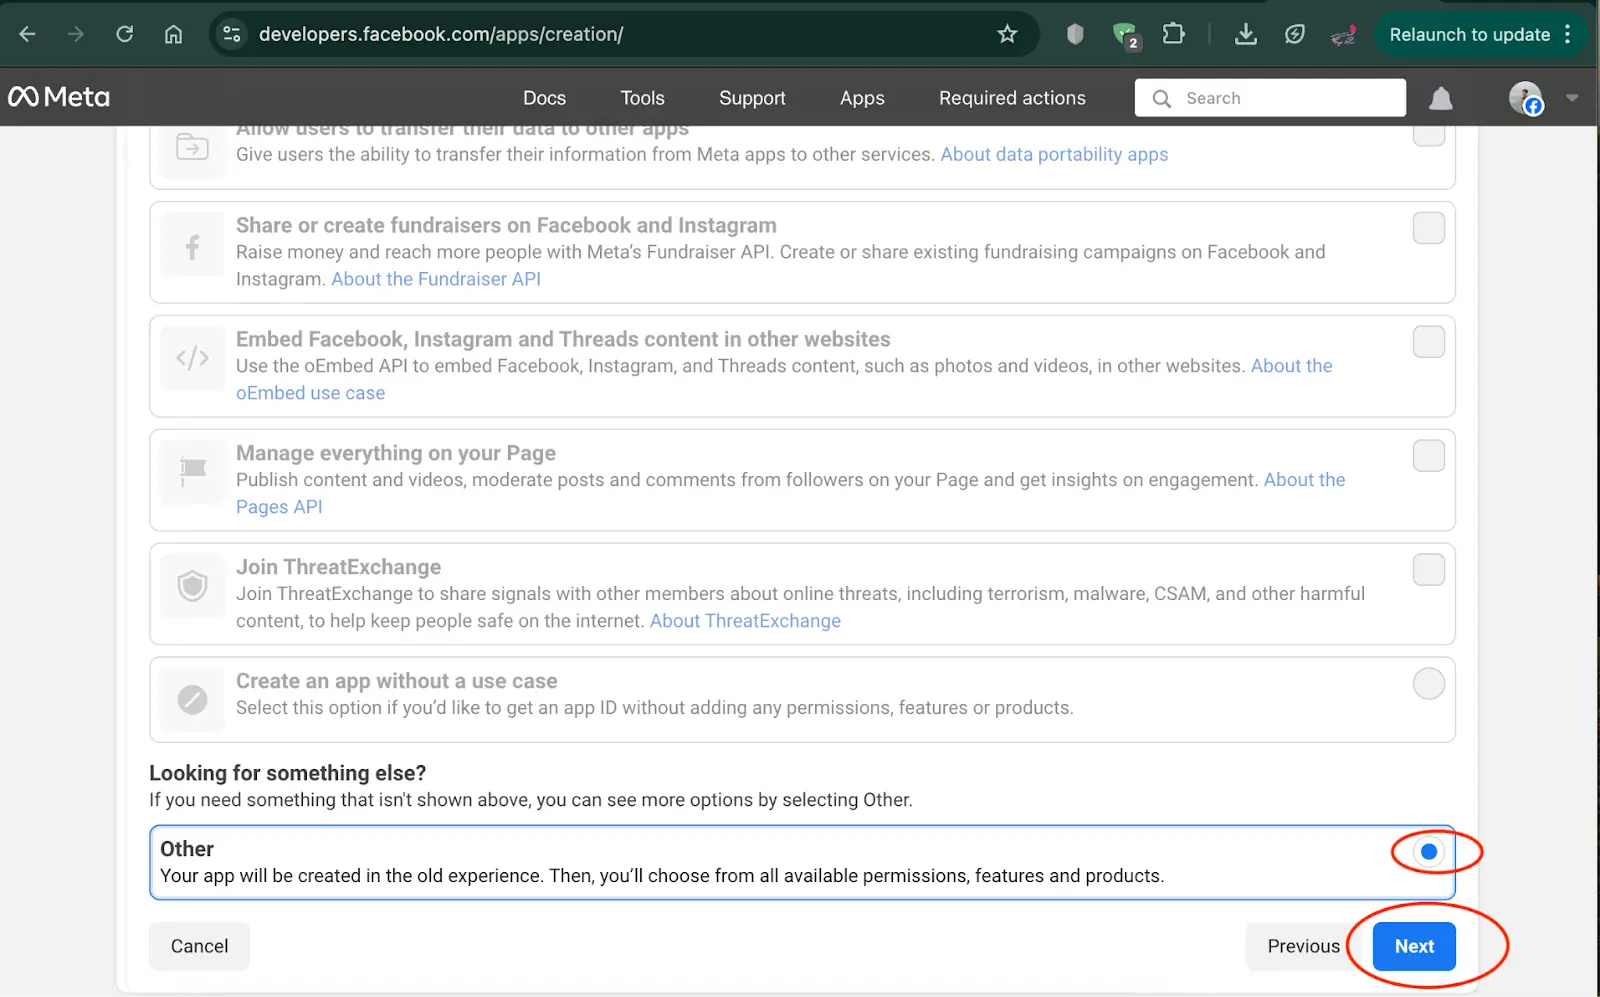
In the next step, you will be asked to provide your use case, you should choose Other. You will select your own permission later.
When asked to provide an app type, please select the type ‘Business’. You need this to manage your shop and interact with the customers, don’t you?
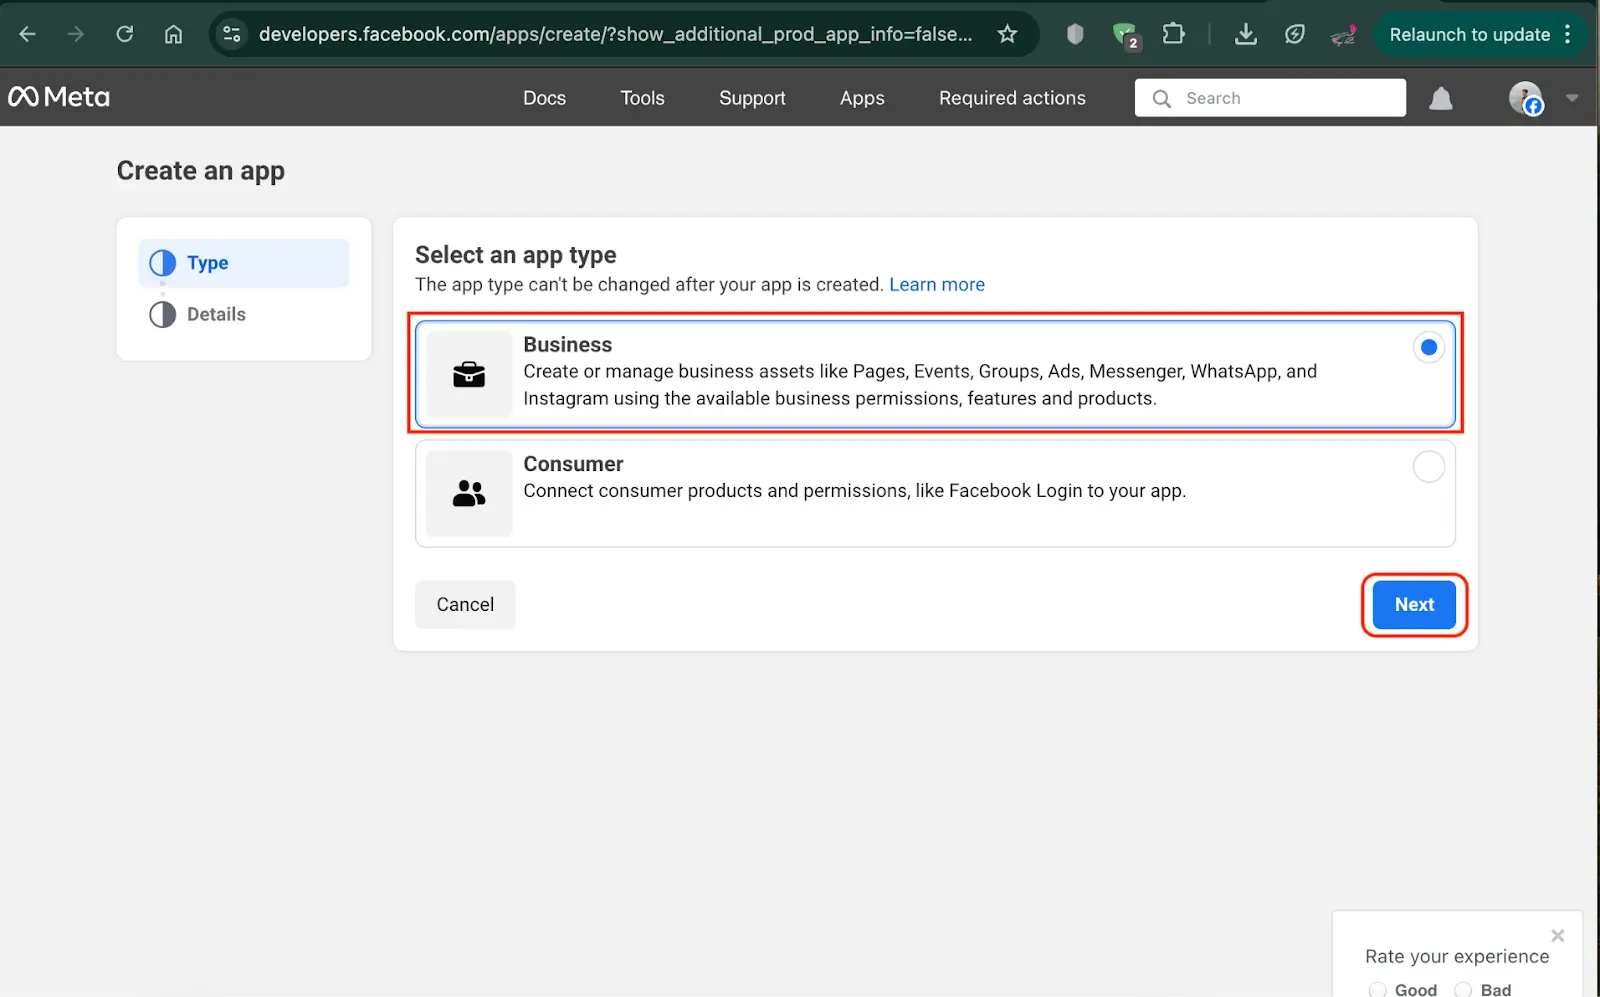
At the last step, click on “Create app” to finish.
Now your application has been created successfully. Then you need to add the Messenger product to the app, so you can use it as the assistant interaction.
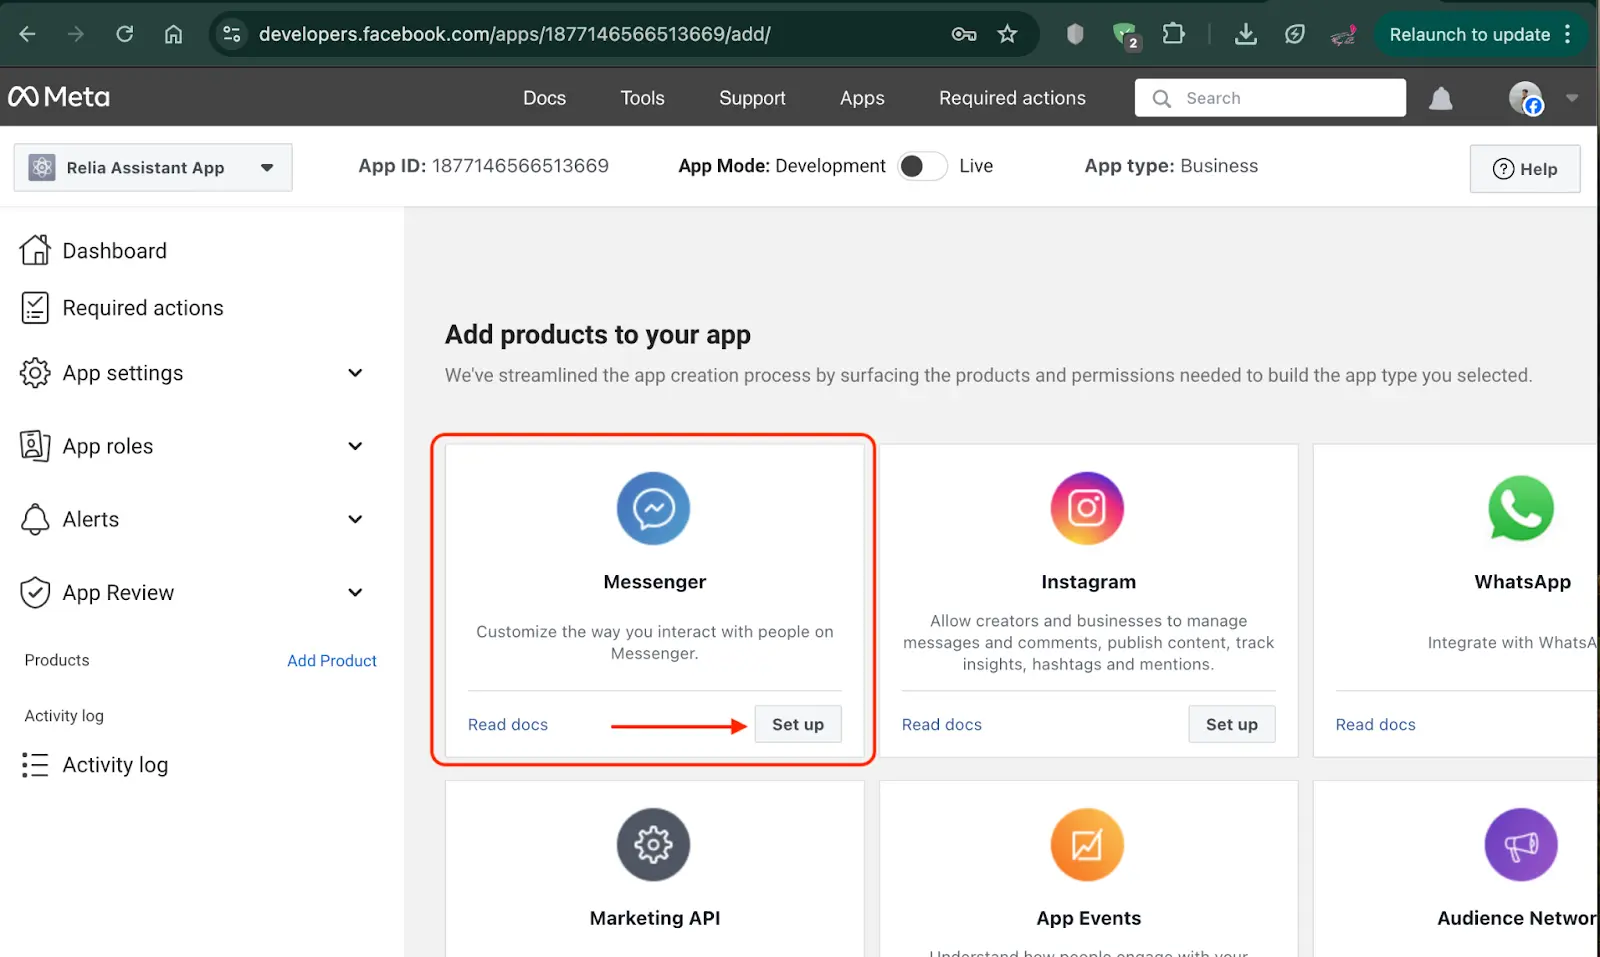
Now you have completed this setup.
Scroll down a little bit, in the second section, you should create a new Facebook access token. We need to connect to our page.
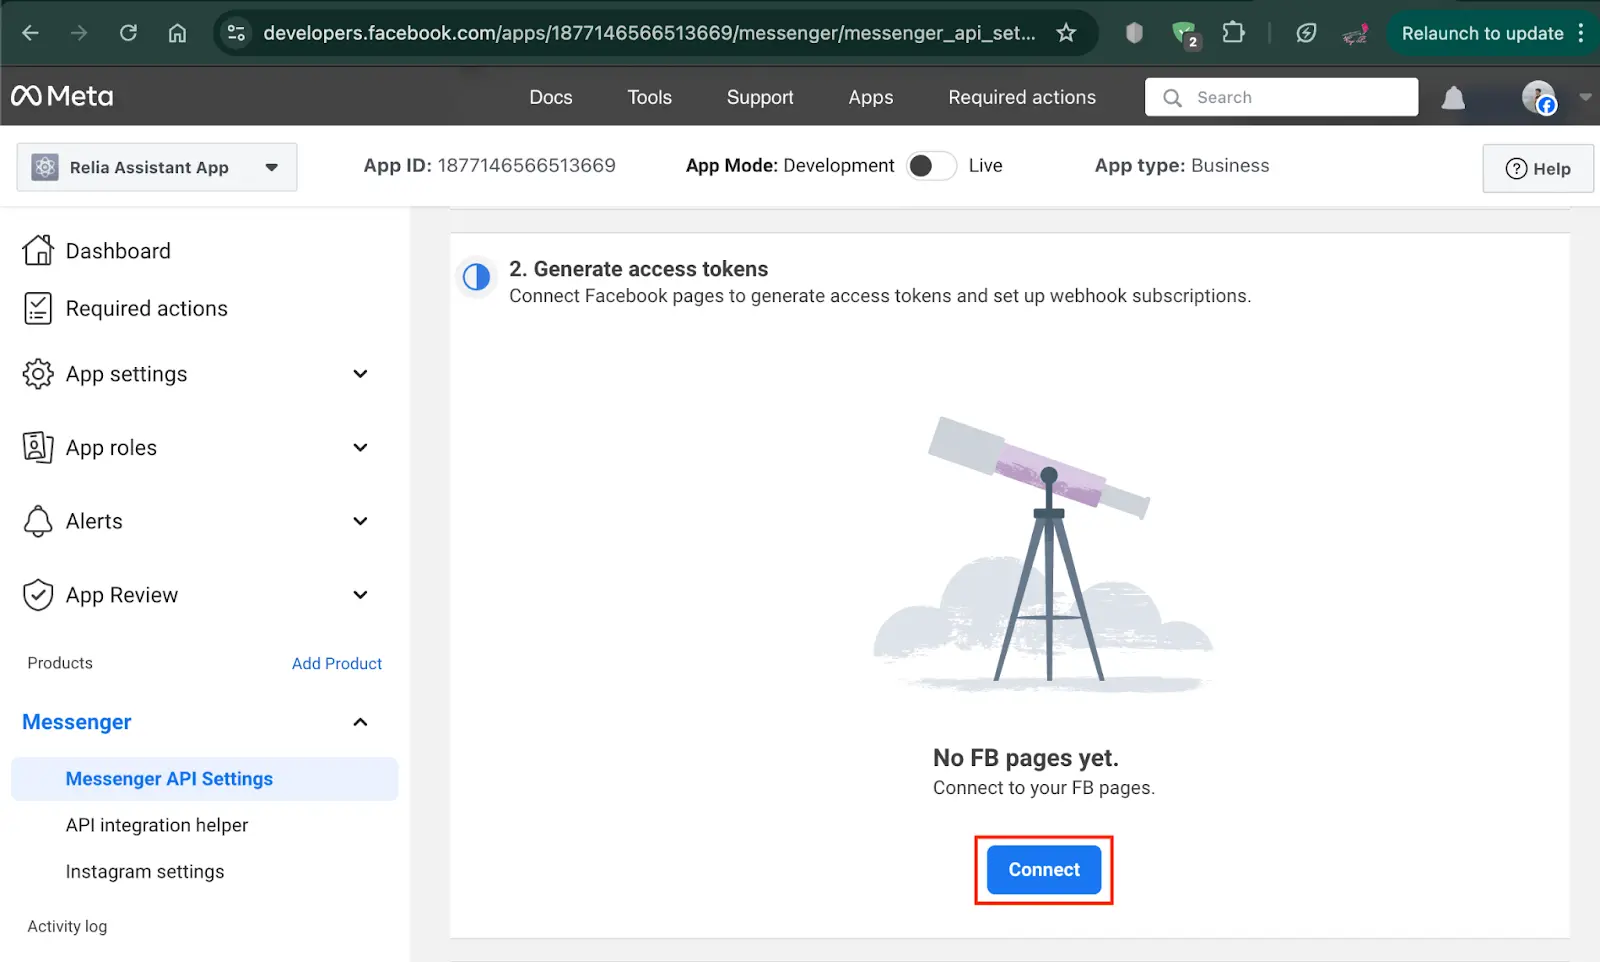
A new pop-up window will show and ask you to choose a page that you want to connect to.
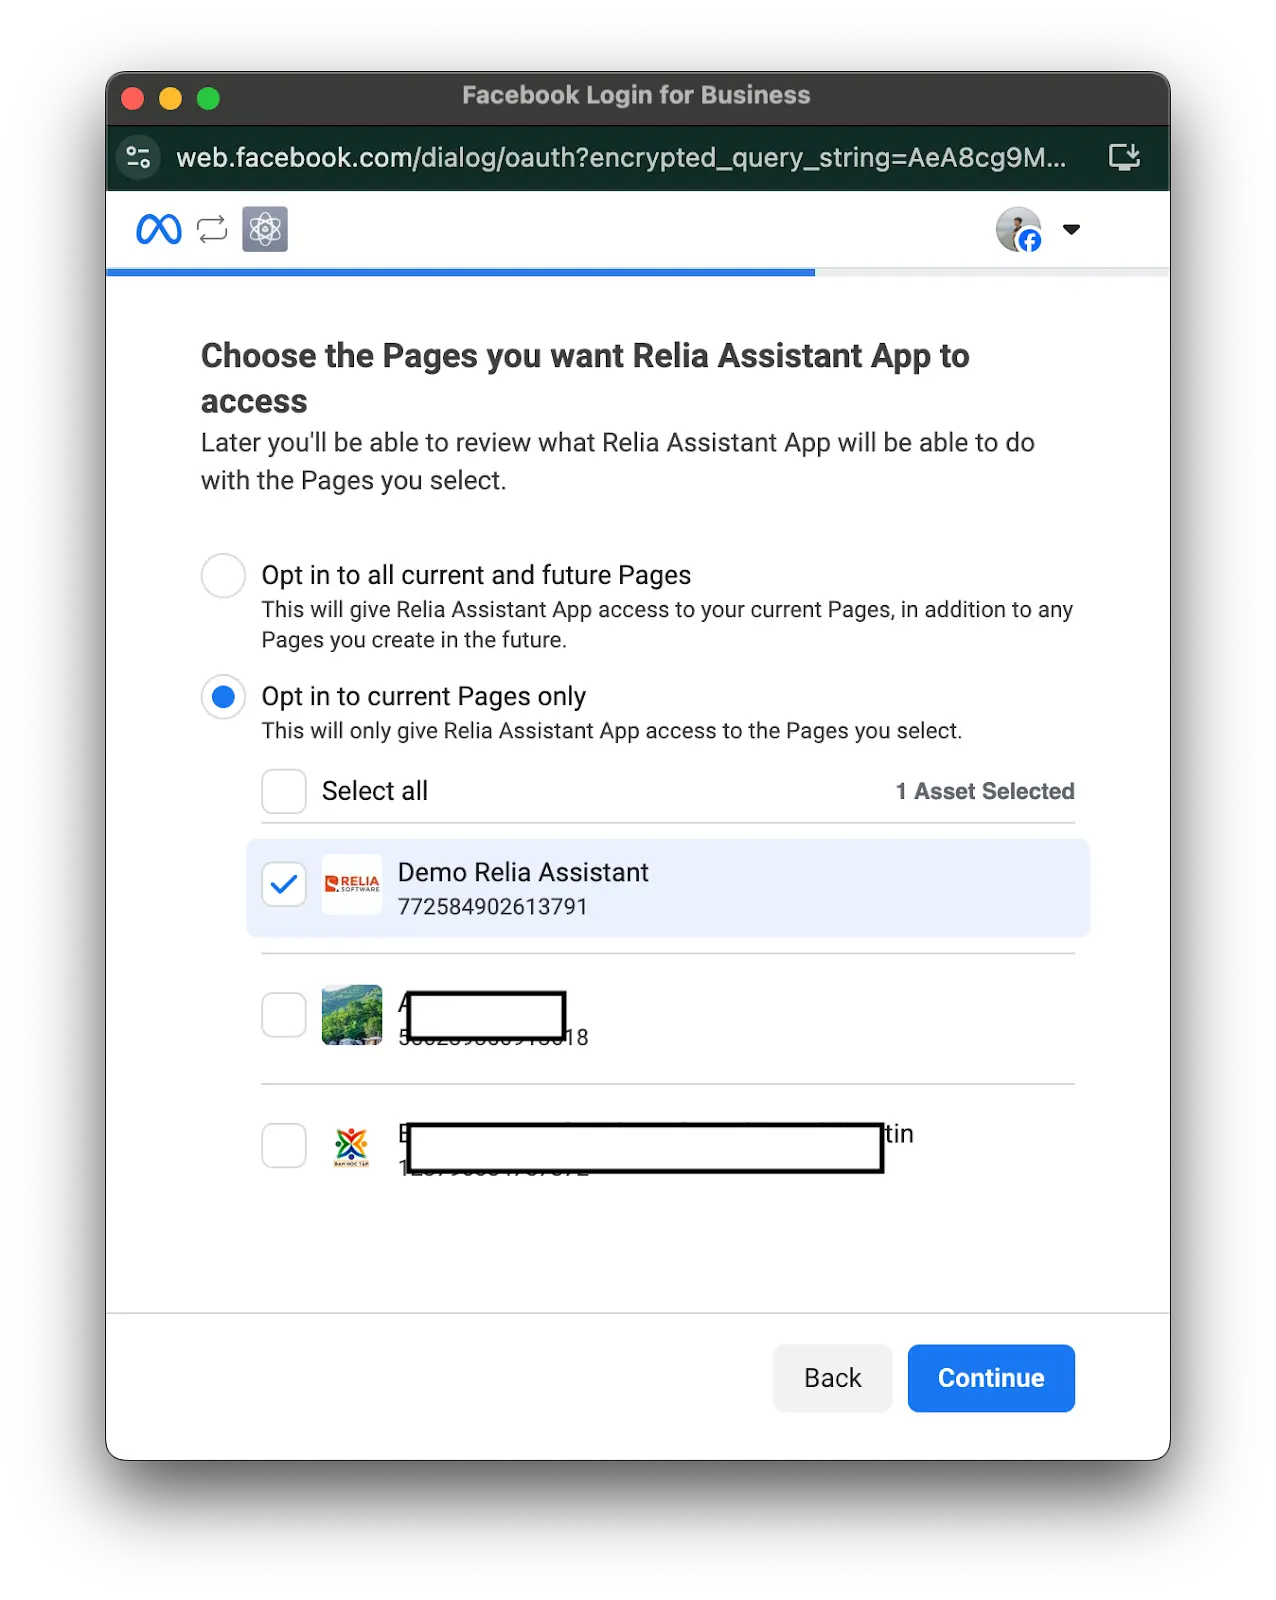
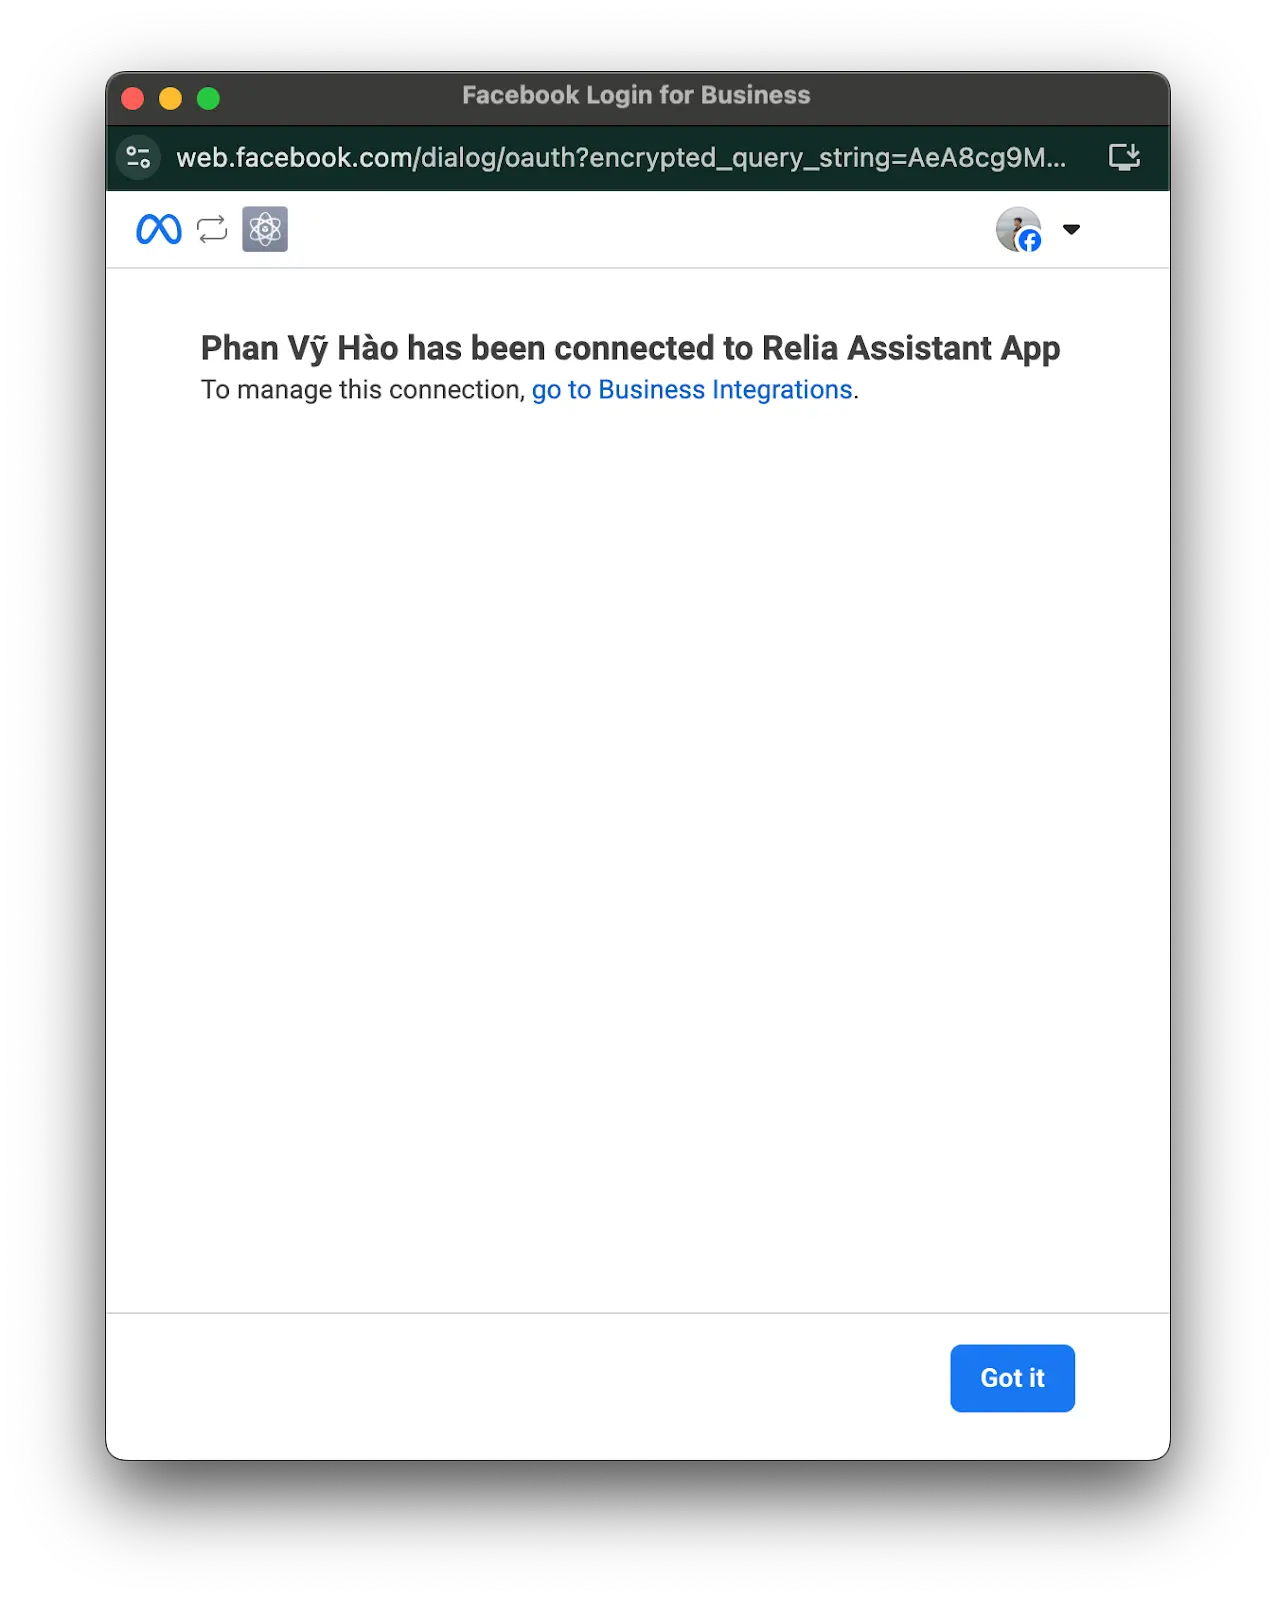
If you see this message, it would mean that you have connected to your page successfully.
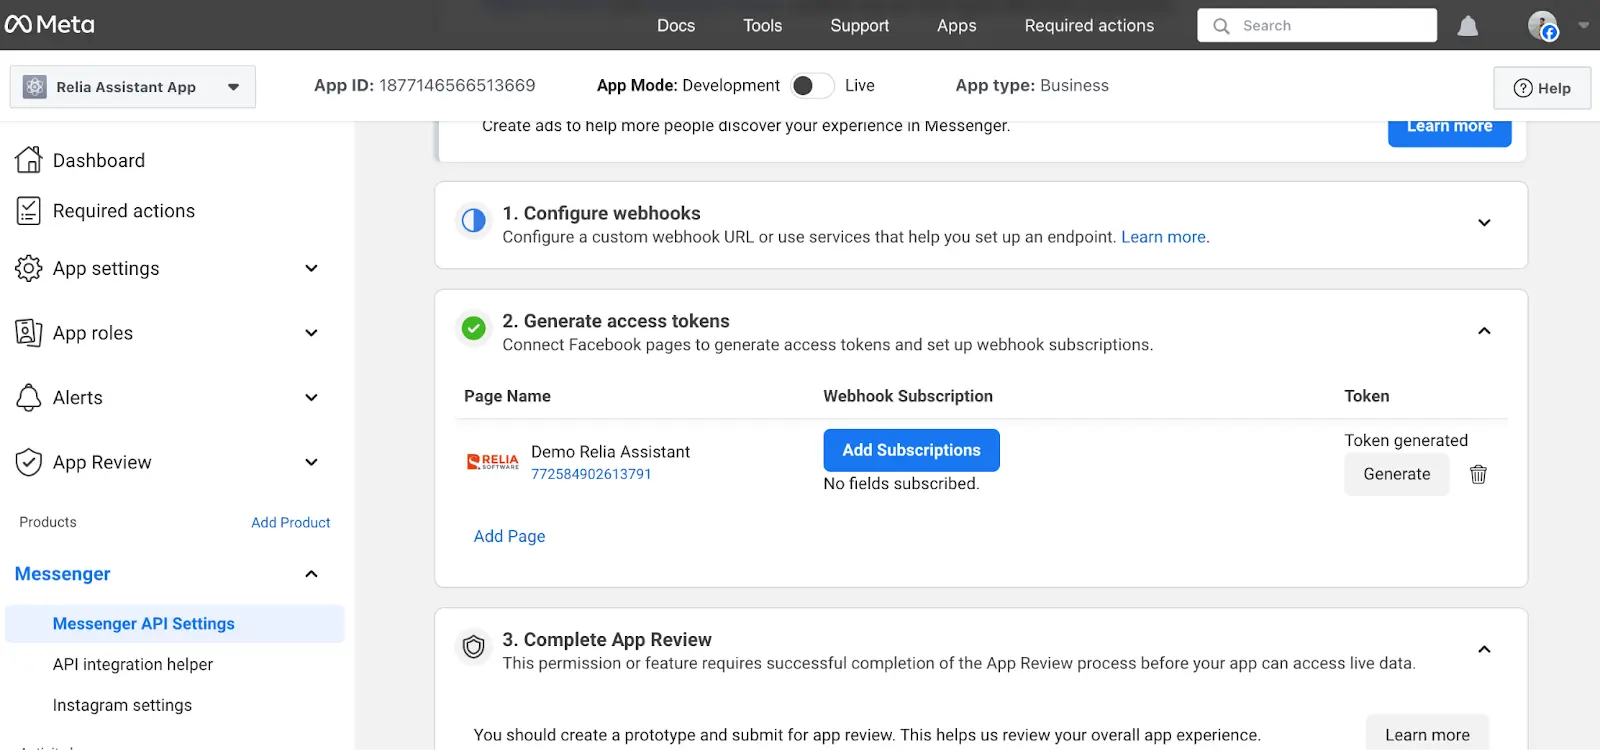
Back to the page Messenger API settings, now you can see that this app has connected with the page Demo Relia Assistant. We will do more with it later. For now you have completed this setup successfully.
Setup the project
Go to your favorite IDE and create a new project.
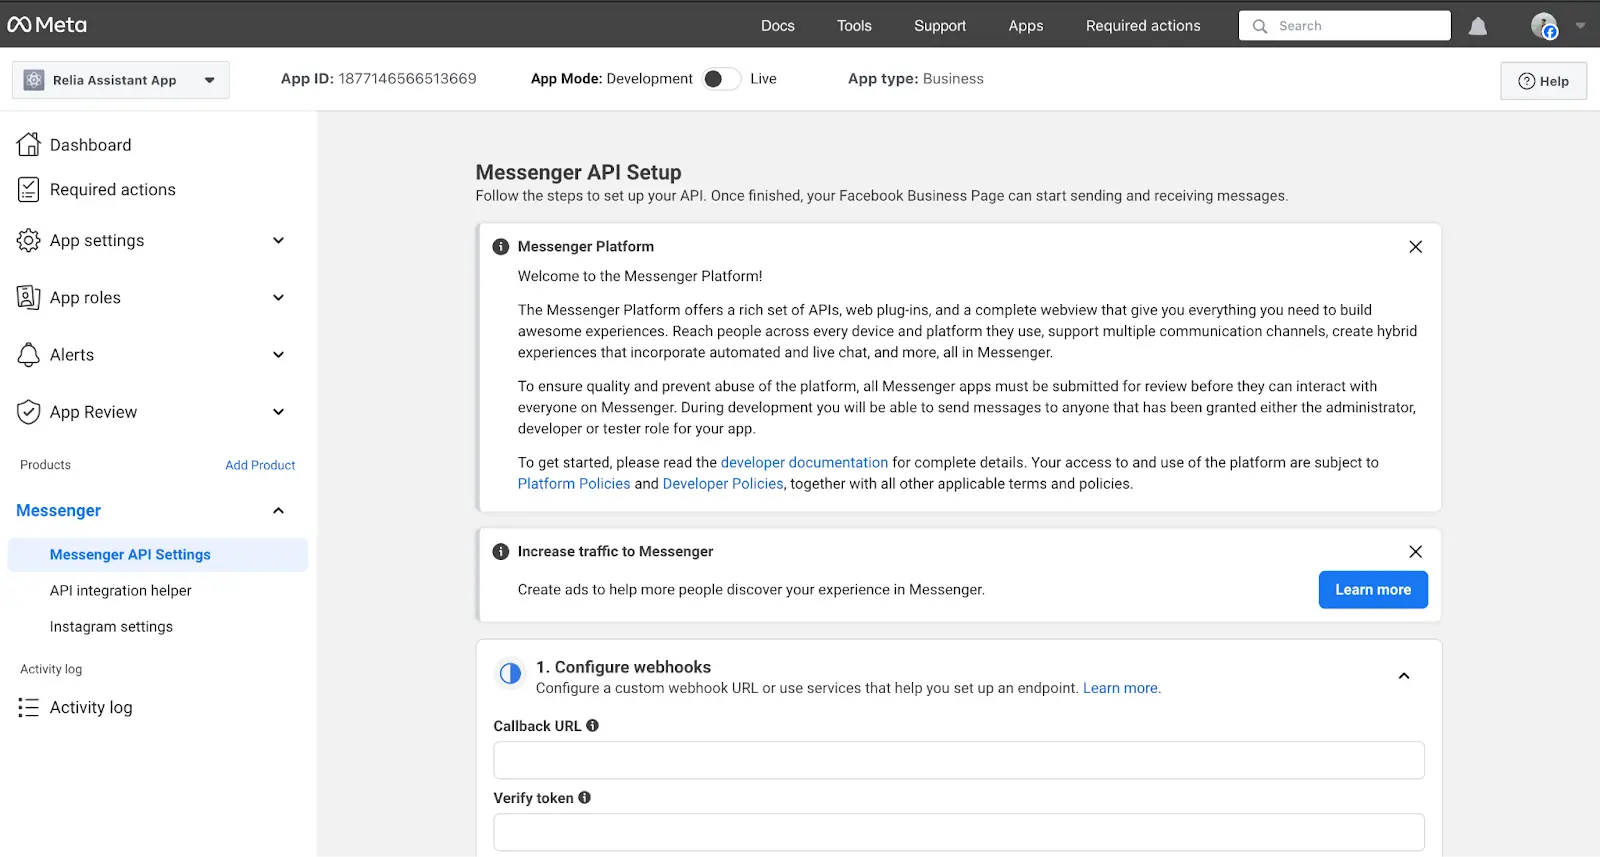
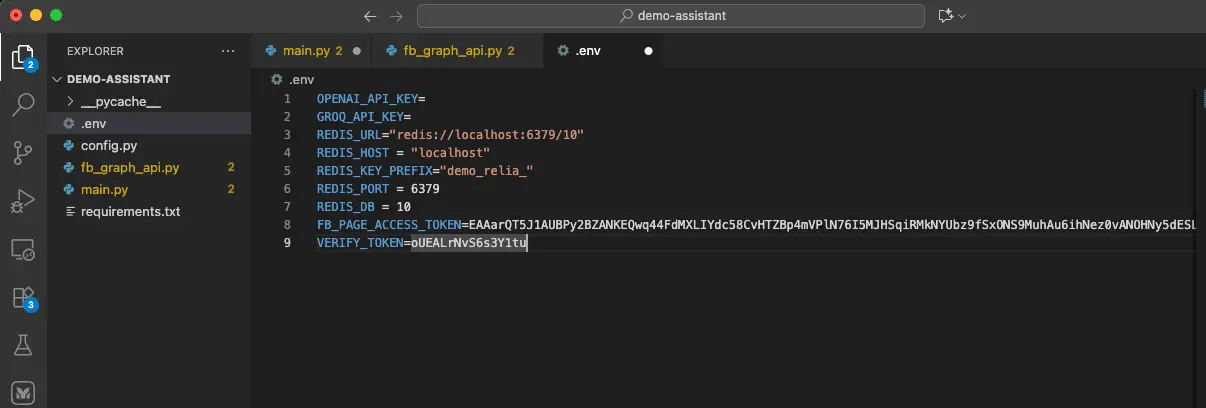
First, we need to set up some environment variables and verify tokens. Therefore, create a file named .env and put some variables.
OPENAI_API_KEY=
REDIS_URL="redis://localhost:6379/10"
REDIS_HOST = "localhost"
REDIS_KEY_PREFIX="demo_relia_"
REDIS_PORT = 6379
REDIS_DB = 10
FB_PAGE_ACCESS_TOKEN=
VERIFY_TOKEN=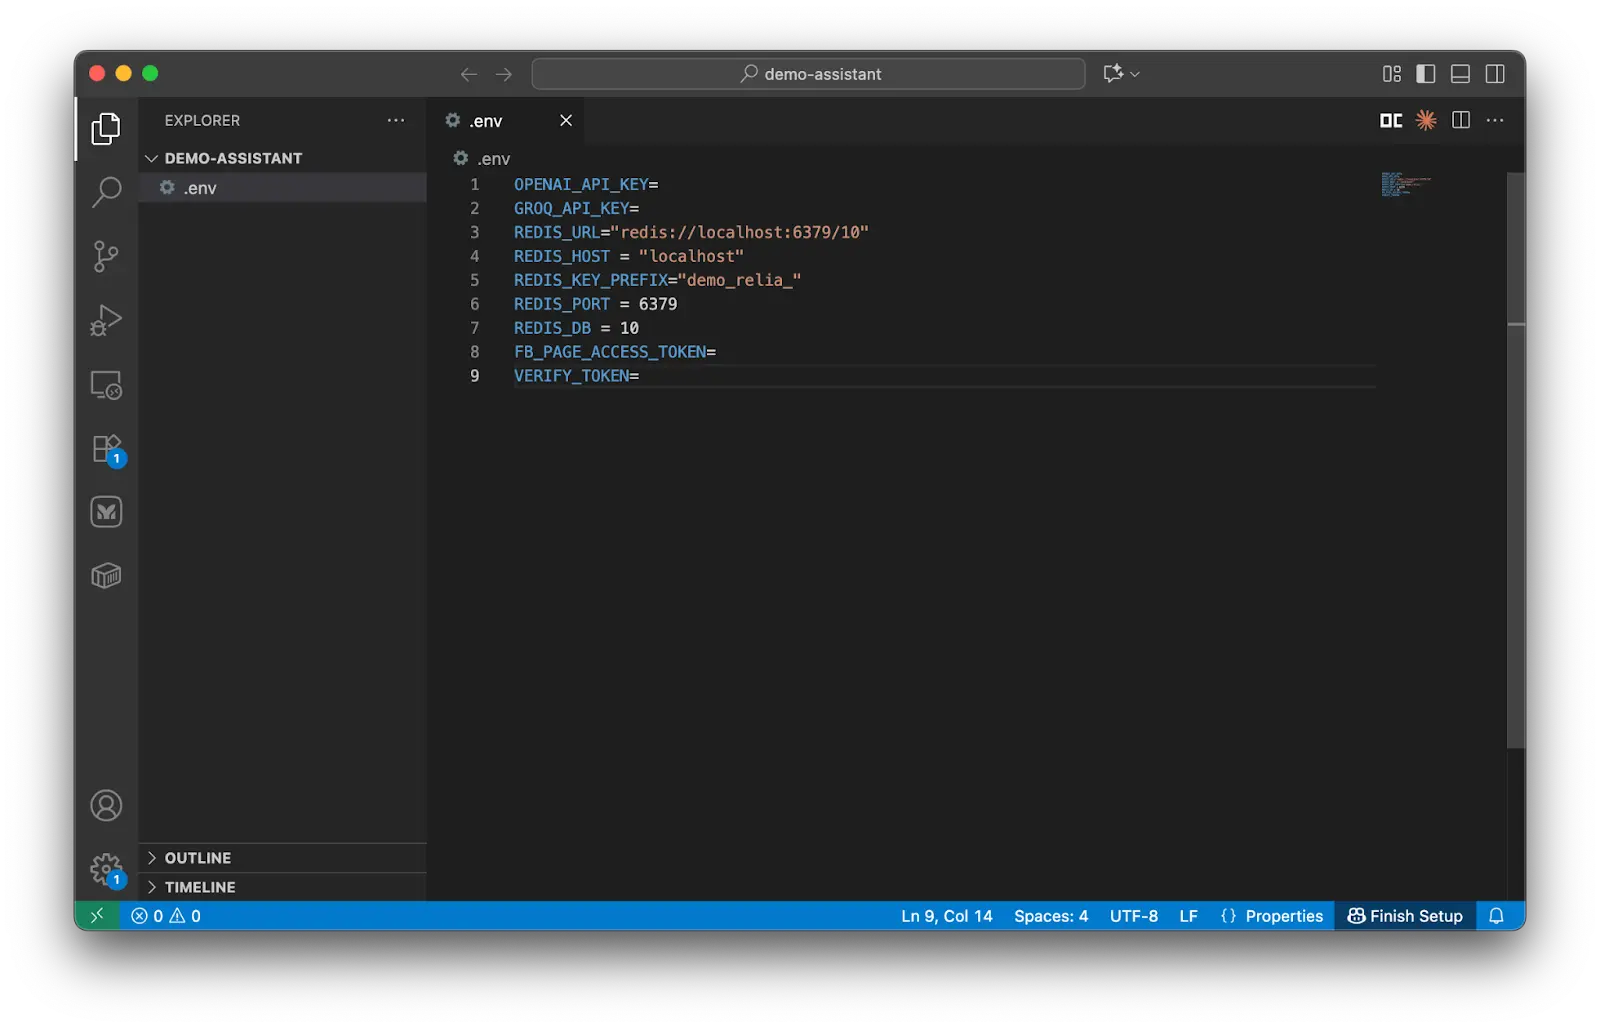
The first two lines hold the secret key for OpenAI, which we set up earlier. Lines 3-7 are where we define the Redis server's config and the channels we'll be connecting to.
The last two lines of the file are all about the Facebook Developer platform. To get our app and Facebook talking, we need two things: the Access Token, which Facebook gives us, and, the verification token, which we create ourselves and then hand over to Facebook. I'll show you how to grab and handle these tokens later.
Now we need to generate a random string as the verification token. For example:
VERIFY_TOKEN=my_generated_tokens_for_relia_app
VERIFY_TOKEN=PPyrRsD5T4CBtjUv
VERIFY_TOKEN=abcdef
Meta webhooks:
Basically, the Messenger service works using the webhook. Whenever someone sends a message to your Facebook Page, a webhook is automatically triggered to send a notification to the app to tell that the Facebook page has received a new message.
Once your app receives a notification, it can process the data and send a reply back to the user within 24 hours.
So, to successfully interact with the users with this Messenger Webhooks, implement the following steps:
- Set up a Python Flask server with an endpoint to receive and process webhook notifications.
- Configure Messenger Webhooks in the Meta App Dashboard.
- Subscribe our Facebook Page ("Demo Relia Assistant") to the webhook to begin sending and receiving messages.
Build your Flask server
Because Python is really popular and familiar with most of the developers all around the world, we are going to use Python and Flask to build the backend server.
Firstly, we need to gather the necessary Python libraries and packages in a file, and create a new separate Python environment for running this project. This helps reduce the environment size, better control all the environment configurations, and error handling.
Create a new text file requirements.txt to store these packages.
annotated-types==0.6.0
anyio==4.2.0
blinker==1.7.0
certifi==2024.2.2
charset-normalizer==3.3.2
click==8.1.7
distro==1.9.0
dnspython==2.5.0
exceptiongroup==1.2.0
Flask==3.0.2
h11==0.14.0
httpcore==1.0.2
httpx==0.26.0
idna==3.6
itsdangerous==2.1.2
Jinja2==3.1.3
loguru >=0.7.2
MarkupSafe==2.1.5
openai>=1.61.0
redis>=5.0.1
python-dotenv>=1.0.0
requests==2.31.0
sniffio==1.3.0
tqdm==4.66.2
typing_extensions>=4.9.0
urllib3==2.2.0
Werkzeug==3.0.1
langchain >=0.2.0
langchain-community >=0.0.38
sse-starlette >=2.1.0
pydantic >=2.0.0
loguru >=0.7.2
litellm ==1.51.0
uuid7==0.1.0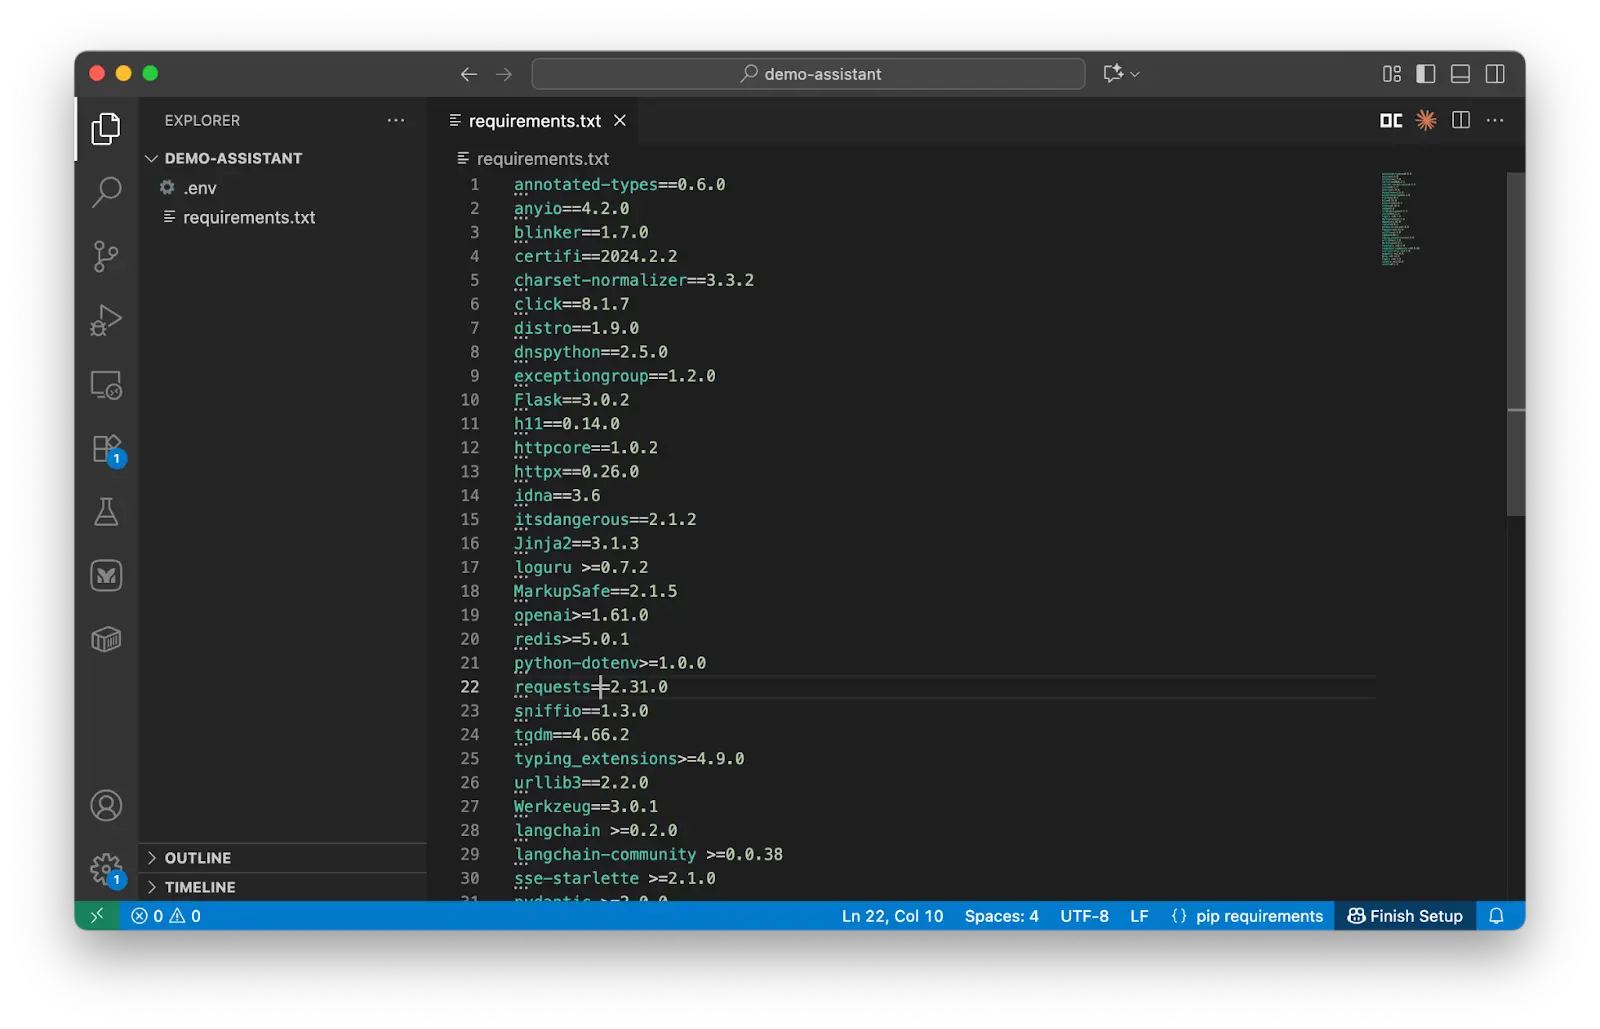
Open a new terminal and run the following command to set up a new environment.
conda create -n my_demo_env python=3.12 -yIf you do not have Conda in the system, use the following:
python -m venv my_demo_env
Wait until it finishes setting up the environment.
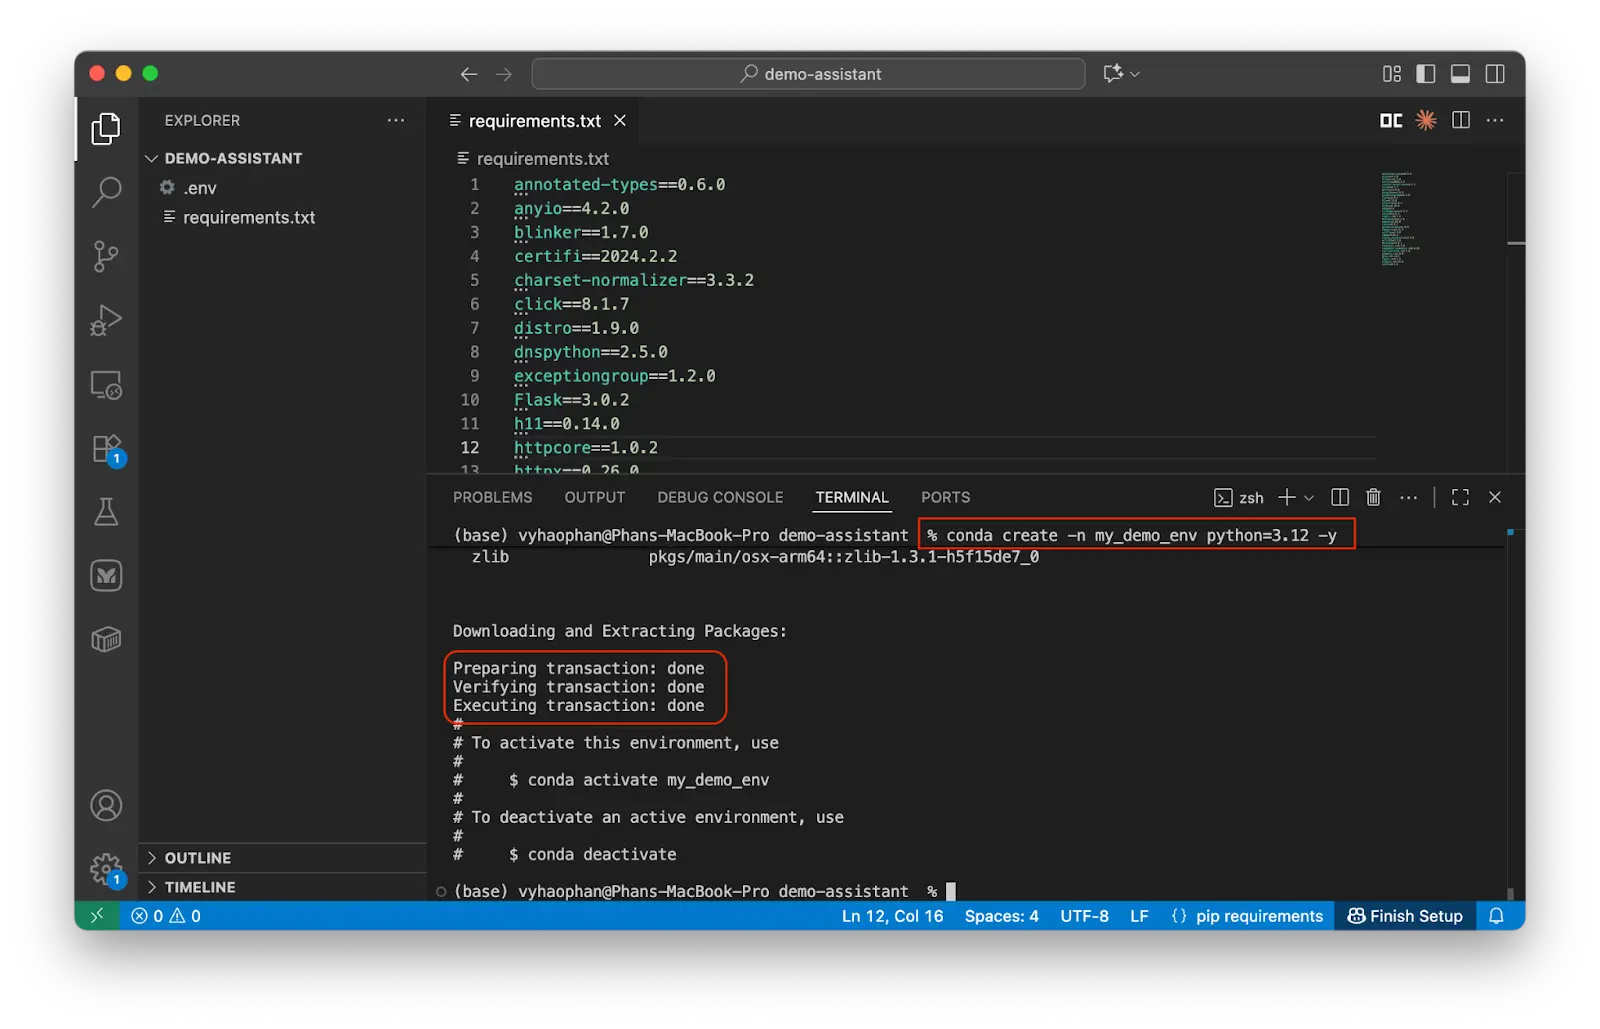
Now activate this new environment and install the necessary information.
conda activate my_demo_env (if you use conda)


or


my_demo_env\Scripts\activate
source my_demo_env/bin/activate (Mac or Linux)
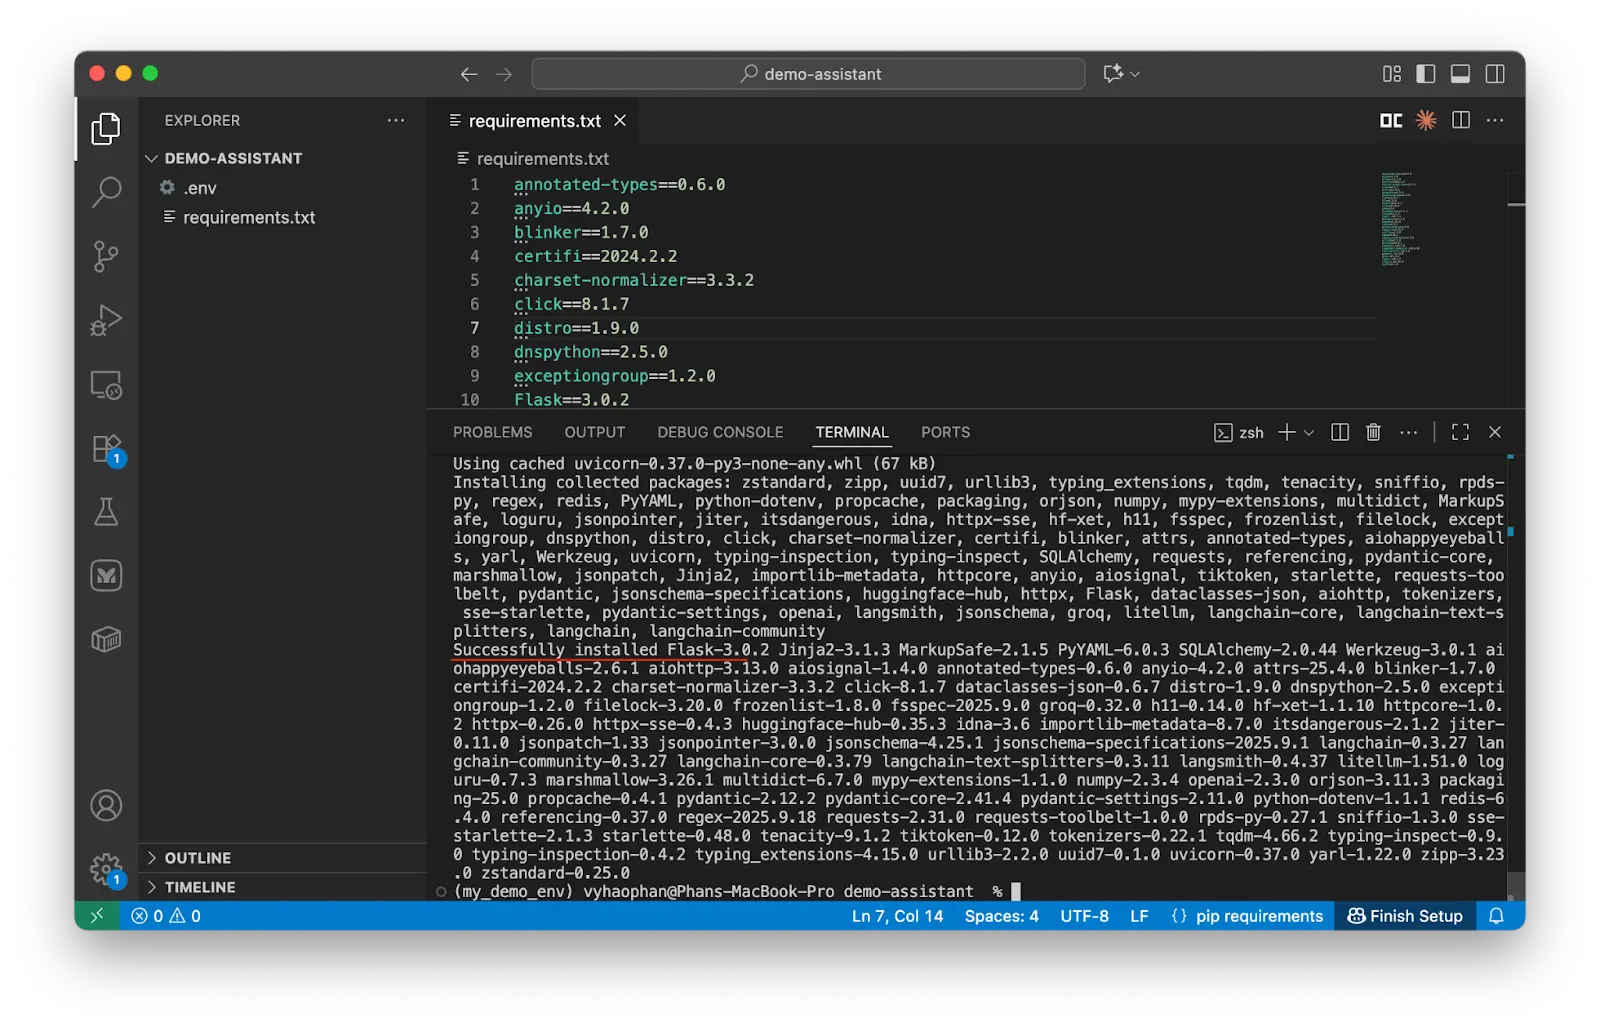
Then install the packages with the following command.
pip install -r requirements.txt
Now you have successfully got a complete environment.
We'll create a new file, config.py, to keep all our constant values in one place. In a project, you often use the same constant variables over and over again in different spots and files. Putting them all together makes it much easier to manage and change them whenever we need to.
import os
from dotenv import load_dotenv, find_dotenv
import redis
load_dotenv(find_dotenv())


# API Keys and tokens
OPENAI_API_KEY = os.getenv('OPENAI_API_KEY')
FB_PAGE_ACCESS_TOKEN = os.getenv('FB_PAGE_ACCESS_TOKEN')
VERIFY_TOKEN = os.getenv('VERIFY_TOKEN')


# Redis configuration
REDIS_URL = os.getenv('REDIS_URL')
redis_client = redis.StrictRedis.from_url(REDIS_URL)
# Default error message
ERROR_MESSAGE = 'We are facing an issue at this moment, please try again later.'
# Facebook Messenger character limit
MESSAGE_LIMIT = 2000
# LLM Models
DEFAULT_MODEL = "openai/gpt-4o-mini"
SEARCH_MODEL = "openai/gpt-4o-mini-search-preview"


# Model parameters
MODEL_PARAMETERS = {
    "max_tokens": 4000,
    "temperature": 0.7,
    "top_p": 1,
    "presence_penalty": 0,
    "seed": 20
}


# Memory configuration
CHATBOT_MEMORY_CONFIG = {
    'key_prefix': os.getenv("REDIS_KEY_PREFIX"),
    'url': os.getenv("REDIS_URL"),
    'host': os.getenv("REDIS_HOST"),
    'port': os.getenv("REDIS_PORT"),
    'db': os.getenv("REDIS_DB", 10),
}


# Session configuration
SESSION_EXPIRY_HOURS = 24
MAX_MESSAGES_PER_SESSION = 50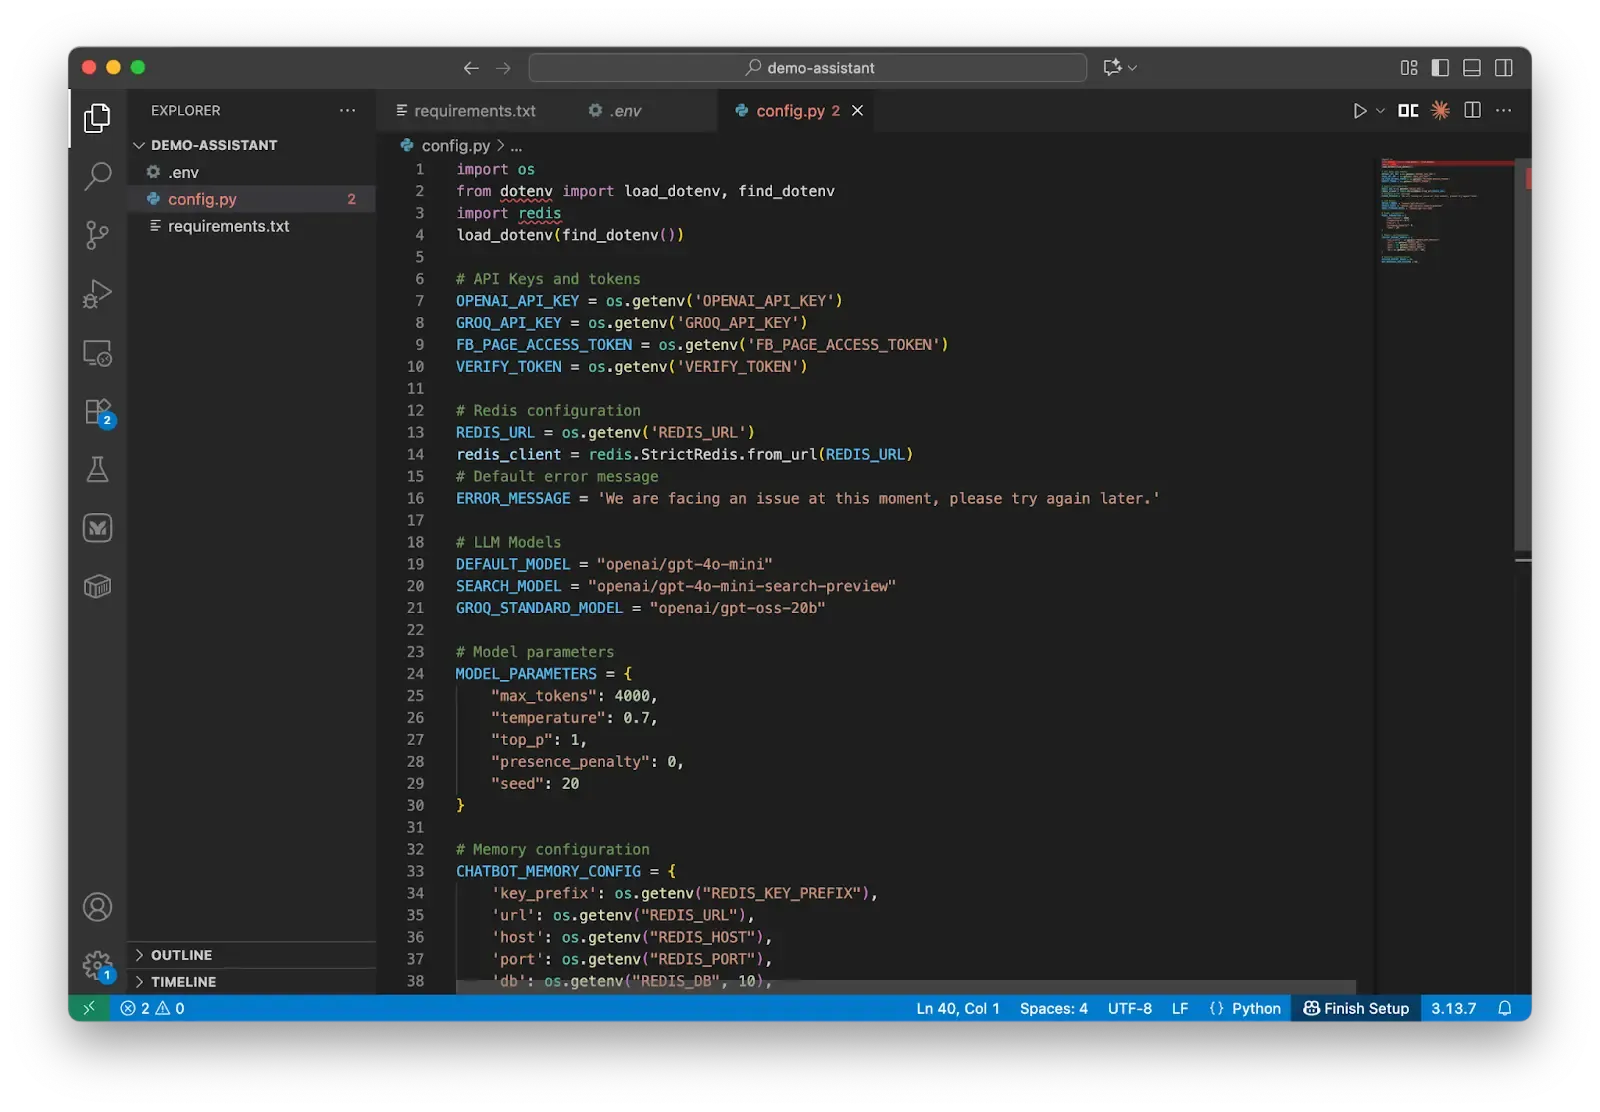
You might be wondering about a lot of new variables here which you are not familiar with.
- From line 7 to line 10, there are the secret keys of the LLMs models OpenAI
OPENAI_API_KEYand also the secret token which will be used for communication between the app and Messenger serviceFB_PAGE_ACCESS_TOKENandVERIFY_TOKEN. - At lines 13-14, we set up a client to connect to Redis with the Redis URL.
- The default apology message is also defined at line 16 which you can modify to have an apology message of your preferences.
- The message’s number of characters is set to two thousand characters (due to Facebook policy)
- The next 3 variables are the default LLM models which will be used by our services OpenAI.
- The variable
MODEL_PARAMETERShelps define the combination of model parameters. These are always used in LLM calls several times. - The last 3 variables are for using the Redis to manage the memory and the expiration time of the conversations.
Manage the sessions
We are going to add some new functions which help organize and manage the conversation sessions between the app and the Page.
First, we need to design how the session system is and how it works and how it helps the applications interact with the users. Here we use Redis as a key:value storage to store the conversation history for a lot of different users.
When a user starts messaging the Page, we get their user ID and create a conversation key with this ID and their current chatting date which is always unique for all time. We use this key for at maximum 1 day to keep track of the users’ conversations and help support their requests. If my user ID were ‘1234-1234’, and I chatted on the day 2025 January 1st, my conversation key would be “conversation:1234-1234:2025-01-01”.
One question you might have is why we are using the date to generate the key? If all the history records are stored forever in Redis, the management cost will be extremely high due to the Redis pricing. Therefore, for this demo, we are storing the conversation history in Redis and letting the conversations expire after 24 hours, which saves setup time and redis cost. This is the reason we are using the date in the conversation key name.
Now let’s add a new block of code.
# config.py
from datetime import timedelta, datetime
from uuid_extensions import uuid7
from loguru import logger
# Session management functions
def create_session_id():
    """
    Create a new unique session ID.

    Returns:
        str: The new session ID
    """
    session_id = str(uuid7())
    logger.success(f"Created session successfully with id: {session_id}")
    return session_id


def get_conversation_key(user_id):
    """
    Get the Redis key for a user's conversation.

    Args:
        user_id: The Facebook user ID

    Returns:
        str: The Redis key for the conversation
    """
    return f"conversation:{user_id}:{datetime.now().strftime('%Y_%m_%d')}"
Now we have had two new functions. UUID version 7 is used to generate a new session ID. This version is naturally time-based and sorted, which is my favorite Python package for generating IDs. The function get_conversation_key() helps create a conversation key with the user ID and the current day.
# config.py
import json
def create_or_get_session_id(user_id):
    """
    Get an existing session ID or create a new one if it doesn't exist.

    Args:
        user_id: The Facebook user ID

    Returns:
        tuple: (session_id, conversation_id)
    """
    conversation_key = get_conversation_key(user_id)

    # Try to get existing session
    conversation_data = redis_client.hgetall(conversation_key)

    if conversation_data and b'session_id' in conversation_data:
        session_id = conversation_data[b'session_id'].decode('utf-8')
        logger.info(f"Retrieved existing session: {session_id} for user: {user_id}")
    else:
        # Create new session
        session_id = create_session_id()

        # Initialize conversation data
        conversation_data = {
            'session_id': session_id,
            'user_id': user_id,
            'created_at': str(datetime.now()),
            'last_message_time': str(datetime.now()),
            'messages': json.dumps([]),
            'message_count': '0'
        }
        # Store in Redis with expiration
        redis_client.hmset(conversation_key, conversation_data)
        redis_client.expire(conversation_key, timedelta(hours=SESSION_EXPIRY_HOURS))

        logger.success(f"Created new session: {session_id} for user: {user_id}")

    return session_id, conversation_key


def get_conversation_info(conversation_key):
    """
    Get conversation metadata.

    Args:
        conversation_key: The Redis key for the conversation

    Returns:
        dict: Conversation metadata
    """
    try:
        data = redis_client.hgetall(conversation_key)
        if data:
            return {k.decode('utf-8'): v.decode('utf-8') for k, v in data.items()}
        return {}
    except Exception as e:
        logger.error(f"Error retrieving conversation info: {e}")
        return {}
The create_or_get_session_id function is responsible for the following:
- Verifying if the user has an existing session with the Assistant.
- If a session exists, retrieving the corresponding session ID and associated conversation data.
- Otherwise, generating a new session ID and creating a new session record. This record includes the session ID, User ID, two timestamp fields (
created_atandlast_message_time), amessagesfield (a list of conversation messages between users and the chatbot), and amessage_countfield (initialized to 0) to track conversation length. - This session record is then saved to Redis memory. As the record is a dictionary (a key-value pair), the
hmsetcommand is used to store a hash (a key-value map) in Redis under the keyconversation_key. The.expire()command sets an expiration time for the key, ensuring its deletion after a specified period to conserve Redis space.
The function get_conversation_info helps retrieve the conversation data quickly using the conversation ID. What it returns is the dictionary of all the active session items of that conversation.
Manage the session messages
Now we will set up some functions to help us add and manage the session messages.
# config.py
def store_message(conversation_key, role, content):
    """
    Store a message in the conversation.

    Args:
        conversation_key: The Redis key for the conversation
        role: The role of the message sender ('user' or 'assistant')
        content: The message content
    """
    try:
        # Get current messages
        messages_json = redis_client.hget(conversation_key, 'messages')
        if messages_json:
            messages = json.loads(messages_json.decode('utf-8'))
        else:
            messages = []

        # Add new message
        new_message = {
            'role': role,
            'content': content,
            'timestamp': str(datetime.now())
        }
        messages.append(new_message)

        # Keep only last MAX_MESSAGES_PER_SESSION messages
        if len(messages) > MAX_MESSAGES_PER_SESSION:
            messages = messages[-MAX_MESSAGES_PER_SESSION:]

        # Update Redis
        redis_client.hset(conversation_key, 'messages', json.dumps(messages))
        redis_client.hset(conversation_key, 'last_message_time', str(datetime.now()))
        redis_client.hset(conversation_key, 'message_count', str(len(messages)))
        redis_client.expire(conversation_key, timedelta(hours=SESSION_EXPIRY_HOURS))

        logger.info(f"Stored {role} message in conversation: {conversation_key}")

    except Exception as e:
        logger.error(f"Error storing message: {e}")
This function saves a chat message (from either the user or the assistant) into a Redis conversation record, while keeping the history trimmed and up-to-date.
Firstly, it gets the messages list from Redis with the conversation ID. These messages are stored as Json objects in Redis. If they are found, they are converted into Python lists.
A new message dict is created with the input content from users, the role (user or assistant), and the timestamp at creation time. It is added to the messages list and the list is trimmed to ensure its length does not exceed our defined parameter MAX_MESSAGES_PER_SESSION.
The whole conversation is then updated to redis. Lastly, we print to the console the announcement of successful message storage or log anything wrong.
def get_conversation_messages(conversation_key, limit=10):
    """
    Get recent messages from the conversation.

    Args:
        conversation_key: The Redis key for the conversation
        limit: Maximum number of messages to retrieve

    Returns:
        list: List of message dictionaries
    """
    try:
        messages_json = redis_client.hget(conversation_key, 'messages')
        if messages_json:
            messages = json.loads(messages_json.decode('utf-8'))
            return messages[-limit:] if limit else messages
        return []
    except Exception as e:
        logger.error(f"Error retrieving messages: {e}")
        return []
This function get_conversation_messages() contains a part of the above function. This helps get a limit number of latest messages in the conversation data.
def delete_conversation(user_id):
    """
    Delete a user's conversation.

    Args:
        user_id: The Facebook user ID
    """
    conversation_key = get_conversation_key(user_id)
    redis_client.delete(conversation_key)
    logger.info(f"Deleted conversation for user: {user_id}")
Another necessary function is this delete_conversation. It helps remove the conversation key and its items from Redis.
Now you have successfully completed the first necessary file used for setting up the server. The complete code of file config.py is as follows.
# config.py
import os
from dotenv import load_dotenv, find_dotenv
import redis
import json
from datetime import timedelta, datetime
from uuid_extensions import uuid7
from loguru import logger
load_dotenv(find_dotenv())


# API Keys and tokens
OPENAI_API_KEY = os.getenv('OPENAI_API_KEY')
FB_PAGE_ACCESS_TOKEN = os.getenv('FB_PAGE_ACCESS_TOKEN')
VERIFY_TOKEN = os.getenv('VERIFY_TOKEN')


# Redis configuration
REDIS_URL = os.getenv('REDIS_URL')
redis_client = redis.StrictRedis.from_url(REDIS_URL)
# Default error message
ERROR_MESSAGE = 'We are facing an issue at this moment, please try again later.'


# LLM Models
DEFAULT_MODEL = "openai/gpt-4o-mini"
SEARCH_MODEL = "openai/gpt-4o-mini-search-preview"


# Model parameters
MODEL_PARAMETERS = {
    "max_tokens": 4000,
    "temperature": 0.7,
    "top_p": 1,
    "presence_penalty": 0,
    "seed": 20
}


# Memory configuration
CHATBOT_MEMORY_CONFIG = {
    'key_prefix': os.getenv("REDIS_KEY_PREFIX"),
    'url': os.getenv("REDIS_URL"),
    'host': os.getenv("REDIS_HOST"),
    'port': os.getenv("REDIS_PORT"),
    'db': os.getenv("REDIS_DB", 10),
}


# Session configuration
SESSION_EXPIRY_HOURS = 24
MAX_MESSAGES_PER_SESSION = 50


# Session management functions
def create_session_id():
    """
    Create a new unique session ID.

    Returns:
        str: The new session ID
    """
    session_id = str(uuid7())
    logger.success(f"Created session successfully with id: {session_id}")
    return session_id


def get_conversation_key(user_id):
    """
    Get the Redis key for a user's conversation.

    Args:
        user_id: The Facebook user ID

    Returns:
        str: The Redis key for the conversation
    """
    return f"conversation:{user_id}:{datetime.now().strftime('%Y_%m_%d')}"


def create_or_get_session_id(user_id):
    """
    Get an existing session ID or create a new one if it doesn't exist.

    Args:
        user_id: The Facebook user ID

    Returns:
        tuple: (session_id, conversation_id)
    """
    conversation_key = get_conversation_key(user_id)

    # Try to get existing session
    conversation_data = redis_client.hgetall(conversation_key)

    if conversation_data and b'session_id' in conversation_data:
        session_id = conversation_data[b'session_id'].decode('utf-8')
        logger.info(f"Retrieved existing session: {session_id} for user: {user_id}")
    else:
        # Create new session
        session_id = create_session_id()

        # Initialize conversation data
        conversation_data = {
            'session_id': session_id,
            'user_id': user_id,
            'created_at': str(datetime.now()),
            'last_message_time': str(datetime.now()),
            'messages': json.dumps([]),
            'message_count': '0'
        }

        # Store in Redis with expiration
        redis_client.hmset(conversation_key, conversation_data)
        redis_client.expire(conversation_key, timedelta(hours=SESSION_EXPIRY_HOURS))

        logger.success(f"Created new session: {session_id} for user: {user_id}")

    return session_id, conversation_key


def get_conversation_info(conversation_key):
    """
    Get conversation metadata.

    Args:
        conversation_key: The Redis key for the conversation

    Returns:
        dict: Conversation metadata
    """
    try:
        data = redis_client.hgetall(conversation_key)
        if data:
            return {k.decode('utf-8'): v.decode('utf-8') for k, v in data.items()}
        return {}
    except Exception as e:
        logger.error(f"Error retrieving conversation info: {e}")
        return {}


def store_message(conversation_key, role, content):
    """
    Store a message in the conversation.

    Args:
        conversation_key: The Redis key for the conversation
        role: The role of the message sender ('user' or 'assistant')
        content: The message content
    """
    try:
        # Get current messages
        messages_json = redis_client.hget(conversation_key, 'messages')
        if messages_json:
            messages = json.loads(messages_json.decode('utf-8'))
        else:
            messages = []

        # Add new message
        new_message = {
            'role': role,
            'content': content,
            'timestamp': str(datetime.now())
        }
        messages.append(new_message)

        # Keep only last MAX_MESSAGES_PER_SESSION messages
        if len(messages) > MAX_MESSAGES_PER_SESSION:
            messages = messages[-MAX_MESSAGES_PER_SESSION:]

        # Update Redis
        redis_client.hset(conversation_key, 'messages', json.dumps(messages))
        redis_client.hset(conversation_key, 'last_message_time', str(datetime.now()))
        redis_client.hset(conversation_key, 'message_count', str(len(messages)))
        redis_client.expire(conversation_key, timedelta(hours=SESSION_EXPIRY_HOURS))

        logger.info(f"Stored {role} message in conversation: {conversation_key}")

    except Exception as e:
        logger.error(f"Error storing message: {e}")


def delete_conversation(user_id):
    """
    Delete a user's conversation.

    Args:
        user_id: The Facebook user ID
    """
    conversation_key = get_conversation_key(user_id)
    redis_client.delete(conversation_key)
    logger.info(f"Deleted conversation for user: {user_id}")
Let’s move to the second file.
FastAPI setup
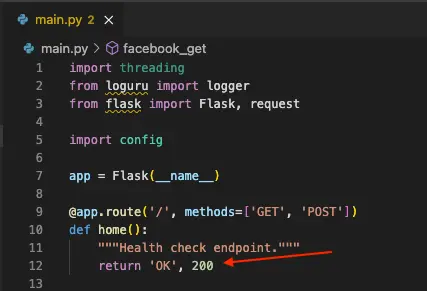
Let’s create a new file named main.py to store the following code.
import threading
from loguru import logger
from flask import Flask, request


import config


app = Flask(__name__)


@app.route('/', methods=['GET', 'POST'])
def home():
    """Health check endpoint."""
    return 'OK', 200
This setup gets you a FastAPI server running Flask to serve the APIs.
Threading and Loguru are imported to help run tasks in separate threads and save logs to the terminal console. The file config.py is also added for later usage with sessions and conversations.
Your very first API here is the root API. For example, if you hosted your server at the URL http://localhost:8000/ then if you access this root URL you will have a string “OK” with a status code 204.
Now create a new API to connect to the Facebook Messenger API.
# main.py
@app.route('/facebook', methods=['GET'])
def facebook_get():
    """Handle Facebook webhook verification."""
    mode = request.args.get('hub.mode')
    token = request.args.get('hub.verify_token')
    challenge = request.args.get('hub.challenge')
    try:
        if mode == 'subscribe' and token == config.VERIFY_TOKEN:
            logger.info('WEBHOOK_VERIFIED')
            return challenge, 200
        else:
            logger.warning(f'Invalid verification token: {token}')
            return 'Invalid verification token', 403
    except Exception as e:
        logger.error(f'Verification error: {str(e)}')
        return 'Verification failed', 403
This GET-type API /facebook is responsible for getting the webhook notifications from Messenger API and extracting the webhook content.
The first 3 lines of the API extract the parameters that the Webhook has sent to us including the mode, verify_token and the challenge (this include the user message from facebook page).
After that, we need to check if the mode is ‘subscribe’ and the messenger Token matches our provided Verify token. If successful, return the challenge content with status code 200. Otherwise, handle the error with error code 403.
Now add the following new code to help serve the FastAPI backend server.
if __name__ == '__main__':
    app.run(debug=True, host='0.0.0.0', port=5001)
Now you have basically set up a Flask server in order to connect to Facebook webhook. Let’s try to connect to the Facebook webhook to see if we were doing the correct things.
Connect and get the Facebook access token
At your project directory, open 2 terminals, activate your virtual environment, then run each of the following commands in each of them.
python main.pyThis function starts the Flask server at the localhost path and we can use it as a backend host which we can use the APIs. The APIs are also used for contacting the Webhook.
ngrok http 5001This code starts the grok service and helps you get a public endpoint which allows other external applications on the Internet to interact with your local developed one.
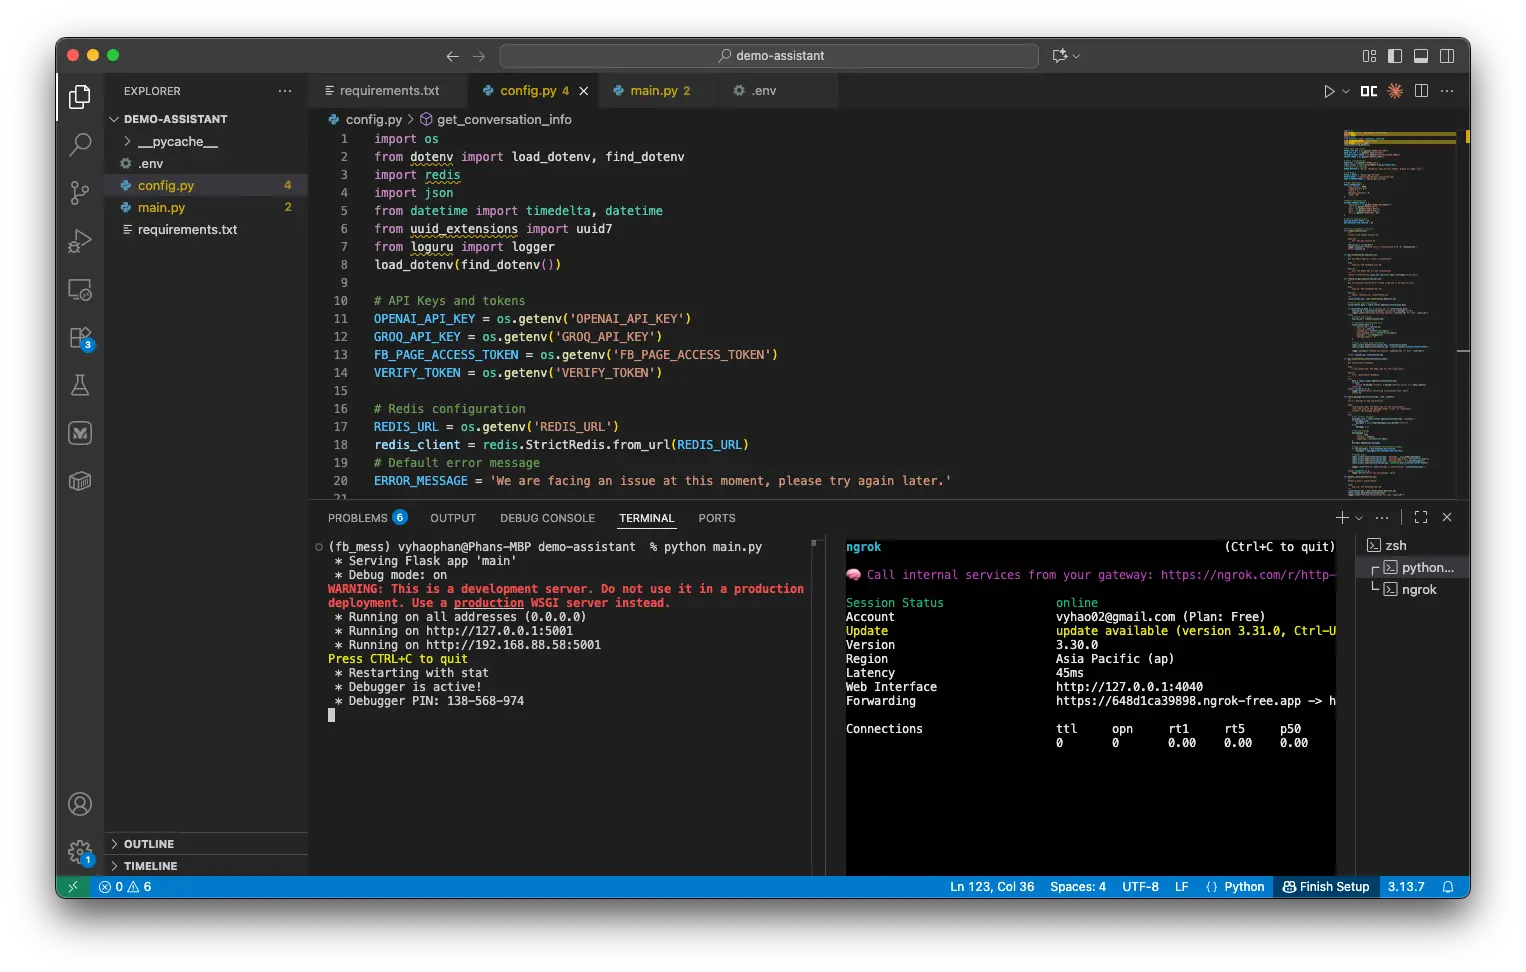
If you run them correctly, you will see a similar screen. The left terminal shows that your Flask APIs are hosted locally at the address http://127.0.0.1:5001, the port is 5001 and the right one provides a public URL pointing to this port and your localhost.
You can get that public endpoint by looking at the row Forwarding. This URL means that whenever there is a request accessing this URL, that request will be forwarded to the port 5001 at your localhost.
Now please click on that forward URL to see what happens.

You will be directed to a page showing you are accessing a URL created by Ngrok service and ask for your confirmation. Because we are using the Free plan of Ngrok, so whenever there is a new access request, this page will be shown.
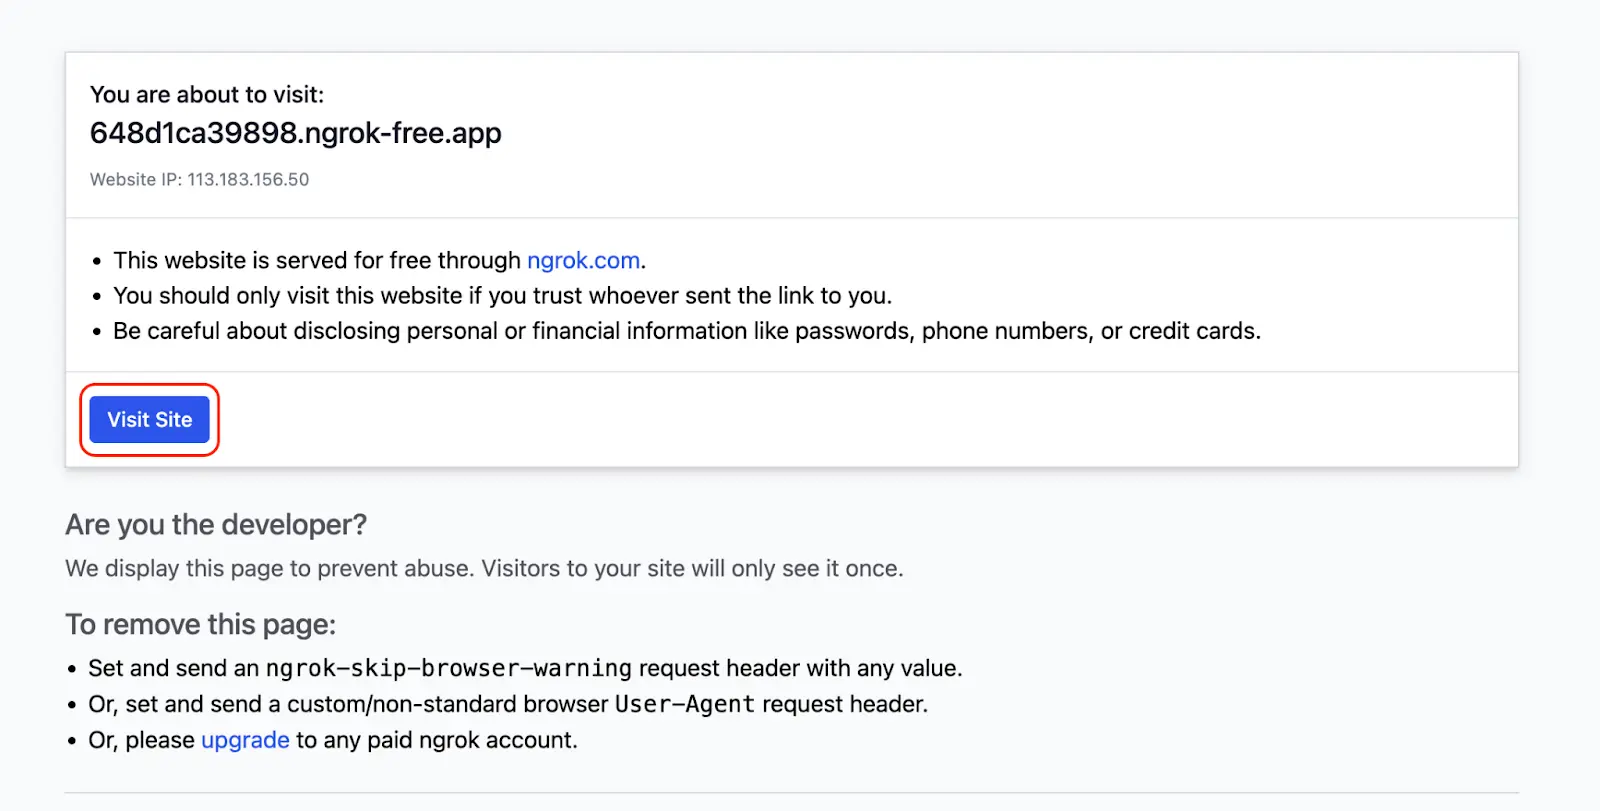
Click on the button ‘Visit Site’ to access your link.
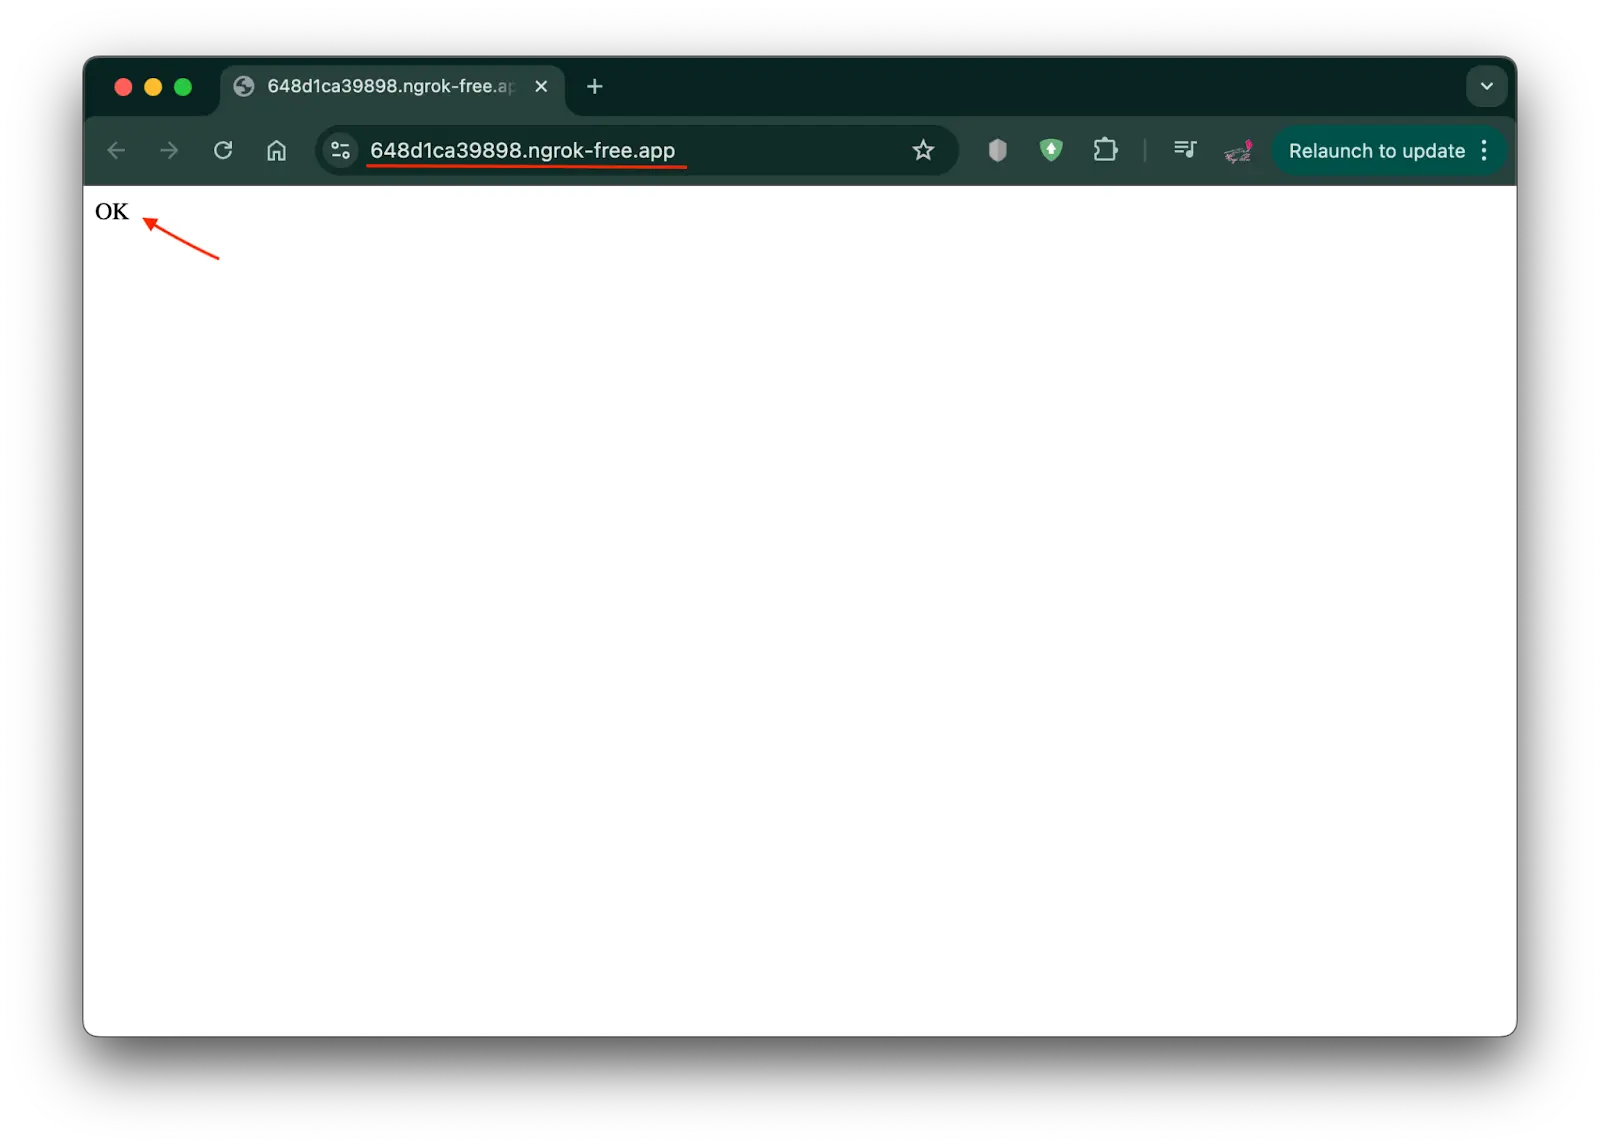
This screen announces that you have visited the page successfully. Here you have got ‘OK’ because previously, you had defined a root API to return a string ‘OK’ with status code 200.
And if you go back to the terminal, you would see there is a new successful request GET as well.
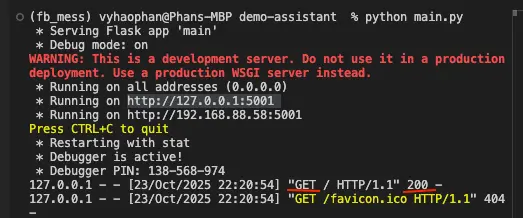
This means you have deployed a FastAPI server successfully, and if someone accesses your public Grok URL, their request is forwarded to your localhost and port 5001. The connection has been established successfully.
Now navigate to the Facebook API dashboard and connect our application to the Messenger webhook.
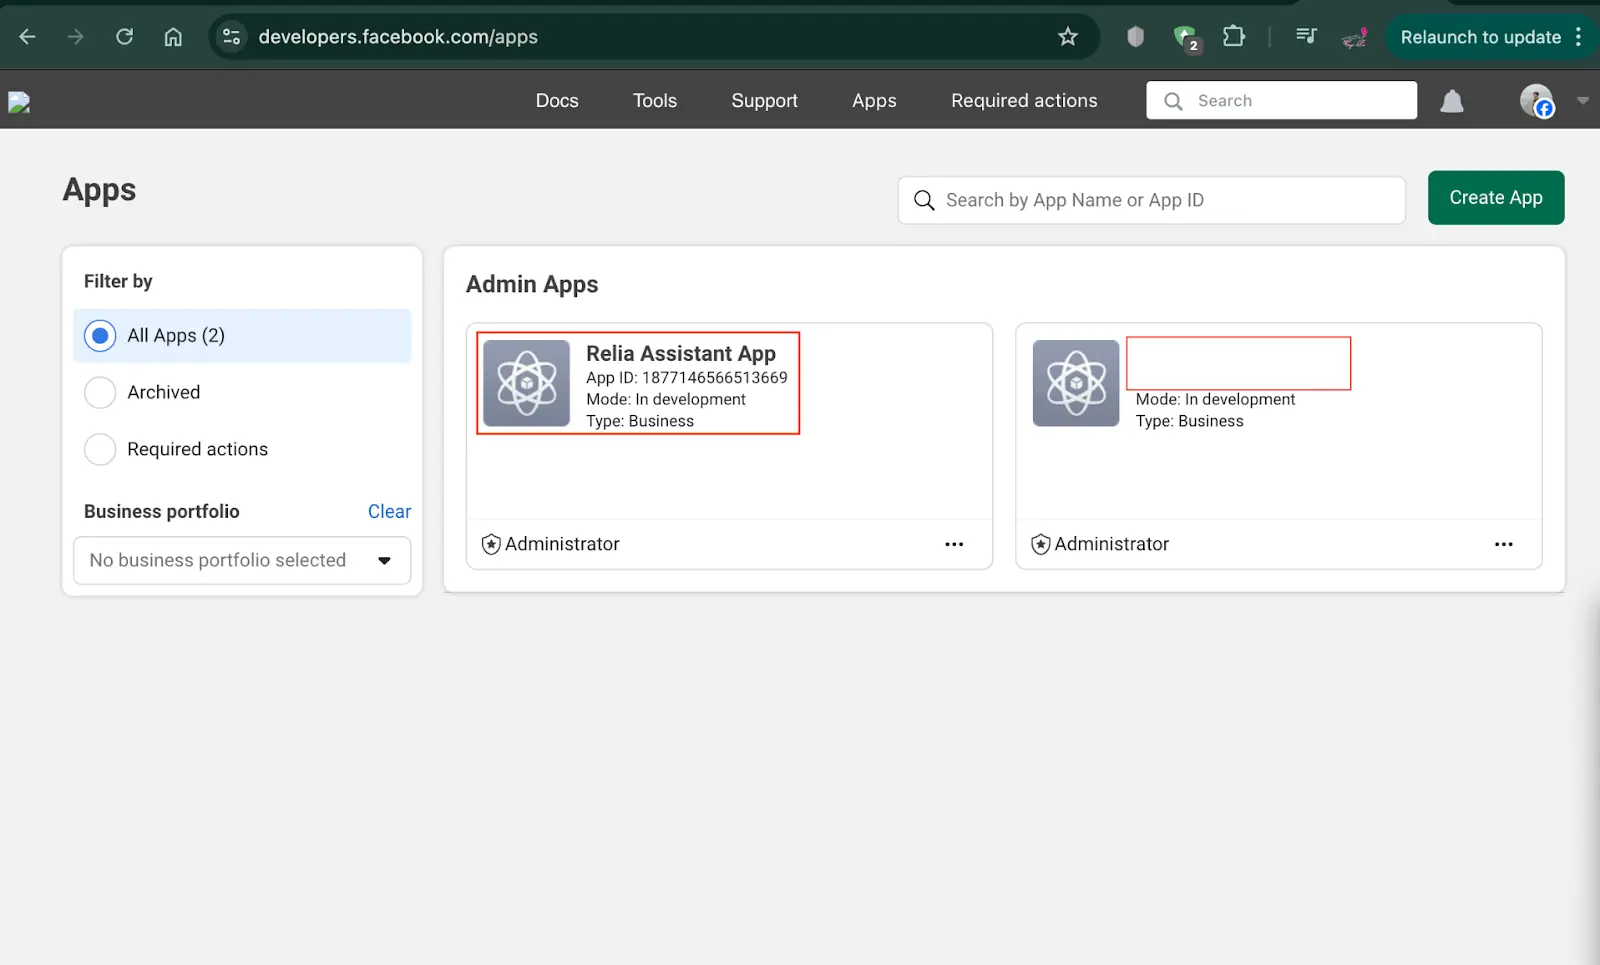
Here you would see the Facebook app that we have created before. Please click on the App that you want. For me, I will click on the app ‘Relia Assistant App’.
When you have entered the App, go to the tab Messenger API Settings. This is the place where your app’s connection to the Page Messenger is managed.
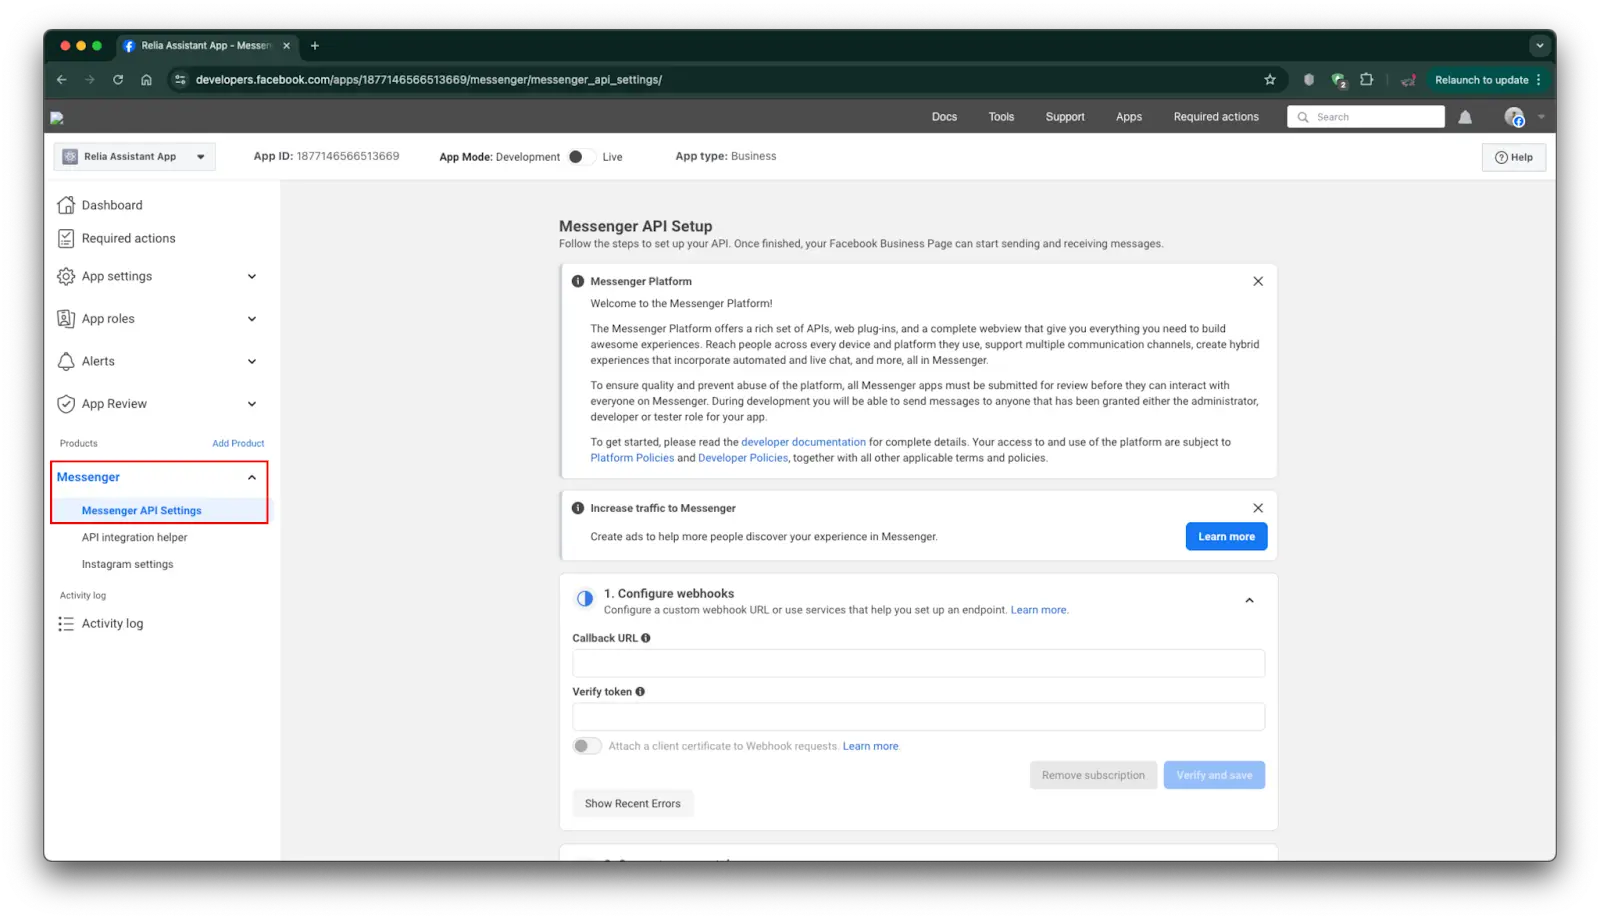
So let’s move on to the main part. To connect our Flask API with the Facebook Webhook, we have to verify the webhook URL. Look at the first section “Configure webhooks”, there are two values that we have to provide.
- Callback URL:
- This is the endpoint GET /facebook that we have defined in the previous section.
- We have to provide a publicly accessible endpoint. Therefore, localhost endpoint is not applicable. The correct thing to do is provide the Grok Forward URL with path /facebook.
- For example, my public endpoint is https://648d1ca39898.ngrok-free.app/. I will provide the endpoint https://648d1ca39898.ngrok-free.app/facebook to the textbox ‘Callback URL’.
- Verify token:
- This is the environment variable
VERIFY_TOKENthat we have put in the environment file previously. - Just paste its value here.
- This is the environment variable
Finally, click on ‘Verify and save’ to validate and establish the connection. After clicking, you may be redirected to another page named Webhooks, it asks for the same parameters, provide again and proceed.
After that, you will get a page to register which webhooks you want to receive or send between the app and Messenger.
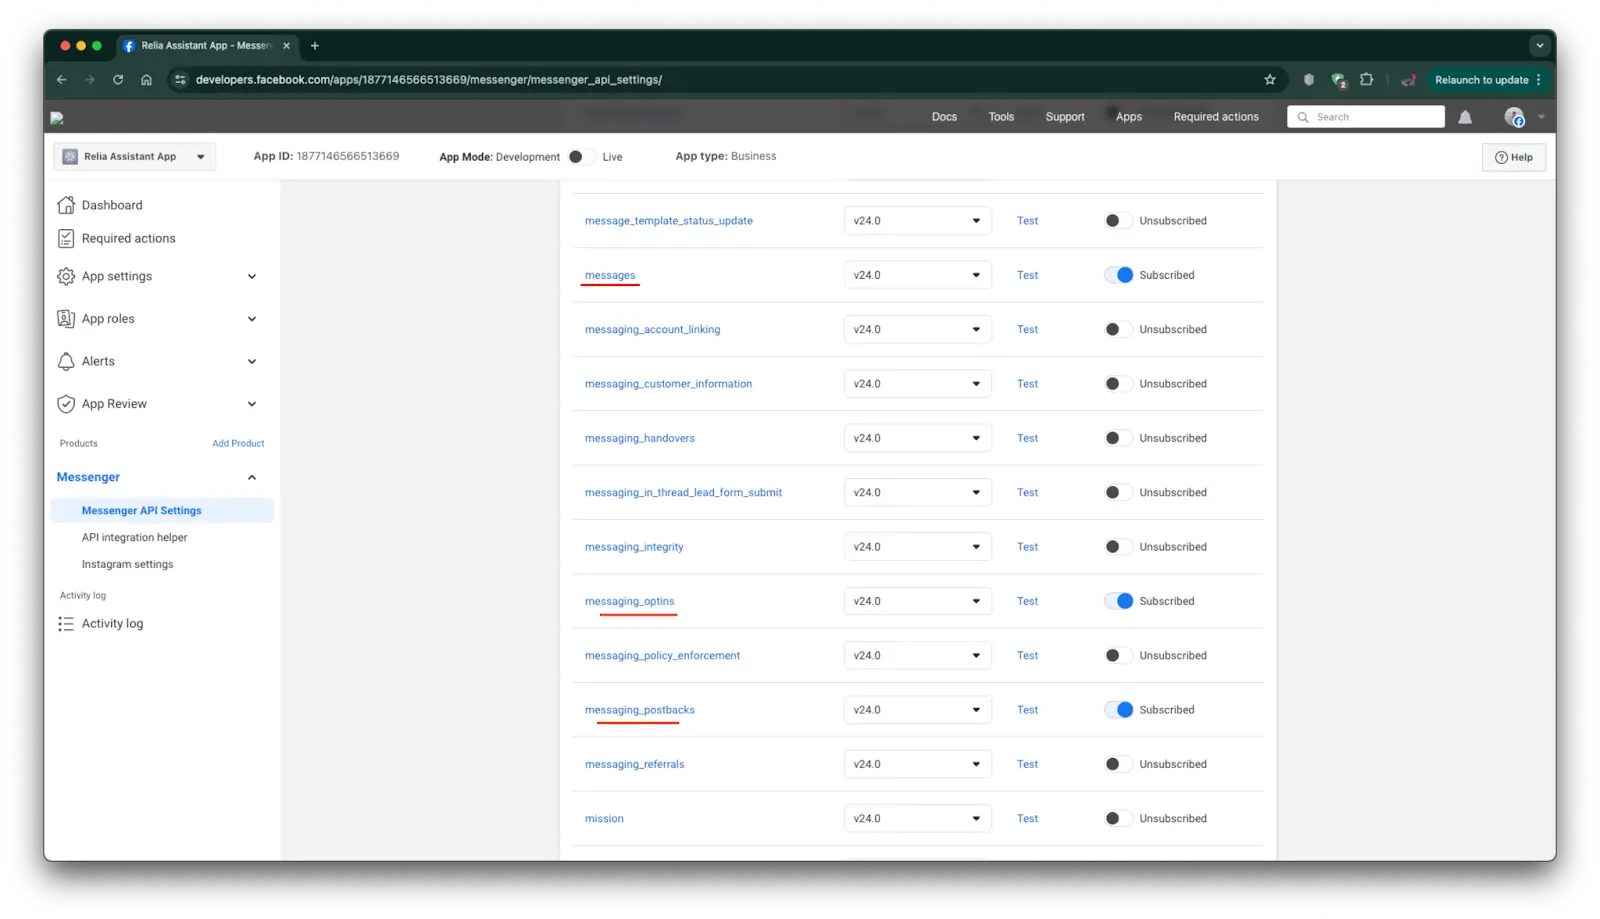
In this demo tutorial, we just need to receive and send messages back to users. Therefore, select these three webhooks and turn them on to subscribe. Then proceed as usual.
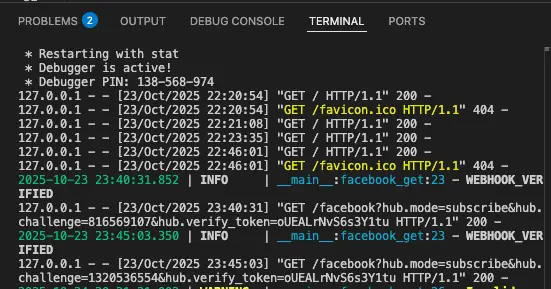
When you come back to your terminal, if you saw some messages similar to my terminal output, this would mean you have connected your app with Messenger API successfully.
Now go back to the Settings page of Messenger API. You would see the first section has been marked done. Continue to the second section.

Let’s click on the button Add Subscription to add which webhooks are going to be transferred.
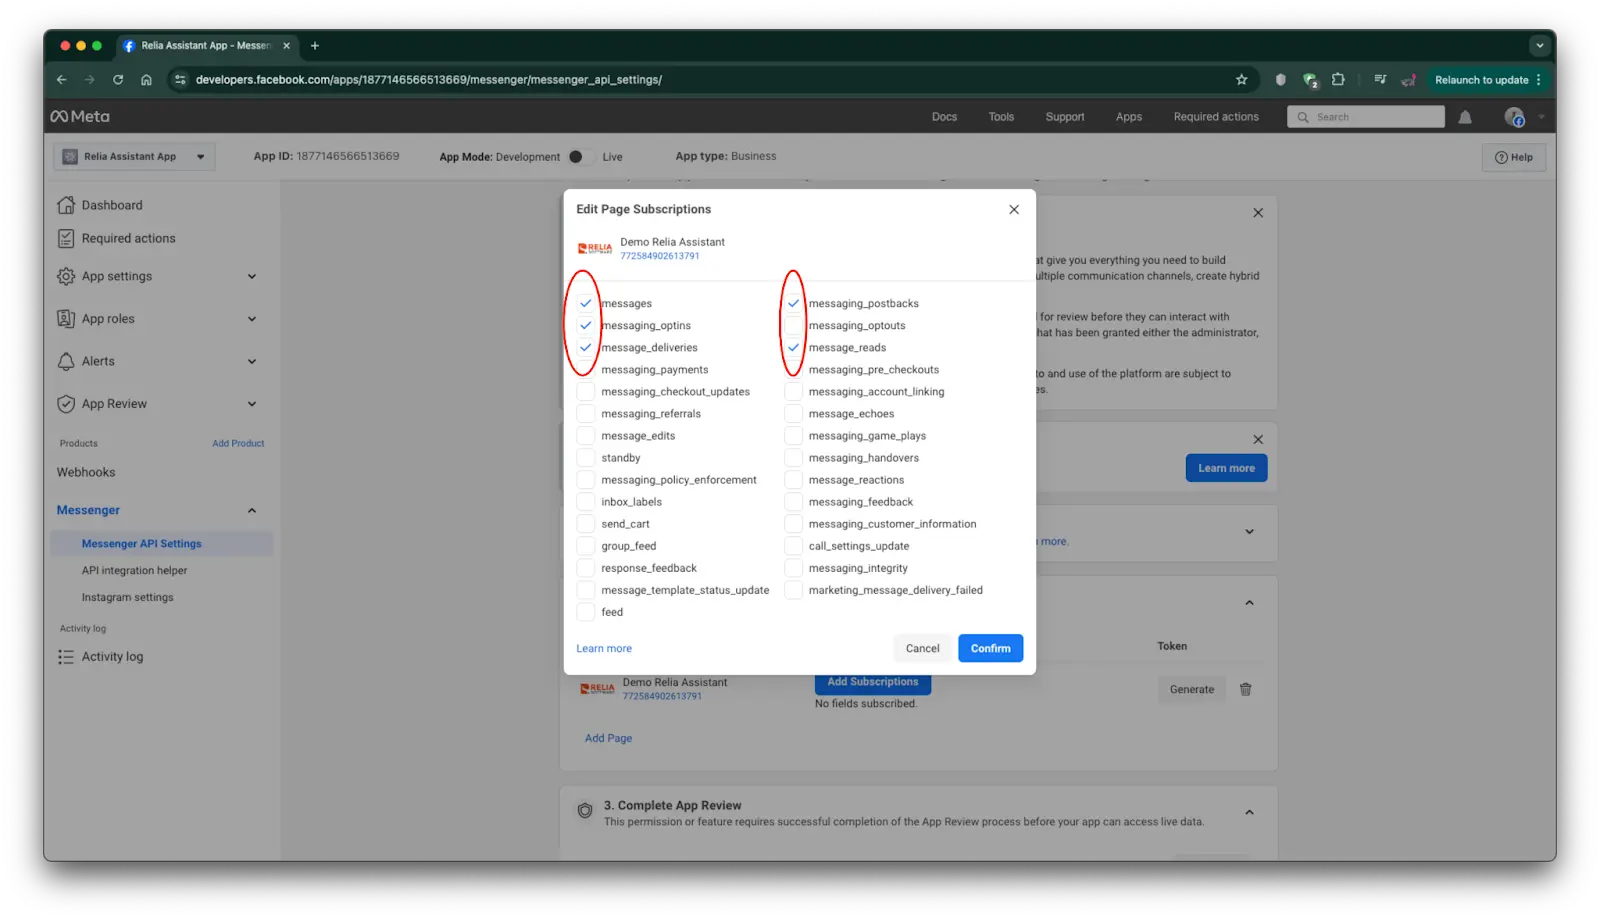
You should select some subscriptions related to Messaging and click on Confirm to proceed.
Now click on Generate to get an access token which will be used in transferring messages between the app and Messenger.
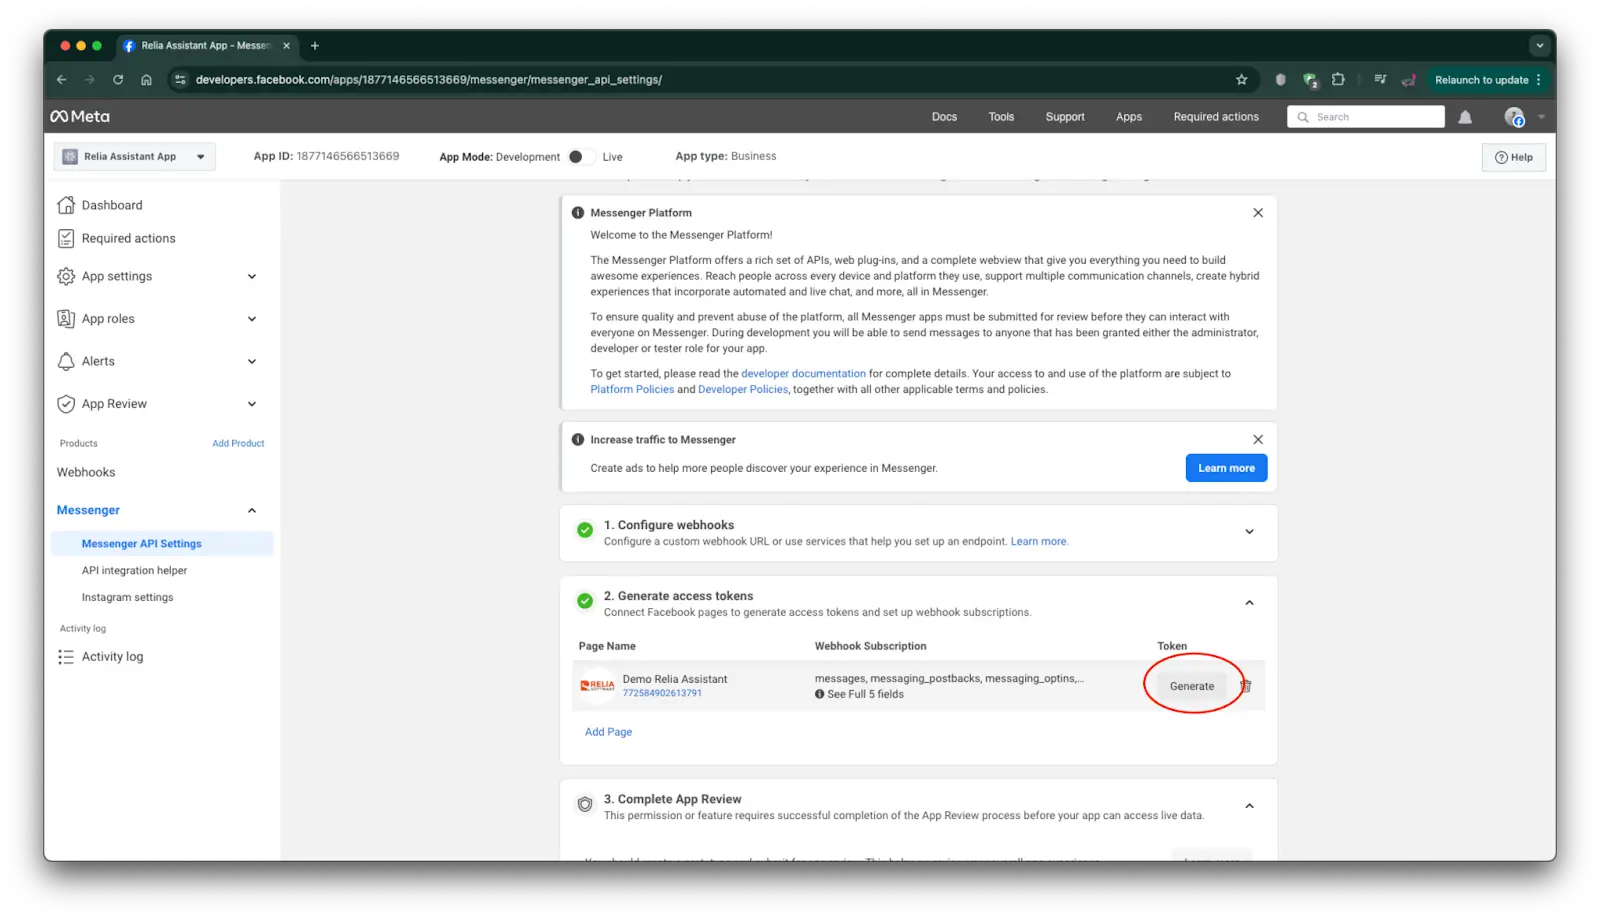
A new top-up shows and asks for your acceptance due to the security reason. Please click on “I understand” and click Copy to copy the Facebook Access Token to your clipboard.
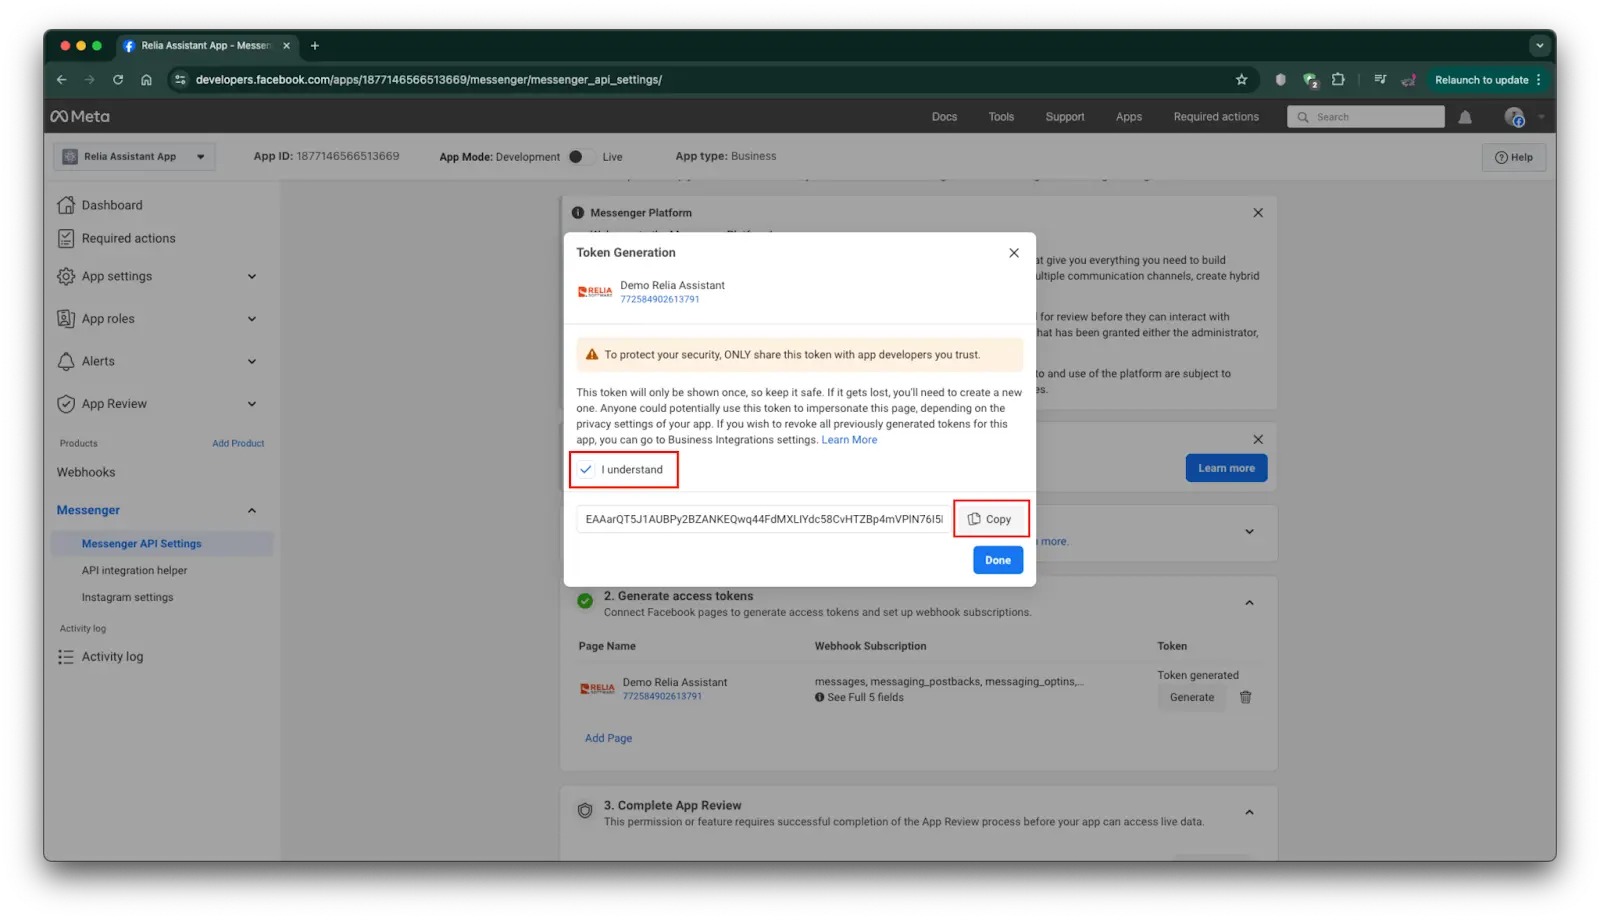
Move to the project and paste the access token at the variable FB_PAGE_ACCESS_TOKEN.
Now you have connected the app and Messenger successfully. We will come back to writing some more code to make the whole workflow complete.
Get and process the user message
Now you have connected successfully. The next step that we should do now is to establish somehow we can get the user message, and send responses to them directly using a few LLM magics.
Create a new file named fb_graph_api.py and put a new function there.
import requests
import json
import time
from loguru import logger
import config


def send_single_message(recipient_id: str, message_text: str) -> bool:
    """
    Send a single message to Facebook Messenger.

    Args:
        recipient_id: The Facebook ID of the message recipient
        message_text: The message content to send

    Returns:
        bool: True if message was sent successfully, False otherwise
    """
    url = f"https://graph.facebook.com/v17.0/me/messages?access_token={config.FB_PAGE_ACCESS_TOKEN}"
    data = {
        "recipient": {"id": recipient_id},
        "message": {"text": message_text}
    }

    try:
        response = requests.post(url, json=data)

        if response.status_code == 200:
            logger.info("Message part sent successfully.")
            return True
        else:
            # Extract error details
            error_detail = ""
            error_json = {}
            try:
                error_json = response.json()
                error_detail = json.dumps(error_json, indent=2)
            except:
                error_detail = response.text

            logger.error(f"Failed to send message. Status code: {response.status_code}")
            logger.error(f"Error details: {error_detail}")

            # Handle common error codes
            if response.status_code == 400:
                if "error" in error_json and "code" in error_json["error"]:
                    code = error_json["error"]["code"]
                    if code == 190:
                        logger.error("Authentication error: Token might be invalid or expired")
                    elif code == 100:
                        logger.error("Parameter error: Check recipient_id format")
                    elif code == 613:
                        logger.error("Message limit reached: Too many messages sent to this recipient")

            return False

    except Exception as e:
        logger.error(f"Exception while sending message: {str(e)}")
        return False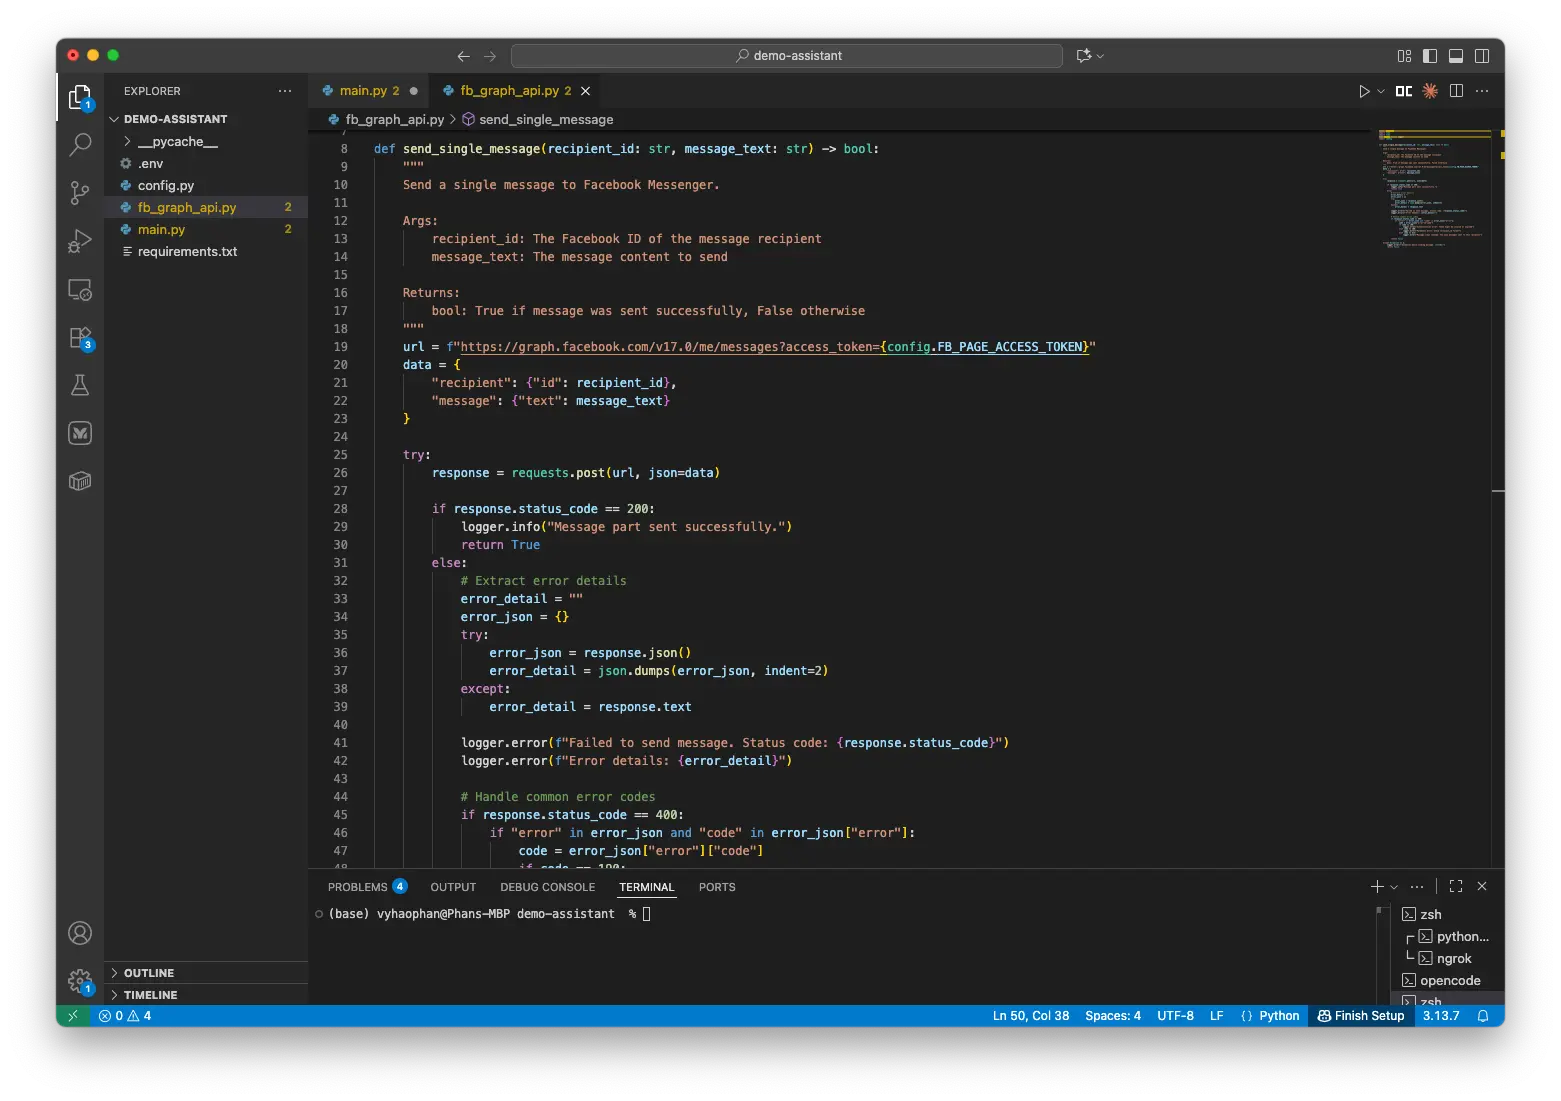
This function shows how we can communicate with the Messenger API.
In terms of the API architecture, Facebook's Graph API is being implemented here. Meta team has delivered the developer tutorials and documentation at this link: https://developers.facebook.com/docs/graph-api/. You can navigate to this site if you want to explore more details about how this Graph architecture works.
Because we are just using the Messaging service from the Meta team, we will focus on this. In order to send and post messages to users, the app needs some following information:
- The correct API endpoint which can be used for conversing with the users. We are using
https://graph.facebook.com/v17.0/{PAGE-ID}/messages?access_token={PAGE-ACCESS-TOKEN}for this app. - The Page Access Token: this is required for authentication and we have got this token in the previous section.
- The Page ID tells you which page is sending the messages. You can use "
/me" as a shortcut if your access token only works for one page. But if your access token covers several pages, you'll need to make sure the Page ID you use specifically matches the page that's actively sending messages. - The recipient ID: The ID of the person receiving responses.
- Finally, we need the message type and the message content.
- Messenger message types include different types (text, audio, button, images, etc.). However, in this demo, we focus on the text type.
- According to the Facebook Guide, we can use some basic Markdown text format (bold, italics, etc.) to send to users.
After having all these parameters, let’s make an HTTP POST request to the Facebook server (line 26 in the image). When receiving the request, Facebook does some verifications including access token validation, permission check (check if the page is allowed to send messages), then it delivers the message to the recipient's Messenger and returns the status code to us.
If the status code were 200, we would be happy to know that the message has been sent successfully. Otherwise, we check for the error code.
- Error code 190: The facebook access token has expired.
- Error code 100: Invalid parameters, the request body should be checked.
- Error code 613: We have exceeded the Facebook rate limit.
Understanding the Messaging limit
When we have just registered for a Meta Developer Account and our page is not officially verified by the Meta team, our Page’s business portfolio is at the lowest level. We are allowed to do the following things.
- 2000 characters is the maximum characters that our messages can contain.
- 300 requests is the maximum number of requests that can be submitted within a second.
- Some other limits you can find out more at this site https://developers.facebook.com/docs/graph-api/overview/rate-limiting/
This is the reason why we would need some more functions which help us deliver messages successfully even if the LLM response content is too long.
Comeback to the file fb_graph_api.py and get some new functions.
# fb_graph_api.py
def _split_message(message: str) -> list:
    """
    Split a long message into chunks of appropriate size.

    Args:
        message: The message to split

    Returns:
        list: List of message chunks ready to send
    """
    chunks = []
    max_chunk_size = config.MESSAGE_LIMIT - 10  # Leave room for "... (cont)" suffix

    # Simple sentence-based splitting
    current_chunk = ""
    sentences = message.replace('\n', ' \n ').split('. ')

    for i, sentence in enumerate(sentences):
        # Add period back except for the last sentence if it doesn't end with period
        if i < len(sentences) - 1 or message.endswith('.'):
            sentence = sentence + '.'
        # If adding this sentence would exceed the limit, save current chunk and start a new one
        if len(current_chunk) + len(sentence) + 10 > config.MESSAGE_LIMIT:
            if current_chunk:
                chunks.append(current_chunk + " (cont)")
                current_chunk = sentence.strip()
            else:
                # Single sentence is too long, need to split by character
                chunks.append(sentence[:max_chunk_size] + "... (cont)")
                current_chunk = sentence[max_chunk_size:].strip()
        else:
            current_chunk += " " + sentence if current_chunk else sentence
    # Add the last chunk if there's anything left
    if current_chunk:
        chunks.append(current_chunk)
    return chunks
The first function is _split_message. This helps us split the original LLM response into chunks that do not exceed the max character limit. The splitting approach is as follows.
- The response is firstly splitted into sentences by using the “
.” (period + space) to identify sentence boundaries. We also keep the new line character by adding spaces outside the new line characters, from “\n” to “\n”. - Then iterate through sentences, add them to a current chunk until adding another sentence would exceed the message limit (minus 10 characters for the "(cont)" suffix)
- If the current chunk is not the last one, it is added a string “ (cont)” at the end to indicate the continuation.
- Finally, return a list of chunks.
# fb_graph_api.py
def send_message_to_fb_messenger(recipient_id: str, message_text: str) -> None:
    """
    Send a message to Facebook Messenger, splitting into multiple messages if too long.

    Args:
        recipient_id: The Facebook ID of the message recipient
        message_text: The message content to send

    Returns:
        None
    """
    # If message is within limits, send it directly
    if len(message_text) <= config.MESSAGE_LIMIT:
        send_single_message(recipient_id, message_text)
        return

    # Split long message into multiple chunks
    logger.info(f"Message length ({len(message_text)} chars) exceeds limit. Splitting into multiple messages.")
    chunks = _split_message(message_text)

    # Send each chunk with a small delay to respect rate limits
    for i, chunk in enumerate(chunks):
        success = send_single_message(recipient_id, chunk)
        if not success:
            logger.error(f"Failed to send message part {i+1} of {len(chunks)}. Aborting remaining parts.")
            return
        if i < len(chunks) - 1:  # Don't sleep after the last message
            time.sleep(1)  # Small delay between messages to avoid rate limiting


    logger.info(f"Successfully sent message in {len(chunks)} parts")
The last function of this file is send_message_to_fb_messenger. This function helps us combine the previous two functions into a single function which delivers the LLM response to users. What the function does is:
- If the message is not lengthier, use the function
send_single_messageto send it. - Otherwise, split the message into chunks and send each chunk to Messenger, avoiding the rate limit error.
Send the response message to Facebook user
Now you have built some code which can deliver the message to Facebook users. Therefore, now we will try to test those functions to see whether the code can really interact with the users.
Move to the Flask server file main.py and put some new code.
#  main.py
from fb_graph_api import send_message_to_fb_messenger
def get_and_send_assistant_message_to_fb_messenger(query: str, recipient_id: str) -> None:
    """Process the incoming query and send response to Facebook Messenger."""
    try:
        logger.info(f"Processing query: '{query}' from user ID: {recipient_id}")
        response_text = f"Hello User ID {recipient_id}, nice to meet you."
        send_message_to_fb_messenger(recipient_id, response_text)
    except Exception as e:
        logger.error(f"Error processing message: {str(e)}")
The function get_and_send_assistant_message_to_fb_messenger gets the response and sends it to the Messenger API. Currently, we put a dummy response, not the actual result from LLM processing. For now, every response is only saying hello and greeting.
After that, we take advantage of our previously defined function send_message_to_fb_messenger which delivers this message to the user.
Create a new POST HTTP API which helps handle the Facebook Messenger message.
#  main.py
@app.route('/facebook', methods=['POST'])
def facebook_post():
    """Handle incoming messages from Facebook Messenger."""
    try:
        logger.info('Received a new Facebook Messenger request')
        body = request.get_json()

        # Process each entry
        for entry in body.get('entry', []):
            for messaging_event in entry.get('messaging', []):

                # Only process message events (ignore read receipts, delivery confirmations, etc.)
                if 'message' in messaging_event and 'text' in messaging_event['message']:
                    recipient_id = messaging_event['sender']['id']
                    query = messaging_event['message']['text']

                    logger.info(f"User query: '{query}' from user ID: {recipient_id}")

                    # Process in a separate thread to allow immediate response to Facebook
                    threading.Thread(
                        target=get_and_send_assistant_message_to_fb_messenger,
                        args=(query, recipient_id)
                    ).start()

                elif 'read' in messaging_event:
                    logger.debug(f"Received read receipt from user: {messaging_event['sender']['id']}")
                elif 'delivery' in messaging_event:
                    logger.debug(f"Received delivery confirmation from user: {messaging_event['sender']['id']}")
                else:
                    logger.debug(f"Received other event type: {list(messaging_event.keys())}")

        logger.info('Request processed successfully')
    except Exception as e:
        logger.error(f'Request processing failed: {str(e)}')

    # Always return 200 to Facebook quickly
    return 'OK', 200
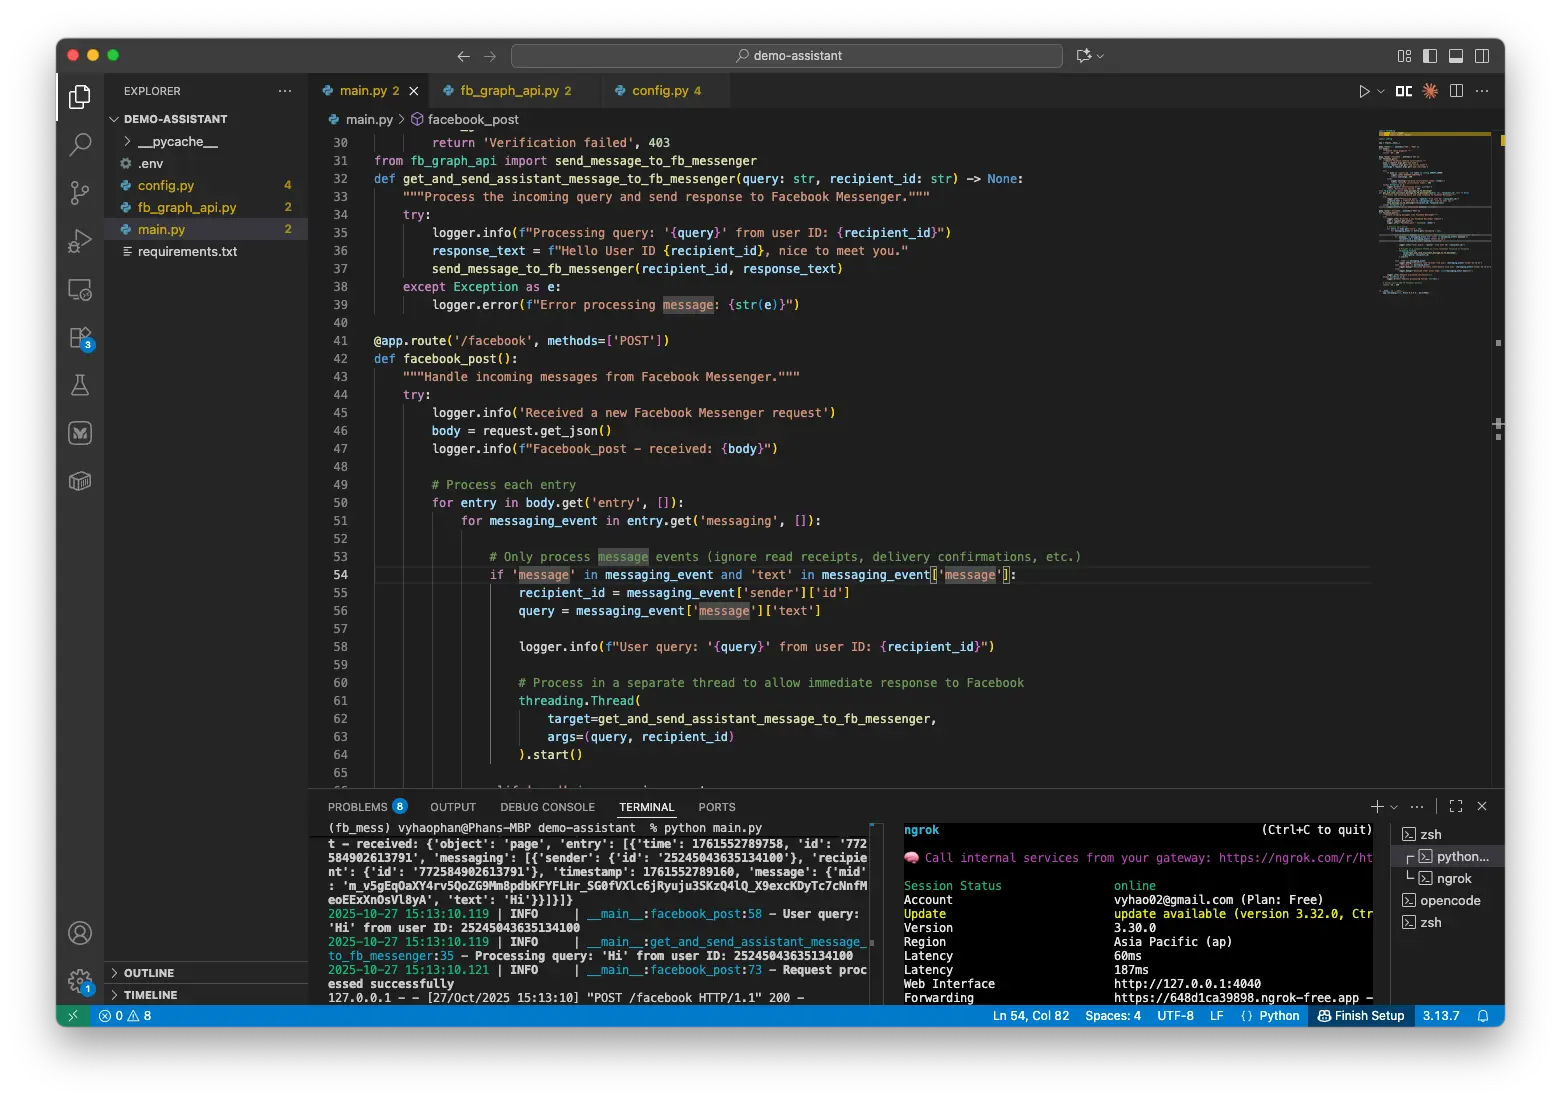
This POST HTTP API follows the requirements from Facebook development documents. The API endpoint must be POST type, end with /facebook.
Firstly, we convert the request content to json format and store it as the variable body.
The typical format of a Facebook Messenger request is as follows:
{
  "object": "page", // type of webhook source
  "entry": [  // List of page events delivered in this webhook.
// Each entry represents one update.
    {
      "time": 1761552789758, // Unix timestamp (in milliseconds) of the event
      "id": "772584902613791", // Unique identifier for the Facebook Page
      "messaging": [
// List of messaging events (messages, delivery receipts, etc.) included in this webhook entry.
        {
          "sender": {
            "id": "25245043635134100" // The PSID (Page-scoped ID) of the user who sent the message.
          },
          "recipient": {
            "id": "772584902613791" // ID of the recipient/ receiver (usually also the page ID)
          },
          "timestamp": 1761552789160, // Timestamp when the message event was created.
          "message": {
            "mid":  "m_v5gEqOaXY4rv5QoZG9Mm8pdbKFYFLHr_SG0fVXlc6jRyuju3SKzQ4lQ_X9excKDyTc7cNnfMeoEExXnOsVl8yA", // The Facebook's generated Message ID
            "text": "Hi" // The message text sent by the user.
          }
        }
      ]
    }
  ]
}
Because we need only 2 parameters for sending back the response to users, we will pay attention to these fields in the json request.
entry[].messaging[].sender.id: This is the person ID of who sent the message and we need to reply to them.entry[].messaging[].message.text: This is the message content of the user.
After having these variables, create a new thread and run the function get_and_send_assistant_message_to_fb_messenger inside that thread.
Moreover, there may be other messaging event types such as read or delivery. However, we do not do anything with these events. We take care of only the type ‘message’. At the end of the function, make sure that the function always returns a string “OK” with a status code 200.
Try messaging the Page
Now we have built the main code for conversations between the users and the app. So let’s test to see if the app responds correctly with our previously defined message “Hello User ID {recipient_id}, nice to meet you.”
Get any of your devices and go to the Messenger app, then go to your page and start messaging.
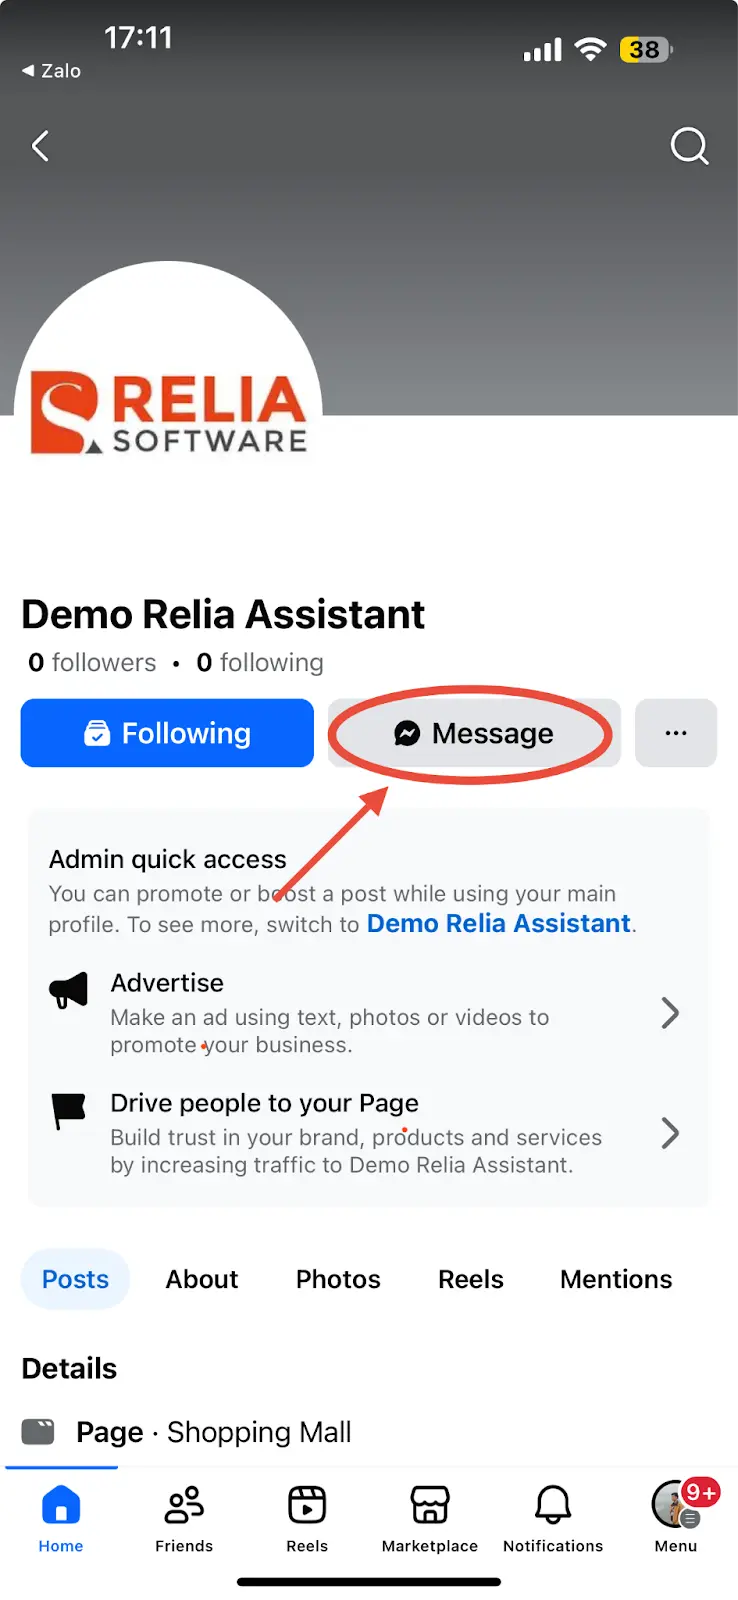
Click on the Message button.
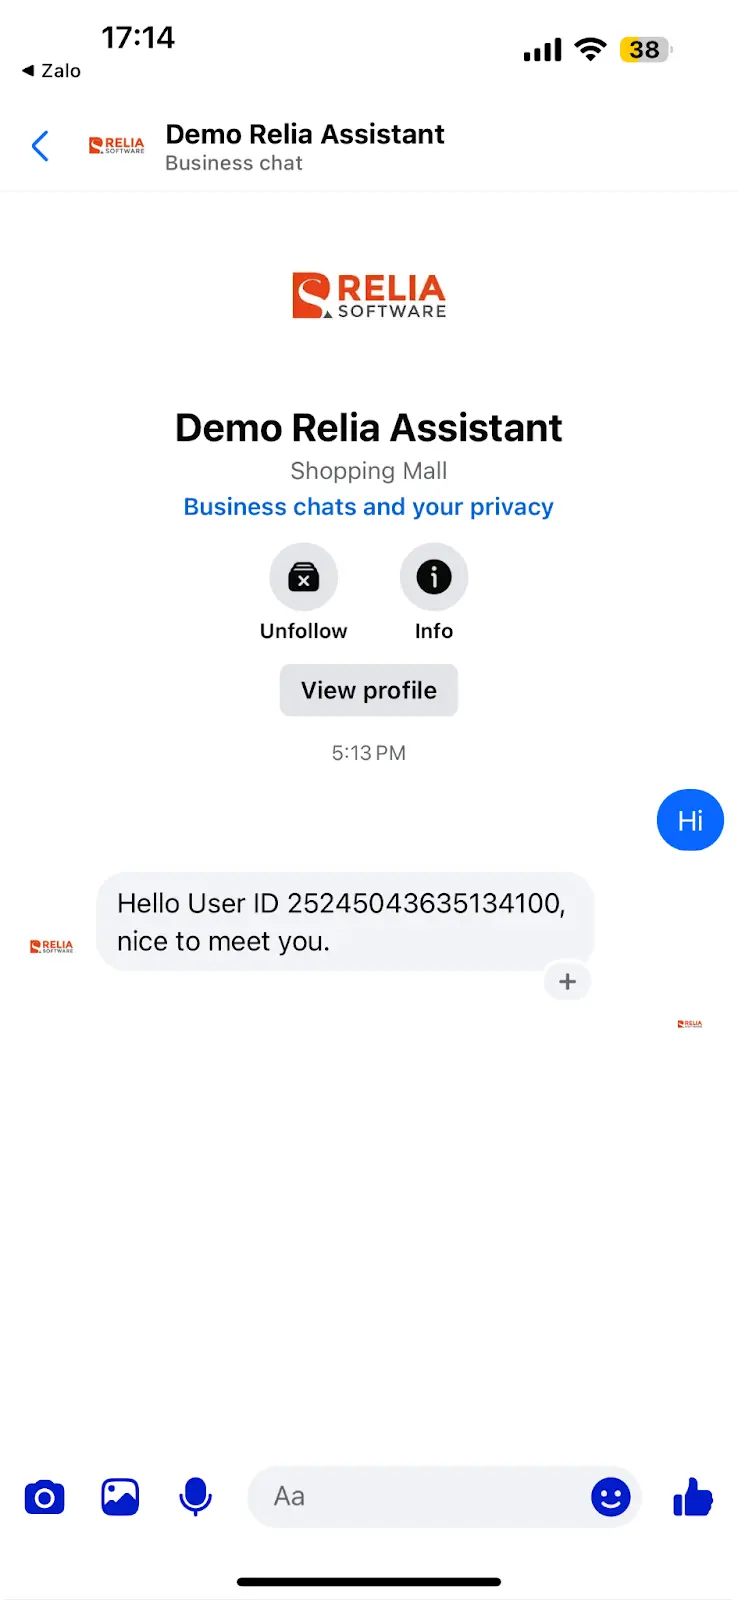
You can see that it does interact with the user message with our defined response text. This means that you have set up the Assistant connection successfully.
We have done a lot of things so far. However, these are just a few first steps. In the following section, we are going to build the session management system which manages the chat conversations and history between users and the app.
Build the main LLM Response engine with LiteLLM
Now we are going to do the most important and exciting sections of the whole process which is to set up the core LLM engine. This engine is responsible for understanding, processing the user query, connecting to other tools, executing and synthesizing the results, and returning the response to the user in the most organized and nice way.
Introducing LiteLLM
LiteLLM is a lightweight, unified API layer for large language models that makes it easy to switch between providers without changing your code. It improves reliability with built-in retry and fallback logic, so your app keeps working even when an LLM provider has issues.
On top of that, it helps control costs by standardizing pricing comparisons and supporting features like caching and rate limiting. In short, LiteLLM simplifies LLM integration, reduces time spent fixing model incompatibilities, and gives you flexibility, stability, and cost efficiency in one place.
The core function for LLM engine
Create a new file llm_api.py and put a new function there.
# llm_api.py
import time
from loguru import logger
import config
import litellm


def ask_assistant(query: str, recipient_id: str) -> str:
    """
    Chat with LiteLLM using Redis session management.

    Args:
        query: User's input message
        recipient_id: Facebook user ID

    Returns:
        str: Assistant's response
    """
    try:
        # Get or create session
        session_id, conversation_key = config.create_or_get_session_id(recipient_id)
        logger.info(f"Session: {session_id} | User: {recipient_id} | Query: {query}")
        logger.info(f"Request received at: {time.strftime('%Y-%m-%d %H:%M:%S', time.localtime())}")

        # Store user message
        config.store_message(conversation_key, "user", query)

        # Get conversation history
        recent_messages = config.get_conversation_messages(conversation_key, limit=10)

        # Build messages for LiteLLM
        messages = [
            {
                "role": "system",
                "content": """You are Relia Agent, a helpful AI assistant that helps shop owners managing their customers orders and shop revenue. You can search for information about weather, living standards, transportation, and career opportunities when needed.
When greeting users, always introduce about yourself which is a helpful Agent working at Relia Software company in Vietnam, and you can help answer anything.
*Output format*:
- Please only use text or list format in your responses.
- Never use table format.
- You can make some text formats with *, _, `, = like this:
    - This is *bold* text
    - This is _italics_ text
    - This is ~strikethrough~ text
    - This is a hyperlink [click here](https://www.example.com)
    - This is ==highlighted== text """
            }
        ]

        # Add conversation history (excluding system message)
        for msg in recent_messages:
            if msg['role'] in ['user', 'assistant']:
                messages.append({
                    "role": msg['role'],
                    "content": msg['content']
                })

        assistant_response = ""
        all_chunks=[]
        has_tool_call = False

        # Initial completion with tools
        response = litellm.completion(
            model=config.DEFAULT_MODEL,
            messages=messages,
            stream=True
        )

        # Process streaming response
        for chunk in response:
            if hasattr(chunk, 'choices') and chunk.choices:
                delta = chunk.choices[0].delta

                # Handle content
                if hasattr(delta, 'content') and delta.content:
                    assistant_response += delta.content

                all_chunks.append(chunk)

        # Store assistant response
        config.store_message(conversation_key, "assistant", assistant_response)

        return assistant_response

    except Exception as e:
        logger.error(f"Error in ask_litellm_assistant: {e}")
        return config.ERROR_MESSAGE
The function ask_assistant is the most important one. Let me explain the code step-by-step.
- This function receives 2 input parameters of the user query and the user ID.
- At the beginning of the function,
create_or_get_session_idis used to get a session ID and conversation ID for that user. This session is used for managing the conversation history. - Then add the user query to the conversation using the function
store_message. This function helps save the user input query as a value and the conversation ID as a key into the Redis database. - Due to the LLM’s limit of the token window, we cannot put the whole conversation into the LLM input, which may raise the token limit error and may significantly increase the budget of LLM token price. Therefore, what we do with messages would be getting the most recent messages, then add them and the system prompt to a list variable.
- Currently, my system prompt is really basic with some role specifications and some output guidance. You are free to edit the prompt to match your needs.
You are Relia Agent, a helpful AI assistant that helps shop owners managing their customers orders and shop revenue. You can search for information about weather, living standards, transportation, and career opportunities when needed.
When greeting users, always introduce about yourself which is a helpful Agent working at Relia Software company in Vietnam, and you can help answer anything.
*Output format*:
- Please only use text or list format in your responses.
- Never use table format.
- You can make some text formats with *, _, `, = like this:
    - This is *bold* text
    - This is _italics_ text
    - This is ~strikethrough~ text
    - This is a hyperlink [click here](https://www.example.com)
- This is ==highlighted== text- After getting the messages, we need to send these messages to the LLM server to get the responses. Using LiteLLM, this step would be easier than ever. We use LiteLLM's built-in function completion to make a request to the LLM model with the streaming mode (by setting the parameter
stream=True)
# llm_api.py
response = litellm.completion(
    model=config.DEFAULT_MODEL,
    messages=messages,
    stream=True
)- The reason we are using the streaming mode is that we will integrate some tool calls to this chat endpoint, and streaming makes the whole process including tool calls more efficient. Therefore, at the moment, what we are going to do is handle the content output of the function.
# Process streaming response
for chunk in response:
    if hasattr(chunk, 'choices') and chunk.choices:
        delta = chunk.choices[0].delta

        # Handle content
        if hasattr(delta, 'content') and delta.content:
            assistant_response += delta.content
# Store assistant response
config.store_message(conversation_key, "assistant", assistant_response)
Each streaming token is collected and added to the variable assistant_response. After the stream has ended, we use the function store_message to store the response to our Redis database for later query and processing. Finally, the response is returned to users.
Now go back to our main application file main.py and make some modifications to the function get_and_send_assistant_message_to_fb_messenger.
from llm_api import ask_assistant
def get_and_send_assistant_message_to_fb_messenger(query: str, recipient_id: str) -> None:
    """Process the incoming query and send response to Facebook Messenger."""
    try:
        logger.info(f"Processing query: '{query}' from user ID: {recipient_id}")
        response_text = ask_assistant(
            query=query,
            recipient_id=recipient_id
        )
        send_message_to_fb_messenger(recipient_id, response_text)
    except Exception as e:
        logger.error(f"Error processing message: {str(e)}")
We have imported the function ask_assistant from the file llm_api.py which uses OpenAI to handle the user query and return the LLM response.
It seems that the application has almost completed its core processing algorithm.
Check to see if we can chat with the Assistant
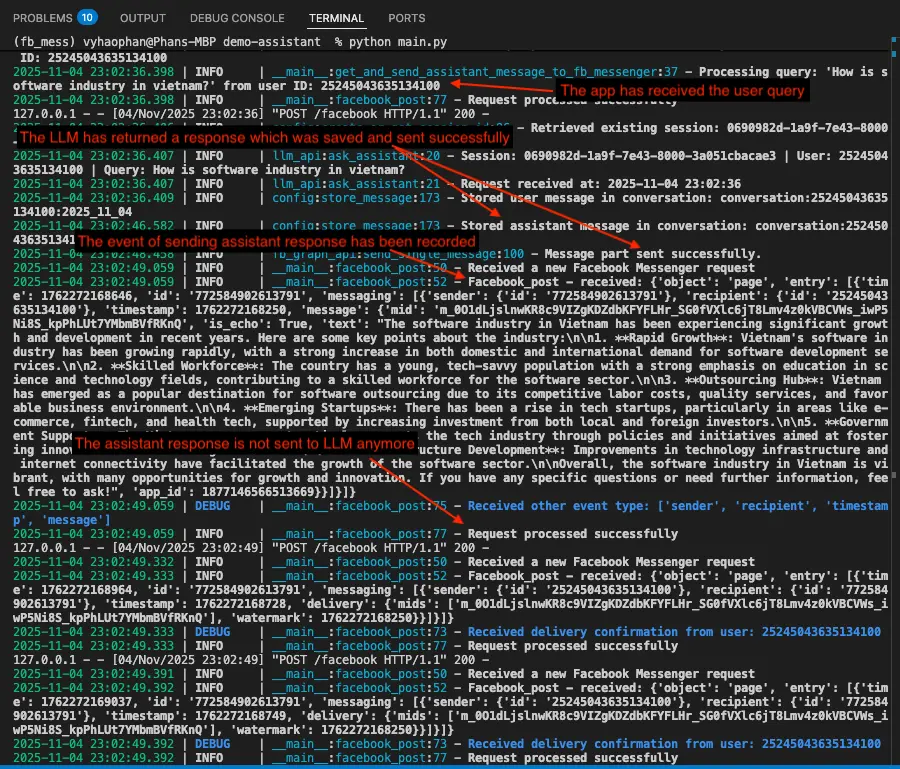
Now go to the Page messenger and start chatting with it. Let’s see if it responds with another type of answer.
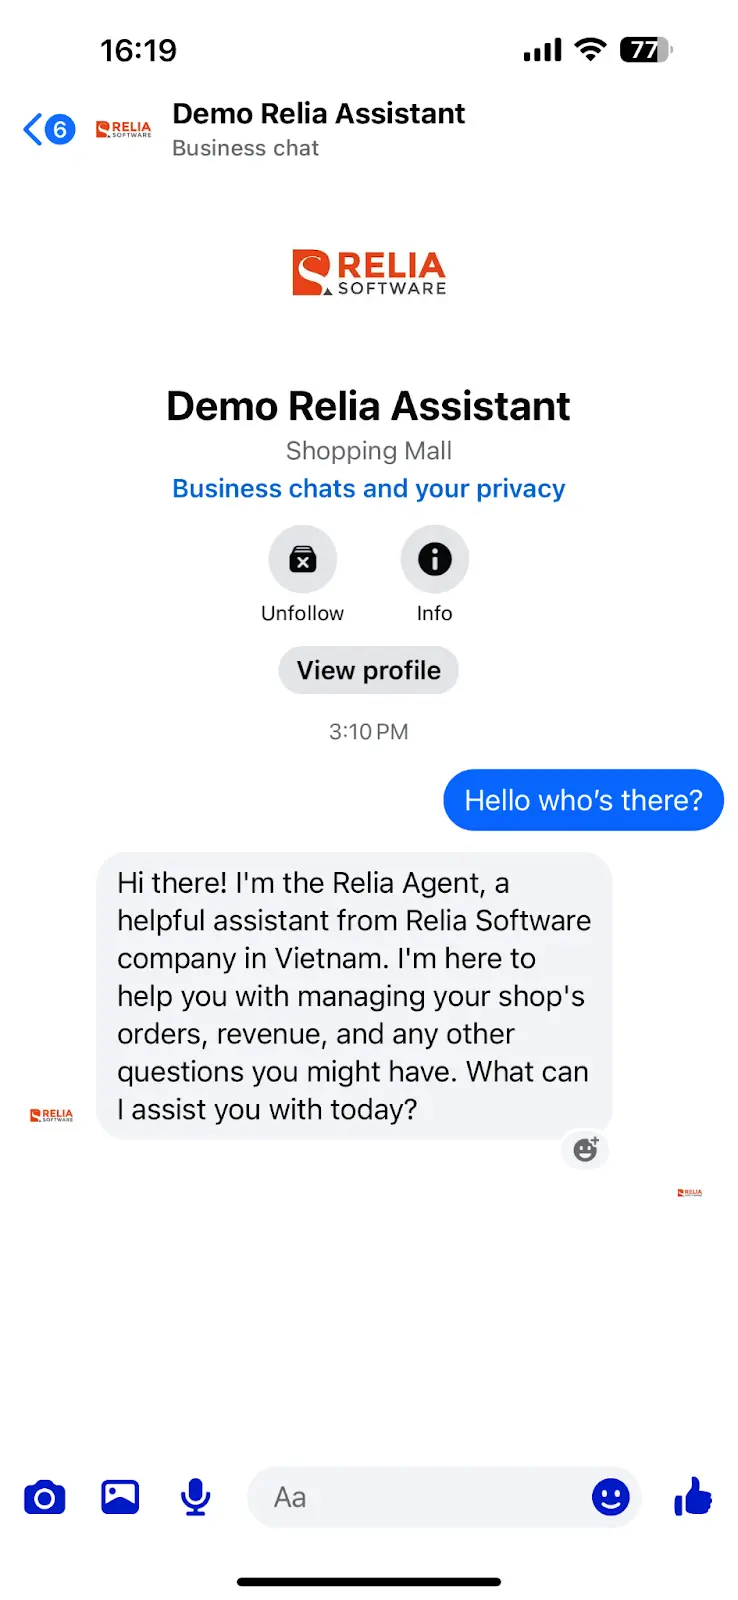
As seen from the above image, the Assistant now responds with another answer type.
Now if you come back to the IDE and look at the terminal console, you will see something similar to the following output.
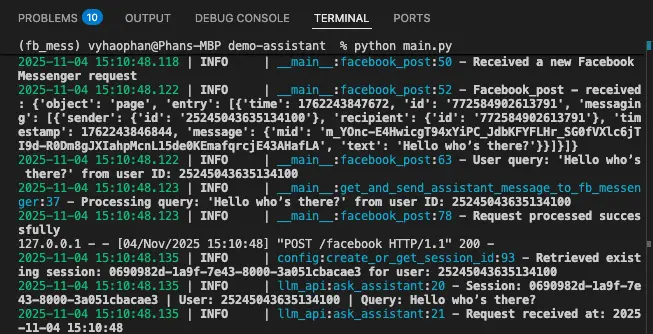
You can see that the application has received and processed the input text from the user. This means the application has successfully integrated the Messenger Webhook and is now actively interacting with each other.
Firstly, the function facebook_post() is actively listening to the webhook, and catching the event immediately. Facebook Webhook events may vary a lot of different kinds including messaging events, read events, etc.
When it receives a messaging event, it goes to Redis to find the conversation and session for this user. After that, it sends it to OpenAI to get an answer. This answer is then sent back successfully to the user, looking like the professional assistant has responded.
However, when scrolling down the terminal output a little bit, you will see that the app has processed another messaging event.
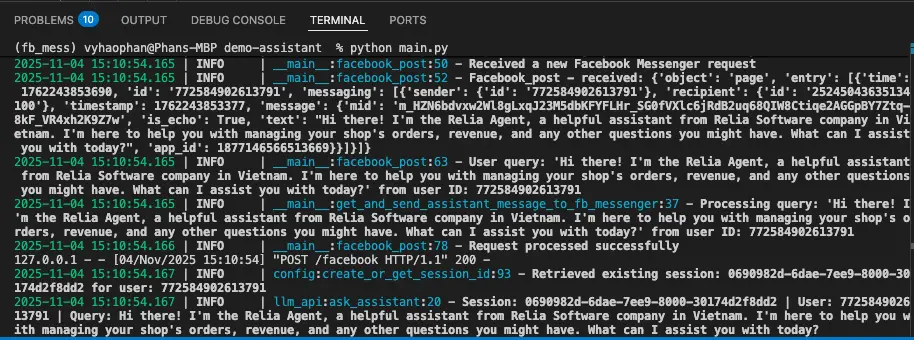
We can see that this app also receives the messaging event from Assistant and gets Assistant’s reply to continually response generation. This behavior cannot be evaluated as correct behavior.
The reason for this is that we do not exclude the responses which come from the app. In terms of the responses sent by the App (which stay at the left side of the chat), there is always an additional field app_id.
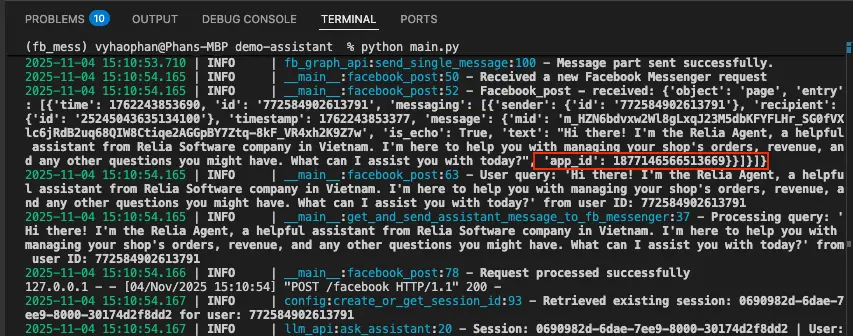
{
"object": "page",
"entry": [
{
"time": timestamp,
"id": "uuid",
"messaging": [
{
"sender": {
"id": "uuid"
},
"recipient": {
"id": "uuid"
},
"timestamp": timestamp,
"message": {
"mid": "the id of message",
"is_echo": true,
"text": "the response text from the assistant to reply to users ",
"app_id": the ID of the API app // only exists in the app responses
}
}
]
}
]
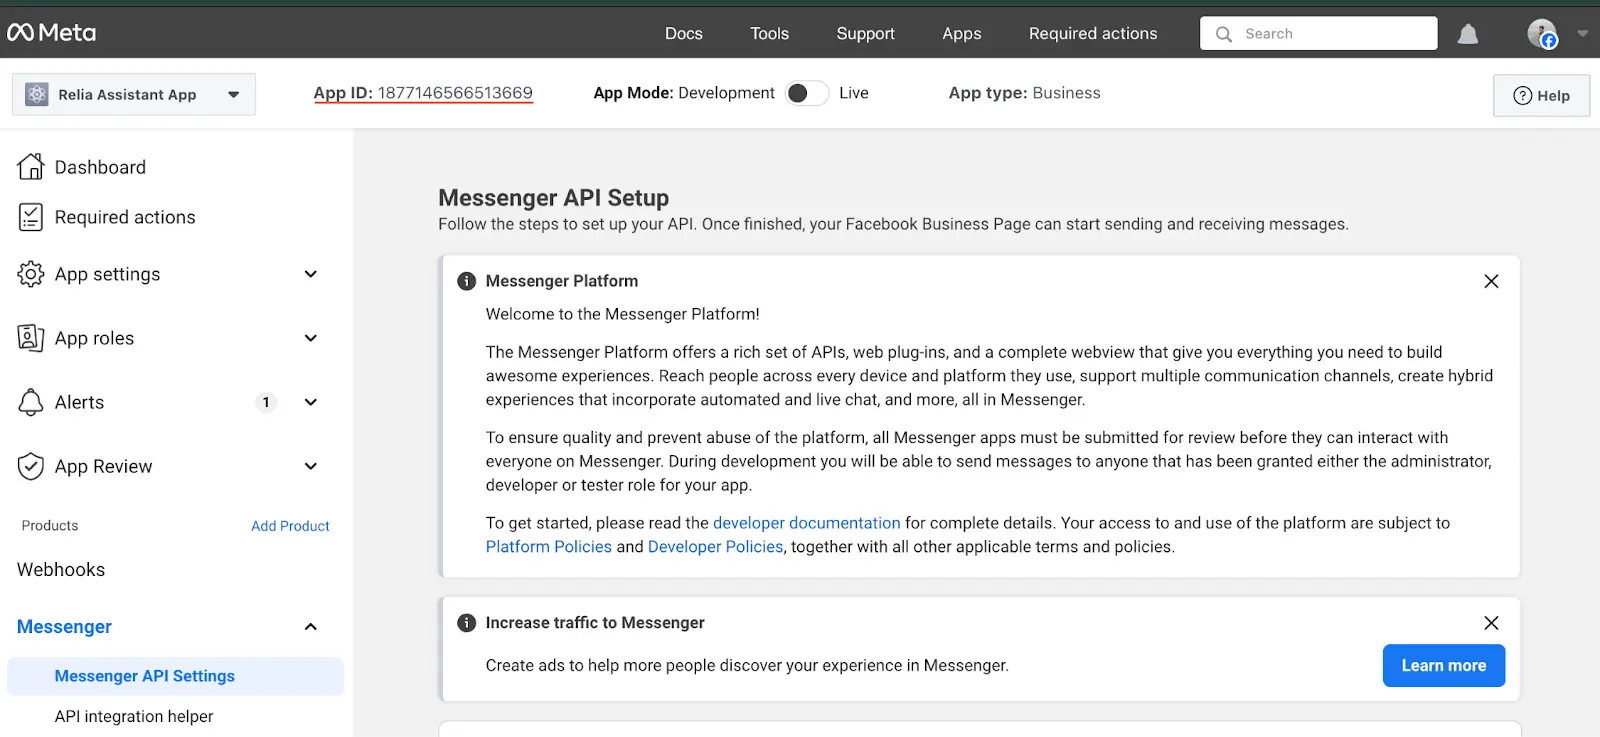
}You can find this App ID if you go to the dashboard of your Messenger App.
Now let’s update the code a bit more.
In the main file, we update the function facebook_post() which is the primary function handling the conversation messages.
# main.py
@app.route('/facebook', methods=['POST'])
def facebook_post():
    """Handle incoming messages from Facebook Messenger."""
... (other code remains the same)


           for messaging_event in entry.get('messaging', []):
                # Only process message events (ignore read receipts, delivery confirmations, etc.)
                if 'message' in messaging_event and 'text' in messaging_event['message'] and 'app_id' not in messaging_event['message']:
                    recipient_id = messaging_event['sender']['id']


... (other code remains the same)
We have added one more check to ensure that the webhook notification does not contain a field app_id which means we do not take the app reply as a new input for our OpenAI model.
Now let’s try again.
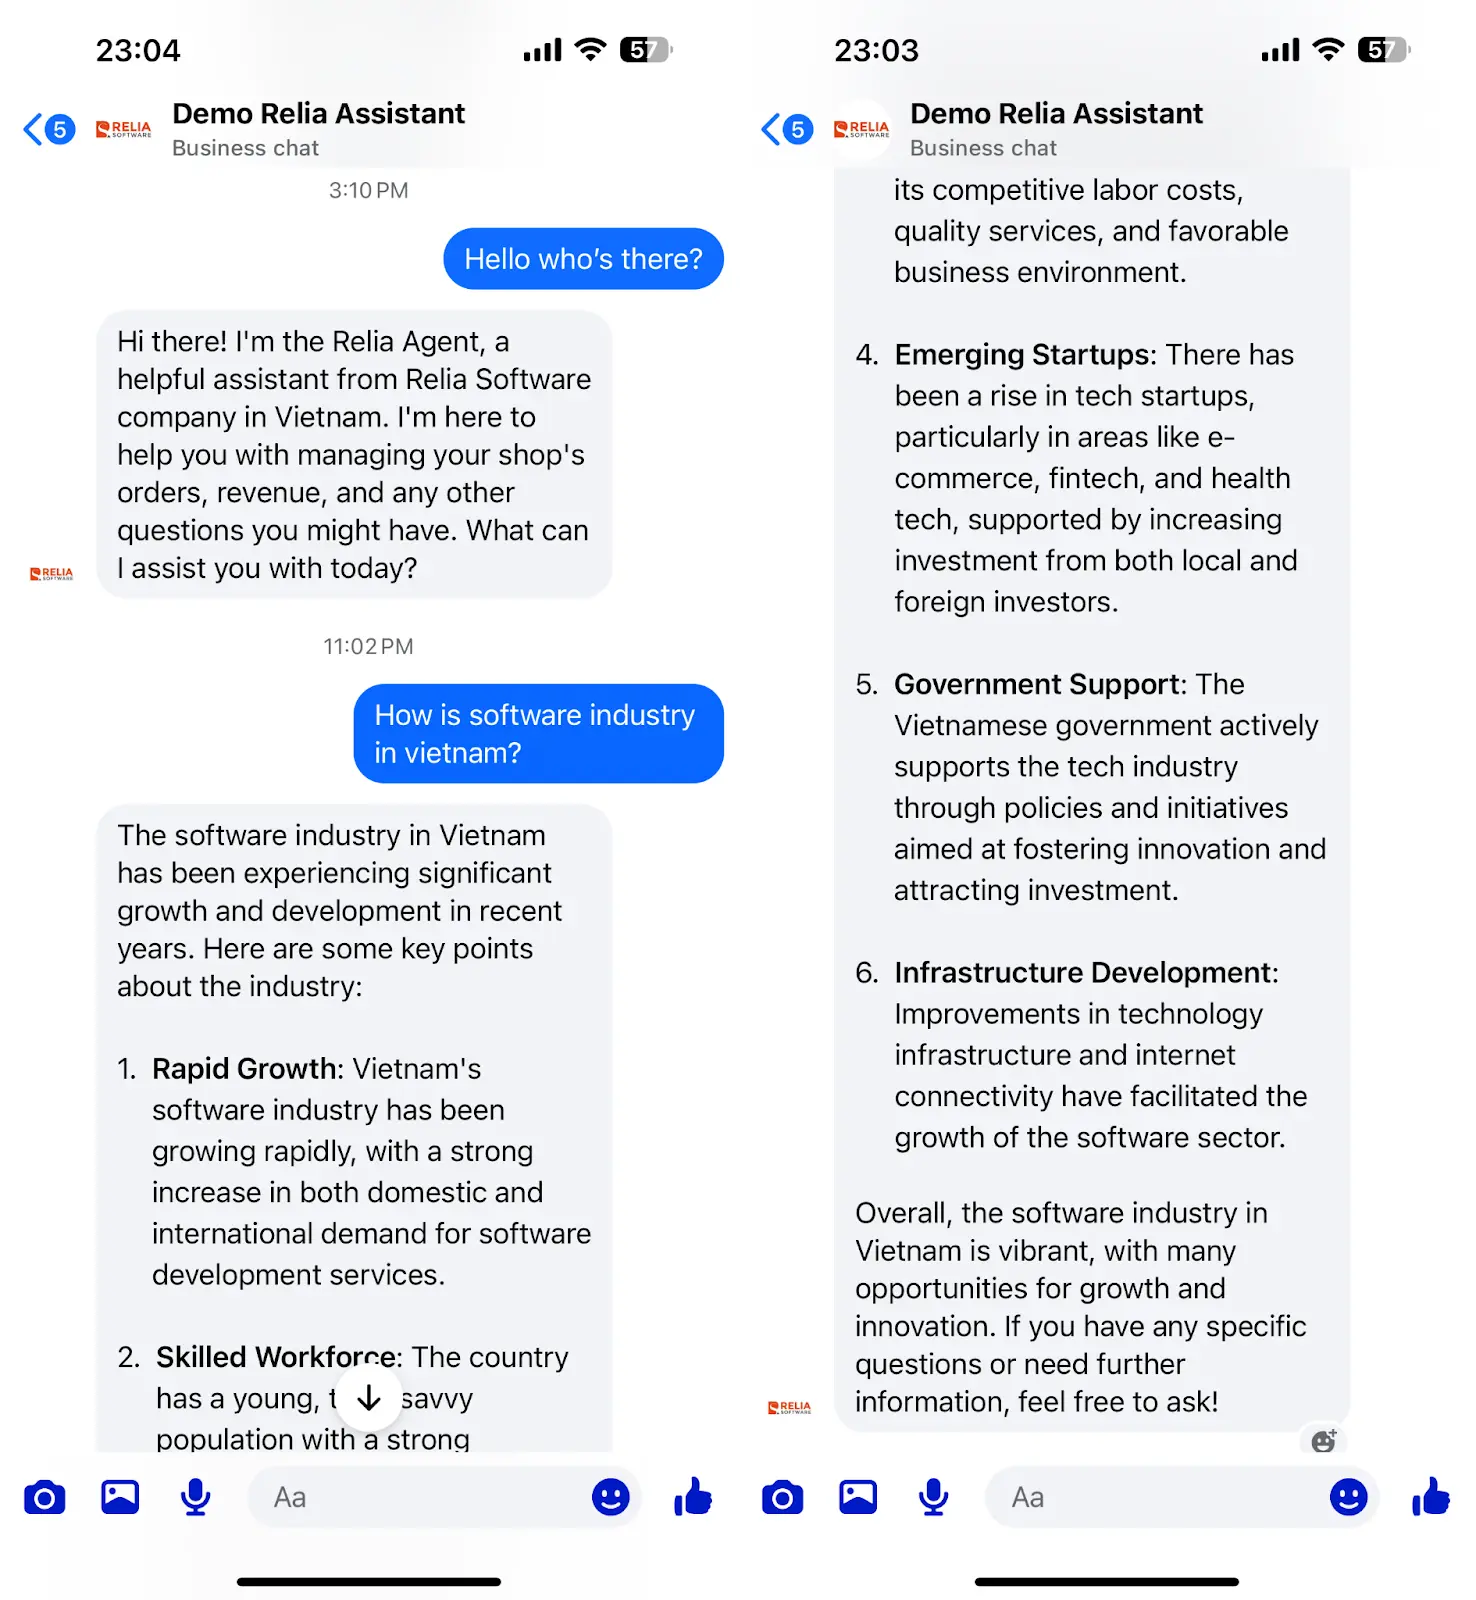
It has responded to another question that I asked about the industry status of software development. Let’s look at the terminal and check for what it has processed.
Congratulations on your work. We have completed setting up a project and a local environment which can directly listen to the Facebook Webhook events and interact like a professional.
Summary
By following this tutorial, we have been through the process of creating a Facebook Messenger AI chatbot integrated with OpenAI's GPT models, focusing on practical applications for small businesses. It covered setting up a Facebook Page and developer account, configuring a Python Flask server with Redis for session management, and utilizing LiteLLM for seamless LLM interaction.
Key highlights could be handling Messenger webhooks for real-time communication, implementing functions to store and retrieve conversation history, and managing message length limitations.
The tutorial has focused on setting a working chatbot that can intelligently respond to user queries, laying the groundwork for future enhancements such as advanced tools, expanded use cases, and database integration.
What to do next?
After building the basic version of the assistant: a general prompt and a single “answer” function. You can already start improving it by:
- Updating the prompt in
llm_api.pyto match your business and tone. Rename the bot (e.g., “My Company Buddy” or “Company Intelligent Assistant”) and define how it should respond to topics like finance, law, etc. - Exploring other webhook events such as read receipts and delivery status.
- Refactoring the project structure to better fit your own coding style.
See you in the next posts.
>>> Follow and Contact Relia Software for more information!

- coding
- automation