Docker emerges as a cornerstone technology, revolutionizing how we build, deploy, and manage applications. At its core, Docker provides a platform for containerization, enabling developers to package applications along with their dependencies into isolated environments, known as containers. This innovation ensures consistency across various computing environments, reducing the “it works on my machine” syndrome.
For Go applications, leveraging Docker's capabilities is particularly beneficial. The Go programming language, known for its efficiency and simplicity, aligns seamlessly with Docker's philosophy of lightweight and portable solutions.
Dockerizing a Go application not only streamlines deployment processes but also enhances scalability and ensures a high degree of reproducibility. Integrating Docker into your Go workflow promises a more robust and manageable development lifecycle.
You can find the complete code for this blog in this repository: dockerize-golang-application
What is The Docker?
Docker is an open platform for developing, shipping, and running applications. Docker enables you to separate your applications from your infrastructure so you can deliver software quickly.
With Docker, you can manage your infrastructure in the same ways you manage your applications. By taking advantage of Docker's methodologies for shipping, testing, and deploying code, you can significantly reduce the delay between writing code and running it in production.
>> Read more about Golang:
- Go Tutorial: Golang Basics of Knowledge for Beginners
- What's New in Go 1.21 Release?
- Instruction For Using Golang Generics With Code Examples
- Type Conversion in Golang
- Gin-Gonic Tutorial: API Development in Go Using Gin Framework
8 Benefits of Dockerizing Go Applications
- Consistent and Reproducible Environments: Docker containers ensure that your Go application runs in the same environment, regardless of where it is deployed. This consistency eliminates the common issue of encountering bugs and inconsistencies due to differences in development, testing, and production environments.
- Isolation and Security: Docker provides a level of isolation as each container runs independently. This means that the processes, memory, and filesystem are isolated from the host system and other containers. This isolation helps in enhancing the security as issues within a container do not directly affect other parts of the system.
- Ease of Deployment and Scaling: You can easily deploy your Go application across any system that runs Docker, without worrying about dependencies or environment-specific configurations. You can also quickly scale up or down by creating or removing containers, making your application more responsive to changes in demand.
- Efficient Resource Utilization: Containers are more lightweight than traditional virtual machines as they share the host system’s kernel, rather than virtualizing the hardware stack. This results in a more efficient use of system resources, allowing you to run more applications on the same hardware compared to VMs.
- Rapid Development and Testing Cycles: Docker can significantly speed up development and testing cycles. By containerizing your Go application, developers can work in an environment that closely mirrors the production environment. This reduces the time spent on configuring environments and resolving "works on my machine" issues.
- Version Control and Continuous Integration/Deployment (CI/CD) Compatibility: Docker images can be version-controlled and stored in repositories like Docker Hub or private registries, making it easy to track changes, roll back to earlier versions, and manage releases. Docker's compatibility with CI/CD pipelines allows for automated testing and deployment.
- Microservices Architecture Friendly: Docker is particularly well-suited for microservices architectures. You can easily break down your Go application into smaller, independent services that run in separate containers. This not only makes your application more modular and manageable but also improves fault isolation and system resilience.
- Community and Ecosystem Support: Docker has a large and active community, which means a wealth of resources, tools, and shared knowledge. This support can be invaluable, especially when troubleshooting, optimizing your Docker setup, or exploring advanced use cases.
What is Docker-Compose?
Docker Compose is a tool designed to simplify the process of deploying multi-container Docker applications. It allows you to define and run multi-container Docker applications using a YAML file, typically named docker-compose.yml. This file is where you configure your application’s services, networks, and volumes, allowing Docker to automatically manage the setup and interconnectivity of these components.
6 Benefits of Docker-Compose
- Service Configuration: With Docker Compose, each container in your application can be defined as a service. In the
docker-compose.ymlfile, you specify the image to be used, ports, volumes, and other settings for each service. This makes it easier to configure complex applications that might consist of several interconnected containers. - Networks and Volumes: Docker Compose allows you to define networks and volumes for your containers. Networks facilitate communication between containers, while volumes can be used for persistent data storage. This is crucial for applications that require data persistence or have containers that need to communicate with each other.
- Simplified Deployment Process: By running a single command (
docker-compose up), you can create and start all the services defined in yourdocker-compose.ymlfile. This greatly simplifies the process of deploying multi-container applications, as you don’t need to manually start each container and set up their interconnections. - Environment Standardization: Docker Compose ensures that your application runs the same way in different environments like development, testing, and production. This consistency is achieved because the service configuration, networks, and volumes are all defined in the
docker-compose.ymlfile. - Scalability: Docker Compose makes it easier to scale certain services of your application. You can increase or decrease the number of container instances for a particular service, which is especially useful in load balancing scenarios.
- Local Development: For developers, Docker Compose provides a convenient way to define and run complex applications locally on their machines. It can mimic a production environment, allowing developers to test their applications in a controlled setting.
4 Main Steps To Dockerize A Golang Application
Step 1: Installing Docker
Docker can be run on most major Linux distributions, and there are tools to let you run it on OSX and Windows too.
Follow one of the installation guides below for your operating system:
- Linux: https://docs.docker.com/get-started/
- Windows and Mac: https://www.docker.com/products/docker-desktop/
Before proceeding, you should have Docker installed and you need to have completed at least the hello world example included in one of the installation guides above.
Step 2: Creating the Dockerfile
Let's start by creating a simple Go application. We'll develop a basic web server that responds to HTTP requests. This example will provide a foundation for understanding how to dockerize Golang application.
package main

import (
	"fmt"
	"os"

	"github.com/gin-gonic/gin"
	"gorm.io/driver/postgres"
	"gorm.io/gorm"
)

func (Todo) TableName() string {
	return "todos"
}

func uri(dbHost, dbPort, dbName, dbUsername, dbPassword string) string {
	return fmt.Sprintf("host=%s user=%s password=%s dbname=%s port=%s sslmode=disable", dbHost, dbUsername, dbPassword, dbName, dbPort)
}

func main() {

	connStr := uri(
		os.Getenv("DB_HOST"),
		os.Getenv("DB_PORT"),
		os.Getenv("DB_NAME"),
		os.Getenv("DB_USERNAME"),
		os.Getenv("DB_PASSWORD")
	)

	db, err := gorm.Open(postgres.Open(connStr), &gorm.Config{})
	if err != nil {
		panic(err)
	}

	gormDB, err := db.DB()

	if err != nil {
		panic(err)
	}

	if err := gormDB.Ping(); err != nil {
		panic(err)
	}

	if err := db.AutoMigrate(&Todo{}); err != nil {
		panic(err)
	}

	router := gin.Default()
	TodoHandlers(router, db)
	router.Run(fmt.Sprintf(":%s", os.Getenv("APP_PORT")))
}
The next step will be creating a Dockerfile tailored for this application, which will define how to build its Docker image and run it inside a container.
A Dockerfile is a text document containing a set of instructions to build a Docker image. For a Go application, the Dockerfile generally follows a straightforward pattern. Here's an example of a basic Dockerfile for a typical Go application:
# Start by building the application in a builder image
# Stage 1: Build the application FROM golang:1.18 AS builder

# Set the working directory inside the container WORKDIR /app

# Copy go.mod and go.sum files first to leverage Docker cache COPY go.mod go.sum./

# Download all dependencies
RUN go mod download

# Copy the source code into the container COPY

#Build the application
RUN CGO_ENABLED=0 GOOS=linux go build -o main.

# Stage 2: Build a small image with only the compiled application FROM alpine: latest

# Add necessary dependencies for a minimal runtime
RUN apk --no-cache add ca-certificates

# Set the working directory
WORKDIR /root/

# Copy the pre-built binary file from the previous stage
COPY --from=builder /app/main
COPY --from-builder/app/.env

# Expose necessary port (e.g, if your app is a web server) EXPOSE 8080
# Command to run the executable CMD ["./main"]
Here's a breakdown of the code:
Stage 1: Build the Application
FROM golang:1.18 AS builder: This line starts the first stage namedbuilderusing the official Golang image.WORKDIR /app: Sets the working directory inside the Docker container.COPY go.mod go.sum ./: Copies the Go module files first. This is done to take advantage of Docker's layer caching. If these files haven't changed, Docker will reuse the cached layers.RUN go mod download: Downloads the application dependencies.COPY . .: Copies the source code into the container.RUN CGO_ENABLED=0 GOOS=linux go build -o main .: Compiles the application. The flags ensure that the resulting binary is statically linked and compatible with the Alpine base image in the next stage.
Stage 2: Create a Smaller Runtime Image
FROM alpine:latest: Starts the second stage using the lightweight Alpine Linux image.RUN apk --no-cache add ca-certificates: Adds CA certificates for SSL.WORKDIR /root/: Sets the working directory for the second stage.COPY --from=builder /app/main .: Copies the compiled binary from thebuilderstage.EXPOSE 8080: Exposes port 8080.CMD ["./main"]: Specifies the command to run the binary.
Step 3: Creating the docker-compose.yml
version: "3.9"

services:
    pgadmin:
        container_name: pgadmin4_container
        image: dpage/pgadmin4
        restart: always
        environment:
            PGADMIN DEFAULT EMAIL: admin@admin.com
        PGADMIN_DEFAULT_PASSWORD: root
        ports:
            - "5050:80"
        depends_on:
            - postgres
        networks:
            - backend

    postgres:
        image: bitnami/postgresql:13
        environment:
            POSTGRESQL_USERNAME: dbadmin
        POSTGRESQL PASSWORD: demo@123456
        POSTGRESQL_DATABASE: demo
        networks:
            - backend

    go-app:
        build:
          context: .
        ports:
          -"8080:8080"
        env_file:
            .env
        depends_on:
            postgres
        networks:
            backend

    networks:
        backend:
Here's a breakdown of the code:
Version
version: "3.9": This specifies the version of the Docker Compose file format. Version3.9supports specific features and configurations available in Docker Compose version 3.
Services
pgadmin Service:
container_name: pgadmin4_container: Sets the name of the running container topgadmin4_container.image: dpage/pgadmin4: Uses thedpage/pgadmin4image from Docker Hub to run pgAdmin 4, a web-based administration tool for PostgreSQL.restart: always: Ensures that the container always restarts unless it is explicitly stopped.environment: Sets environment variables inside the container. Here, it's configuring the default email and password for pgAdmin.ports: Maps port 5050 on the host to port 80 on the container, allowing access to pgAdmin throughhttp://localhost:5050.depends_on: Specifies thatpgadmindepends on thepostgresservice. Docker Compose will startpostgresbeforepgadmin.networks: Connects thepgadmincontainer to thebackendnetwork.
postgres Service:
image: bitnami/postgresql:13: Uses thebitnami/postgresql:13image to run a PostgreSQL 13 database server.environment: Sets the PostgreSQL username, password, and default database todbadmin,demo@123456, anddemo, respectively.networks: Connects thepostgrescontainer to thebackendnetwork.
go-app Service:
build: Instead of using an image from Docker Hub, this tells Docker Compose to build the image from a Dockerfile in the current directory (context: .).ports: Maps port 8080 on the host to port 8080 on the container, useful for accessing a web application running in thego-appcontainer.env_file: Specifies an environment file named.envfrom which to read environment variables.depends_on: Indicates thatgo-appdepends on thepostgresservice.networks: Connects thego-appcontainer to thebackendnetwork.
Networks
networks: backend:: Defines a custom network namedbackend. All three services are part of this network, allowing them to communicate with each other. The lack of additional configuration underbackendmeans Docker Compose uses the default settings for this network.
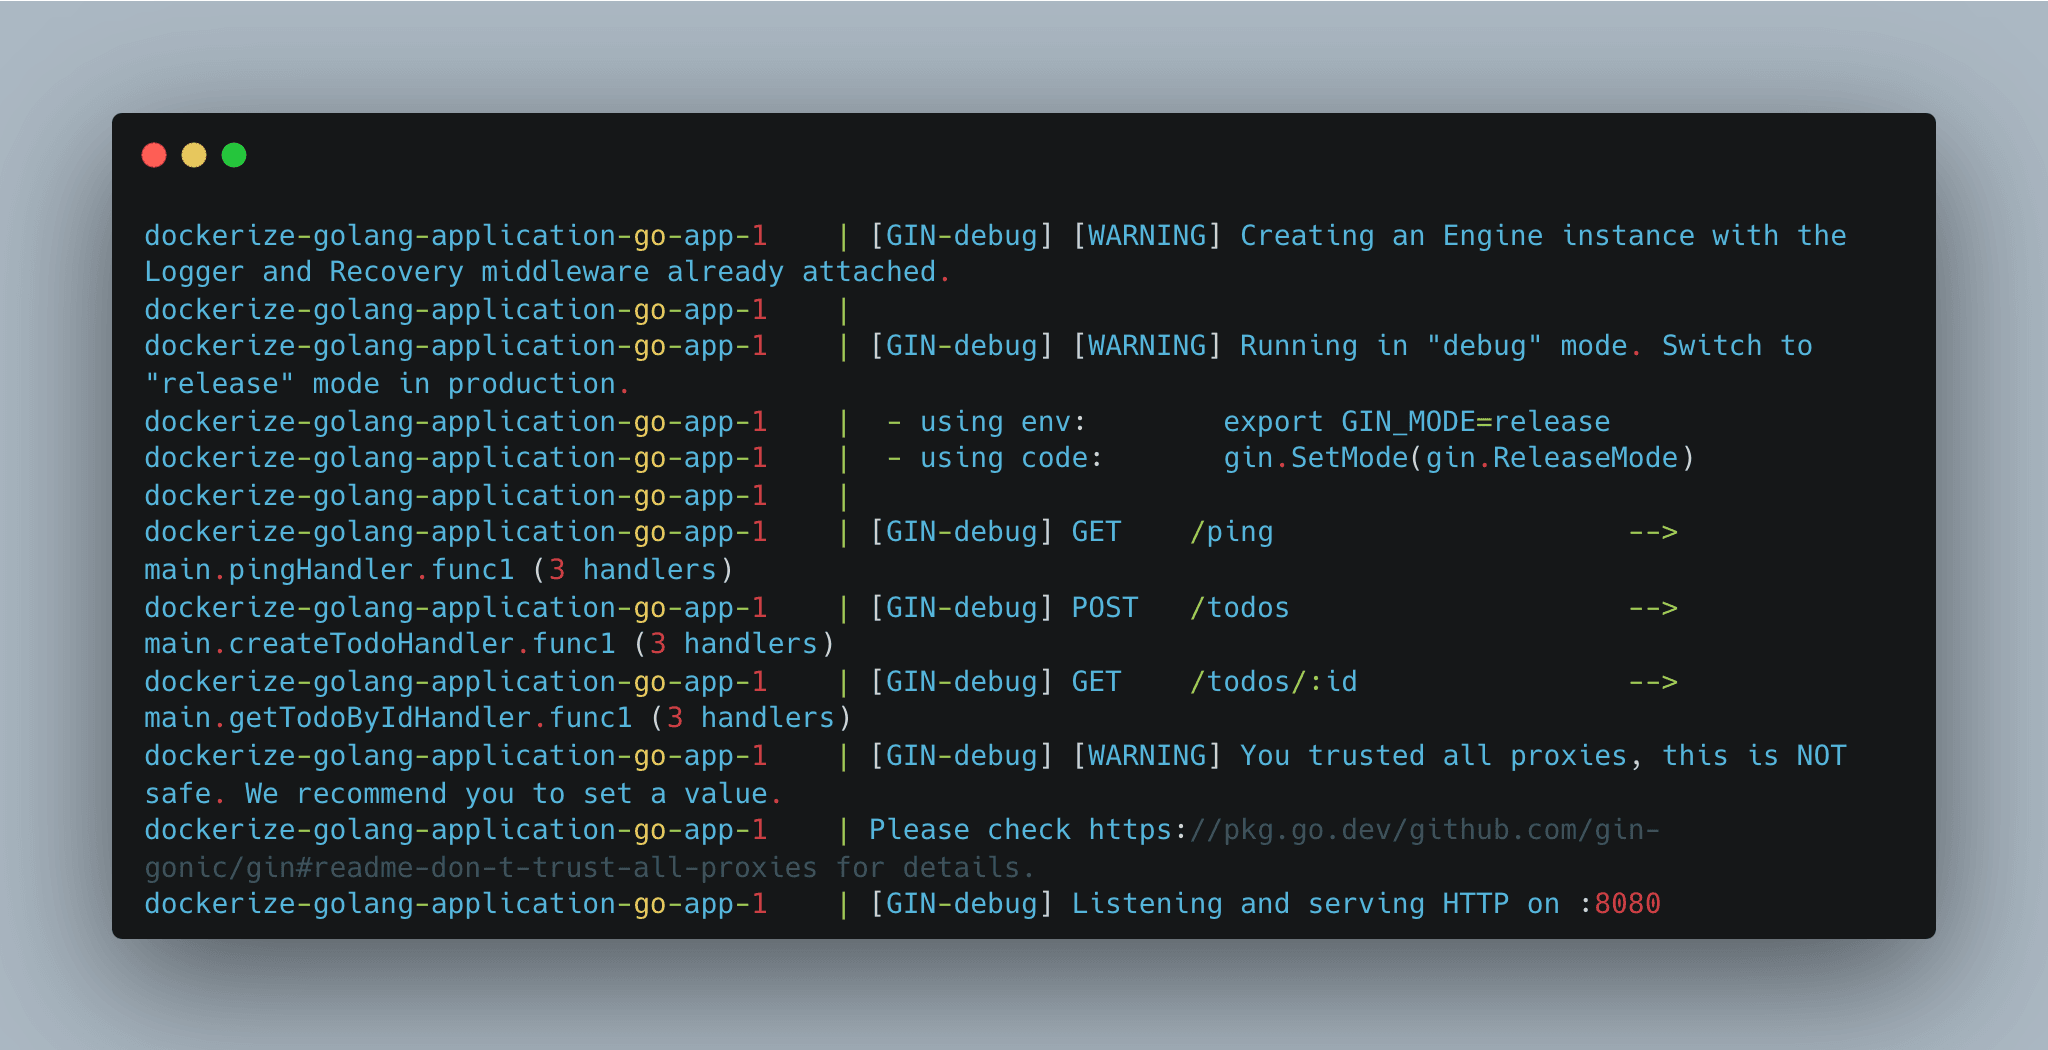
Step 4: Running Everything
Now it’s time to put everything together and start-up our stack by running the following:
docker-compose up --buildThe first time this command runs it will take quite a while because it needs to pull down all of the Docker images that our application requires.
This operation is mostly bound by network speed, so your times may vary.
At some point, it’s going to begin building the Rails application. You will eventually see the terminal output, including lines similar to these:
>> Read more:
- Comprehending Arrays and Slices in Go Programming Language
- Hands-On Implementation for Dependency Injection in Go
- Practical SOLID in Golang: Single Responsibility Principle
- Top 6 Best Golang Testing Frameworks
Conclusion
In this guide, we've walked through the comprehensive process of dockerizing a Go application, a journey that began with a simple Go web server and culminated in a fully containerized application. Here's a quick recap of the steps we covered:
- Developing a Simple Go Application: We started by creating a basic Go web server that responds with "Hello, World!" to HTTP requests.
- Creating the Dockerfile: We then crafted a Dockerfile, specifying the instructions for building the Go application's Docker image, including setting up the environment, copying the source code, and compiling the application.
- Creating the docker-compose.yml: We then create a docker-compose.yml file which contains the scenario configuration to run our services in single place
- Running the all services in docker-compose: Next, we will build and run all services that we defined
In conclusion, the integration of Docker into your Go development workflow is not just a trend but a strategic decision that can enhance the robustness, scalability, and maintainability of your applications. As you continue to develop and dockerize more complex Go applications, the principles and practices outlined in this guide will serve as a valuable foundation.
>>> Follow and Contact Relia Software for more information!

- golang
- coding
- development
- Designing an application