
Table of Contents
Due to the speed and reliability of web application development, Node.js has grown in popularity. It is an open-source, cross-platform runtime environment for server-side JavaScript development of high-performance, scalable apps.
This blog will review the top 15 Node.js projects for developers from beginner to advanced. We will also provide some code examples of these Node.js open-source project ideas for you to refer to. Let's try these Node.js projects!
Node.js Projects for Beginners
If you are a beginner in Node.js development, don't worry! Many basic projects can help you learn and master this versatile technology. Let's discuss some great project ideas to start your Node.js journey!
Real-time Chat App
Real-time chat apps may appear overwhelming, but they may help novices learn Node.js basics like server development, real-time communication, and data structures. Start with this simplified real-time chat app with the key function of creating a username and joining a chatroom where users can send and receive real-time communications.
Key Takeaways:
-
Basic Node.js server setup with Express.js.
-
Use sockets like Socket.IO for real-time client-server communication.
-
Using arrays or objects to store user data and messages.
-
Sending messages to all chatroom users.
-
Simple username and message validation.
Key Tech Steck: Node.js, WebSockets, and sockets.io.
Code Example:
const express = require('express');
const app = express();
const http = require('http').Server(app);
const io = require('socket.io')(http);

const messages = []; // In-memory array to store messages (replace with database)

app.use(express.static(__dirname + '/public')); // Serve static files from public directory

app.get('/', (req, res) => {
  res.sendFile(__dirname + '/public/index.html');
});

io.on('connection', (socket) => {
  console.log('A user connected');

  // Send all existing messages to the connected user
  socket.emit('allMessages', messages);

  socket.on('chat message', (msg) => {
    messages.push({ text: msg, username: socket.id }); // Use socket ID as username (replace with actual username)
    io.emit('chat message', msg); // Broadcast message to all connected users
  });

  socket.on('disconnect', () => {
    console.log('A user disconnected');
  });
});

const port = process.env.PORT || 3000;
http.listen(port, () => {
  console.log(`Server listening on port ${port}`);
});
Multiplayer Gaming App
This project allows players to join a game room, take turns making moves, and view the current game condition in real time.
Key Takeaways:
-
Node.js and Express.js are used to route and manage connections in this project.
-
The server and clients use Socket.IO to communicate in real-time, allowing participants to observe each other's motions and game state updates.
-
The server refreshes the gameboard and current player for all players in a room.
-
Client-side and server-side logic can detect cheating, manage erroneous movements, and gracefully disconnect players.
Key Tech Stack: Node.js, Express, Socket.io.
Code Example:
const express = require('express');
const app = express();
const http = require('http').createServer(app);
const io = require('socket.io')(http);

const port = process.env.PORT || 3000;

app.get('/', (req, res) => {
  res.sendFile(__dirname + '/index.html');
});

app.use(express.static(__dirname + '/public'));

io.on('connection', (socket) => {
  console.log('A user connected!');

  socket.on('joinGame', (data) => {
    // Add player to game (logic not implemented here)
    console.log(`Player ${data.username} joined the game!`);

    // Broadcast a message to all connected players (excluding sender)
    socket.broadcast.emit('message', {
      username: 'Server',
      message: `${data.username} has joined the game!`
    });
  });

  socket.on('chatMessage', (data) => {
    console.log(`${data.username}: ${data.message}`);

    // Broadcast the message to all connected players
    io.emit('message', data);
  });

  socket.on('disconnect', () => {
    console.log('A user disconnected!');
  });
});

http.listen(port, () => {
  console.log(`Server listening on port ${port}`);
});
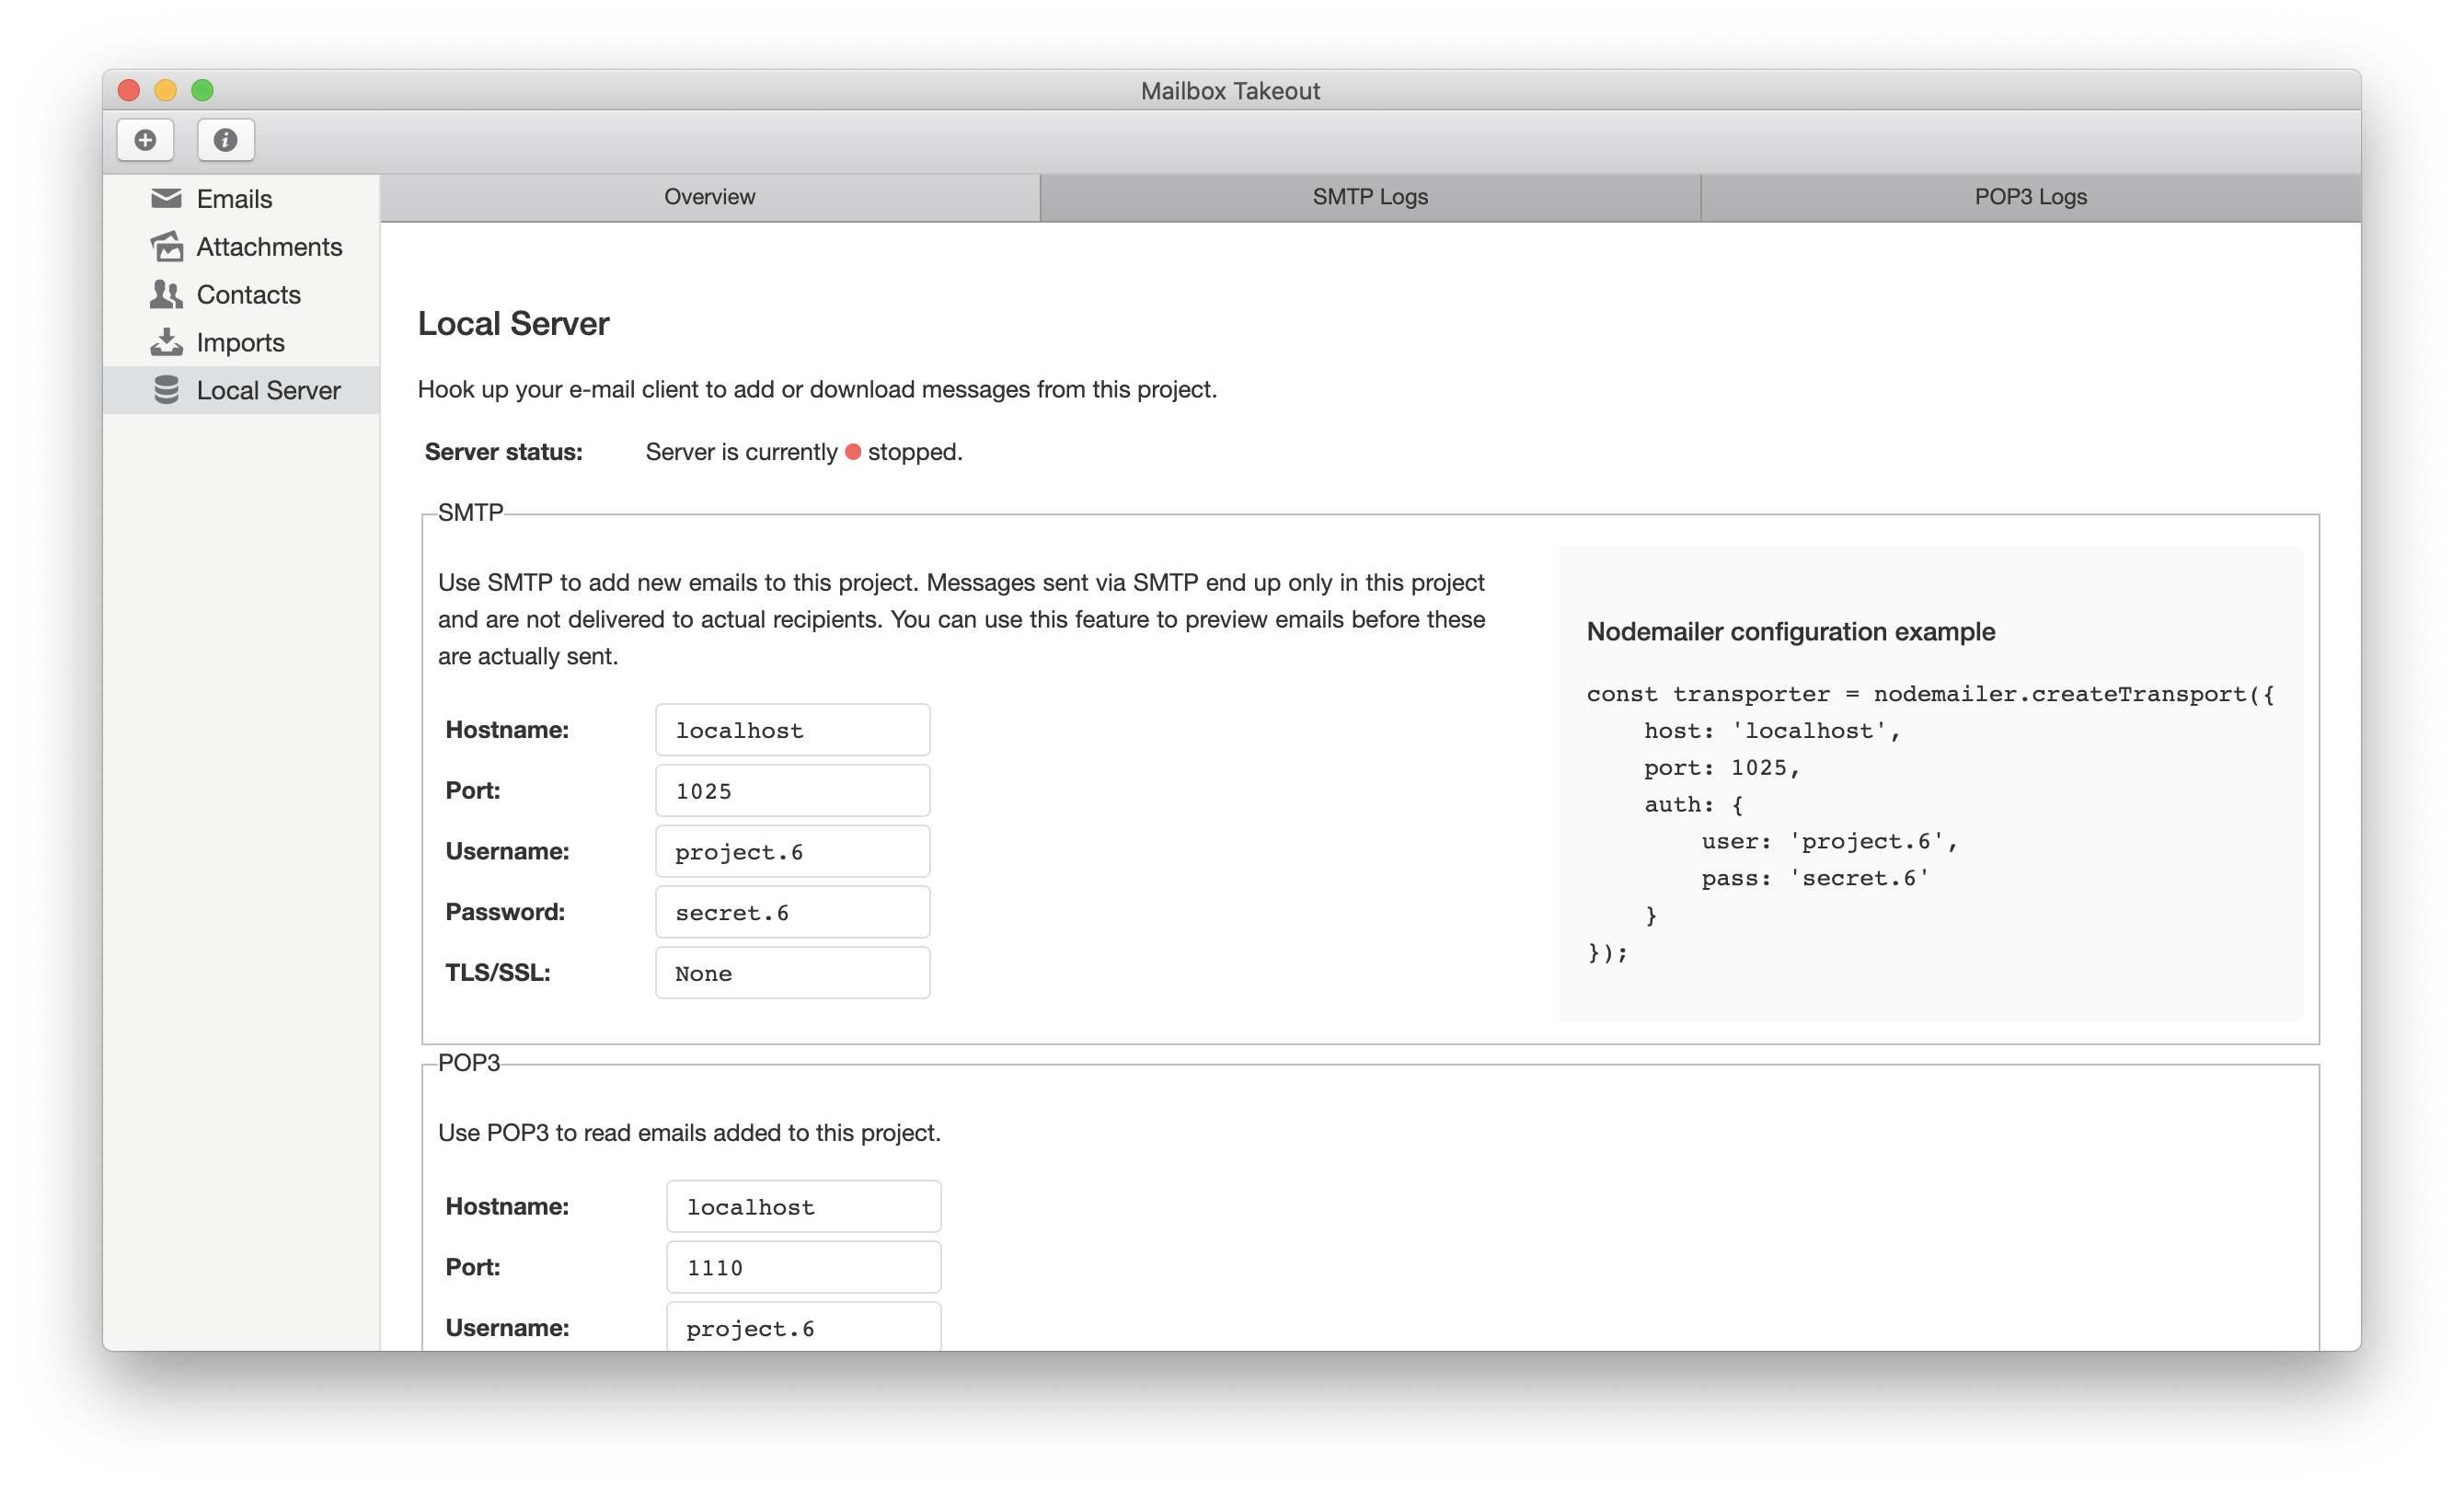
Node Mailer
While constructing this project, you can learn Node.js email sending and scheduling. The Nodemailer plugin simplifies email sending and lets you include HTML. Node.js powers user verification emails. The most frequent way to send outgoing emails across networks is using SMTP. It also relays emails between servers.
Key Takeaways:
-
This project shows how to send emails from Node.js using Nodemailer.
-
Email configuration through Nodemailer with your email provider's credentials.
-
Email content composition when the code defines the sender, recipient, subject, and text.
Key Tech Stack: Node.js, Nodemailer plugin.
QR Code Generator
The QR Code Generator combined with a Discord bot project generates QR codes and effortlessly integrates them into Discord. The Discord bot integration lets users produce QR codes instantly and share them in channels or private messages. The bot can scan and decode QR codes, making it a useful tool.
Key Takeaways:
-
How to establish Express routes for HTTP requests (GET).
-
How to get URL query parameters and process user input.
-
The code generates QR Code data URLs from text input using the QR code library.
-
Client-server interaction retrieves the QR Code URL from the server-side code and displays it on the web page.
Key Tech Stack: Node.js, discord.js.

Portfolio Website
The Node.js portfolio website lets people and businesses showcase their work, abilities, and accomplishments. It requires creating a user-friendly interface to exhibit projects, services, contact information, and other facts. Back-end programming, data storage, and dynamic content are made easier using Node.js. It works with HTML, CSS, and JavaScript to provide a visually appealing user experience.
Key Takeaways:
-
This project shows how to use Express.js to serve static files and handle routing on a Node.js server.
-
Serve HTML, CSS, and JavaScript files from a project directory.
-
Renders the initial HTML page server-side. Client-side frameworks like React and Angular may create interactive content.
Key Tech Stack: Node.js, Express.js, HTML/CSS, JavaScript, and MongoDB
Code Example:
const express = require('express');
const mongoose = require('mongoose');
const bodyParser = require('body-parser');

// Replace with your MongoDB connection string
const mongoURI = 'mongodb://localhost:27017/portfolio';

mongoose.connect(mongoURI, { useNewUrlParser: true, useUnifiedTopology: true })
  .then(() => console.log('MongoDB connected'))
  .catch(err => console.error(err));

const ProjectSchema = new mongoose.Schema({
  title: { type: String, required: true },
  description: { type: String, required: true },
  image: { type: String }, // Optional: URL for project image
  link: { type: String }, // Optional: Link to project website
});

const Project = mongoose.model('Project', ProjectSchema);

const app = express();
app.use(bodyParser.json());

// Get all projects
app.get('/projects', async (req, res) => {
  try {
    const projects = await Project.find();
    res.json(projects);
  } catch (err) {
    console.error(err);
    res.status(500).json({ message: 'Error fetching projects' });
  }
});

// Create a new project (replace with authentication and validation)
app.post('/projects', async (req, res) => {
  const { title, description, image, link } = req.body;
  try {
    const newProject = new Project({ title, description, image, link });
    await newProject.save();
    res.json({ message: 'Project created successfully' });
  } catch (err) {
    console.error(err);
    res.status(500).json({ message: 'Error creating project' });
  }
});

const port = process.env.PORT || 3000;
app.listen(port, () => {
  console.log(`Server listening on port ${port}`);
});
Intermediate Level Node.js Project Ideas
After learning some fundamental Node.js projects, it’s time to challenge your abilities and solidify your understanding. Buckle up innovative intermediate-level project ideas that will challenge and push you to explore new functionalities.
Random Web App
A random number generator web development generates random numbers for users. It is used for a variety of tasks, including generating lottery numbers, constructing secure passwords, and imitating dice rolls.
Key Takeaways:
-
The Express.js server setup project shows how to serve static files using a basic Node.js server.
-
Learned how to handle user button clicks and dynamically update the web page with JavaScript.
-
The code generates random numbers and colors using built-in JavaScript methods.
-
The optional random quote feature shows how to use the retrieve API to make asynchronous calls and handle problems.
Key Tech Stack: Node.js, HTML, CSS, Javascript, Amazon web services (Cloud Services).
Code Example:
const express = require('express');
const path = require('path'); // For serving static files

const app = express();
const port = process.env.PORT || 3000;

// Serve static HTML file from the 'public' directory
app.use(express.static(path.join(__dirname, 'public')));

// Route to handle the root path ('/')
app.get('/', (req, res) => {
  // Generate a random number between 1 and 100 (inclusive)
  const randomNumber = Math.floor(Math.random() * 100) + 1;
  res.send(`Your random number is: ${randomNumber}`); // Send the random number in the response
});

app.listen(port, () => {
  console.log(`Server listening on port ${port}`);
});
Sleep Tracker App
Node.js tracks and analyses sleep patterns to reveal quality, duration, and other parameters. It helps users improve their sleep patterns with informed judgments.
The sleep-tracking application project entails constructing a server-side application that collects and analyses sleep data from a mobile or web-based client. Node.js allows real-time data processing and data visualization to give users useful sleep statistics.
Key Takeaways:
-
Integrating MongoDB with Mongoose to store and retrieve sleep entries is shown in this project.
-
Learned how to establish routes for GET and POST user interactions.
-
The code generates dynamic HTML content from server data using EJS templates.
Key Tech Stack: Node.js, React, HTML, CSS (for front-end development), MySQL (for the database), java, Vue.
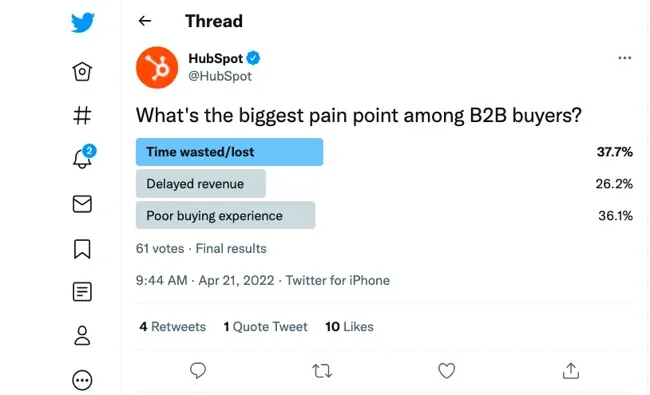
Twitter Bot
In this project, you'll practice developing a Twitter bot that uses hashtags like “#WorkFromHome”. You can create a Twitter bot to like and retweet all “WorkFromHome” posts. This project is perfect for API development. This Twitter API-using Node.js app is easy.
Key Takeaways:
-
This project shows how to use Node.js and Twitter API v2 for bot functions.
-
For secure API access, it emphasizes authentication.
-
The Twitter Streaming API has been used to listen for real-time events like mentions and hashtags.
Key Tech Stack: Node.js, database management, Twitter RESTful API, npm module.
Recipe AI Finder App
The Recipe Artificial Intelligence (AI) Finder will allow users to search for recipes, store their favorites, and create grocery lists based on the components required for each recipe. You may even search for recipes based on a broad description, a list of crucial ingredients, or your dietary requirements.
Key Takeaways:
-
A basic method for applying NLP with the natural library for text tokenization and keyword extraction is shown in this project.
-
External API integration uses the request library to call an external recipe search API.
-
The fetch API improves user experience by allowing client-side code to communicate with the server.
Key Tech Stack: Node.js, Spoonacular API, OpenAI ChatGPT, Express.js, dotenv
Code Example:
const express = require('express');
const axios = require('axios');
const dotenv = require('dotenv');

dotenv.config(); // Load environment variables

const app = express();
const port = process.env.PORT || 3000; // Use environment variable for port or default to 3000

app.get('/recipes', async (req, res) => {
  const ingredients = req.query.ingredients; // Get comma-separated ingredients from query string

  if (!ingredients) {
    return res.status(400).json({ message: 'Please provide ingredients.' });
  }

  try {
    const apiUrl = `https://api.example.com/recipes/search?apiKey=${process.env.API_KEY}&includeIngredients=${ingredients}`; // Replace with your API URL and parameters
    const response = await axios.get(apiUrl);
    const recipes = response.data.recipes; // Replace with the actual data structure from your API

    res.json({ recipes });
  } catch (error) {
    console.error(error);
    res.status(500).json({ message: 'Error fetching recipes.' });
  }
});

app.listen(port, () => {
  console.log(`Server listening on port ${port}`);
});
User Authentication System
Web application user registration, login, and access control are secure with Node.js user authentication. It restricts access to resources and actions to authorized users.
The user authentication system project involves a server-side application for registration, login, password hashing, session management, and authorization checks. Node.js secures authentication and connects with front-end technologies for a smooth user experience.
Key Takeaways:
-
Utilise Node.js for user authentication, including password hashing and session management.
-
Learned how to utilize Mongoose to the user interface with a MongoDB database that stores user data.
-
Create protected routes that require successful authentication before access.
Key Tech Stack: Node.js, Express.js, Database Management System, Encryption Libraries, Front-end Framework.
Code Example:
const express = require('express');
const mongoose = require('mongoose');
const passport = require('passport');
const LocalStrategy = require('passport-local').Strategy;
const bcrypt = require('bcryptjs');
const cors = require('cors');

const app = express();
const port = process.env.PORT || 3000;

// Connect to MongoDB (replace with your connection string)
mongoose.connect('mongodb://localhost:27017/user-auth', { useNewUrlParser: true, useUnifiedTopology: true })
  .then(() => console.log('MongoDB connected'))
  .catch(err => console.error(err));

// Define User schema
const UserSchema = new mongoose.Schema({
  username: { type: String, required: true, unique: true },
  password: { type: String, required: true },
});

// Hash password before saving user
UserSchema.pre('save', async function (next) {
  if (!this.isModified('password')) {
    return next();
  }
  const salt = await bcrypt.genSalt(10);
  this.password = await bcrypt.hash(this.password, salt);
  next();
});

const User = mongoose.model('User', UserSchema);

// Passport Local Strategy configuration
passport.use(new LocalStrategy((username, password, done) => {
  User.findOne({ username: username })
    .then(user => {
      if (!user) {
        return done(null, false, { message: 'Incorrect username or password.' });
      }
      bcrypt.compare(password, user.password, (err, isMatch) => {
        if (err) return done(err);
        if (isMatch) {
          return done(null, user); // User object on successful login
        } else {
          return done(null, false, { message: 'Incorrect username or password.' });
        }
      });
    })
    .catch(err => done(err));
}));

// Configure middleware
app.use(cors());
app.use(express.json()); // Parse JSON body data
app.use(passport.initialize());

// Login route (using Passport authentication)
app.post('/login', passport.authenticate('local'), (req, res) => {
  // User object is available in req.user if login is successful
  res.json({ message: 'Login successful!', user: req.user });
});

// Protected route example (requires logged-in user)
app.get('/protected', passport.authenticate('local'), (req, res) => {
  res.json({ message: 'You are authorized to access this route.' });
});

app.listen(port, () => {
  console.log(`Server listening on port ${port}`);
});
Advanced Node.js Projects
These simple and medium projects have helped you get better at Node.js. Now it's time to make and build advanced projects that will not only help you learn new things but will also show possible employers that you are professional.
Social Media App
A server-side program manages user registration, content sharing, commenting, likes, and following in the social media application project.
Developed with Node.js, a social media program that allows user connection, content exchange, and interaction. It allows people to share their ideas, build communities, and connect with others. Node.js powers the application's smooth functionality and effective user interaction handling.
Key Takeaways:
-
Authenticate users using Node.js and Local Strategy (username/password) or JWT for a more scalable and stateless solution.
-
Hash user passwords before putting them in the database using scripts.
-
Practice session management or token-based authentication to log users in and restrict access to protected routes.
Key Tech Stack: Node.js, Express.js, Database Management System, Front-end Framework, Cloud Storage.

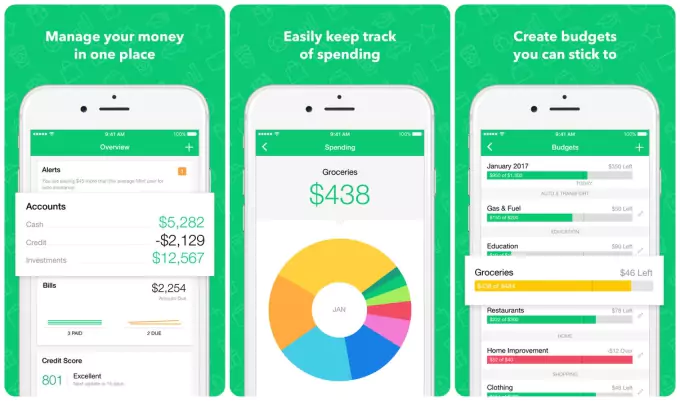
Payment Reminder App
Freelancers find billing and collecting fees burdensome. If you're a freelancer or going to freelance, this project will improve your Node.js abilities and provide you with a client payment tracking tool.
This application creates, sends, and receives bills and automatically reminds late payers. Naturally, your app will solve freelancing's largest issue.
Key Takeaways:
-
Build a comprehensive and scalable server-side API for your payment reminder app using Express.js.
-
Determine routes, handle requests and responses, and maybe create RESTful APIs for frontend interactivity.
-
Link your Node.js application to a database (MongoDB, PostgreSQL) to store user, bill, and reminder data.
-
Cover Node.js task scheduling libraries or frameworks. Practice production Node.js deployment by hosting on Heroku or AWS and automating the process with CI/CD pipelines.
Key Tech Stack: Node.js, MongoDB, Express, React.
The Online Photo Collage Tool
Coding an online application that can mix photographs and generate beautiful vertical or horizontal collages on our own may be wonderful. This artistic picture collage application performs basic image tasks with user input. Create stunning designs with this tool.
Add these features to your project:
-
Users should be allowed to resize collage images.
-
Users can choose border style and color.
-
The user should see ‘Download’ after the procedure.
Key Takeaways:
-
Communicate between HTML, CSS, and JavaScript frontends and Node.js server-side functionality.
-
Practice Node.js server-side logic for user requests to suitable functions, handle picture data and create the composite image.
-
Learn how to deploy Node.js in production. This may require setting up Nginx or Apache to serve your frontend files and handle Node.js backend queries.
-
Production picture uploads may require storage (local filesystem, cloud storage) and security considerations.
Key Tech Stack: Node.js, Vue, Python, React.
Code Example:
const express = require('express');
const path = require('path');
const bodyParser = require('body-parser');
const multer = require('multer');
const fs = require('fs');

const app = express();
const port = process.env.PORT || 3000;

// Define upload destination for temporary images
const upload = multer({ dest: 'uploads/' });

// Body parser middleware
app.use(bodyParser.urlencoded({ extended: false }));

// Serve static files from the 'public' directory (HTML, CSS, etc.)
app.use(express.static(path.join(__dirname, 'public')));

// Route for uploading images
app.post('/upload', upload.array('images', 3), async (req, res) => {
  // Check if any files were uploaded
  if (!req.files) {
    return res.status(400).json({ message: 'No images uploaded' });
  }

  // Validate number of uploaded images (limit to 3 for this example)
  if (req.files.length > 3) {
    return res.status(400).json({ message: 'Maximum 3 images allowed' });
  }

  // Store image paths in an array
  const imagePaths = req.files.map(file => path.join(__dirname, 'uploads', file.filename));

  // Logic to create the collage image (replace with your preferred library/method)
  // ... (code to combine images into a collage using a library like Jimp)

  // Send response with a success message or error (if collage creation fails)
  res.json({ message: 'Collage created successfully!' }); // Replace with actual collage data
});

// Route for downloading the collage (optional)
// ... (code to serve the generated collage image)

app.listen(port, () => {
  console.log(`Server listening on port ${port}`);
});
Stock and Crypto Exchange App
Node.js powers the stocks and crypto exchange app, which lets users buy, sell, and trade cryptocurrencies. Real-time market data helps investors make informed decisions. Track and analyze your assets using the app's efficient portfolio management capabilities.
Additionally, strict security measures protect users' financial assets during transaction processing. This stock and crypto trading app uses Node.js to provide a complete and dependable investment platform.
Key Takeaways:
-
Discover how to use web sockets to connect to stock and cryptocurrency APIs in real-time.
-
Learn how to parse JSON or other API data, extract essential information (e.g., pricing, volumes, changes), and maybe convert or manipulate the data for presentation or analysis in your application.
-
Passport.js and Local Strategy (username/password) or OAuth (social login) will be used to authenticate users.
-
For high-demand applications, consider load balancing to disperse traffic over different servers and develop your application as microservices for improved scalability and maintainability.
Key Tech Stack: Node.js, Express Js, Financial Data APIs, Database Management System, Payment Gateway Integration
Code Example:
const express = require('express');
const app = express();
const bodyParser = require('body-parser');
const cors = require('cors');
const axios = require('axios');

// Replace with your API key and base URL
const API_KEY = 'YOUR_API_KEY';
const API_BASE_URL = 'https://www.alphavantage.co/query?function=';

app.use(bodyParser.json());
app.use(cors());

app.get('/api/stock/:symbol', async (req, res) => {
  const symbol = req.params.symbol.toUpperCase();
  const url = `${API_BASE_URL}GLOBAL_QUOTE&symbol=${symbol}&apikey=${API_KEY}`;

  try {
    const response = await axios.get(url);
    const data = response.data;
    res.json(data); // Assuming the API response contains stock data
  } catch (error) {
    console.error(error);
    res.status(500).json({ message: 'Error fetching stock data' });
  }
});

app.get('/api/crypto/:symbol', async (req, res) => {
  // Implement logic to fetch crypto data using your chosen API
  // ... (similar structure to stock data retrieval)
});

const port = process.env.PORT || 3000;
app.listen(port, () => {
  console.log(`Server listening on port ${port}`);
});
E-commerce Website
Web MVC applications can be built with Node.js, MySQL, and express.js. It should be an e-commerce site for browsing and buying things.
Creating an e-commerce online application with Node.js, Express.js, a database (such as MongoDB), and authentication and payment frameworks/libraries is a high-level of Node.js development. The precise code implementation will vary depending on the libraries and functionalities you choose.
Key Takeaways:
You will learn to structure complex Node.js apps. This requires explicit separation of concerns, modular code, and possibly Express.js to organize routes and middleware.
Key Tech Stack: Node.js, Express.js, MongoDB, Passport.js, etc.
Code Example:
const express = require('express');
const mongoose = require('mongoose');
const bodyParser = require('body-parser');

// Replace with your MongoDB connection string
const mongoURI = 'mongodb://localhost:27017/e-commerce';

mongoose.connect(mongoURI, { useNewUrlParser: true, useUnifiedTopology: true })
  .then(() => console.log('MongoDB connected'))
  .catch(err => console.error(err));

const ProductSchema = new mongoose.Schema({
  name: { type: String, required: true },
  description: { type: String },
  price: { type: Number, required: true },
  image: { type: String }, // URL for product image
  category: { type: String }, // Optional: product category
});

const Product = mongoose.model('Product', ProductSchema);

const app = express();
app.use(bodyParser.json());

// Route for getting all products
app.get('/products', async (req, res) => {
  try {
    const products = await Product.find();
    res.json(products);
  } catch (err) {
    res.status(500).json({ message: 'Error fetching products' });
  }
});

// Route for getting a specific product by ID
app.get('/products/:id', async (req, res) => {
  try {
    const product = await Product.findById(req.params.id);
    if (!product) {
      return res.status(404).json({ message: 'Product not found' });
    }
    res.json(product);
  } catch (err) {
    res.status(500).json({ message: 'Error fetching product' });
  }
});

// Route for creating a new product (for demonstration, replace with authentication/authorization)
app.post('/products', async (req, res) => {
  const { name, description, price, image, category } = req.body;
  try {
    const newProduct = new Product({ name, description, price, image, category });
    const savedProduct = await newProduct.save();
    res.json(savedProduct);
  } catch (err) {
    res.status(400).json({ message: 'Error creating product' });
  }
});

// Placeholder route for simulating a successful payment (replace with actual payment processing logic)
app.post('/payment', (req, res) => {
  res.json({ message: 'Payment successful' });
});

const port = process.env.PORT || 3000;
app.listen(port, () => {
  console.log(`Server listening on port ${port}`);
});
Tips for Successfully Developing Node.js Projects
Now that you have several project ideas to get you started with Node.js development, let's talk about some useful tips that will help you have a smooth and successful time. These tips will not only help you get better at coding, but they will also make your projects stronger, easier to manage, and more fun in the end.
Take Advantage of Version Control
Version control systems, like Git, are very helpful for developers, especially when they are working on projects. They make it easy to keep track of changes to your coding over time, go back to older versions if you need to, and work together with other people. You should learn how to use Git and do so for all of your Node.js projects.
Write Maintainable Code
The code should be clean, well-structured, and easy to understand. This makes it easier for you to fix code errors and for others to contribute to or understand your project. Use enough indentation, meaningful variable names, and comments to illustrate complex logic.
Testing Repeatedly
Test Node.js programs thoroughly to make them operate. Node.js testing tools include Mocha and Jest. Use unit tests to verify that discrete code elements operate, and consider integration tests to see how they fit together. The more attempts mean fewer bugs for your projects.
Code Documentation
Long-term, documenting code pays off. Clear and succinct documentation helps you and others on the project understand code sections, functionalities, assumptions, and design choices. Add comments to your code and create additional documentation for complex projects.
Make Use of Online Communities
The Node.js developer community is huge and helpful. Ask for aid when you hit obstacles. Online forums, communities like Stack Overflow, and Discord Node.js channels are great for receiving help, exchanging expertise, and learning from others.

>> Read more:
Conclusion
Building high-performance web apps with Node.js is common. Its various features and capabilities let you construct top Node.js projects including real-time apps, APIs, and more. A huge and friendly community makes learning Node.js easier than ever. Explore Node.js today to improve your development abilities.
>>> Follow and Contact Relia Software for more information!

- development
- coding